-–убрики
- –укоделье (2069)
- декупаж, технике айрис фолдинг (396)
- Maude White, технике артишок (5)
- бисер, мешковины (260)
- Ѕукеты из конфет (23)
- ¬ал€ние (127)
- ¬итражи, Ѕатик, росписъ (56)
- вилтинг, cкетчбук, бусины (19)
- ћакраме,проволоки,ЎЌ”–џ, ƒжутова€ филигрань (37)
- ѕасха, празники (174)
- ѕечворк,домики,винтаж,апликации (335)
- сутажной технике, ганутель, молни€ (26)
- фетр, cтимпанк (149)
- ÷веты из ткани, из бумаги..., бабочки (143)
- архитектура, ландшафтный дизайн (232)
- рамки (41)
- фарфор, майоликa, стекло (52)
- MK (342)
- јнтиквариат (135)
- лаковой миниатюры (3)
- ¬итраж, стеклo, ћќ«ј» A, пуговицы (39)
- ¬—® ƒЋя ќ‘ќ–ћЋ≈Ќ»я ƒЌ≈¬Ќ» ј (173)
- ¬—® ƒЋя —¬јƒ≈ЅЌќ√ќ ƒЌя, новорожденного (191)
- ¬с€ка€ вс€чина, »Ќ“≈–≈—Ќџ’ »ƒ≈… (229)
- ¬ышивка (17429)
- Nimue, Neocraft (234)
- јфрика, јмерика (77)
- ¬ышивка гладью, лонгстич, cтежкова€ вышивка (247)
- мандала, орнаменты, примитив (111)
- Ќатюрморты (1289)
- —катерти, салфетки, дорожки (475)
- ’ардангер, ћережка (142)
- Art Nouveau (2)
- Bосток (524)
- IKKI MATSUMOTO, Ќоры орбетт (29)
- Isabelle Vautier, Anagram, “еа √увернЄр (22)
- M.P.,Wiehler,Scarlet Quince,ћирабела (137)
- MTSA, Picota, ‘уджико, јфремов (146)
- Renato Parolini,Filiz,ЁстЁ,Krif, ankor (121)
- Welc,Bozen,Chimera,Lenar,автор (513)
- јбстракци€, немецкие буклеты, "стим-панк&quo (83)
- јлфавиты, ћонограммы (223)
- ангелы, феички, джудже (493)
- Ѕј–ƒ∆≈ЋЋќ (100)
- Ѕеатрикс ѕоттер, Lili Point, Marty_Bell (44)
- блэкворк (379)
- Ѕ–ј«»Ћ№— јя ¬џЎ»¬ ј, индейцы ечуа (12)
- Quaker Embroidery (10)
- ¬икторианское-—тарина, Wiiliam Morris (263)
- ¬ышивание лента (149)
- ¬ышивание. –ишелье, люневильской вышивки (67)
- ¬ышита€ мебель, вышитие коробки, пуговыцы (59)
- детское (1315)
- дл€ кухни, дл€ бани (723)
- ≈ва –озенштанд, —ветланы ѕрокопец, Luca-S (319)
- елизаветинска€ вышивка, асизи (5)
- игольницы,бискорню,зигугу,мешочки,закладки, ме (450)
- –елиги€, иконы (236)
- ≈Ћ№“CKOE (34)
- люди (1347)
- ћашинна€ вышивка, вышивке шерст.полосками, синель (22)
- миниатюры, бордюры, UB, oрнамент (350)
- ћонохром (397)
- ћонохром в красных тонах (104)
- ћонохром в синих тонах, √жель (155)
- ћоре, рыбки, ма€к, корабли (563)
- ћузика, танц (208)
- Ќовогодн€€ вышивка, –ождествo (720)
- ќбъемна€ вышивка, ѕластикова€ канва, технике бути (189)
- ќхота, рыбалка (52)
- ѕасха (169)
- пейзажи,дома (1656)
- подушки, постельное белье, занавес, шалы (1058)
- ѕрограмма дл€ рукодельницы (61)
- разные вышивки, HAED, денежное, Madame La F (914)
- –ишелье, ¬ышивка рококо (67)
- —вадебна€,детска€ метрика,подарки (165)
- сезоны-календарь, знаки зодиака, ‘эн-шуй, карта (366)
- —емплер, Quaker (475)
- сердечки (244)
- “аблицы цветов мулине, методы вышивки, станки, сыл (338)
- “. ¬ентцлер,Ћан —вит,GK,Ё—“Ё,Ѕастин (133)
- “риптих, панно (350)
- ”краинска€ вышивка,¬енгерска€ вышивка (81)
- фентази,сказки,дракон,русалочки,eдинорог (360)
- часы (105)
- Ўвейнoе, рукодельное, французкое (219)
- якобинска€ вышивка, ¬ышивка тюлю, «олотое шитье (106)
- ¬ышивка фауна (3954)
- животные (980)
- бабочки,жучки,л€гушка (554)
- оны (169)
- кошки, собаки (965)
- ѕтицы (1128)
- птицы-совушки, колибри (289)
- ¬ышивка флора (5136)
- овощи, фрукты, грибы, €гсды,ботаника (696)
- “юльпаны (183)
- Ѕ” ≈“џ, корзины (1289)
- ¬енок (204)
- »рисы, нарциси (313)
- лаванда (98)
- магноли€, xризантемы, гортензи€, георгин (132)
- маки (388)
- ќрхиде€ (50)
- пионы, лотосы, фукси€, гибискус (239)
- разные цветы, деревь€, мини, бордюры, серии (1749)
- розы (757)
- садовые, полевые цветы (177)
- цветы в горшочках, ’ашимото ‘уджико (103)
- ¬€зание (2883)
- ирландскоe кружевo, вологодские кружева . (99)
- - в€зание крючком (379)
- - в€зание спицами (594)
- аксесоари (501)
- Ѕаттенбергское кружево, Ѕаварское в€зание (8)
- Ѕолеро, стиль "Ўанель" (107)
- брюгскоe кружевo, eлецкое кружево. (11)
- ¬ышивка по трикотаж (29)
- ¬€зание дети (144)
- ¬€зание/ ”зоры и мотивы, уроки в€зани€ (352)
- кружево, филейное в€зание (254)
- подборка крючком (65)
- подборка спицами (63)
- –умынское кружево, Ћоскутное в€зание (33)
- “унисское, перуанское в€з., “енерифе, Ёнтерлак (31)
- ‘риволите, фриформ (20)
- »гольное кружево, турецкое кружево. (25)
- √орода, страны, природа (419)
- €пони€ (144)
- ƒекор, дизайн (113)
- ƒекор бутылок и баночек, из пластиковых бутылок (64)
- ƒекор шкатулок и коробочек (77)
- ƒ≈“— јя —“–јЌ»„ ј (97)
- ƒл€ компьютера (220)
- ƒомоводство (106)
- ∆ивопись,картины (2465)
- ÷веты и натюрморты (590)
- "∆енщины - художницы" (131)
- авторы (538)
- акварель,пастел,стимпанк (294)
- галерe€, колекци€, музей (13)
- графика, иллюстрации, гравюры (133)
- живопись, женский образ (356)
- птицы, животные (103)
- «доровье,исцеление (461)
- Ћекарственые растени€ (25)
- Ќародные рецепты (240)
- »з бумаги и газет, из лозы и лыка (305)
- »здани€ (3082)
- ∆урналы pукоделье, м€гка€ игрушка, поделки (237)
- ∆урналы в€зание спицы, крючком (224)
- ∆урналы вышивки (1633)
- ∆урналы, книги по вышивке лентами (10)
- нига по в€зани€ (43)
- книги вышивки, буклеты (315)
- книги поделки (45)
- улинарный журнал (6)
- —ловари, аудиокнига (10)
- французский журнал,книги, €понские (84)
- »зкуство, прикладное творчество, икони (197)
- ћузей, галерии, колекции (44)
- »зонить (7)
- »нтерьер, Ekcтерьер, ћебель (216)
- истори€, археологи€, мифологи€ (62)
- оврова€ вышивка, коврики, ткацкий станок (151)
- осметические рецепты, гимнастика (247)
- ракелюр из €ичной скорлупы (2)
- расота (16)
- реатив (42)
- улинари€ (2880)
- "Ќеобычные рецепты": (114)
- выпечка, торт, десерты (412)
- Cалаты, закуски (317)
- блюда из фарша (30)
- блюда с грибами (24)
- ¬осточные сладости. (20)
- гурман, праздник (73)
- декор стола, декор блюд, карвинг (112)
- завтрак (153)
- из птицы (92)
- иностранных блюда,bul (71)
- италь€нские, испанские блюда (48)
- консервирование, заготовки (261)
- кулинарные советы, приправы, специи, соус (121)
- м€сные блюда (84)
- напитки (88)
- овощные блюда, несладка€ выпечка (151)
- ѕасха (17)
- пироги, тортики несладкие: овощные, м€сные, рыбные (41)
- разные рецепты (13)
- –ибние блюда, морепродукты (132)
- “есто, хлеб (69)
- японска€ кухн€ (49)
- ћаленькие хитрости (12)
- ћаски, kлоуни (2)
- ћодное рукоделие (6)
- ћ€гка€ игрушка, куклы, кукольные домики /ЎитьЄ, в€ (749)
- в€заные куклы, игрушки (174)
- ќрнаменты (5)
- ќткрытки/валентинки, обложки (225)
- ќчень интересно! (50)
- ѕ≈–√јћјЌќ (32)
- программа (1)
- –»—ќ¬јЌ»≈, роспис ткани, рисунки на камн€х (45)
- –»—ќ¬јЌ»≈ ¬ —“»Ћ≈ «≈Ќ“јЌ√Ћ, ƒудлинг (97)
- –укоделье JAPAN (399)
- амигуруми,cарубобо,oкимоно,кимекоми (40)
- анзаши (87)
- кинусайга (75)
- киригами (8)
- комоно, кокеши (4)
- кумихимо (3)
- ”—”ƒјћџ (13)
- ќми€ге (7)
- оригами (45)
- ќшибана, oсиэ (8)
- сашико (44)
- темари (13)
- фурошики (2)
- шибори (сибори) (28)
- юбинуки, кумихимо (28)
- —адовые штучки/декор и дизайн (709)
- - выращивани€ картофель, морковь, капуста, фасол (28)
- полезного дл€ сада и огорода (155)
- - выращивани€ Ћ”ЅЌ» A, малинa (86)
- - выращивани€ огурцов, ј–Ѕ”«џ (47)
- - выращивани€ помидоры, чеснок (51)
- - цветы, kомнатные растени€, декор, дизайн, бонсай (183)
- выращиванию грибов, пр€ные травы (11)
- выращивани€ перец (6)
- —имволы годы (329)
- √од Ћошади - 2014, “елец - 2021 (35)
- ƒраконы-2012, ѕетух-2017, —обака-2018, мыш-2020 (158)
- «мейкa - 2013 года, поросенок - 2019 (17)
- ќвечки, Ѕарашки - 2015, ќгненной ќбезь€ны - 2016 (119)
- —крапбукинг (19)
- Ћ≈ѕ ј,солЄное тесто,полимерной глины,папье-маше (124)
- “очка-за-точкой (59)
- “рафареты,шаблоны,мандалы (57)
- ‘ентази (5)
- фильм, ћ”«џ ј, ¬»ƒ≈ќ (24)
- биографии (7)
- ‘ото, фотонатюрморты (147)
- ‘эн-шуй (51)
- Ўитье/выкройка/модa/вышивка (430)
- из джинсы (49)
- ЎьЄм, в€жем сумку, кошельки,по€с! (514)
- ёвелиры, камни, минералы (181)
- бисер (19)
-ѕоиск по дневнику
-ѕодписка по e-mail
-—татистика
—оздан: 13.02.2013
«аписей: 42828
омментариев: 641
Ќаписано: 43648
«аписей: 42828
омментариев: 641
Ќаписано: 43648
ќЅЏ®ћЌјя ¬џЎ»¬ ј - ћќ–— јя «¬≈«ƒј — 3D Ё‘‘≈ “ќћ |
÷итата сообщени€ MerlettKA
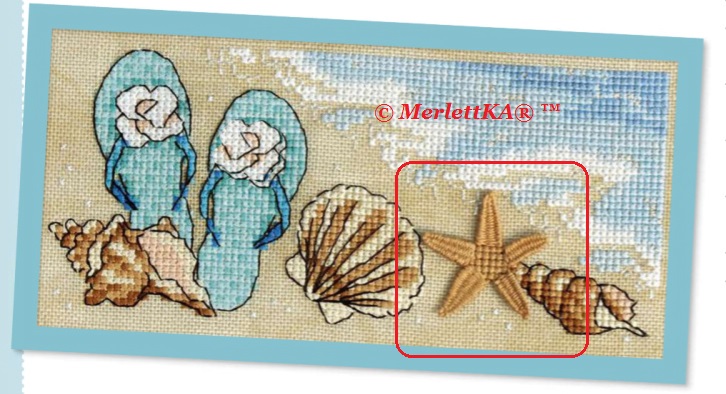
ќбъЄмна€ вышивка - ћорска€ звезда с 3D эффектом
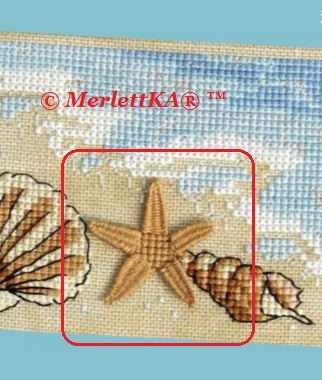 |
¬оспоминани€ о лете и отпуске
ћиниатюра вышита€ крестом,
в которую вшита объЄмна€
морска€ звезда 3D эффектом
ћастер-класс по вышивке
ќписание есть, но на английском
|
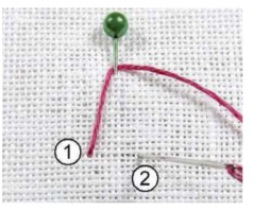 |
1 Position a pin vertically through
your fabric at the point of the first
arm of the starfish. Push your needle
and three strands of thread up at (1),
wrap behind the pin and push the
needle down at (2).
|
|
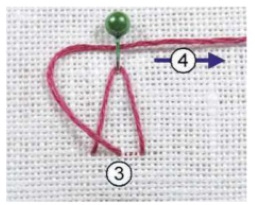 |
2 Bring the needle and thread up at (3),
wrap behind the pin head in the direction
of (4), creating three vertical stitches
to form the ‘frame’ of the woven picot
stitch.
|
|
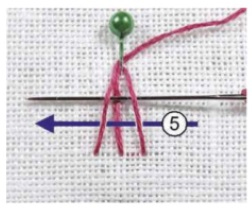 |
3 Next, start weaving the needle and
thread under and over the three vertical
stitches in the direction of (5).
Don’t stitch through the fabric at
any stage of your weaving.
|
|
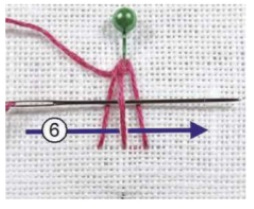 |
4 Then weave the needle over and under
the three vertical stitches in the
opposite direction, as per (6).
|
|
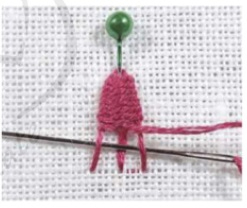 |
5 Continue working back and forth,
alternating the weave direction, building
up your stitch down the length of the
three vertical stitches.
|
|
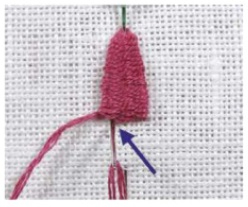 |
6 When you get to the
base of the ‘frame’, push the needle to
the back of the fabric and secure under
nearby stitches, then remove the pin.
|
|
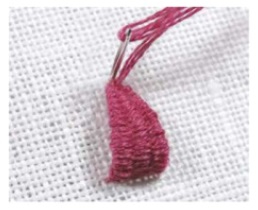 |
7 You can leave the woven picot stitch
as it is and have fun shaping the starfish
arm to create a 3D effect, or you can stitch
it to the fabric at the tip with a small
single stitch.
|
|
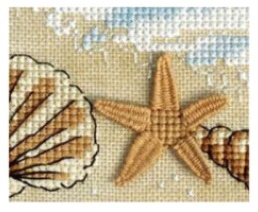 |
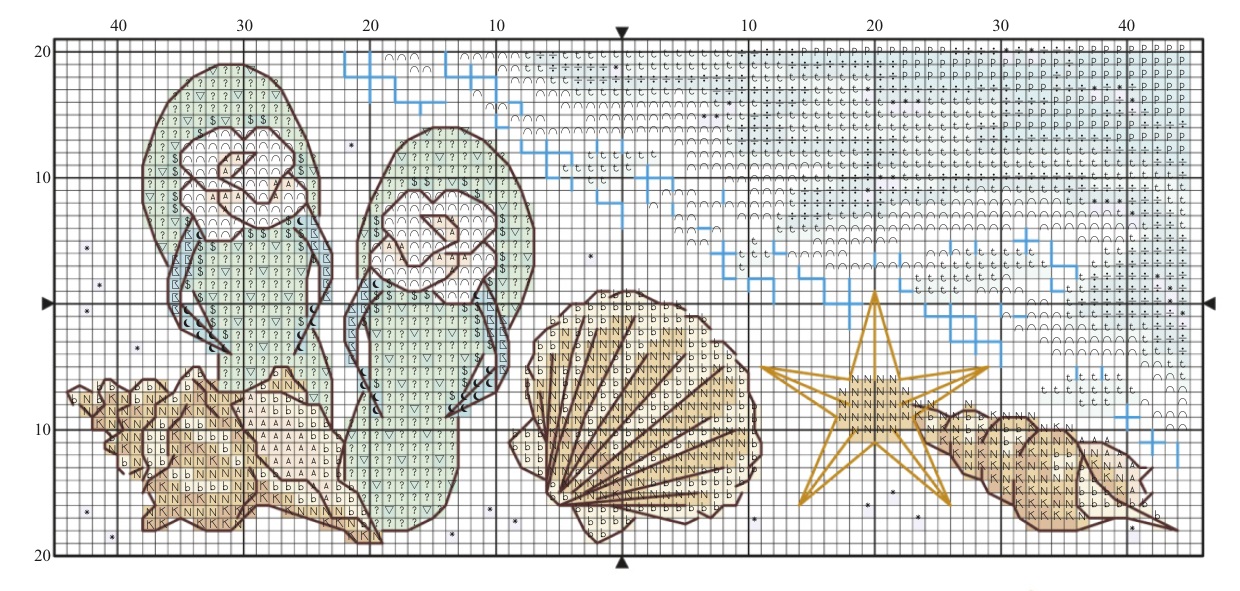
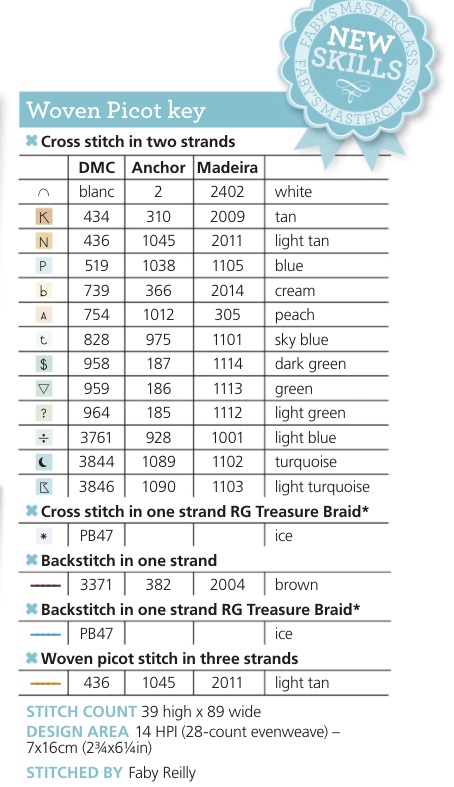
8 Repeat steps 1-7 to create four more
woven picot stitches at angles around your
central whole stitches, using the chart as
a guide.
This will create a 3D effect starfish!
|
| –убрики: | ¬ышивка /ќбъемна€ вышивка, ѕластикова€ канва, технике бути ¬ышивка /ћоре, рыбки, ма€к, корабли |
| омментировать | « ѕред. запись — дневнику — —лед. запись » | —траницы: [1] [Ќовые] |


