-–убрики
- путешестви€ (0)
- шить. шьем (0)
- вышивка (0)
- в€зание (0)
- дача (0)
- декор (0)
- делаем сами елочные игрушки (0)
- десерт (0)
- дом (0)
- дом.ремонт (0)
- краса (0)
- кулинари€ (1)
- печворк (0)
- фотошоп (0)
-ћузыка
- Ћунное танго - Richard Clayderman
- —лушали: 21606 омментарии: 0
- Black_-_Wonderful_life_
- —лушали: 3155 омментарии: 0
- ’улио »глессиас "Ќатали"
- —лушали: 19337 омментарии: 0
-ѕоиск по дневнику
-ѕодписка по e-mail
-ѕосто€нные читатели
-—ообщества
-—татистика
Ћќ— ”“Ќјя »ЋЋё«»я. —’≈ћј Ќј јЌ√Ћ»…— ќћ я«џ ≈ |

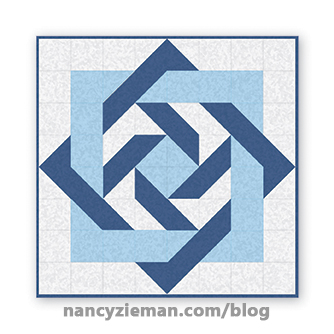
»ллюзи€ получаетс€ в результате эксперимента с оттенками цветов и расположением блоков, чтобы обмануть глаз зрител€ поверить в иллюзию.
Spotlight on the Slip Knot Quilt Pattern
Ropes, in hues of blue, intertwine and knot around this quilt top. Close observation reveals that the illusion of knots is created within carefully positioned half-square triangles. Learn to make the 72″ x 72″ Slip Knot Quilt pattern using a monochromatic color scheme and your sewing machine. Here are the highlights:
Supplies
- 1-3/4 yd, Fabric A—dark blue
- 1-3/4 yd, Fabric B—light blue
- 2-1/2 yd, Fabric C—white
- 5/8 yd. binding
- 4-1/2 yd. backing
- Batting
- Non-Permanent Marking Pen
Note from Nancy: Yardage is based on a 42″/43″ fabric width.
Construction
Note from Nancy: The instructions below feature half-square triangles made using the Point-to-Point Method, the No-Hassle Triangles Gauge Method, or the Two at a Time Technique with the Easy Half-Square Triangles Template.
Cut fabric for HST’s:
- Cut five 9-7/8″ crosswise strips of Fabric A.
- Cut two 9-7/8″ crosswise strips of Fabric B.
- Cut three 9-7/8″ crosswise strips of Fabric C.
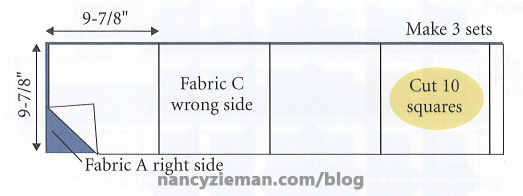
- Subcut the strips into squares for HST’s. Pair two Fabric A strips right sides together with two Fabric B strips; subcut into six 9-7/8″ squares.
- Pair three Fabric A strips, right sides together, with three Fabric C strips; subcut into ten 9-7/8″ squares.

Using your favorite method above, mark, stitch, cut, and press the HST’s (half-square triangles) needed for this quilt as shown in diagram below and in the Illusion Quilts Made Easy book.
Cut fabric for Solid Colored Squares (SCS)
- Cut three 9-1/2″ crosswise strips of Fabric B; subcut into twelve 9-1/2″ squares.
- Cut five 9-1/2″ crosswise strips from Fabric C; subcut into twenty 9-1/2″ squares.
Arrange the Quilt Blocks
- Assemble the quilt top by first arranging completed blocks on a work surface or design wall as shown:
- Stitch the blocks into rows. Press seams flat, then press to one side in the opposite direction of the previously constructed row.
- Stitch rows together; aligning seam intersections and nesting seam allowances to complete the quilt top.
Finish
- Quilt using your favorite quilting method. I share my favorite finishing methods in the last chapter of this book, Illusion Quilts Made Easy.
- Lastly, add the binding using this easy, six-step binding tutorial.
http://www.nancyzieman.com/blog/quilting-2/illusio...-easy-slip-knot-quilt-pattern/
| омментировать | « ѕред. запись — дневнику — —лед. запись » | —траницы: [1] [Ќовые] |


