МК крылышки для феи. |
 Close-up images of materials needed.
Enlarge Picture of supplies need.
 1. Enlarge pattern image (its going to appear large, you'll need to scroll to close the image). Copy to your computer, right click, save image; then print out in any size you need.
Enlarge Picture to enlarge pattern.
 2. Begin by cutting the heavy wire, bend it to follow the pattern's main stem. This is the part of the wing that will go into the fairy's back. It gives good support and superior strength.
Enlarge Picture of wire to pattern.
 3. Continue cutting the other or veining wires, bending them to follow the curved lines in the pattern.
Enlarge Picture showing pattern and bent wires.
 4. It's important to make sure the wires lay flat. I cut the wires for both wings at one time and lay them out in order.
Enlarge Picture showing flattened wires.
 5. Cut two pieces of the Fantasy Film and tape them down on top of your pattern. (I used Spring Morning Fantasy Film, although you wouldn't know it by the colors my camera picked up).
Enlarge Picture showing fantasy film preparation.
 6. Holding the wires with a tweezers, apply glue to the underside of each wire.
Enlarge Picture show how to apply glue.
 7. Carefully place the wire with the glue onto the film, following the pattern. This can be a bit touchy, you don't want to get excess glue on the film if you can help it. Try to butt the cut ends up against one another. This will give the wings a finished look.
Enlarge Picture showing how to place wire onto film.
 8. As the glue is setting up, press down on the wires to make sure they have adhered evenly.
Enlarge Picture showing to show even glue method.
 9. One side is done! Now repeat Steps 2-8, for the other wing.
Enlarge Picture on repeating Steps 2-8.
 10. Add an extra bead of glue where all the wires come together with the main stem of the frame. This will help strengthen and reinforce this area.
Enlarge Picture on how to strengthen and reinforce wings.
 11. Allow the glue to dry thoroughly. This will take a couple hours at least.
Enlarge Picture about dry stage.
 12. Once the glue is completely dry, cut around the pattern, leaving about 1/4" extra film around the edges.
Enlarge Picture showing cutting away excess film.
 13. Now here comes the fun part! Now for the shrinking of the film and that all important votive candle!!!!!
Fantasy Film will shrink and strengthen with heat. The more heat it is exposed to the more the color comes alive. You must be careful because too much heat will melt it away, or remove the color, leaving a haze of white.
Enlarge Picture showing the votive candle.
 14. Hold your hand over the flame to see how high your hand has to be before you feel the heat. Judging by that distance, hold your wing over the flame, about 6 or more inches above it. Holding the wing flat, move the wing around quickly, and watch the film tighten against the wires!
Enlarge Picture showing how to start shrinking.
 15. Raise and lower the wing to see the colors explode! You will also be able to see where a hole is going to form, first the color becomes very intense, then the hole forms. As I was holding this wing with one hand and trying to take a photo with the other, two large holes appeared, just that quick! Oh well, I'll have to try to match them on the other wing! We must be creative!
Enlarge Picture on how to create holes.
 16. To sear the edges along the wires, you can go very close to the flame, drawing the edge of the wing along the flame. Be careful not to scorch the wires, however. Go over it twice, rather than too much the first time. To shape the outer jagged edge of the wings, hold them upright and perpendicular to the flame.
Enlarge Picture on how to sear the edges.
 17. Raise the wings up and down to form the jagged edges.
Enlarge Picture on searing the tips.
 18. Again, go over it twice rather than melt too much the first time.
Enlarge Picture to repeat process, if needed.
 19. Lay the wings out and check for symmetry. They don't have to be exact, but close is good! See the holes? I tried to match them as much as I dared! If you melt away too much it does affect the look of the wings. I try not to do that. You might have to start over, so go slowly and be careful.
Enlarge Picture on how to determine symmetry.
 20. Another view to determine wings symmetry.
Enlarge Picture showing another view.
 21. I did a little more melting of the edges to make them more uniform.
Enlarge Picture showing final searing.
 22. Now to seal the wings. This step serves two purposes. Most importantly, it bonds the wires to the film and it adds strength to the overall structure of the wings. In this step I used clear Gallery Glass, but you can also use 3D Lacquer. You want to be sure to use a product that will stick to the film. Some varnishes won't. Do a test if you are using something other than what is suggested here.
Enlarge Picture showing how to seal the wings.
 23. Brush the product on the wired side of the wings. Be sure to have a good deal of the product along the wires. Let it pool there. This will hold the wires securely. Keep in mind that 3D Lacquer dries much more quickly than the Gallery Glass.
Enlarge Picture showing how where to pool the sealant.
 24. To speed up the drying time of the Gallery Glass, I placed the wings on a ceramic tile and then suspended a reflector light and 100W bulb over them, (see note below). There is about 8" of space above the wings. They dried in about three hours. The ceramic tile helps to distribute and hold the heat. Drying without the light can take 12 hours or more.
Enlarge Picture showing how to dry the wings.
 25. Apply a heavy bead of glue along the main wire.
Enlarge Picture to prepare to glitter.
 26. Place glue on both sides to cover completely.
Enlarge Picture where to place glue.
 27. Quickly sprinkle glitter or microbeads on the glue. You can add glitter to some or all of the other wires if you wish.
Enlarge Picture where to place glue.
 28. Tap off excess, and place upright to dry. I stick the wires into a piece of styrofoam and set aside.
Enlarge Picture showing where to tap off excess.
 29. Finished wings, dry and ready for use.
Enlarge Picture showing finished wings.
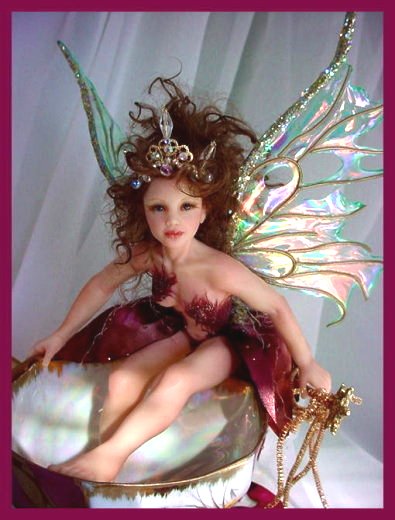
 31. Completed wings on my fairy sculpt!
Enlarge Picture showing completed wings on fairy.
Пока без перевода. Будет время - переведу.
Взято тут http://www.cdhm.org/tutorials/making-fairy-wings.html
| Рубрики: | Лепка/Полимерная глина Куклы/для кукол Куклы/МК |
| Комментировать | « Пред. запись — К дневнику — След. запись » | Страницы: [1] [Новые] |


