http://www.antiquelilac.com/bow--arrows---tutorial.html
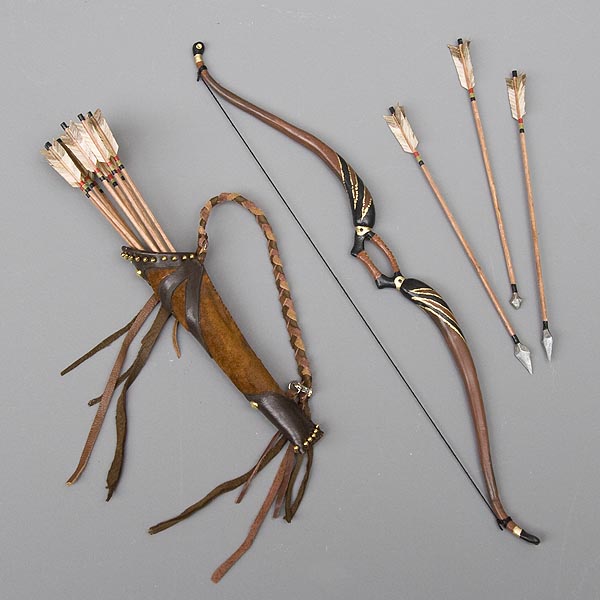
Make a Bow, and a Quiver Full of Arrows
This bow and arrow set is not meant to represent any particular historical or realistic style.
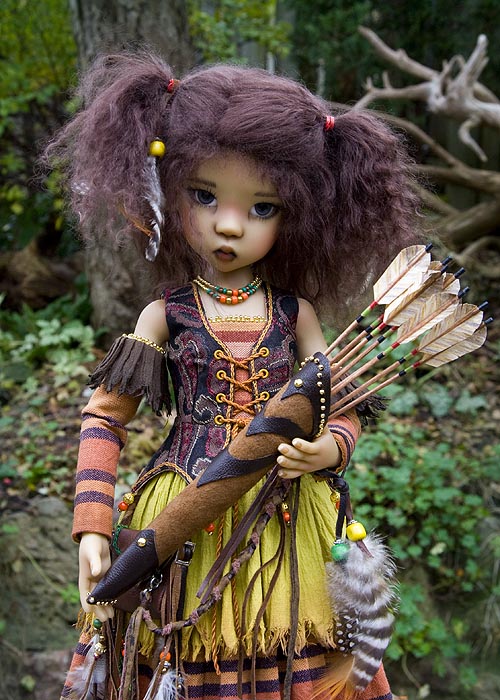
It's just a fantasy set originally made for Isar to take along on a trip to the US Southwest.
When I was asked to remake the entire outfit for a Kaye Wiggs MSD, I though it was the perfect opportunity to photograph each step along the way, and turn it into a tutorial. So, even though a Kaye Wiggs MSD will fit Isar's costume, Isar is an adult, and KW Miki is just a child, so her weapons had to be a larger scale. I will include patterns for both sizes. Instructions are the same.
Materials for Quiver:
- scraps of leather - 2 colours
- three 20" strips of leather 3/8" wide
- white glue
- sharp scissors
- gold beads
- brown thread
- glover's needle
- 2 studs for decoration
- 3 jump rings, and one clasp
- small amount of stuffing
- hot glue gun
|
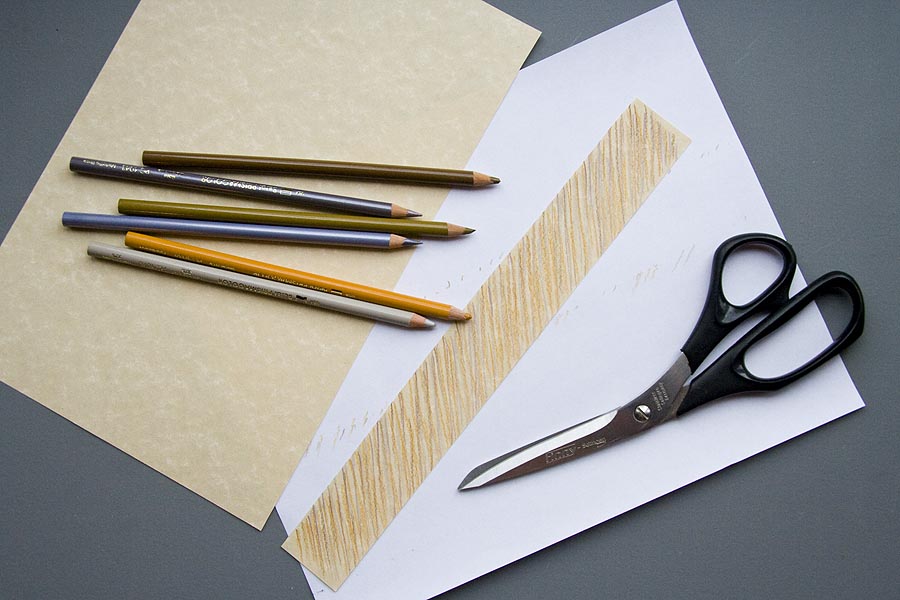
Materials for Arrows:
- 12 wooden skewers or thin dowels
- beige paper
- pencil crayons - beige, light browns,
grays
- sharp scissors
- white glue
- piece of floral foam
- medium and dark brown acrylic paint
- paint to match doll's outfit ( I used
black, rust, & green)
- matte water-base varnish
* if you want to make actual tips on the arrows, you will also need Apoxie Sculpt, sculpting tools, X-acto knife, silver paint
|
Materials for Bow
- sturdy wire - I used 16 gauge
- fine wire - I used 26 guage
- aluminum foil
- florist tape
- white glue
- Aves Apoxie Sculpt
- sculpting tools
- X-acto knife
- sand paper
- paint - brown, black, gold
- satin water-base varnish
- strong black thread
|
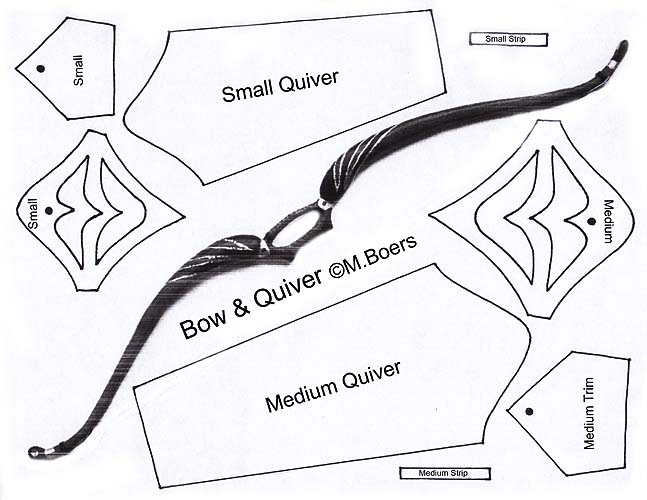
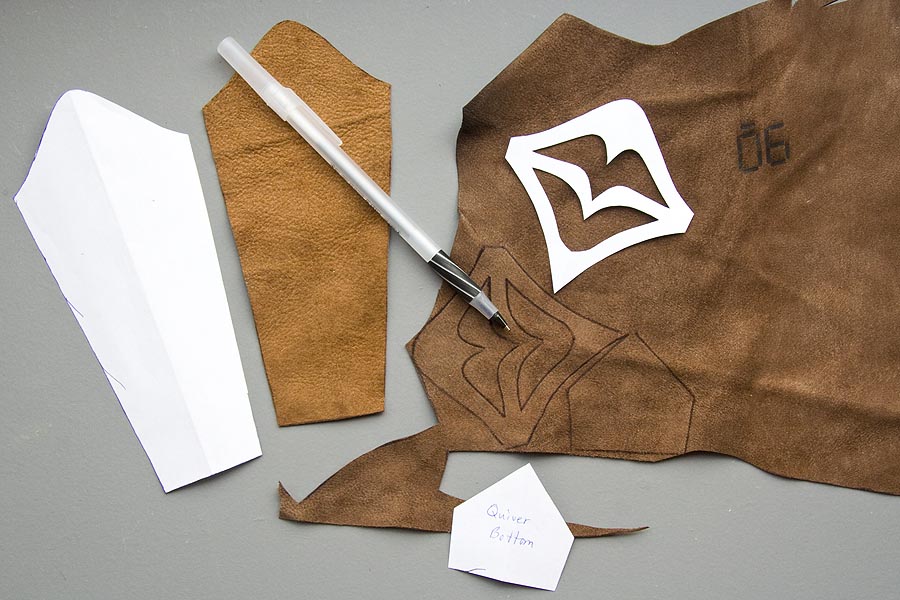
Patterns for Quiver and Bow
Click on the image below to download the pdf. Patterns are full size.
Instructions for Arrows
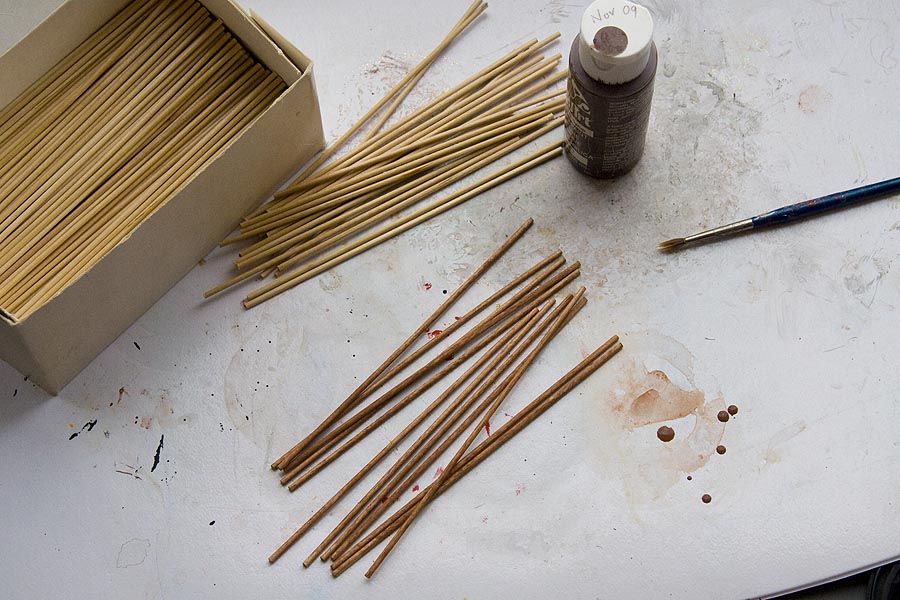
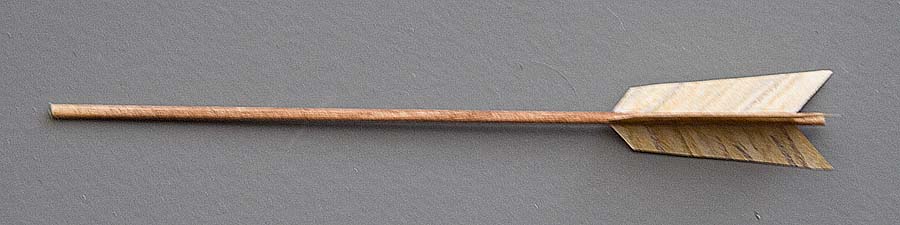
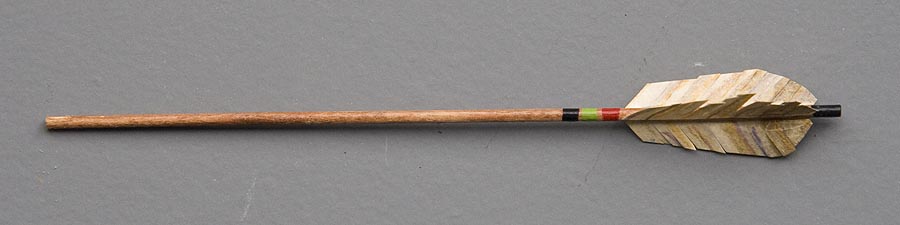
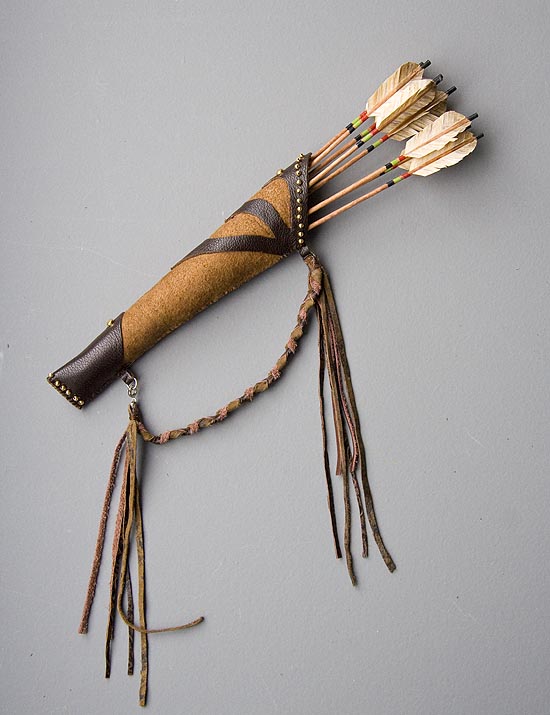
1. The size of doll will determine the size of quiver, and the size of the arrows. I used thin wooden skewers for the arrows in both samples. The arrows only go half-way down into the quiver, but are glued in permanently. If you want removable arrows for a larger doll, you will need thin wooden dowels and cut them to the desired length. Start by mixing some diluted medium brown paint and rubbing all the wooden skewers. Let dry thoroughly.
2. Cut a strip of beige paper about an inch and a half wide. Using a selection of light coloured pencil crayons, draw lines diagonally down the entire strip. Turn the strip over, and paying attention to keep the lines on both sides going the same direction, draw diagonal lines on the back as well.
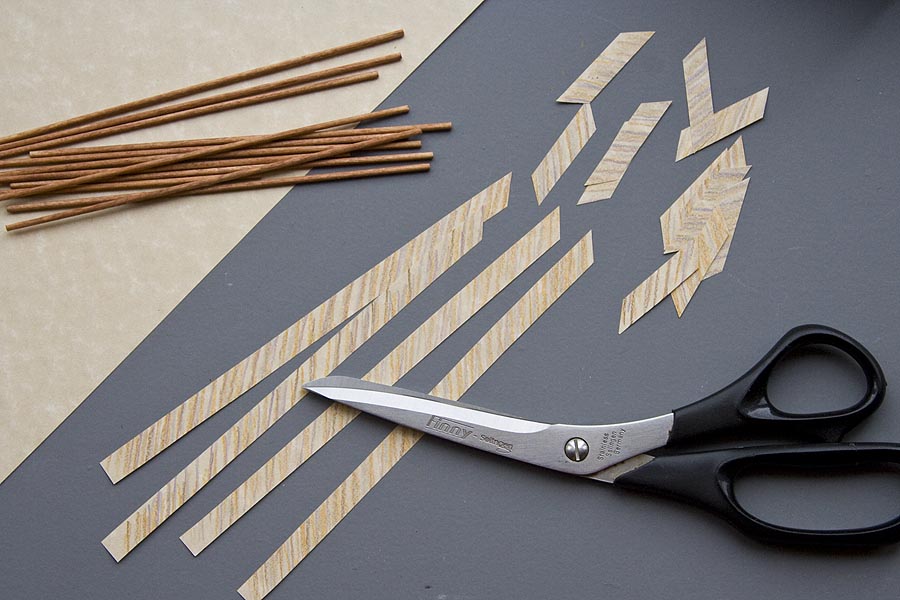
3. Cut the paper strip into narrow strips. The width will depend on the scale of your arrows. For Isar's arrows, the strips were cut 3/16" wide. For Miki's arrows they were cut 3/8" wide. Then cut the narrow strip diagonally into pieces. Again it will depend on the scale of your arrows just how long they need to be.
4. Squirt a puddle of white glue on a scrap of paper. Carefully run one edge of a small cut strip through the glue, and position it with point facing up and out, a short distance from the end of a wooden skewer.
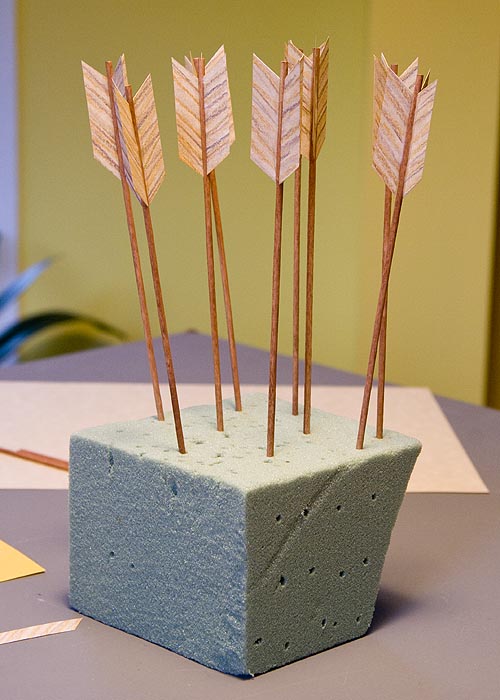
5. Each arrow gets three strips glued onto the end at equal distance around from each other. Push the skewer into a piece of floral foam to let the glue dry thoroughly.
6. I prepped 12 wooden skewers, but only had enough of the paper "feathers" for 9 arrows. The dry arrow.
*Sorry, but several of the following photos are out of focus, but you should still be able to see what's happening.
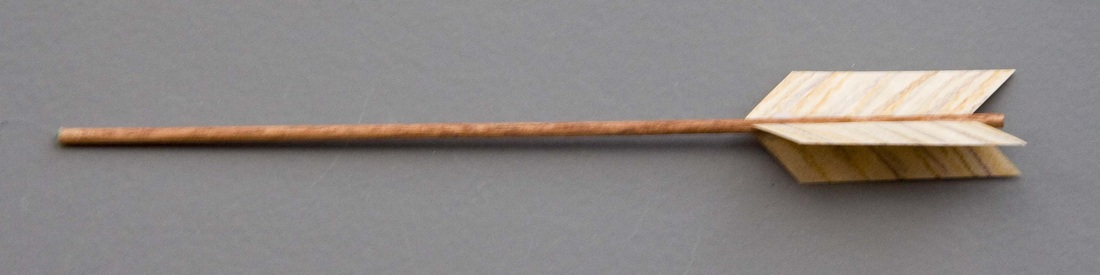
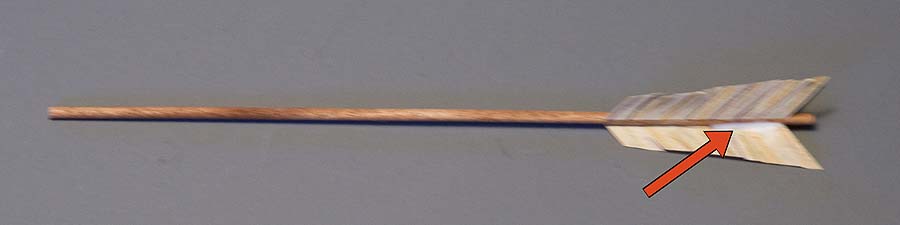
7. Trim the paper feathers into an angle
8. Check the glue seal between the paper and the wood. If there are spaces or loose areas, apply more glue. Let dry.
9. Paint decorative stripes on arrows. Clip each paper feather diagonally with sharp scissors
10. Dilute dark brown paint, and brush on ends of each feather.
11. For Isar's arrows the feathers are now done, but with Miki's arrows being a larger scale, I felt the ends of the feathers pointed outward too much, so I trimmed them all back. It's up to you if you want to trim your tips or not.
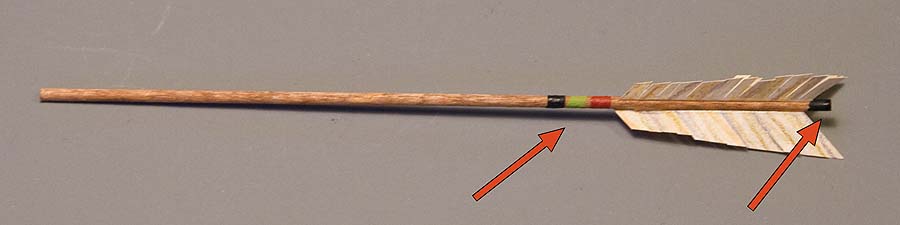
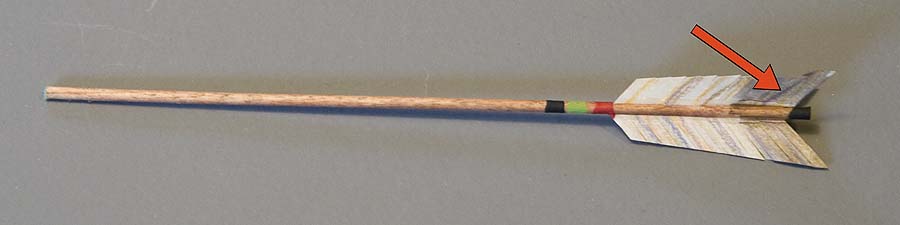
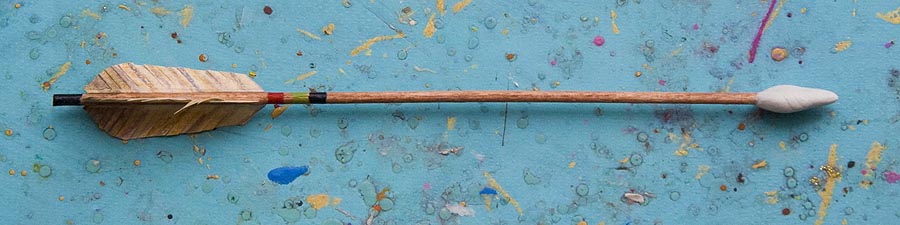
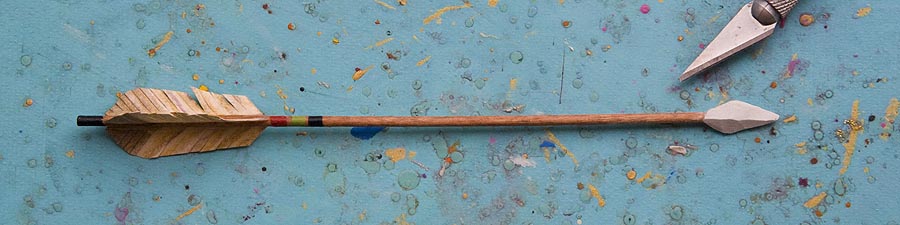
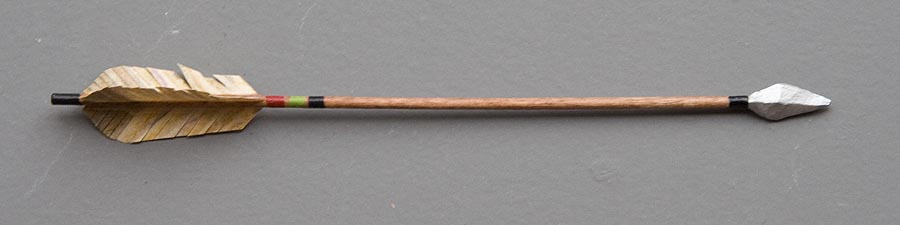
12. If you would like a few arrows with actual points, mix up a tiny amount of Apoxie Sculpt, and form into an arrowhead shape on the end of the dowel. It doesn't have to be perfect - just an approximate arrowhead shape. Let Apoxie cure.
13. Using an X-acto knife, carefully carve the arrowhead into a point with sharp edges.
14. Paint the arrowhead silver, and add painted trim.
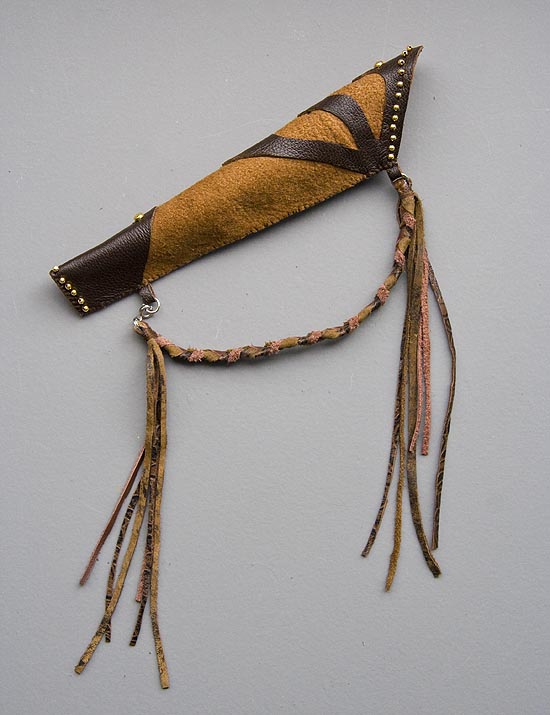
Instructions for Quiver
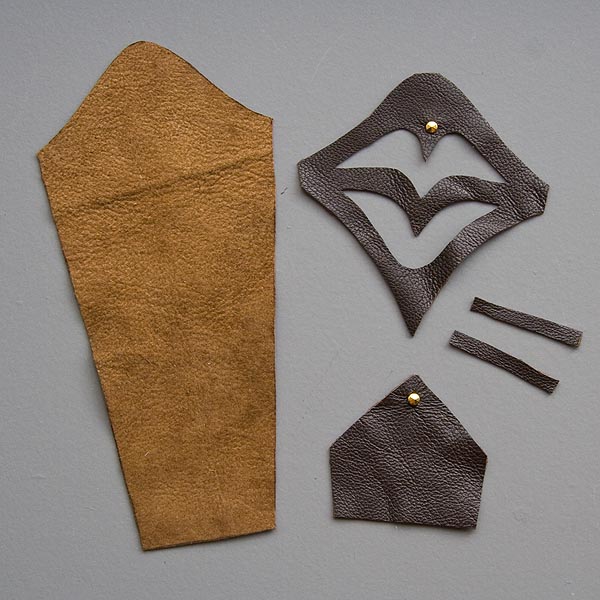
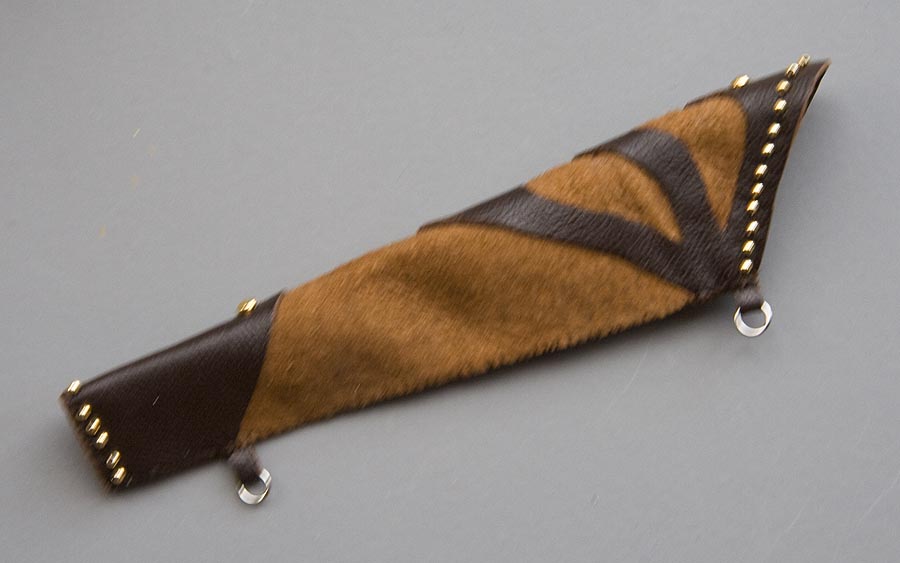
1. Print and cut out pattern. Trace patterns onto back of leather and cut out. *Remember to cut the decorative trim from a different colour leather.
2. Insert a decorative stud in the two decorative quiver pieces as shown
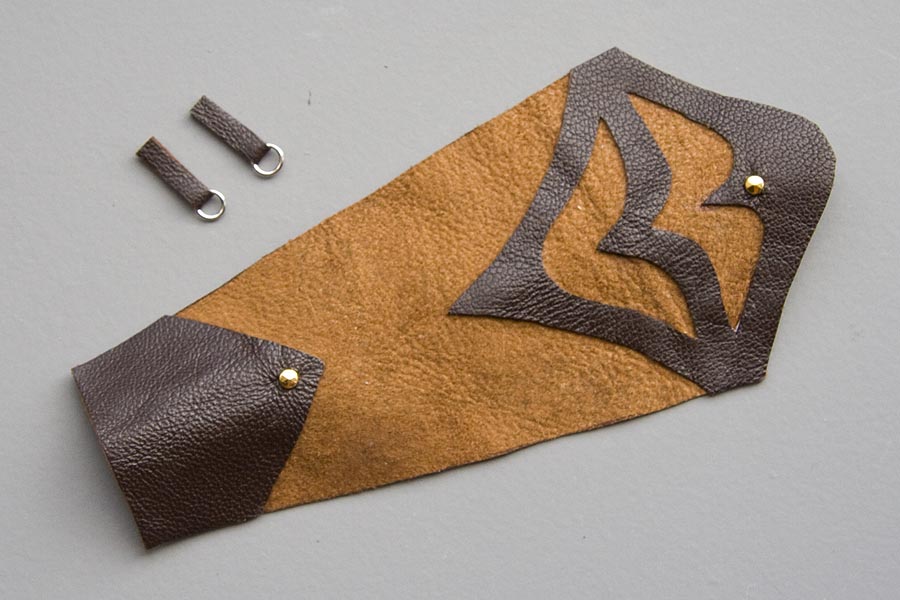
3. Carefully smear white glue on the backs of the decorative pieces, and glue onto main quiver. Slip each of the two small thin strips through a jump ring, and glue back on themselves.
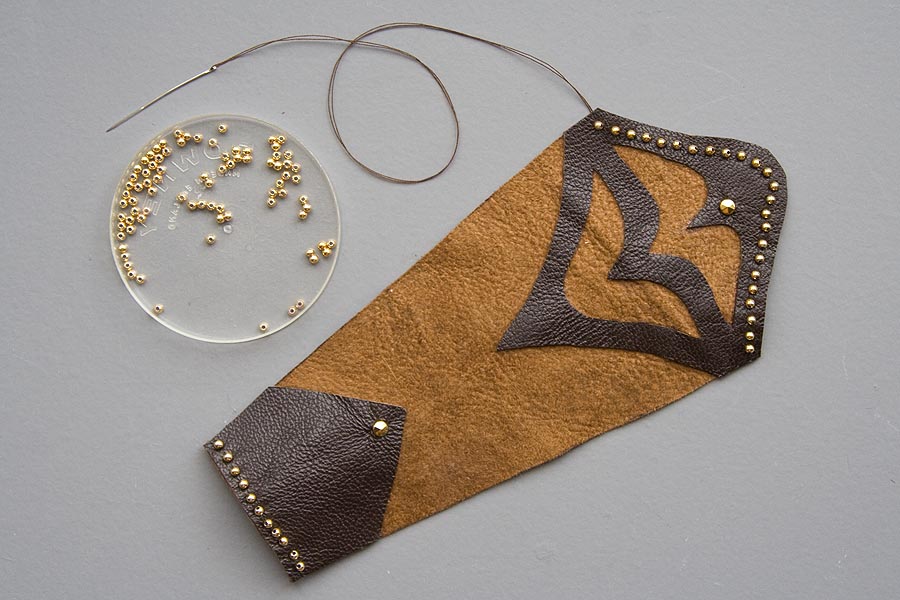
4. Stitch on decorative golden beads. *To make sewing leather easier, use a glover's needle.
5. With wrong sides together sew the quiver together from bottom to top, making sure to insert, and securely sew in, the two strips with the jump rings at the proper places.
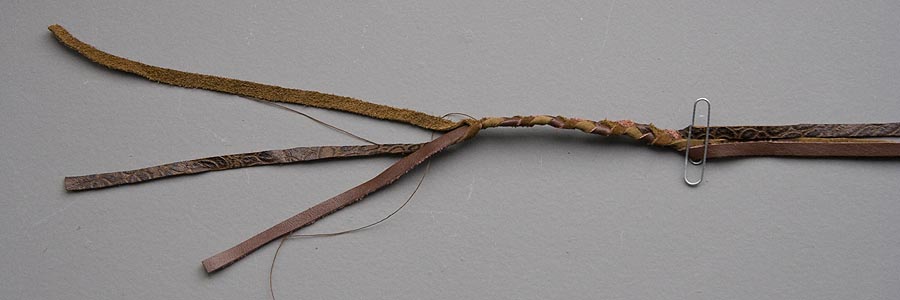
6. Take three strips of leather approx. 17 to 20" long each and 3/8" wide, and find the middle. Secure with a paper clip. Then starting at paper clip, braid for approx. 3". Wrap with brown thread and tie.
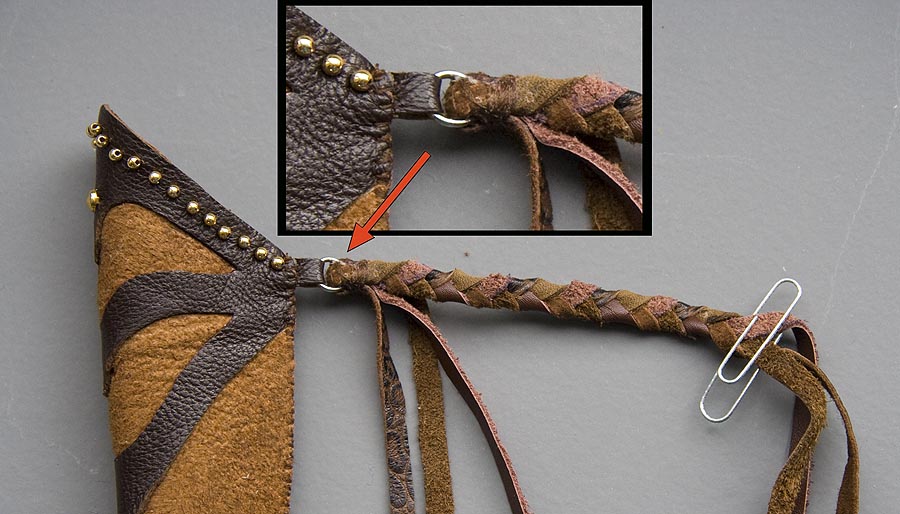
7. Insert three leather strips through jump ring at top of quiver, bend back on itself with a dot of white glue, and wrap securely with thread. Tie off.
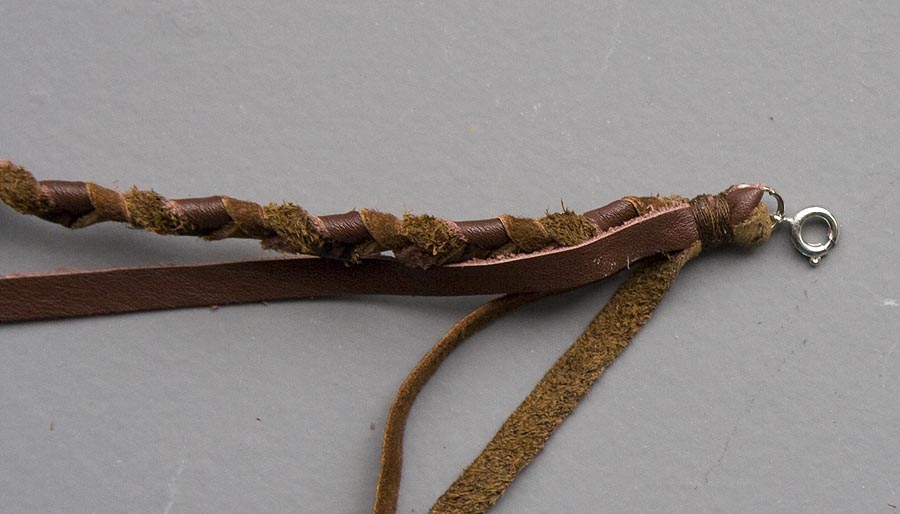
8. Remove paper clip, and continue braiding for another 3" (6" in total). Tie with brown thread. Insert leather strips through jump ring with clasp, bend back on itself, with a spot of white glue, and wrap securely with thread. Tie off.
9. Split each leather strip up to the jump rings. The finished quiver.
10. Inserting the arrows. When using wooden skewers for arrows, the will not be long enough to protrude the proper amount out of the quiver, so I lightly stuff the bottom half of the quiver with bits of stuffing. Test by inserting an arrow to see if it's been stuffed enough. Then using a glue gun, carefully squirt hot glue into the quiver and insert the arrows, positioning them artistically until the hot glue sets.
Instructions for Bow
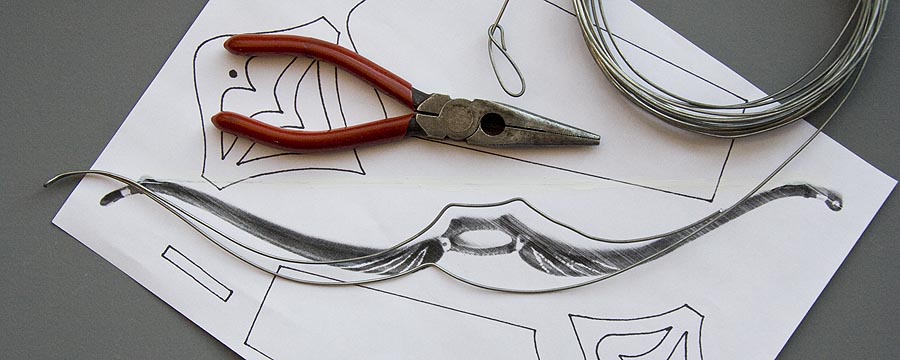
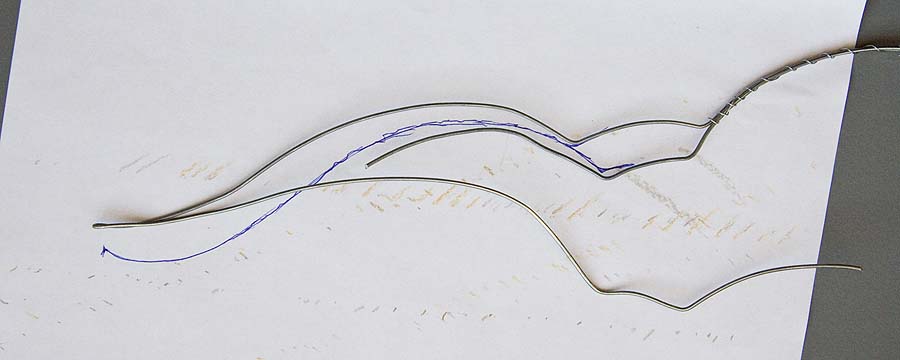
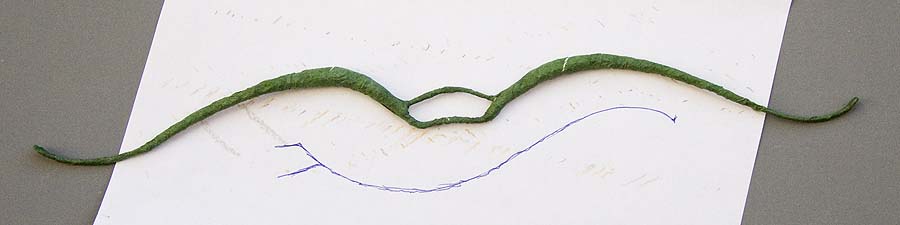
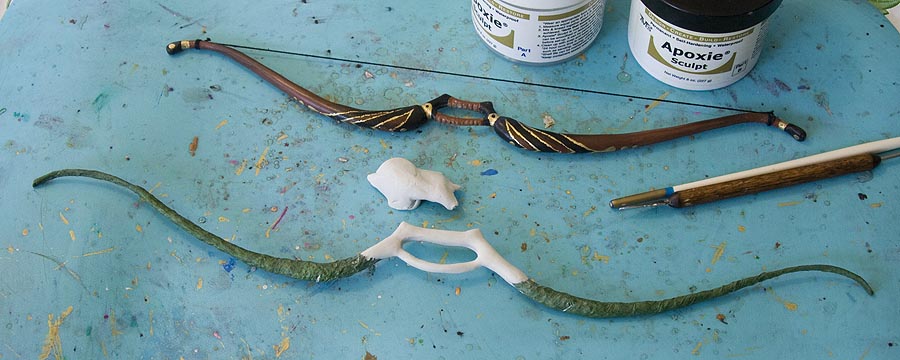
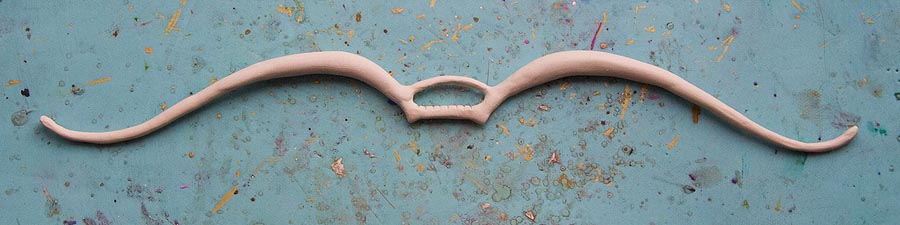
1. Using 16 gauge wire and a pair of pliers, start shaping wire into bow shape. I'm making a slightly larger bow this time, so even though I'm using the picture of the original bow as a guide, this second bow will be bigger. Start with your wire extending several inches past the middle handle, bend to form handle, curve out towards end of bow, bend back on itself, duplicate curve, then bend out at second part of handle.
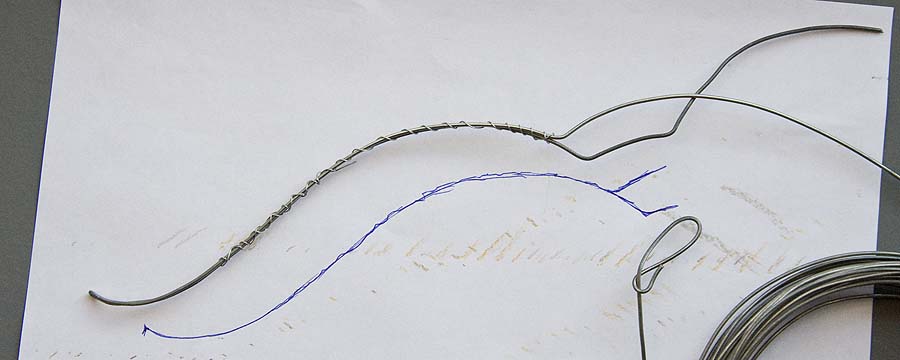
2. Wrap wires together with fine 26 gauge wire. Trace this half of the bow onto a piece of paper as a pattern for the second half
3. Using the traced line on the paper as a guide, bend the second half of the bow. Cut wire several inches past handle.
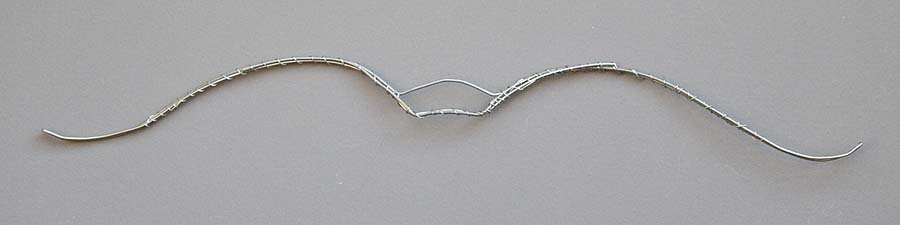
4. Wrap with fine 26 gauge wire.
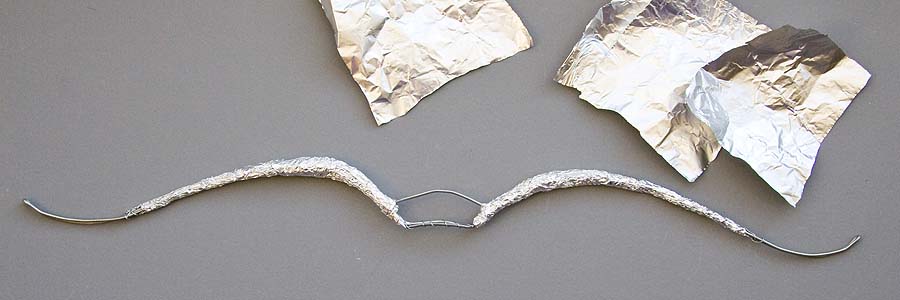
5. Using small squares of aluminum foil, and squeezing firmly, build up the thicker part of bow.
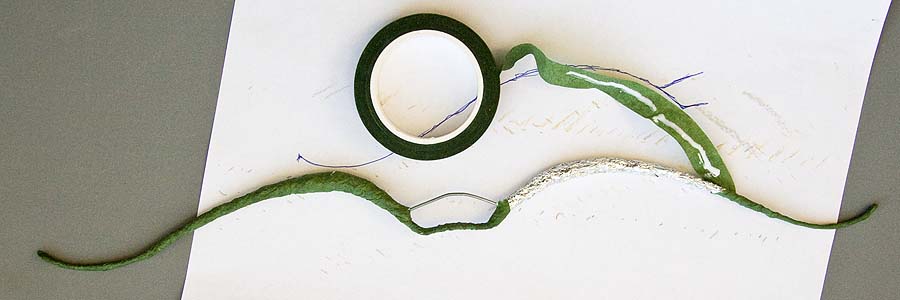
6. Wrap entire bow with florist tape. I like to use some white glue on the tape for extra hold.
7. The wrapped bow, ready for the Apoxie Sculpt
8. Set up a working space for sculpting your bow. Protect surface with plastic placemat. Fill a small bowl with water. The water is for smoothing the Apoxie. Wet a cloth rag and place in another bowl. This is for wiping your fingers and cleaning your tools.
Since it's impossible to sculpt the entire bow at one sitting, since we need something sturdy to hold onto while sculpting, we will sculpt in two stages. Take small equal parts of the Apoxie and mix thoroughly together. Start by covering the bow handle. Dip fingers into the water to help smooth the Apoxie.
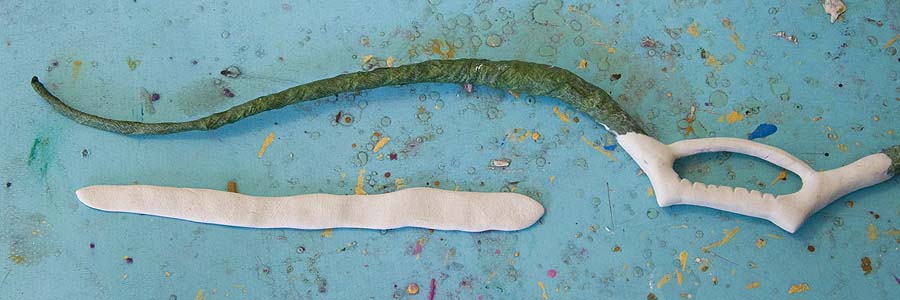
9. Divide the remaining mixed Apoxie in half and form each half into a long flat tapered strip
10. Wrap lengthwise onto end of bow, starting at end, working towards handle as far as it will go. Smooth with wet fingers, making as even as possible. It doesn't have to be perfect, as any slight bumps can be sanded smooth after the Apoxy cures. When both ends are done, set aside for several hours and let everything cure.
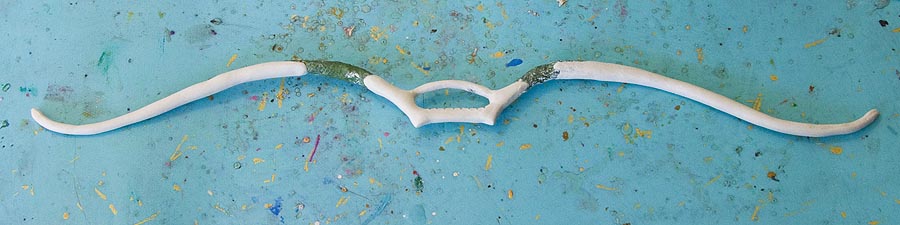
11. After the Apoxie has cured, mix up another batch. Divide in half, and blend each half onto one side of the bow, working it smoothly into the already cured Apoxie with wet fingers. Let cure.
12. Sand smooth, and remove any bumps or unevenness.
13. Paint with acrylics or folk art paint as desired. Seal with two coats satin water-base varnish. Tie bow-string, and glue knots. Trim extra thread when dry.
*These instructions just show how I made this particular bow. Other bows, whether simple or more elaborate,
can be made using these same materials and techniques