http://www.antiquelilac.com/christine---a-creative-journey.html
'Christine', a Creative Journey
This tutorial will be a little different than my others, as it won't give any patterns. Instead I will document my creative process in making a specific outfit, and share how I figured out and did things. I'm still working on finishing the costume, so updates will be added as I go.
|
|
Many years ago, my sister and I made a one-of-a-kind art doll which was called "Think of Me". It was our version of Christine, from the stage production of Phantom of the Opera. Carlotta, the leading lady, had been injured in the famous chandelier accident, and Christine made her public singing debut as Queen of Carthage in the opera Hannibal Triumphant.
Christine had been playing the role of slave girl in that opera, but was given Carlotta's skirt to wear over it, and went out to sing "Think of Me"
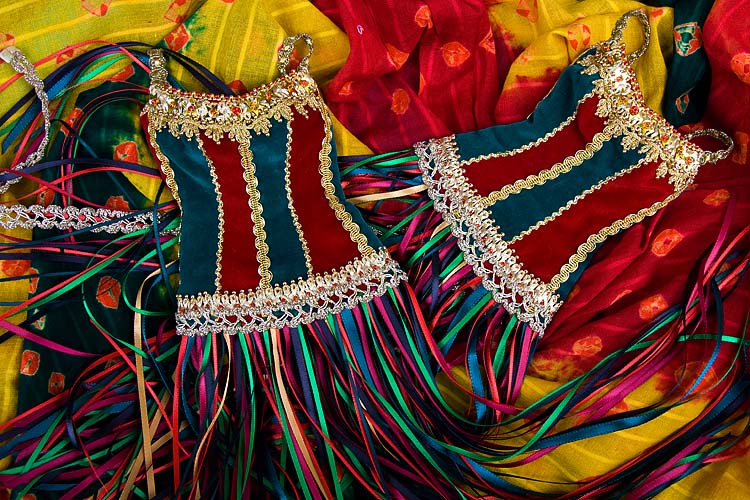
Ever since getting into BJDs, I've wanted to recreate this costume for one of my dolls. In November 2010 I bought many of the special trims. I went back to the same store, but had to buy different ones as the trims used for my original were no longer available - except for the blue and red fringe.
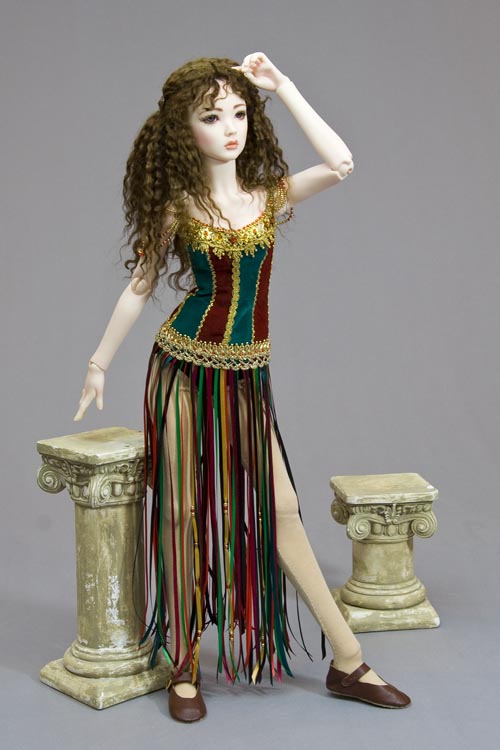
It took some time to decide which doll to make the outfit for. I knew it would be very dramatic, and could end up quite bulky, so felt my Iplehouse girls were too realistic and with too thick a waist. My Soom and Elfdoll girls, even though they had nice slim waists, both had way too big a bust. In the end I decided that my Supia Rosy would be perfect - she had a beautiful slim body and small bust.
|
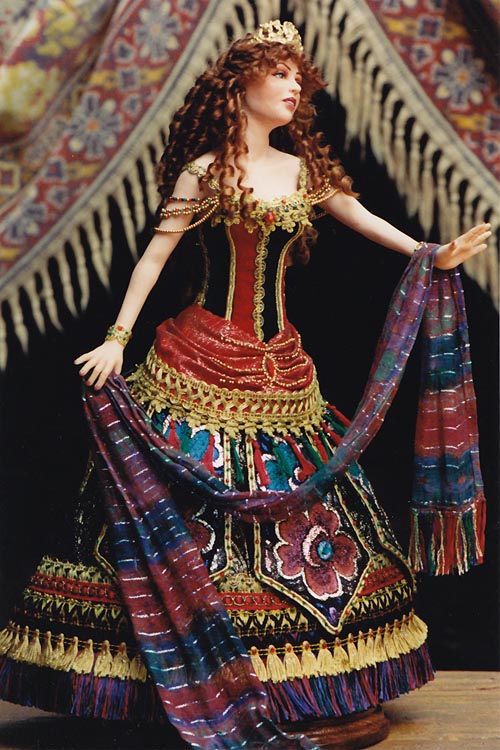
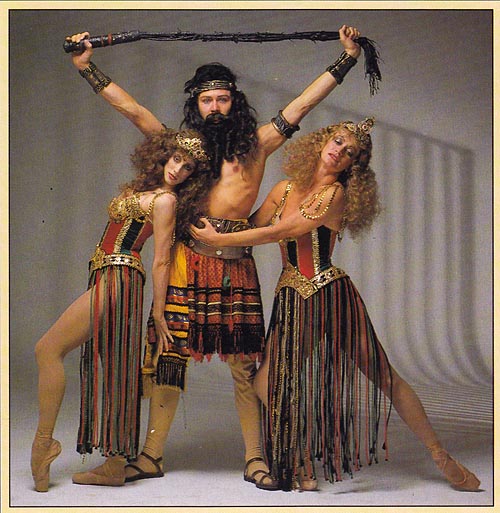
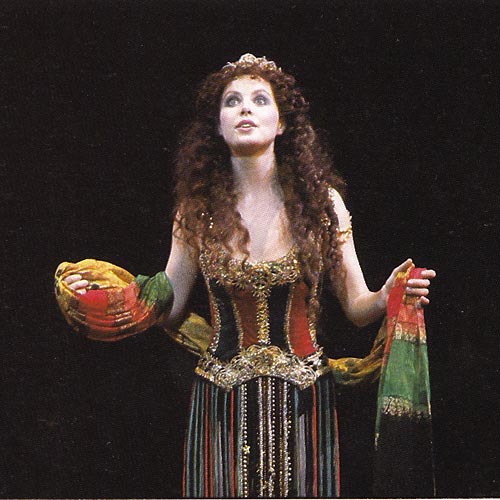
Inspirational Photos
|
Two Slave Girls
|
Christine
|
Figuring Out the Bodice
|
|
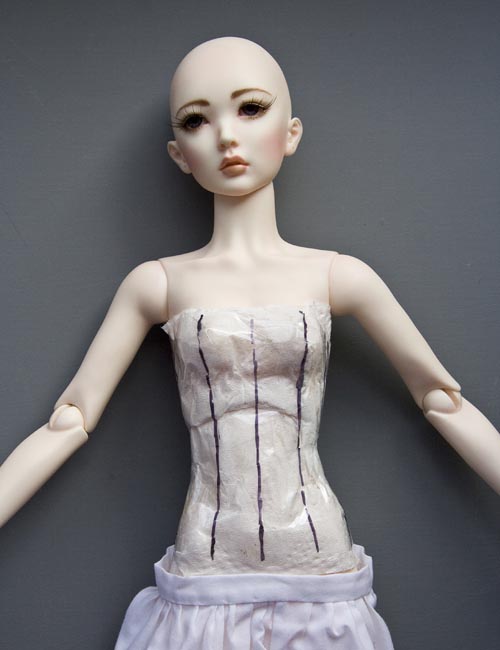
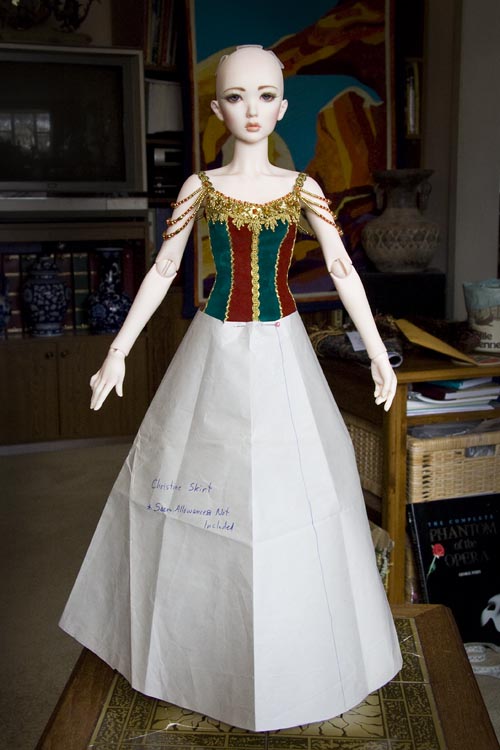
How would I make a tight-fitting multi-panel bodice?
I usually do my pattern making using the 'draping' method using paper towels, but this bodice would have too many specially shaped segments, and I was envisioning all kinds of difficulties.
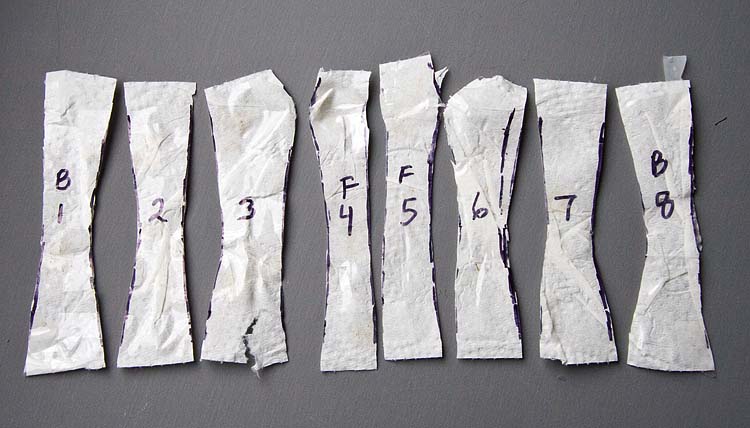
Then it hit me - wrap the doll's torso with the paper towel, then use narrow strips of packing tape to fit the paper towel tightly to the doll's body.
Then with a Sharpie, I drew the center front and back lines. Then lines downward over the point of each breast, two more from the armpit downwards, and finally two more between the center back and side lines.
I very carefully cut the paper and tape bodice apart and immediately labelled them.
|
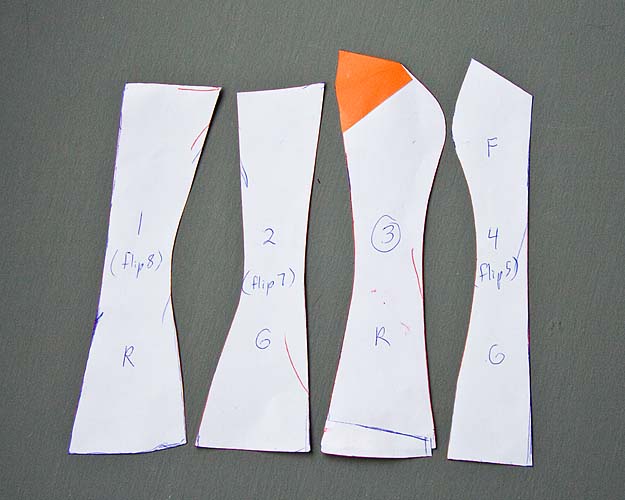
To fine-tune the patterns, I lay corresponding pieces of pattern on top of each other (1+8, 2+7, 3+6, 4+5) and drew a new pattern halfway between any difference in the two pieces.
Next step is to make a 'test bodice' in order to check the fit and make any final adjustments
- including drawing the top edge of the bodice.
The test bodice is fit on inside-out and any adjustments drawn on and then re-sewn.
|
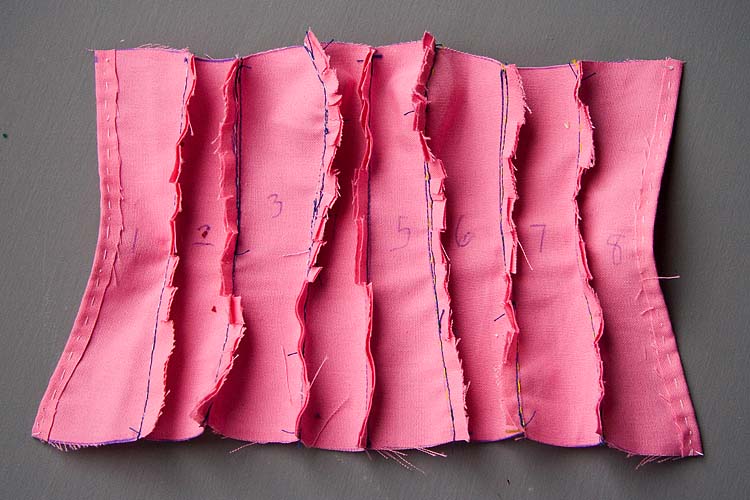
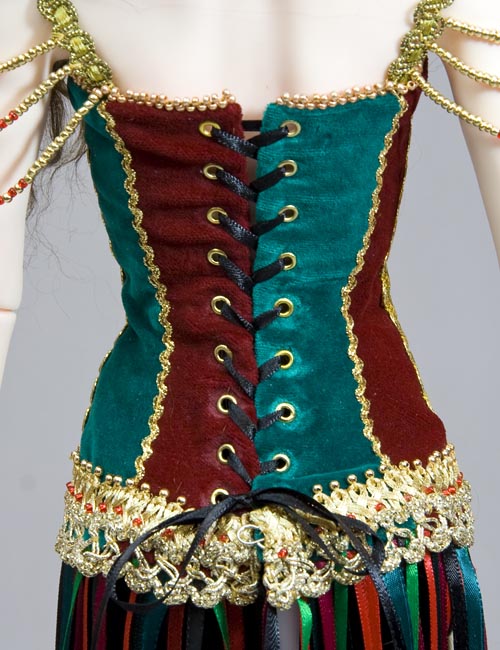
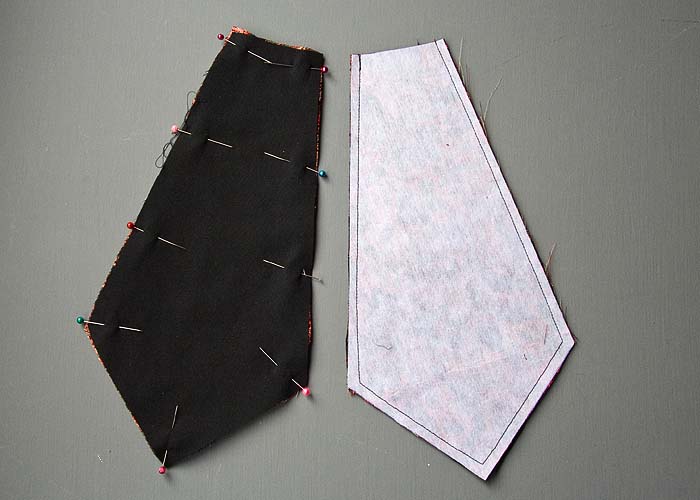
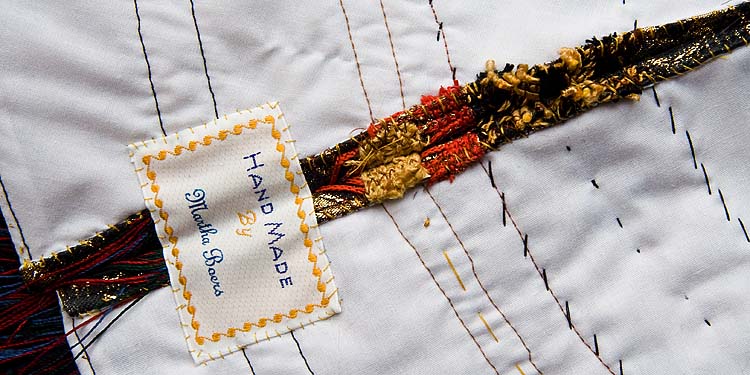
Next step was to cut the bodice out of the good fabric and lining.
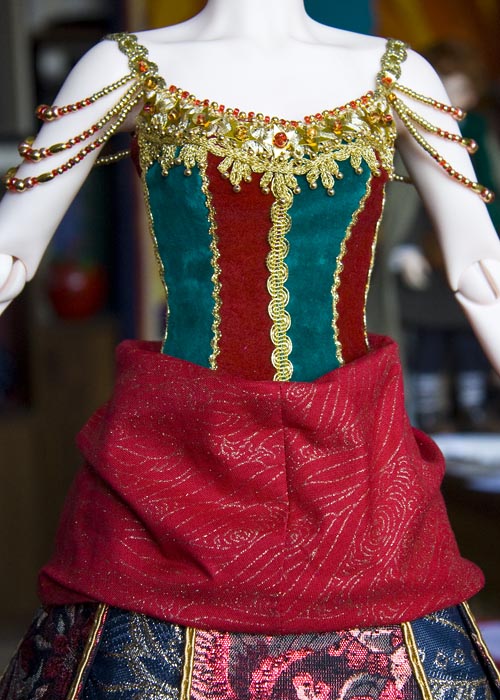
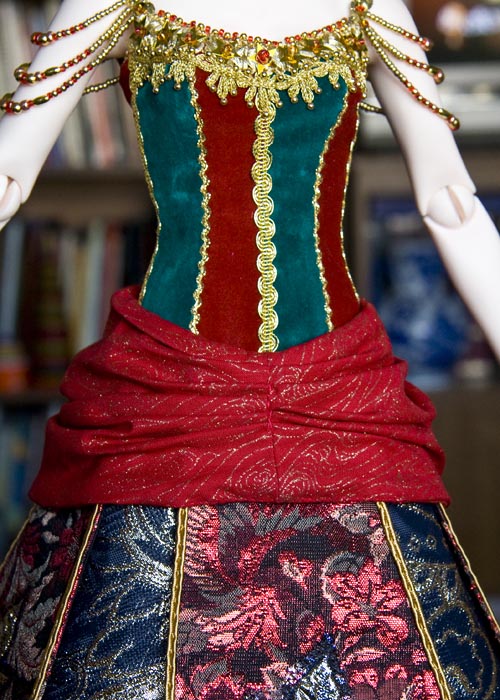
Christine's bodice is green and red velvet, which needs special treatment. I used Fray Check around all the velvet edges to reinforce them and prevent fraying.
Then each piece needed to be hand-basted together before machine stitching (*velvet has a nap, and the fabric will ride even if securely pinned, so whenever working with velvet one must first hand-baste each and every seam)
The seams were clipped, and pressed, and gold trim was sewn on top of the seams on the right side. Then the lining was basted and sewn, and shoulder straps added.
The slave girl costume includes light tan tights and black panties overtop. I decided to make them in one piece. Both the tan and black stretchy fabrics were cut from T-shirts from the thrift shop.
|
|
Embellishing the Bodice
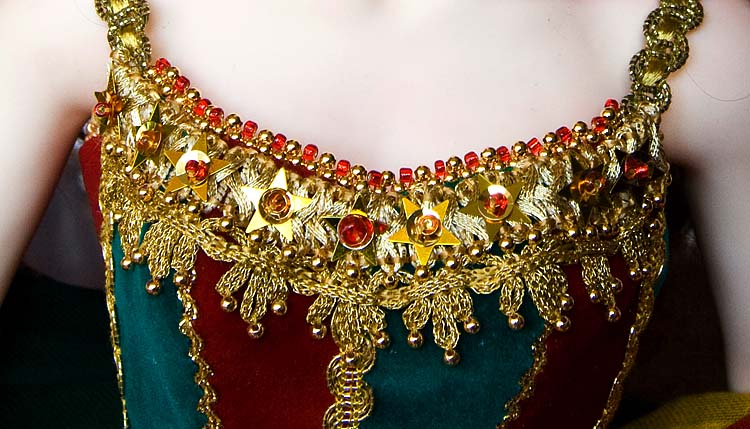
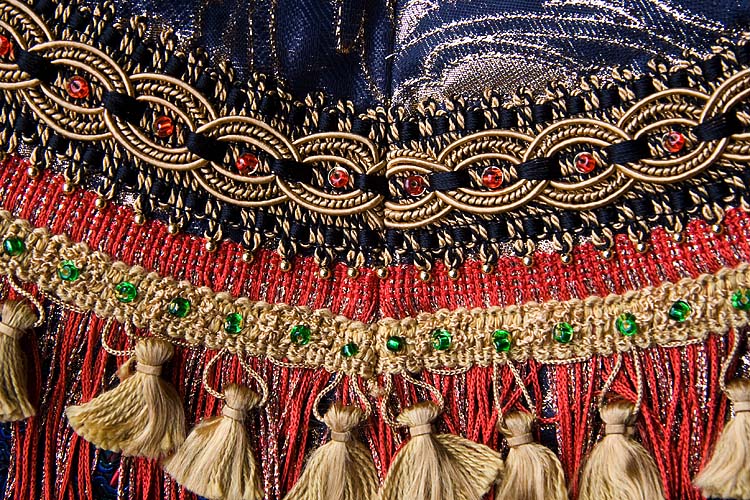
The top edge of the bodice was beaded using picot-stitch with gold and red beads. Two strips of gold trim were cut, their edges heavily saturated with Fray-Check, folded under and hand-stitched into place. Tiny gold beads were sewn on, and larger beads with sequin backings sewn on.
Then almost 100 strips of ribbon, in shades of red, green and black, were cut and individually hand-sewn onto the bottom of the velvet bodice. Machine stitched, then lining sewn into place.
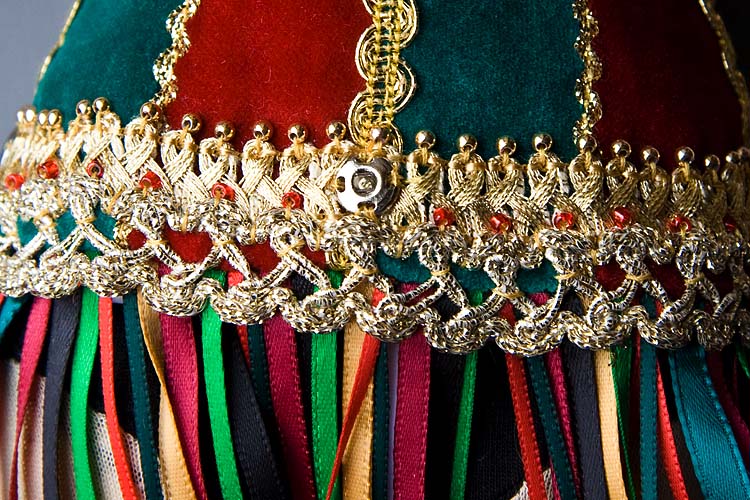
I decided I didn't care for the way the gold 'belt' went up in the front of the real slave girl costumes. It also would make for a more complicated fitting of the over skirt. In the stage production the over skirt goes up to the waist and actually has the red and green velvet panels from the hip up to the waist, which match up to the red and green velvet panels of the slave girl costume underneath.
I wanted a less bulky fit, so decided to make the gold trim go straight across the top of the 'ribbon skirt' and embellished it with hand-beading. (and, by the way, I am working on two)
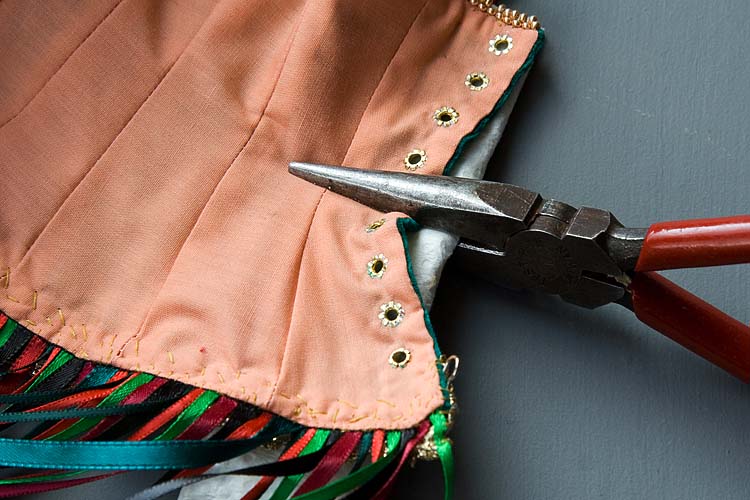
Then it was time to insert the eyelets. I use a large darning needle to start a hole where I want the
eyelet, then make the hole bigger with an even larger dull 'smyrna' needle. I insert the eyelet, squirt
some Fray-Check around the eyelet, and use the eyelet-setting tool and a hammer to set the eyelet.
Sometimes the eyelet doesn't go totally flat and smooth in the back, so I roll up a paper towel and
put it on top of the right side of the eyelet to protect it, then squeeze hard with a pair of pliers.
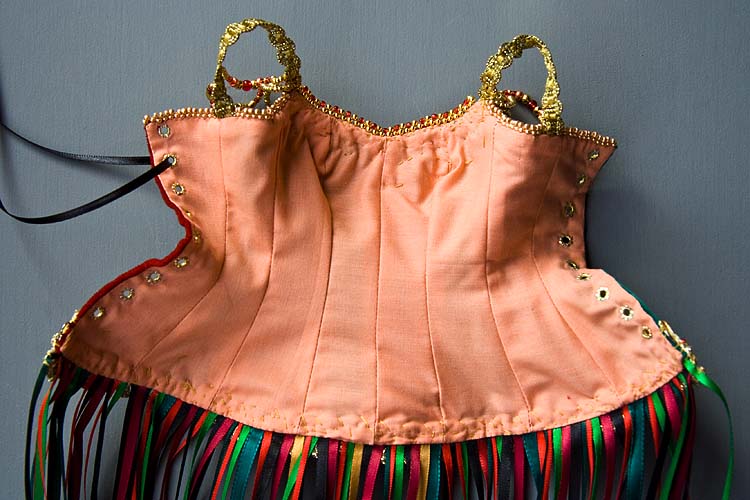
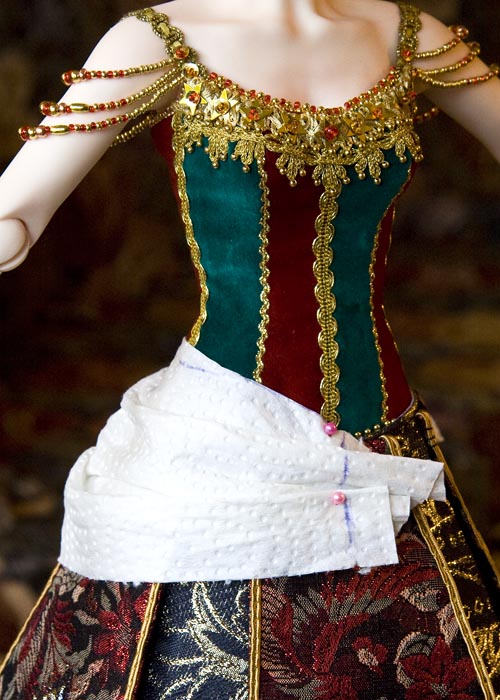
Inside of finished slave-girl costume
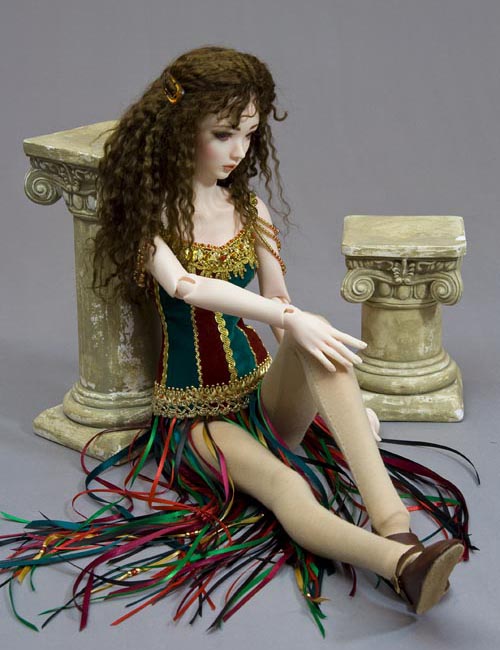
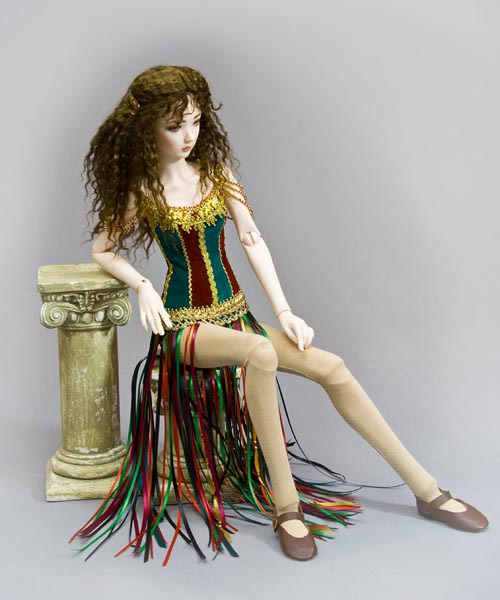
The costume is put on Rosy and laced up with narrow black ribbon. The off-the-shoulder
beading is done next. I make sure to count and write down the number of beads in
each row so it's easier to duplicate on the second side.
|
|
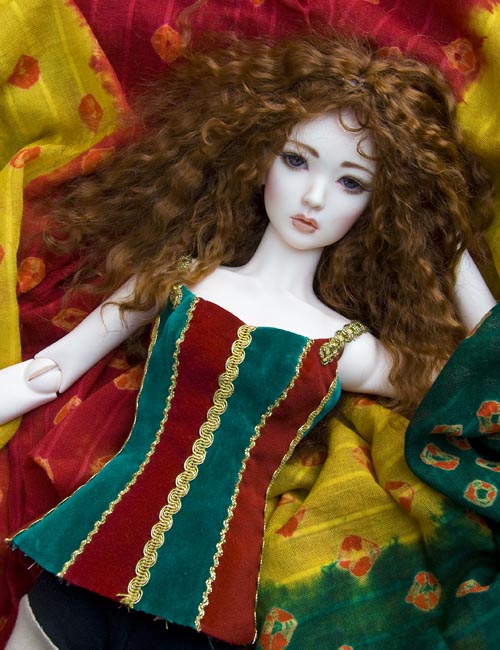
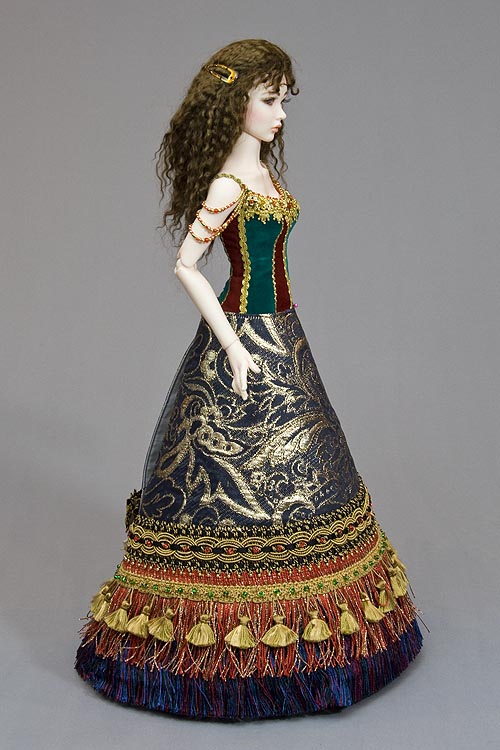
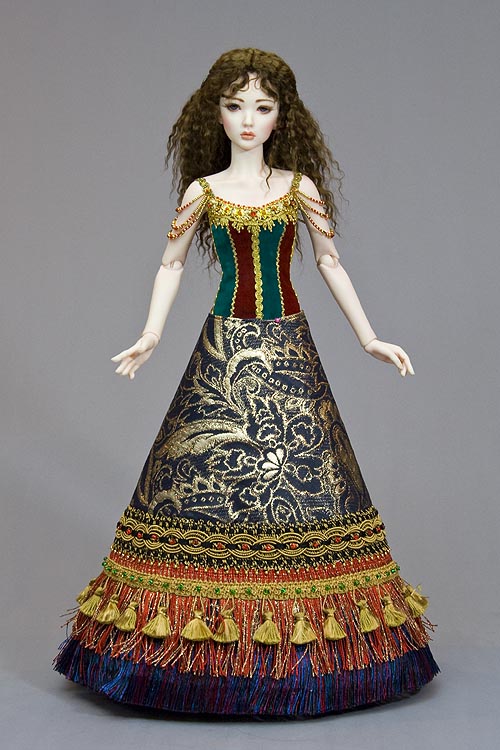
Rosy in the Slave Girl costume. All she needs now is some restyling of her wig, and a gold tiara, and she's ready to go onstage. And for her big solo she also still needs her dramatic overskirt and shawl.
|
the Overskirt
|
|
First step was to draw the pattern.
Originally I was going to make it a gored skirt, so took Rosy's hip measurement and the circumference of the finished skirt bottom, and divided both by six. I drew up one panel for a six-gored skirt.
Then I realized the skirt fabric was going to be reinforced with iron-on interfacing, so I could make the skirt pattern in one piece, so I traced six panels against each other, cut it out and tried it on Rosy.
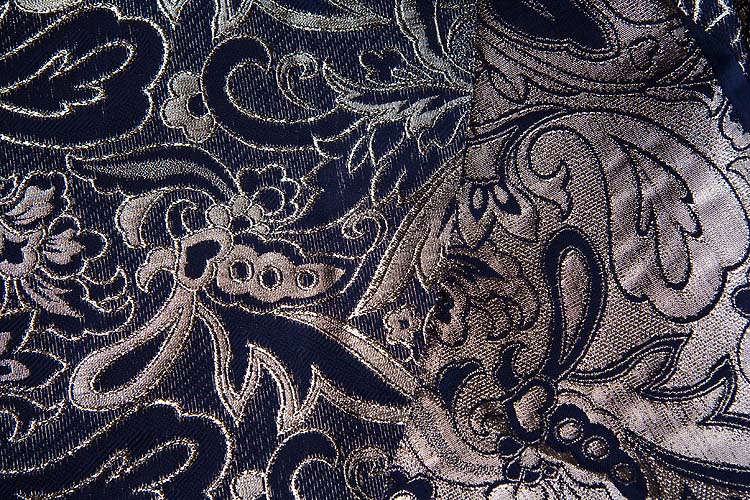
I found a nice black & gold brocade for the skirt.
|
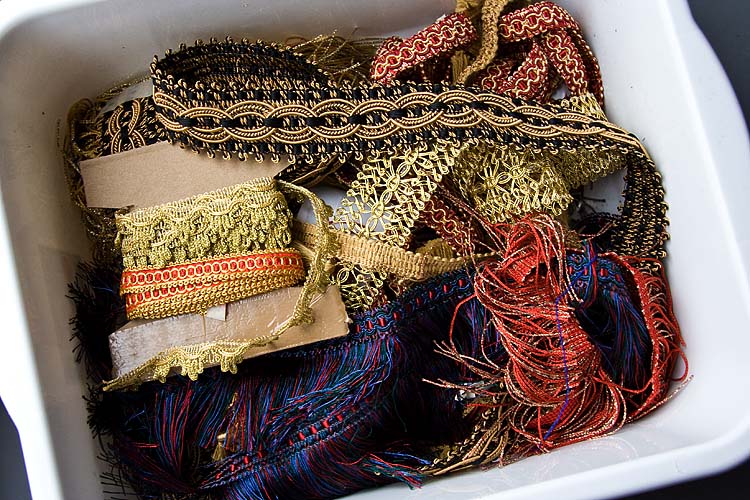
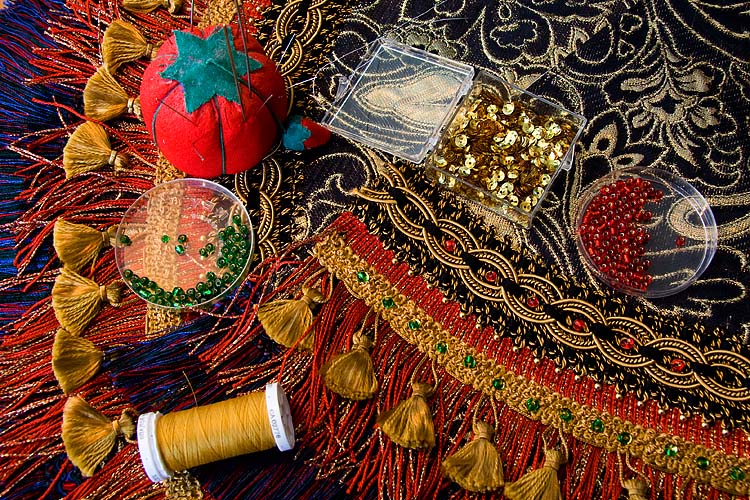
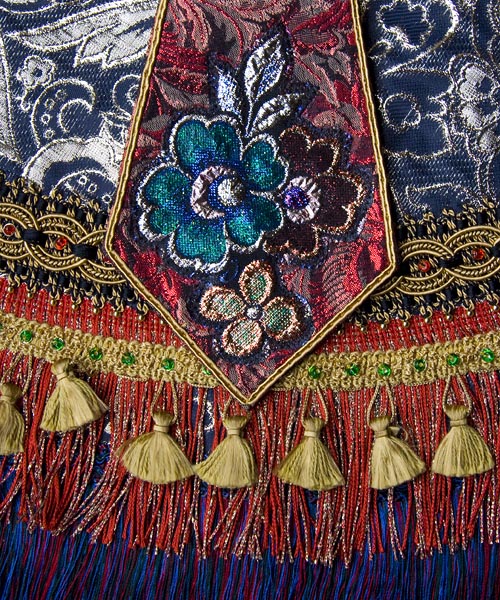
The basket full of trims to embellish the skirt
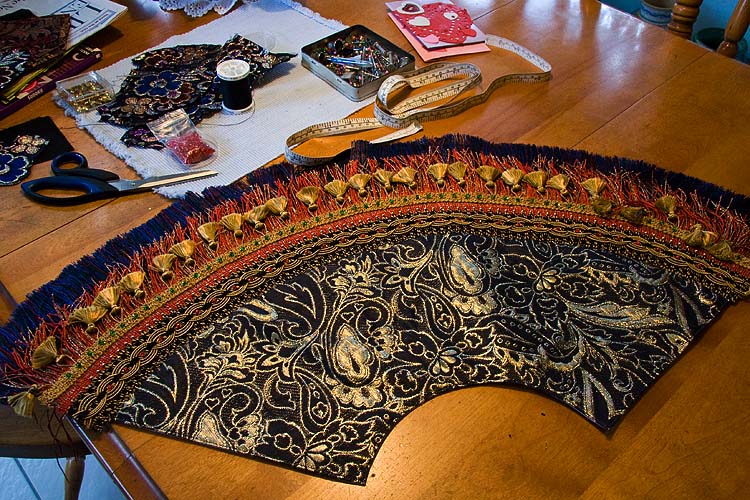
Working on the skirt. I measure where each row of trim will go and mark it with pins.
Some trim can be sewn on by machine, while others need to be sewn by hand.
The trim needs enhancing with beads in order to match the scale of the bodice embellishment. I use larger red and green seed beads and back each one with a gold sequin in order to give the bead some extra sparkle. The gold tassels are rather fragile - the threads catch and pull too easily - so I saturate the tops of each tassel with Fray-Check. That should help keep the tassels neat.
The main overskirt pinned on. It's nice and slender-looking and close-fitting at the waist,
which is good because it still needs to be built up quite a bit.
At this point I'm finding the bottom fringe a little too blue. The doll I dressed many years ago had this same blue and red fringe along the bottom of the overskirt, but it looks like I used black velvet instead of green on that bodice, so the blue was not an issue. Well, it's too late to do anything about it now. I have already added an extra row of red and gold fringe to help break up the blue. If all else fails I can always claim the overskirt doesn't match the bodice perfectly because it's part of Carlotta's costume and was given to Christine at the last minute. It's going to be my excuse - er, "artistic decision" - and I'm sticking by it!
the Pointed Panels
|
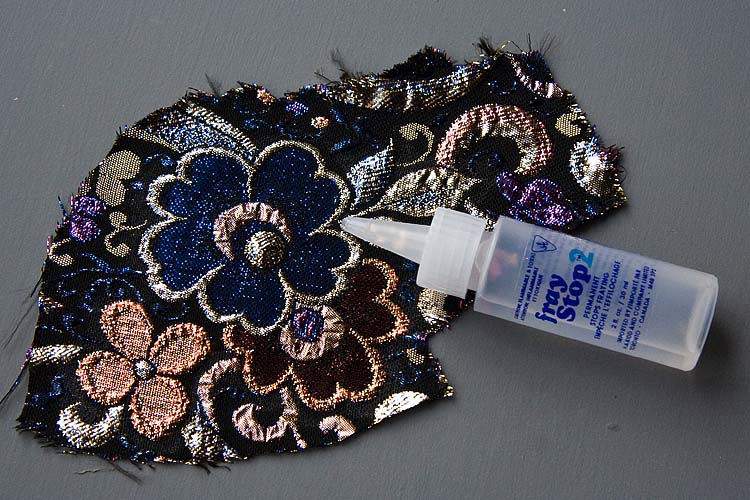
I still had some of the original fabric I used years ago, but there wasn't enough for eight panels.
|
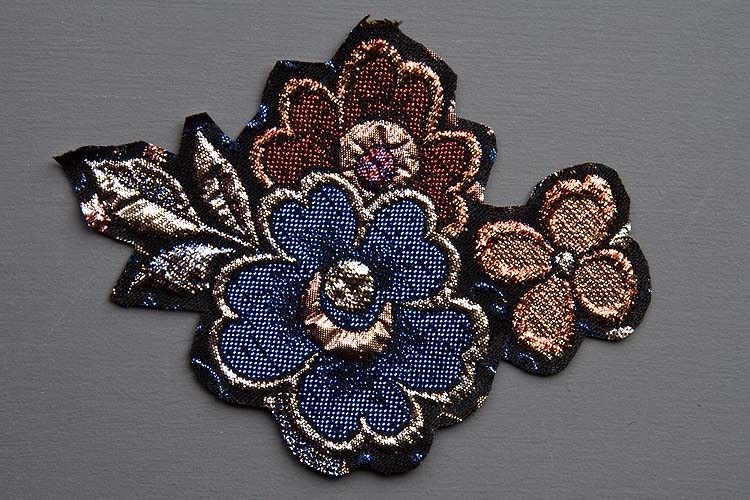
So I cut out eight individual motifs, and used Fray Stop to seal the edges 1/8" around the design.
|
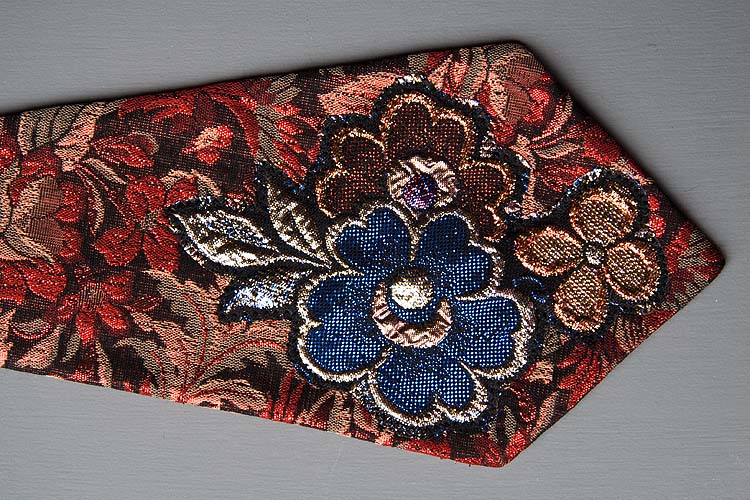
I drew up a pattern for the pointed panels and traced it onto iron-on interfacing. I looked through my fabric stash to find a suitable fabric for the panels. I found a red and a green metallic brocade. The red looked better with the costume so far. The interfacing panels were ironed onto the back of the red brocade, and linings were cut out of black cotton. The panels were sewn, turned right side out, and pressed.
|
When the Fray Stop had dried, the motif
was carefully cut out.
|
The motif was lightly glued onto the panel with a glue stick, and then the edges were zig-zagged all the way around with black thread.
|
After stitching on the motif, I painted over the stitching with red sparkle paint. I then applied green paint
to the petal edges of the blue flower. When the paint dried, I added green glitter paint to the blue flower and a bit to the gold flower as well. The gold trim was hand-stitched around the outside.
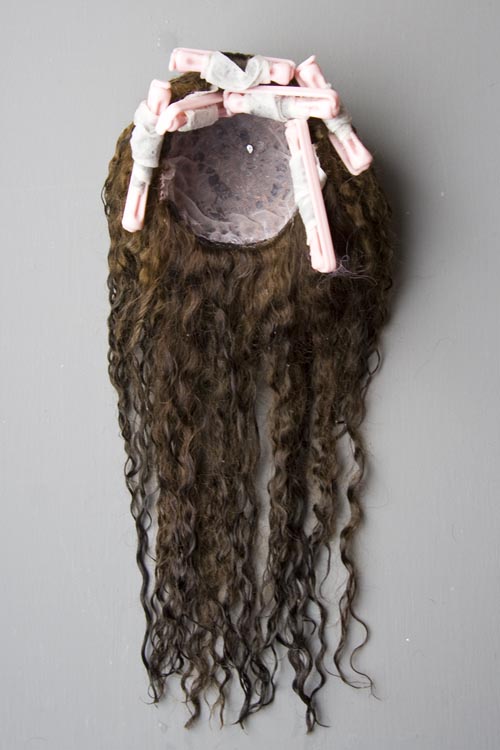
the Wig
I wanted longer hair with soft curly bangs for Christine, and didn't have enough long brown mohair
to make an entirely new wig, so I decided to add extensions to the existing wig. I found a bag of
10" long brown mohair which was almost the exact same colour and amount of curl to match the
existing wig. I combed the mohair and sewed it into wefts.
It was very important that the new bangs be the exact same colour and texture as the main wig,
so I cut lengths of hair from the nape of the neck area of the wig. With my glue-gun, I glued the
longer wefts between toe back rows of wefting on the existing wig, and glued the bangs wefting
along the inside of the wig-cap around the face area.
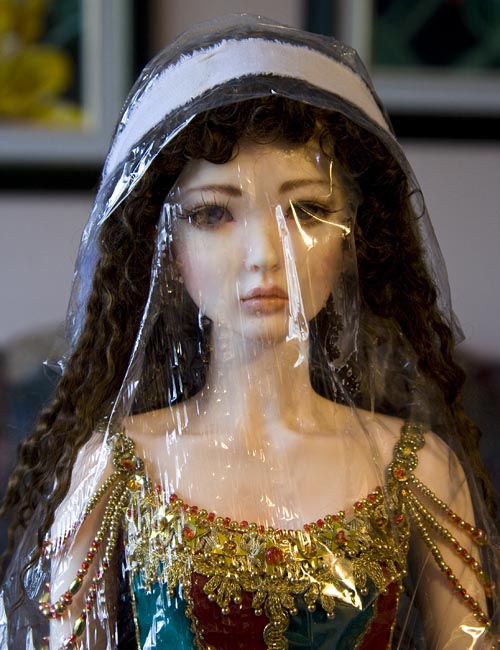
I wet the wig, and gently combed it out. I set the bangs in small curlers. Then the wig went onto a heating duct to dry overnight. Next morning I removed the curlers. I covered Rosy with plastic wrap, and put the wig on her. Some parts of her curly bangs were sticking out in odd directions, and needed taming. I saturated the bangs with hairspray and very gently worked the curls with my fingers until they were where I wanted them, I also sprayed the top of the wig to help keep the hair down.
The wig was still sticking out a bit too much at the sides, so I took another small piece of
plastic wrap and positioned it along the front of the hairline, and held it down with a strip
of fabric which I pinned onto the bottom of her bodice.
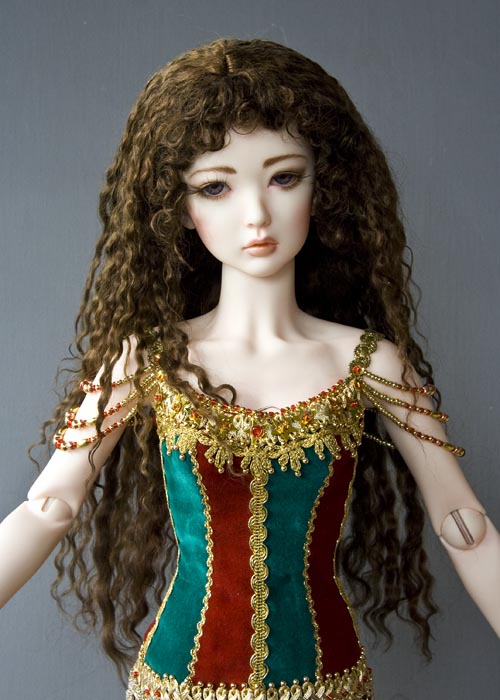
Rosy with her new hair extensions and 'soft' curls around her face.
Finishing the Skirt
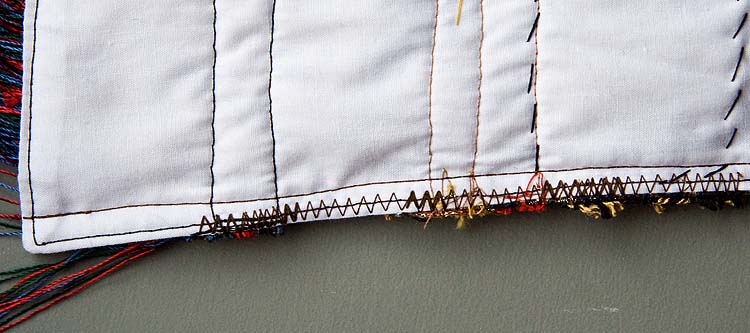
Time to sew the overskirt together. I first zig-zagged the individual back skirt edges to control
the ends of the trims and keep them from unravelling. Then I trimmed off the extra.
I pinned the skirt with right sides together, and proceeded to slowly sew the back seam.
I broke one needle on the very thick trim section.
There was no way I was ever going to be able to press the seam flat....
...so I hand-stitched the seams down flat on the inside. Then the last beads around
the back seam needed to be sewn on. I had left off the beads closest to the
back edge so they wouldn't interfere when sewing the back seam together.
The overskirt was going to be held in place with strong snap fasteners, so I measured where they needed to go, and sewed snaps on the top inside edge of the skirt, and on the bodice in the middle of the golden trim where it looks more or less like part of the embellishment.
The pointed panels were sewn on, and then it was time to draft patterns for the upper drape. I pinned a piece of paper towel in place and drew the seam lines onto it. I also drew a close-fitting lining piece.
The draping fabric was sewn onto the lining, and I checked it for fit...
then the front gathers were stitched into place
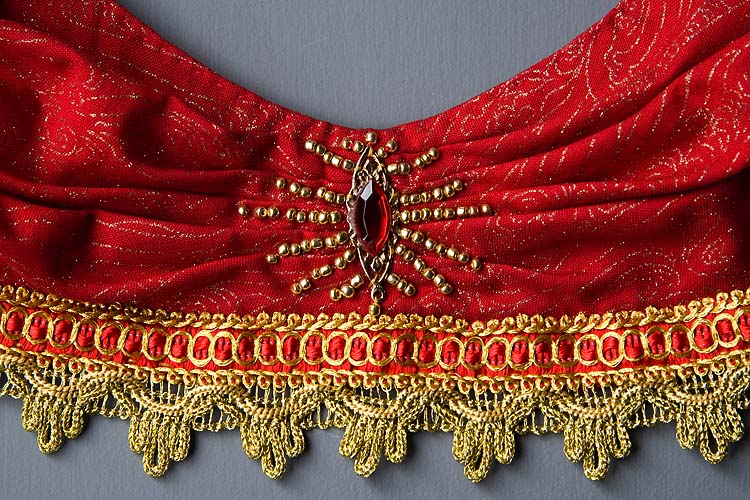
Time to embellish the drapery. I hand-stitched two rows of metallic trim along the bottom edge, and beaded a star-burst design in the front, and glued a tapered jewel over the gold metal finding.
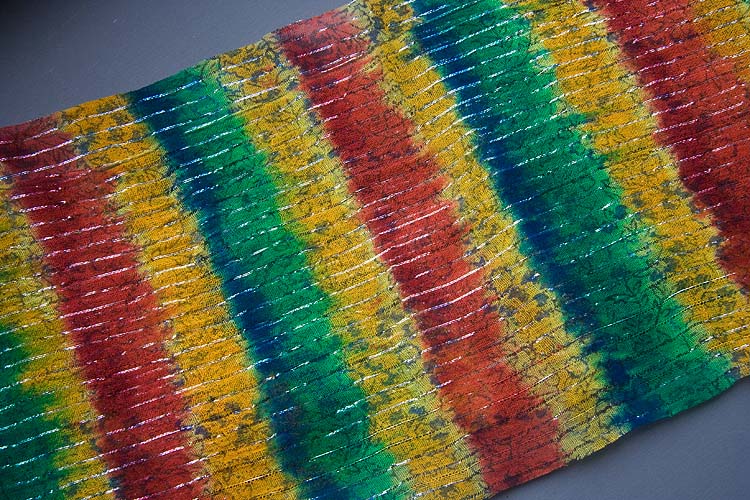
Making the Shawl
What I really wanted was a gold-coloured cotton Indian scarf with the metallic threads woven in, but I didn't have one in a suitable colour. Out of desperation, I took an olive green scarf and washed it with bleach, letting it soak until it turned a light canary yellow. I then mixed acrylic paint into fabric medium and painted the red and green stripes onto the scarf. I'd already painted on a few stripes before I realized I'd wanted the metallic threads to go across the scarf parallel to the stripes. Too late!
When the paint had dried, I heat-set the colour with an iron and pressing cloth. I immediately washed it, but too much colour washed out, and it was very dull. I should have waited a few days before washing.