Fixes and the causes of QuickBooks crash com error |
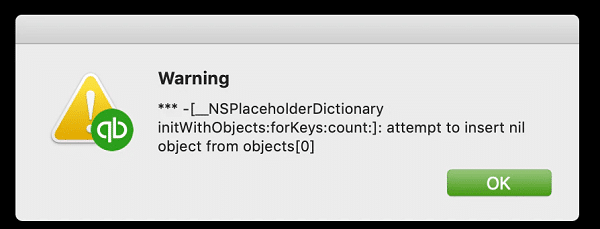
Stuck on QuickBooks com crash error and don’t know what to do? Well, need not to worry anymore, as this blog post will surely rescue you. Com crash error has created a lot of nuisance in the recent times, and is considered as a worrisome problem. When the user tries to email invoices, this error might hinder the entire process. This entire blog is entirely based on the fix crash com error in QuickBooks: best troubleshooting steps.
Thus, stick to the blog till the end and you will get answer to all your queries. However, you can also speak to our support team via our toll-free number i.e., 1(800)761-1787, and clear all your clouds of confusion.

Below, we have few step causes behind to this error:
Following are the latest methods for rectifying the QuickBooks com crash error:
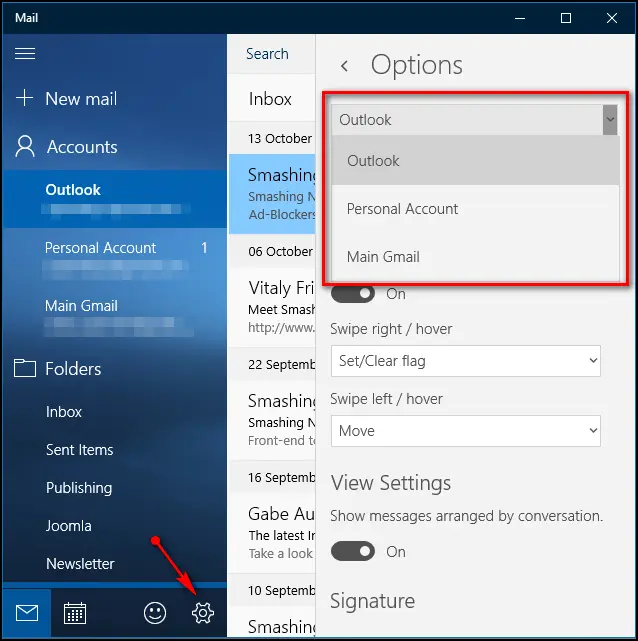
The user can create a new Outlook mail profile to fix the issue. The steps involved in the process are as follows:

After carrying out the steps enumerated above, we expect that the QuickBooks desktop crash com error shouldn’t persist. But if by any chance, the error continues to trouble you, and then we suggest you to speak to our QuickBooks error support team via our toll-free number 1(800)761-1787.
Talking to our team of experts and certified accounting professionals will help you to deal with any kind of QB related error. We own a pool of experts and certified professionals, who are well aware of all types of errors and their fixes. Thus, feel free to talk to our support team and get answers to all your queries.
Read Also: How to Fix QuickBooks Error Code H505 (Multi-User Mode)?
|
Метки: quickbookscrashcomerror |
Resolve QuickBooks install error 1904 (Registration Failed) |
In the recent times, majority of the QuickBooks users have reported QuickBooks error 1904, making it one of the commonly encountered bugs. This error is mainly seen due to a damaged file or also in case if an inappropriate file location. Many times, this error could be seen while installation the software. It also occurs when the computer system files start missing. In order to effective methods to fix QuickBooks error code 1904, you can go through this blog and follow the instructions, or you can seek for professional assistance. You can also dial our toll-free number and consult our certified accounting ProAdvisors.
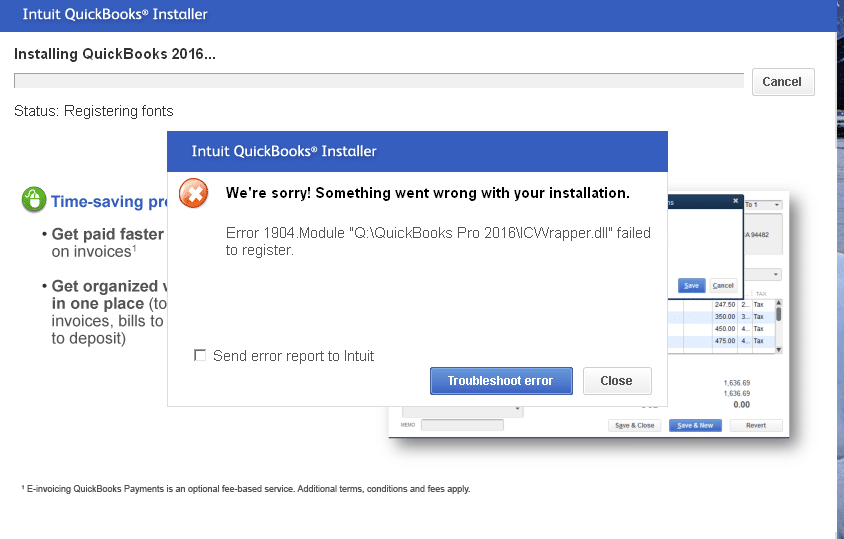
You might see the following error message on your desktop screen:
“Error 1904: [file path / name / extension] failed to register” on your screen.
In order to spot the error, the users can consider the points enumerated below:
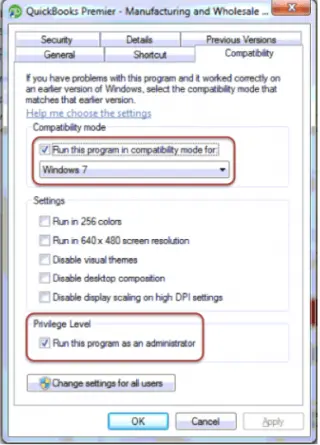
Checkout the below given methods to rectify the QB error 1904:
We hope that the QuickBooks install diagnostic tool would help you to fix the error with much ease. In case of any difficulty, or in case any of queries remained unanswered, the user can simply get to our QuickBooks support team via our toll-free number i.e., 1-800-761-1787.
We own a team of highly skilled professionals and experts who are well versed in dealing all kinds of QuickBooks associated errors. Thus, feel free to speak to our experts and discuss your issue with them, to get round the clock professional assistance.
Read this also: How do I Fix QuickBooks Payroll Update Error 15263?
|
Метки: quickbookserror1904 |
How to set up QuickBooks chart of accounts in QuickBooks |
QuickBooks is an amazing accounting software, designed by the Intuit Inc. This software is packed with some amazing features, but the QuickBooks users at times face difficulty in using each and every feature. One such feature is importing the setup a chart of accounts in QuickBooks [step-by-step]. In this blog, we will be discussing the process to import the charts of accounts into the QuickBooks desktop. Thus, read this article carefully, or you can also talk to our executives for further information, by dialing our toll-free number +1-800-761-1787. Our QuickBooks support team will assist you to resolve all your QuickBooks associated issues in a single call.
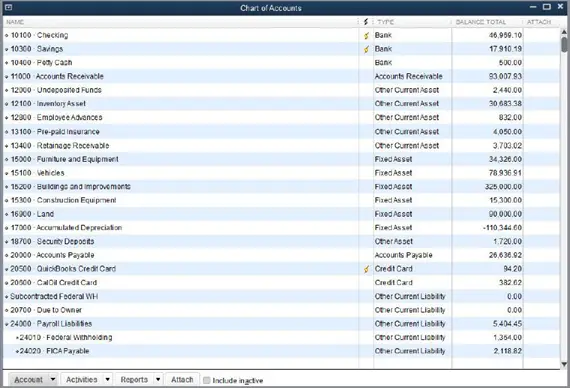
What you require to import the files?
Steps involved in importing the charts of accounts into QuickBooks
We hope that this blog might be of some help to you. However, if the user has any doubts, then he /she can get in touch with our QuickBooks support team by dialing our toll-free number +1-800-761-1787. We own a pool of certified QuickBooks ProAdvisors, who are available round the clock to provide the finest possible service to the QuickBooks users.
Read Also: How to perform a clean installation of QuickBooks desktop?
|
Метки: setupchartaccountinquickbooks |
How to Fix QuickBooks Multi-User Mode Not Working Problem |
QuickBooks is a precise accounting software that is used by entrepreneurs across the globe. But at times, the QuickBooks users might encounter technical troubles or restraints while starting the QuickBooks software. Such kind of errors might terminate the access to the software. One such error can be the Error – QuickBooks Multi-User Mode Not Working. In this blog, we will be discussing the best methods to solve QuickBooks multi-user mode not working error You can also get in touch with our QuickBooks support team, by dialing our toll-free number +1-800-761-1787.
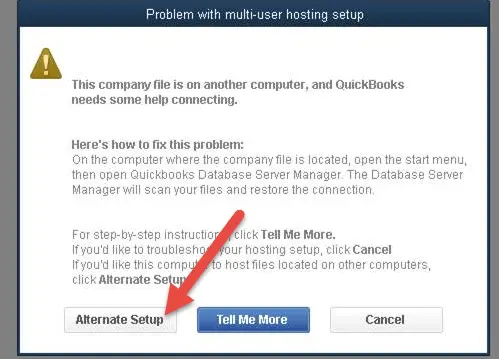
In order to fix the error, the user is required to verify the connectivity, by simply following the below-enumerated steps:
We believe that this blog might be of some help to you in resolving the error- QuickBooks Multi-user mode not working. If in case the blog doesn’t work in your favor, it is recommended to get in touch with our QuickBooks support team by dialing our toll-free number +1-800-761-1787. Our team of experts and highly skilled professionals will ensure to provide the finest possible services.
Read this also: Steps to Install multiple QuickBooks Desktop versions on one computer
|
Метки: quickbooksmultiusermode |
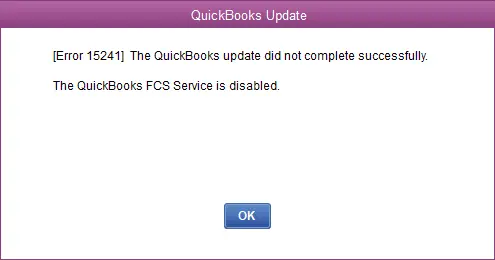
Fix QuickBooks Error 15241 (Error related to Payroll Update) |
QuickBooks error code 15241 is reported commonly with an error message “You receive error 15241: The payroll update did not complete successfully. This error can occur if the QuickBooks desktop file copy service is disabled”. Such an error is associated with the payroll related issues that might be seen at the time of update. In case the Microsoft windows installer gets corrupted, or if there are any missing system settings, then such an error might appear. If you are also facing such an error, then reading this post ahead would surely help. In this post, we will be discussing the a complete guide to troubleshoot the QuickBooks error 15241. You can either read this till the end, or can consult our team via our toll-free number +1-800-761-1787, and they will answer all your queries immediately.
Steps to resolve the error 15241 in QuickBooks
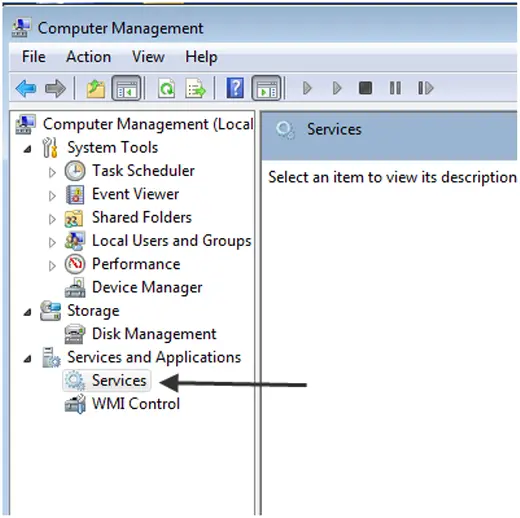
There are certain steps that can be followed in order to fix the QuickBooks error 15241. It should be noted that these steps can be followed by Windows 10, 8, vista, and 7 users. Let us check out the steps one by one:
By the end of this post, we expect that the information shared in above might be of some help in fixing the QuickBooks error support. In case the error continues to trouble you, or if you need any sort of assistance from our experts, start a conversation with our experts at +1-800-761-1787, and they will help you in fixing the error with much ease.
Read also: How to Resolve QuickBooks Error Code 6106, 1069?
|
Метки: quickbookserror15241 |
Troubleshooting the QuickBooks Error 15102 with Effective ways |
QuickBooks error 15102 is usually seen when the user tries to download a payroll or QuickBooks desktop update. This error appears with an error message “Error 15102: Failed to reset update”. There can be numerous causes behind the occurrence of QuickBooks error 15102, which are listed later in this post. If you are also facing such an error, then in this post, you can unleash the detailed methods to resolve error code 15102 in QuickBooks desktop. Thus, we recommend you to read this post carefully till the end. Or you can also get in touch with our customer support team, via our toll-free number +1(800)761-1787, and leave the rest on our professionals. They will resolve your issues instantly on your behalf.
The user might end up in this error due to a couple of factors namely:
There can be numerous methods to fix the error, one of which is to confirm the mapped file location is correct. The steps to be carried out are:
By now, the user might be able to get rid of the QuickBooks error 15102. In case the error persists, or if you have any query, then do not hesitate in getting in touch with our team at any point of time. Make a call at our QuickBooks Payroll support +1(800)761-1787, and our experts and certified ProAdvisors will provide you with immediate assistance.
Read Also: How to Mend QuickBooks PDF Component Missing Error?
|
Метки: quickbookserrorcode15102 |
How to Fix QuickBooks Desktop Freezing up or Crashing Problem |
At the time of installing QuickBooks desktop edition, the user might end up in the effective solutions to fix the QuickBooks desktop freezes. This issue means that the software hangs and doesn’t close when the user tries to shut it down. It usually generates new offscreen window that runs in the background, and when the user closes the software, the window doesn’t shut down. The user might find this issue to quite annoying to handle, considering which we have come up with this post.
The user can read this post carefully, or you can also get in touch with toll-free QuickBooks customer support number i.e. 1-800-761-1787. Accounting experts and certified ProAdvisor’s will ensure to provide the best possible support services.
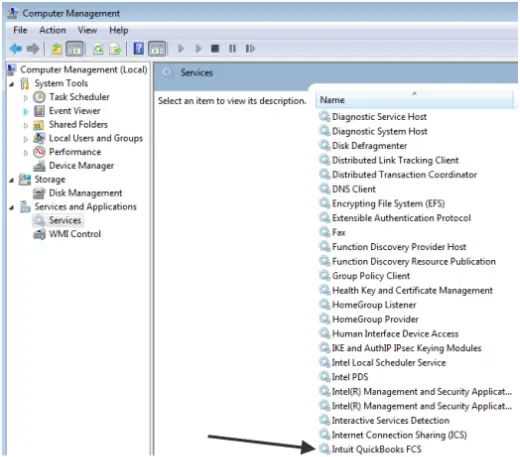
Follow the below given steps to unfreeze the QuickBooks desktop:
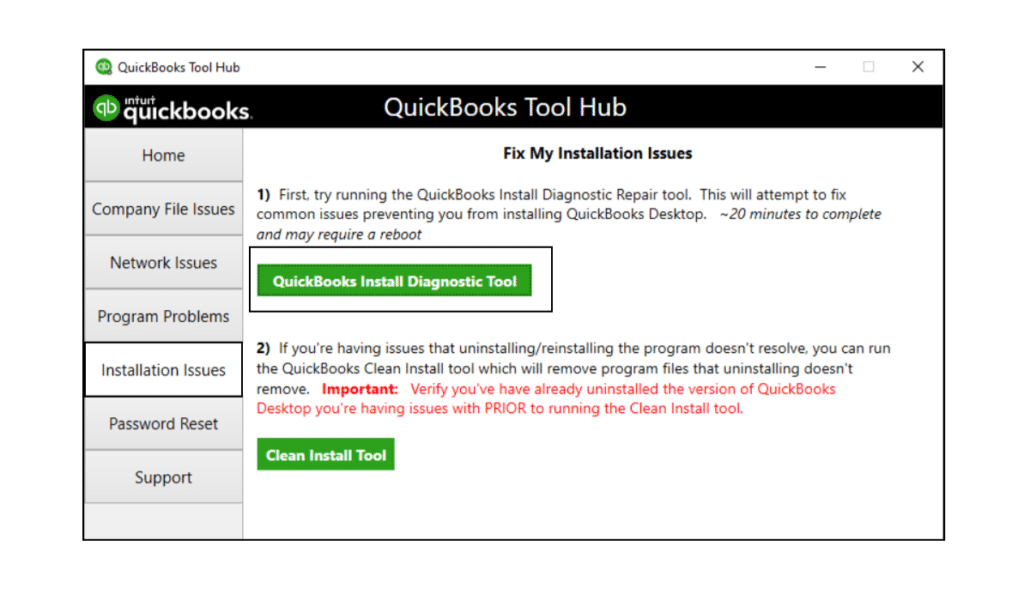
The user can use the QuickBooks clean install tool, to fix the issue. The steps involved in this process are:
![]()
https://qbsenterprisesupport.com/wp-content/upload...es-QB-Tools-Hub-Screenshot.png

Conclusion!
Towards the end, we believe that the information shared here might help in fixing the QuickBooks desktop freezes up error.
However, if you are unable to fix the issue, or in case of any query, feel free to call at our toll-free customer support number i.e. 1-800-761-1787. QuickBooks error support team of professionals and certified ProAdvisors will ensure to provide the best possible support services.
You may also like: How to fix QuickBooks Error code 6177?
|
Метки: quickbooksdesktopfreezes |
Apply a journal entry credit to an invoice in QuickBooks Desktop |
Creating a journal entry in QuickBooks desktop doesn’t involve any rocket science. A journal entry is basically, a journal entry is an account transaction, which is posted or entered to the general ledger. Journal entry basically consists of two parts, mainly debit and credit, and it is a rule that the total of both debit and credit should tally.
Today, we will be learning the record a journal entry in QuickBooks desktop (4 Easy Steps). Thus, if you are interested, then make sure to read this post carefully till the end. Or the user can also get in touch with technical support team, and the accounting experts will be there to assist in a single call.
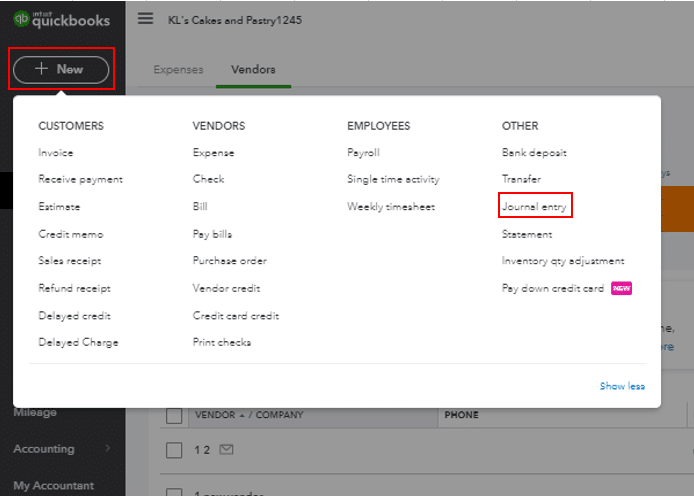
The user can follow the below steps to make journal entries in QuickBooks desktop:
· The user needs to firstly move to the journal entry feature
o The user needs to move to the journal entry feature
o And click on plus icon
o After that, the user will see the create option in which the option for journal entry would be seen

o This will redirect you to the window where you will have to fill in the required information
· And then, enter the date and journal number

· The user needs to enter the date and journal number, by editing the journal date after the form is opened up on the screen. In case you are recording any entry from any other date, the user needs to ensure that correcting the date before moving ahead.
· The user will then have to enter the required information
o Accounts
o Journal code
o Debits or credits
o Description
o Name
· After that, select the recurring journal entry schedule
· Lastly, the user needs to select the finish option to save the transaction

By now, you might be well versed with the Steps to Make a Journal Entry in QuickBooks desktop and online. However, in case you are stuck somewhere, or if you need any sort of technical assistance, you can get in touch with QuickBooks desktop support team via our toll-free customer support number 1-800-761-1787. Our experts and certified accounting professionals will provide you with best possible support services instantly.
See this also: How to set up a Chart of Accounts in QuickBooks?
|
Метки: journalentryinquickbooksdesktop |
QuickBooks File Doctor: Repair Your Damaged Files or Network |
QuickBooks file doctor tool is one of the finest tools designed and developed in a way to diagnose and repair bugs that stops smooth working of the software. This is a file repairing tool that permits the users to fix the type of file and data corruption, network diagnosis, windows problem and many others. This tool is built in 2014 R5 and later versions, but internal file doctor only helps the user in resolving data regarding issues.

The user can download and install, also run QuickBooks file doctor to get rid of the data damage in the software. To know more, the user can read this post till the end. Or you can also get in touch with QuickBooks support team of experts and certified accounting professionals.
The user can make use of the QuickBooks stand alone version, by carrying out the steps below:
![]()


Towards the end, the user might be well versed with the QuickBooks file doctor tool. And also, we hope that the information shared in above might be of some help in making the best use of file doctor tool.
However, for further information, you can call QuickBooks technical support team at 1-800-761-1787, and they will guide you through the process.
See Also: How to Troubleshoot QuickBooks Banking Error Code 9999?
|
Метки: quickbooksfiledoctor |
Windows 10 versions that are Supported with QuickBooks Desktop Pro, Premier and Enterprise |
Is your different QuickBooks versions that are compatible with windows 10? Well, often the QB users face this issue, that their software version isn’t compatible with the windows 10 version or they are facing errors while using it. in such situation, need not to worry, as we have come up with this post, where we will be talking about the versions that are compatible with QuickBooks and also the ones that require an immediate update.
Thus, make sure that you read this post carefully till the end. Or you can also consult our professional for further technical assistance. Give us a call at 1-800-761-1787, and leave the rest on our team.
Checkout the QuickBooks Compatibility with Windows 10:
Now that you know whether your QuickBooks version is compatible with Windows 10 or not, all you have to do is to either update if needed or continue working with your software.
But in case of any query, or if you are facing any difficulty, call us at 1-800-761-1787, and our 24/7 QuickBooks enterprise support team will ensure to provide the best possible support services.
Read more: How to Fix common issues of QuickBooks after the Windows 10 updates?
|
Метки: quickbooksdesktopversionsupportedwindows10 |
QuickBooks Desktop 2020 - how to Download and install it |
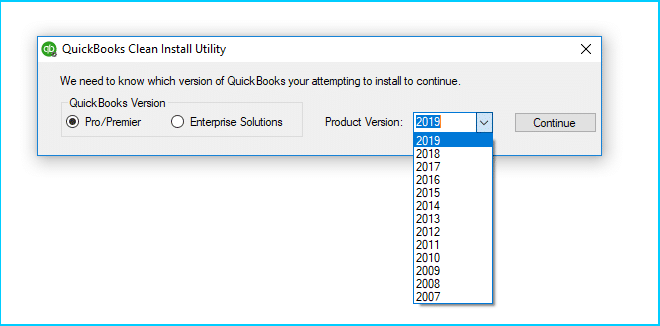
Installing QuickBooks desktop might seem to be a tough task to many QuickBooks users. This tool will be installed once to access it. This software is suitable for small and medium sized businesses and for those who have a product-based business that has complex inventory tracking. Installing QuickBooks desktop involve a couple of steps and procedures, which will be discussed later in this post.
However, if you are a non-technical person, then we would recommend you to consult a professional. You can contact our support team at 1-800-761-1787, and ask them for further assistance.
The below steps would be helpful in installing QuickBooks:
After following the above steps, download QuickBooks desktop latest versions will become easier for the user. However, in case of any query, it is highly recommended to consult a professional.
You can contact our QuickBooks desktop support team right away at 1-800-761-1787, and our professionals and certified experts will be there to assist you in a single call.
You may Also see: Fixing the QuickBooks Error 1911: Could Not Register Type Library for File
|
Метки: downloadandinstallquickbooksdesktop |
Solutions to Fix QuickBooks multi-user mode not working problem |
QuickBooks multi user mode is an inbuilt feature in QuickBooks that permits multiple users to work on the same company file at the same time. It helps in increasing collaboration and enhance productivity. The problem with QuickBooks multiple user mode arises when the user is trying to launch the new company file which has been located on another system.

In case you are also receiving the how to fix QuickBooks multi-user mode not working problem, then continue reading this post. Or you can also get in touch with our 24/7 QuickBooks error support team and ask them to fix the issue immediately.
There can be a couple of factors causing the multi user mode error, which include the following:
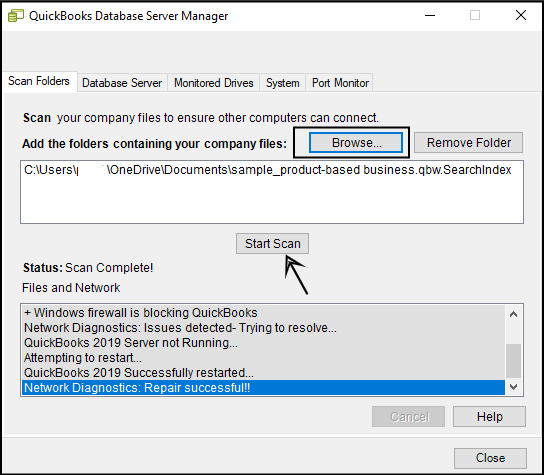
Use QuickBooks database server manager
In order to fix the error, the user can use the QuickBooks database server manager. Following steps involved in the process are:
Final Word!
The user can also use the QuickBooks file doctor tool to fix the error. This tool will analyse whether the system is properly set up for using multi user mode or not
Once you have implemented the above steps, the error might not trouble you anymore. But, if it persists, you can get in touch with our QuickBooks enterprise technical support team at 1-800-761-1787, and they will guide you the way through this.
Read this Also: Steps to Install multiple QuickBooks Desktop versions on one computer
|
Метки: quickbooksmultiusermodedesktop |
QuickBooks Web Connector Error QBWC1085 or Exception TypeError |
QuickBooks web connector is an application that enables qbXML and qbposXML to pass between a web-based application and QuickBooks point of sale. The user might face some issues while using the application and QuickBooks web connector error QBWC1085 is one of them. This error is related to the log file of QuickBooks. This error is usually seen when the user tries to open the company file and restricts the user to write the log files.
You may see the following error message on your desktop screen:
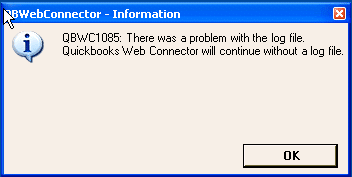
QBWC1085: QuickBooks was unable to write to the log file. QuickBooks will open without writing to log file.
QBWC1085: There was a problem with the log file. QuickBooks Web connector will continue without the log file.
Exception TypeError: Unknown name.
In today’s post, we will be talking about the process to fix this QuickBooks Web Connector Error QBWC1085, along with the causes. Thus, scroll through the post or you can also contact our QuickBooks error support team via our toll-free number. Our experts will help you in fixing the error with much ease.
The user might face this error due to the below mentioned factors:
There can be a couple of steps that the user can follow in order to fix the error QBWC1085:
With this, we come to the end of this post, where we expect that the QuickBooks Web Connector Error QBWC1085 would be resolved after carrying out the steps above.
However, if the error persists, then feel free to call us at 1-800-761-1787, and our 24/7 QuickBooks enterprise support professionals will resolve the error for you.
See Also: QuickBooks Crash Com Error – Unable to Mail Invoices
|
Метки: quickbookswebconnectorerrorqbwc1085 |
Fix PDF and Print problems with QuickBooks Desktop |
QuickBooks is known for its amazing features, one of which is printing from QuickBooks. Often while using this feature, the user might end up in printing issues. How to troubleshoot unable to Print Problem in QuickBooks are often seen due to a missing or corrupt component in QuickBooks, or the issues with the printer or the system. Printing issues can be seen due to a handful of reasons, which will be discussed later in this post, along with the fixes to the same.
Thus, the user can read this post till the end, or can also get in touch with our QuickBooks error support team. We are a team of experts and certified professionals, who work round the clock to provide the best possible support services.
The user can fix the printer issues to get rid of all printing problems in QuickBooks desktop. The steps involved in this process are as follows:
It is believed that this blog post might help in resolving QuickBooks desktop printing issues. But if by any chance, the error continues to trouble you or you are unable to print in QuickBooks, then in that case you can get in touch with our QuickBooks desktop support team at our toll-free customer support number i.e. 1-800-761-1787. Our experts and certified ProAdvisors will be happy to help you.
Read Also: How to Print W-2 Forms in QuickBooks Desktop and Online?
|
Метки: quickbooksdesktopprintingproblems |
How to Use QuickBooks Auto Data Recovery Tool to Restore the Data |
QuickBooks auto data recovery is an effective tool designed to get back the damaged QuickBooks files or lost data. This tool permits the users to make use of the essential features of auto replication to create a duplicate QuickBooks company file, QuickBooks transaction log file, and the auto recovery feature. In this post, we will be talking about the QuickBooks auto data recovery – recover lost data files in detail. Thus, make sure that you read the post carefully till the end.
Or you can also get in touch with our experts and certified QuickBooks ProAdvisors. We will be there to assist you in a single call.
The below mentioned solutions will help you in recovering your lost data by using the QuickBooks Auto Recovery Tool:
The user can make use of the original transaction log file and the auto data recovery version of the company file to recover the recent transactions. The steps involved in this process are:
· At first, the user needs to make a new folder on the desktop names QB test

· And then, open the folder where you have the company file saved
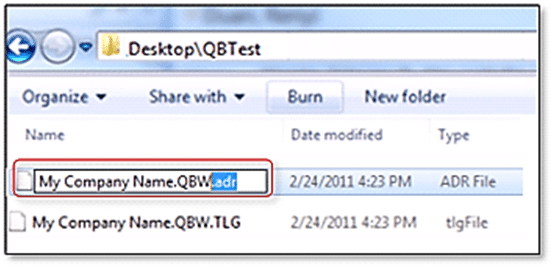
· The user can copy the corresponding.tlg file and then paste it to QuickBooks test folder on the desktop
· The user needs to press windows + R to open the file explorer
· And then, press organize and select the folder and search options
· The user will then have to press view and choose the filename extension
· After that, select hide extensions for the known file types
· Also, select apply and hit OK button
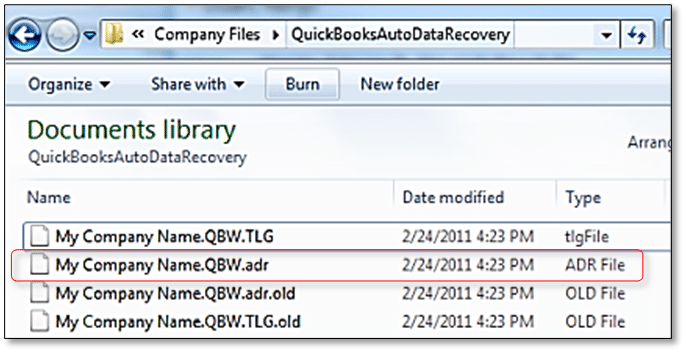
· The user will then have to open the QuickBooks auto data recovery folder
· The next step is to copy .adr file and then paste it to the QB test folder
· The user needs to move to the QBtest folder and then right click QBW.adr file and press rename option
· Now, delete .adr from the end of the file
· After that, the user needs to open QuickBooks again open the company file saved in the QBTEST folder and then verify all transactions are there
· The user will then have to run verify utility to ensure the integrity of this company file
· In case this company file is fine, then you can move to the damaged company file to different location
· Lastly, the user can move the damaged company file to a separate location
With the end of this post, we expect that the information shared in above might enough to make the best use of the QuickBooks auto data recovery tool. However, in case of any query, you can call us at 1-800-761-1787.
Our QuickBooks support experts and certified accounting professionals will provide you with the best possible support services.
You may also see: How to Create Data Level Permissions in QuickBooks Desktop Enterprise?
|
Метки: quickbooksautodatarecoverytool |
QuickBooks Install Diagnostic Tool | Install and Fix Errors |
QuickBooks install diagnostic tool is made in a way to diagnose and fix the issues that are encountered by the users at the time of installing the QuickBooks software. The QuickBooks software needs many Microsoft core components and without any proper functioning, managing the software be very difficult. The QuickBooks install diagnostic tool - fix installation errors is recommended, as it will help in fixing all sorts of .NET framework, C++, and MSXML errors. Downloading, installing and using this tool help the user to fix a lot of issues.

To know more, make sure to read this post till the end. Or you can also get in touch with our support team at 1-800-761-1787. Our team will ensure to provide immediate assistance to you.
The QuickBooks install diagnostic tool can easily fix the below errors:
The user can make use of the install diagnostic tool by carrying out the steps below:
By now you might know well to make the best use of QuickBooks install diagnostic tool. However, if you need any sort of technical assistance, then in that case you can call us at 1-800-761-1787.
We are a team of experts and certified ProAdvisors, who work round the clock to provide the best possible support services. Our QuickBooks enterprise support team and accounting experts will be there to provide you with immediate expert assistance.
|
Метки: quickbooksinstalldiagnostictool |
Which Versions Of Windows 10 Are Supported With QuickBooks Desktop |
Is your QuickBooks version supported by windows 10 or not? Well, to get the answer to this question make sure to scroll through this post carefully. Windows 10 is the upgraded version of Windows operating system, which demands the software to be accordingly. In today’s post, we will be talking about the Which Windows 10 version works best for QuickBooks desktop?.
Thus, continue reading the post. Or if you want to talk to a professional regarding the same, then you can get in touch with our professionals. Our team of experts and certified QuickBooks Proadvisors will be there to assist you in a single call.
The QuickBooks desktop versions that are supported by windows 10 are listed below:
QuickBooks 2016 R7 and later user need not to worry as these versions are completely compatible with windows 10. The users need not to update to the other version, as they will not face any sort of compatibility issues with windows 10
The QuickBooks desktop 2015 and 2016 R1 to 6 versions are only compatible with windows 10 when the .NET framework 3.5 is enabled on the system or else the user might have to face compatibility issues. Thus, if you want to use these versions, then make sure that you system is having the Microsoft .net framework 3.5 enabled.
The QuickBooks desktop 2014 and earlier versions are not only supported by Windows 10. Thus, if you are also a QuickBooks desktop 2014 and earlier version user, make sure to update it to the latest version immediately. As using this version might lead to compatibility issues
We have mentioned all the versions and their possible QuickBooks compatibility issues with Windows 10. In case you are facing compatibility issues, then we recommend you to update your QuickBooks desktop software immediately.
Or in case of any query, you can contact our QuickBooks support team at 1-888-291-2294. Our QuickBooks desktop support experts and certified QuickBooks professionals will assist you in all sorts of issues.
You may also see: How to Set Up or Edit Bank Accounts for Bank Feeds in QuickBooks Desktop?
|
Метки: quickbooksdesktopversionsupportedwindows10 |
Fix QuickBooks Has Stopped Working Or Not Responding Error |
QuickBooks has stopped working is one of the most common issues reported in the recent times. The user might end up in this issue while completing any of the task. It can be caused due to a couple of factors, which will be elaborated later in this post. Tackling this issue becomes easy once you go through the post carefully.

Moreover, if you need any sort of technical assistance to fix QuickBooks has stopped working, won’t open or not responding error instantly, then in that case, make a call at our toll-free customer support number, and leave the rest on our support team. Our experts and professionals will ensure to fix the issue on your behalf permanently.
The user can fix the issue by carrying out the steps below:
Note: You can also download and run the QuickBooks tool hub program in order to troubleshoot the QuickBooks has stopped working or not responding issue.

Final Word!
Now that you know the causes and fixes to the QuickBooks has stopped working error, we believe that you might not face this issue anymore. But if you are unable to deal with it, even after following the above measures, then in that case you need to get in touch with a team of professionals, who can help you with the same.
Feel free to call our QuickBooks error support team at 1-800-761-1787, and they will guide you through the process.
You might also read: What are the Methods to Troubleshoot QuickBooks Error 6106, 1069?
|
Метки: quickbookshasstoppedworking |
Steps to install the QuickBooks database server manager |
QuickBooks database server manager is one of the tools provided by Intuit. The QuickBooks database server manager enables the user to manage application for multiple users. Installation of database server manager is important, in order to make use of the multiple versions of QuickBooks desktop. Also, this tool permits the user to make the best use of QuickBooks desktop software. This also helps in creating the network data file for any company file on the host system. If you are seeking for a guide to QuickBooks database server manager: download & install, then here it is.

Here we will be talking about the process to install and use QuickBooks database server manager. Thus, make sure that you read this post till the end. Or you can also contact us at 1- 800-761-1787, and our experts will be there to assist you.
The user can install the QuickBooks database server manager by carrying out the steps below:
Also check out the following infographic image to understand the procedure of installation of QuickBooks database server manager:

Now that you are well-versed with the process to install and use QuickBooks database server manager, we believe that you might make the best use of this tool.
In case of any query regarding the same, or for any further information call us at 1- 800-761-1787. Our QuickBooks technical support team will get back to you with all the answers to your queries.
|
Метки: quickbooksdatabaseservermanager |
How to Create QuickBooks Desktop Company File? |
Do you know the a complete guide on how to set up a company in QuickBooks? Well, if not, then reading this post will help you in creating a QuickBooks desktop company file. The company file saves all of your financial information and grows with you. In QuickBooks, the user can save multiple company files for multiple businesses. Very easy business should have its own company file.
If you want to create a QuickBooks desktop company file , then make sure to read this post ahead. Or you can also call QuickBooks support team and seek for their assistance.
The user can use the business information to create the company file. The step by step process to create a new company file is as follows:

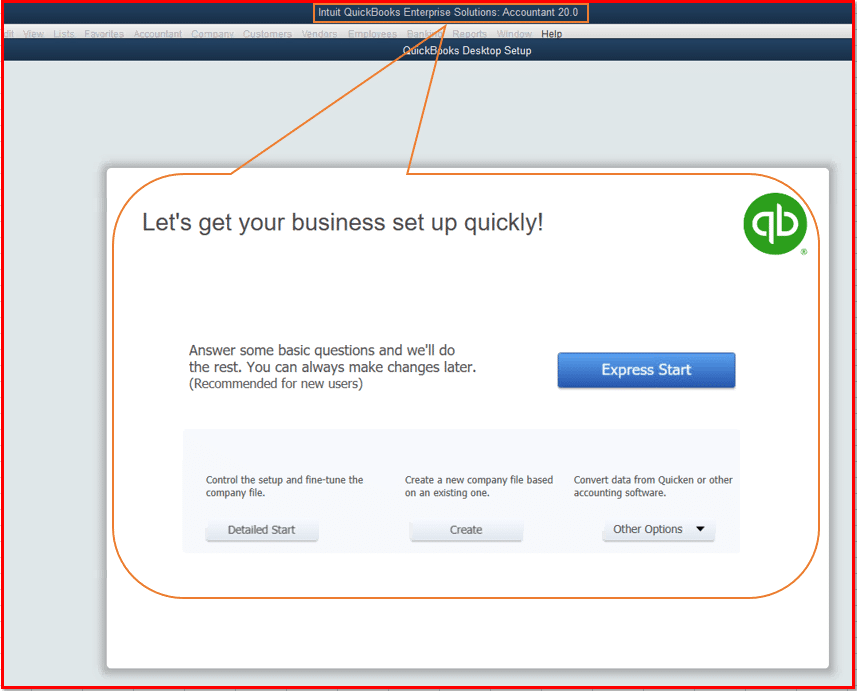
The user can start working in QuickBooks desktop, once done with that.
Now that you know the process to create a QuickBooks desktop company file , you can successfully create it. However, if you need any assistance, or if you have any query, feel free to get in touch with QuickBooks desktop support experts and certified QB professionals at 1-800-761-1787. The very supported team will be happy to help you.
You may also see: Features that are discontinued in QuickBooks Desktop 2022 and Enterprise 22
|
Метки: Createaquickbooksdesktopcompanyfile |


