Troubleshoot Outlook is missing in send forms preferences in QuickBooks |
There are several email alternatives that users can opt for, including Outlook, webmail, etc. In certain occasions Outlook might not be available when sending form preferences in QuickBooks. If you are facing the same issue, this article shall guide you towards fixing outlook is missing in send forms preferences in QuickBooks issue. So, read the article till the end.
• The current version of QuickBooks Desktop may not be supporting Outlook.
• There is no Outlook profile.
• QuickBooks Desktop may be out-to-date.
• The email configuration of outlook might be tampered with.
• Open the Control Panel.
• Visit Programs and Features.
• Here, uninstall MS Office and QuickBooks.
• Then, reinstall both of them.
• To activate both of them, make sure to provide the correct authentic license keys.
• Launch Outlook and head to the Help menu.
• Choose Microsoft Office Outlook in the Help tab.
• Check the version of Outlook ( check the version information and build number).
• Also, check the current version of Outlook set up on the system.
• Verify if the current version of QuickBooks supports the version of Outlook installed on the system.
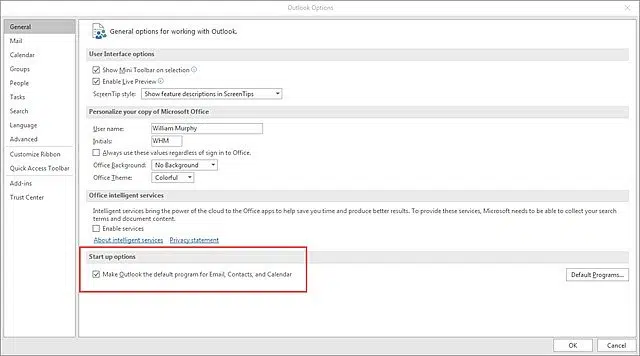
• Open Outlook and click on the File tab.
• Head to Options.
• On the Startup settings page, click on Make Outlook default software for email, contacts, and calendars.
• Open Outlook and head to Tools.
• After that, click on Options.
• Pick the tab labeled Other.
• Check the box next to the Make Outlook the default email program option under the General settings.
• Users may choose which QuickBooks profile to launch Outlook with each time in case of multiple QuickBooks accounts. If any account isn't configured as the default, QuickBooks won't be able to identify it.
• Choose an account and then pick the option to Set as default.
• Open Internet Explorer first.
• After that, go to Tools.
• Here, head to Internet Options.
• Click on the Programs tab.
• Now, perform the following instructions depending on the version of I.E.
• Click on Set Programs option.
• Click on configure your default applications option.
• Choose the email clients.
• Hit on the option to make Internet Explorer as the default browser, followed by hitting on Ok.
• Also, click on the option to use the existing Microsoft email program.
• To conclude, hit on Ok.
• Open Internet Explorer.
• Click on the Tools tab.
• Herein, choose Internet options.
• Next, choose the Programs tab.
• When using web-based programs, select Outlook as your email client.
• Click on OK.
• Choose Preferences from the Edit menu.
• Hit on the Send Forms option, then click on My Preferences tab.

• Log in to the email account under the Send email.
• Open the Control Panel.
• Choose Mail.
• After that, choose the Display Profile.
• After choosing Outlook, c lick on Always display this Profile.
· Search for the WIN.INI file.
· Right-click on it and click on copy.
· The next step is to paste the file in some other folder.
· Go to C:/ Windows and open the WIN.INI file.
· Go to [EMAIL].
· After that, hide the [Mail] section.
· Incorporate it at the file end.
· Notably, the text below should show up along with [MAIL].
o [EMAIL]
o MAPI=1
o MAPIX=1
• After that, run QuickBooks.
• Hit on the Edit tab.
• In the Edit tab, proceed to Preferences.
• Herein, choose Email Form Preferences.
• Open the Control Panel window.
• Head to Programs and Features.
• Choose Outlook, and then click on Repair.
• Click on Continue and wait for the repair to finish.
• Download the Office Uninstall Support Tool from the official Intuit website.
• Run "SetupProd OffScrub.exe," and install the tool.
• After that, select Outlook and uninstall it.
• Reinstall Outlook.
The walkthrough in this blog should be enough to help users fix Outlook is missing in send forms preferences in QuickBooks issue. You can call our experts anytime at 1 800 761 1787 if you require any more assistance with this matter.
|
|
Process To Create Invoice In QuickBooks Desktop |
In QuickBooks, the most viable method for creating invoices depends on the nature of the service you need to bill to your client. You can create an invoice in various ways: using a simple set price, a progress-based fixed price, or the initial cost of the job plus the time or materials.
Once you go for a desirable option, you can modify the invoice to reflect specific details or terms in your project's contract. This article will give users a detailed insight into the steps to create invoice in QuickBooks Desktop.
There are two methods for creating an invoice in QuickBooks Desktop – with and without a sales order. Both of these methods are enumerated within the purview of this section. So, make sure to still till the end.
The process to create an invoice in QB Desktop without a sales order is relatively hassle-free and involves the following steps:
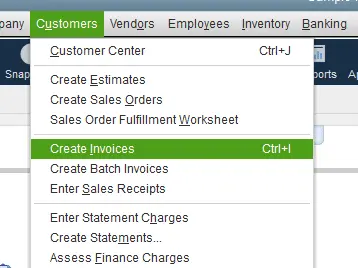
· Click on 'Create Invoices' from the home screen.
· Click on the customer and job from the 'Customer: Job' dropdown menu. To add a new customer or job, click on the 'Add New' option from the dropdown menu. Add and save your customer and job information and continue with your invoice creation.

· You can create different invoice styles for different types of customers and various segments of your business by using customizable templates. Before proceeding with your invoice, ensure that you select the correct template for this particular invoice.
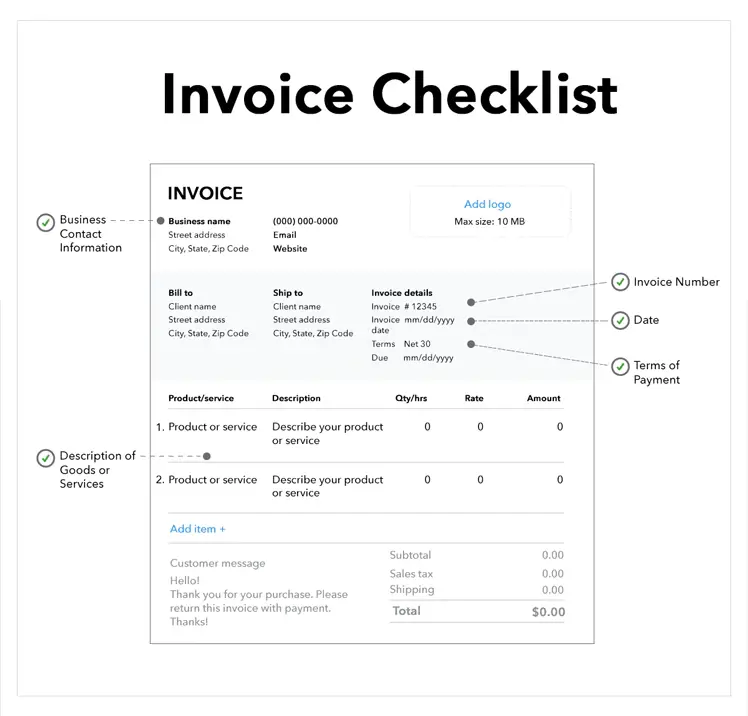
· Now set the following fields on the invoice:
o Date: Q.B. Desktop will set the date to the current date in most cases. Check if the date shown is the one you want on your invoice.
o Invoice number: It is automatically generated by QB Desktop. However, you can change it manually as well. While using an earlier used number, you will get a pop-up dialog box warning you that you are using a duplicate number.
o Bill to, Ship to: This information is occupied by the information in Q.B. Desktop for the customer you are billing. However, you can change it manually if the invoice needs to go to a different address.
o P.O. Number: Some clients require you to use their purchase order (P.O.) number on your invoices. You can enter that information manually here.
o Terms: You must choose the correct payment terms for your cash flow. This will dictate the number of days your client has to pay the invoice.
o Rep, Ship, Via, F.O.B.: These fields are opted for by a few companies only. The Rep field pertains to the sales rep responsible for the sales made to the customer. Ship indicates the date when the product was shipped. Via depicts the delivery method and F.O.B. (freight on board) relates to the product's owner during its transit stage.
o You can now enter the information for your customer's products.
o Add time/costs: While entering billable time into QB Desktop, you can automatically populate the invoice by selecting this icon.
o Quantity, item Code, description, price each, class, and amount: These can be manually entered. If the products are set in advance, you can select the Item Code for those products and save the considerable data entry. The fields including Quantity, Description, Price Each, and Class can be edited manually.
o Tax: Q.B. Desktop allows you to indicate the rate of sales tax against each item on the invoice. Select the correct sales tax code in the 'Tax' column of the invoice.
o Customer message and memo: The customer Message field can be created in advance. You can even enter a Customer Message on the invoice. The Memo field is created for each invoice manually.
o Customer tax code: Just as different products are taxed at different rates, a customer might face an issue during specific sales tax. The most common one is sales tax exemption. You can choose the correct tax code from the menu. This setting will apply to the whole invoice. If the code is not already in QB Desktop, you can enter it manually by selecting 'Add New' from the dropdown menu.
o Tax: The tax field is used for setting the tax rate for the invoice. It can be selected from the dropdown menu.
· You now need to select how you will send the invoice. For this, navigate to the top of the screen to see several options.
· If you want to print and email your invoice, choose an option under the print icon. You can print the invoice immediately, save it as a PDF or preview it.
· To email your invoice, click on the dropdown option under the email icon.
· You also can print or email the invoice later in a batch by clicking the checkbox next to the option you want.
· Finally, attach files to your invoice by clicking on the Attach File icon.
· Check if everything is correct. Once you review your invoice, click on the 'Save & New invoice' option. Do not click on the 'clear' option.
For creating an invoice from the sales order, follow the procedure mentioned below:
· Click on the 'Sales Orders' option on the home screen.
· In the 'Sales Order' form, use the 'find' button to locate the sales order you wish to create an invoice for, and click on the 'Create Invoice' icon.
· You can choose to create an invoice for all sales orders or selected items. Subsequently,click 'OK'.
· If you choose to create an invoice for selected items, you will see a new pop-up that allows you to choose what you want to invoice. Select the appropriate option, then click the 'OK' option.
· Proceed to the invoice screen. You can now edit and send the invoice.
Various clients require an estimate. If you use estimates in QB Desktop, convert them to invoices.
Creating an invoice from estimate is almost similar to creating an invoice from a sales order. However, there are some differences.
· Start by selecting the 'Estimates' icon on the home screen.
· You can invoice for multiple sales orders on one invoice in sales orders. However, you can only create one invoice per Estimate in this case.
· If you are using progress invoicing, you will be prompted to choose how much of the Estimate you wish to bill on this particular invoice. This process is similar to choosing sales order items to include on an invoice.
You may also read: How to Fix QuickBooks errors 181016 and 181021?
We hope that this article served your purpose and familiarized you with the various methods to create Invoice in QuickBooks Desktop.
|
|
How to Fix QuickBooks Multi-User Mode Error H505? |
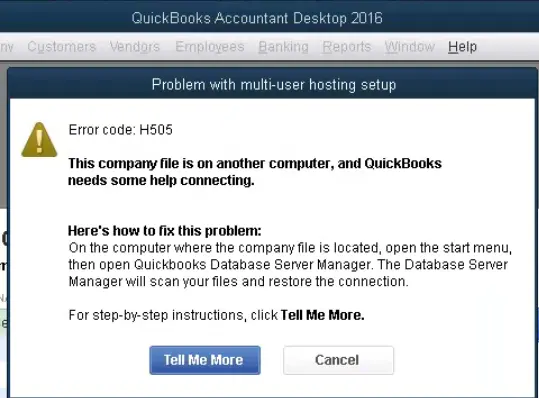
One of the many QuickBooks features is QuickBooks Multi-User Mode, which enables many users to access the same company file from various workstations connected to a network. It's just as easy to access the company file in a shared network as it is on your PC. However, an issue occurs when QuickBooks cannot open the company file for any reason and displays the QuickBooks error H507. If you're receiving an error message with the Error Code H505, read the entire article for thorough troubleshooting tips.
There are various H-series errors that can occur in QuickBooks, and the majority of these are caused by network problems that develop when you attempt to access a company file that is kept on a server. An H-series error appears on the screen if QuickBooks has trouble connecting to the server. When a user's computer running QuickBooks is unable to connect to the network computer containing the company file, an error message with the error code H505 is displayed. This error suggests that there are setup issues with the network that are preventing connections between many workstations in the network.
The causes of QuickBooks error code H505 include the following:
Look for these indicators to determine whether the QuickBooks issue H505 has affected your system:
In most cases, upgrading the QuickBooks application gives users access to an improved version while also fixing small issues and malfunctions. Therefore, implement this solution by carrying out the subsequent steps:
The error H505 can be resolved by relocating the company file.

The multi-user mode's problems and hitches can be resolved by adjusting your hosting settings. Follow these steps as a result:
Contact your IT department for more help with troubleshooting if some workstations are unable to receive all of the packets that are transmitted to the server.
Since network problems are the cause of QuickBooks Error H505, it's possible that you'll get the error again or that it won't go away even if you follow all the troubleshooting methods. For assistance and better support in these circumstances, we advise users to call us at 800 761 1787.
|
Метки: QuickBooks error H507 |
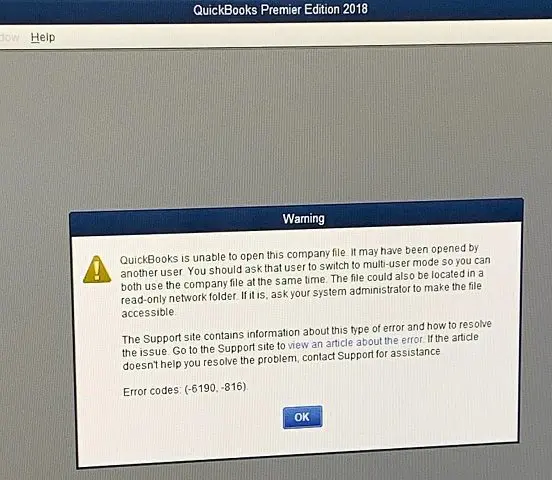
Ways of ousting QuickBooks Error 6190, 816 |
QuickBooks 6xxx series of error have been bothering users of the QuickBooks program, especially when they attempt to open or make changes to their company files. One such error belonging to the series is the QuickBooks error 6190,816. Getting this error rooted out is important as it might embolden some serious ramifications in your QuickBooks program. In this article, we will go over the solutions to QuickBooks error 6190 816.
• This error may be caused by some discrepancies between your Company file and .TLG files.
• Multiple users attempting to access a company file in single-user mode simultaneously.
• A damaged company file may potentially lead to this error.
• One of the other causes of Error 6190,816 is saving the company file in the read-only folder.
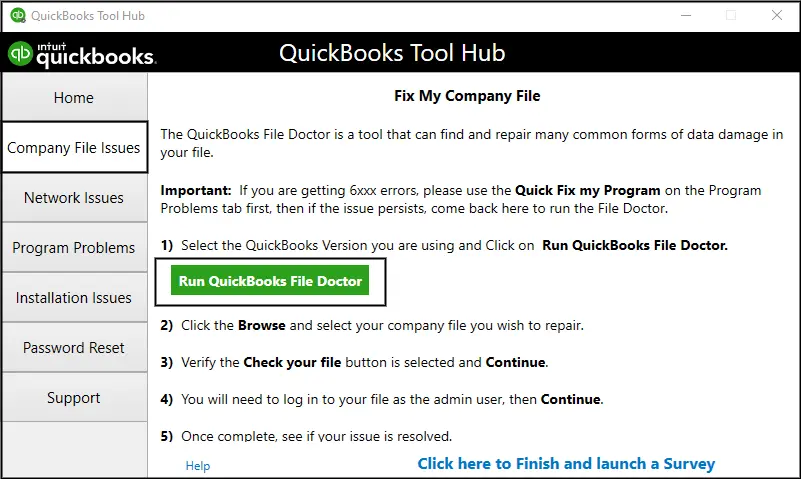
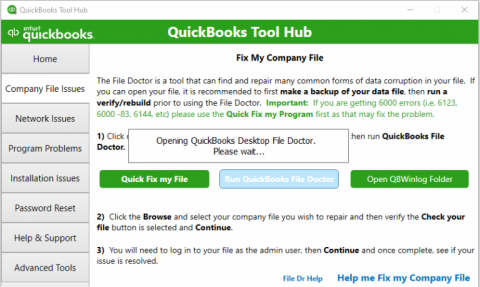
• Download the QuickBooks Doctor File Tool.
• Make sure to only download it from Intuit's official website.
• After the Tool Hub has been installed, select the option to access the Tools Hub, and then select Company File Issues.
• The user must then choose the option to Run QBFD.
• Browser and select the company file.
• Soon after, you will need to enter the correct QuickBooks login and admin password details.
• Now, press the Next button.
• Restart QuickBooks and view the Company file.
• Install QuickBooks Tool Hub.
• Then, open the Program problems tab.
• Within this, select the Quick Fix My Program option and let this feature scan and fix any QuickBooks-related issues, including those leading to Error 6190, 816.
• After completion, open the QuickBooks Company file and check if it is cleared off your computer.
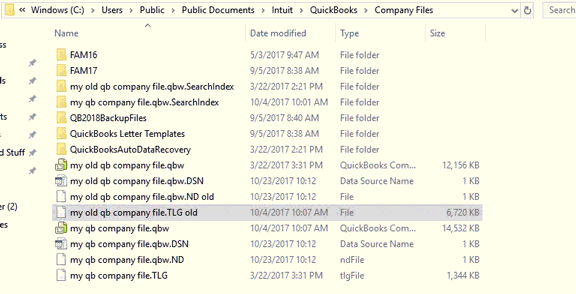
• Open the Windows File Manager and then go to the following location.
Drive: Users/ Public /Public Documents/Intuit/QuickBooks.
• When you are in the QuickBooks folder, search for the files with TLG and ND extensions at their end.
• Once the files have been identified, right-click on them and select Rename.
• After the filename you need to add .OLD.
• Finally, launch QuickBooks and then make sure that you do not face Error 6190 while opening the company files.
• Copy the file for your company from where it is located (press Ctrl + C to copy the file) to the local desktop (press Ctrl + V to paste the file).
• Then, fill up the correct fields to log into your QuickBooks account.
• Try opening your company file.
• Click on the Start button and search for ‘’Update’’.
• Now, click on Windows Update icon.

• Herein, click on the option to Check for Updates.

• Now, download the updates and once done, restart the PC.
• Upon restarting the system, these updates will automatically get installed on your system.
• Thereafter, launch QuickBooks Desktop and try to open the company file once again.
If you continue to experience QuickBooks Error 6190, 816, you can speak with our licensed QuickBooks specialists by calling us at the helpline 1 800 761 1787. To respond to client inquiries around the clock, our Team is constantly active at the back end.
|
|
Easy Methods for Rooting out QuickBooks Error 1935 |
The QuickBooks Error 1935 is one of the many installation issues that QuickBooks users have recently complained about. When you attempt to install QuickBooks in the Windows Startup mode, this technical error frequently interferes with the installation process. This error might occur due to corrupted Microsoft components including .NET Framework. A similar issue also arises with the installation of Windows systems. We will discuss the many causes behind QuickBooks error 1935 as well as possible solutions to fix QuickBooks error 1935.
· This problem may be caused due to a.NET Framework corruption.
· Corrupted files related to the MS Framework file.
· An incomplete installation of QuickBooks Desktop.
· Your PC may have been attacked by malware or a virus.
· Unintentional removal of crucial QuickBooks files.
· Corrupted or broken Windows system files.
· Background-running firewalls or security programs may be obstructing access to QuickBooks functionalities.
Follow the various solutions provided below to resolve this technical issue in QuickBooks.
Make sure the.NET framework and other Microsoft components are upgraded to the most recent versions first. These components are crucial for the smooth operation of QuickBooks, and any problems with them may result in any number of technical errors, including Error code 1935.
· From the Windows Start menu, you should execute a straightforward Windows update.
· Just search for ‘Update’ and then click on the Windows Update icon to open it.
· Then choose and download the most recent version of the Microsoft.NET Framework (version 4.5) for the system.

· Download the QuickBooks Component Repair Tool.
· Set up and run the tool.
· The process may take some time to complete.
· Restart your computer when it's completed, then launch QuickBooks.
· Verify that error 1935 has been repaired.

· Download and install the QuickBooks Install Diagnostic Tool.
· After the installation is finished, restart the computer.
· Click on the "Fix the Problem" button after launching the Diagnostic tool.
· Verify that the error has been corrected.
· Start by pressing Windows and R at the same time. This will open the Run box.
· The next step requires entering Regedit in the Run box.
· Subsequently, press the Enter key.
· The Windows Registry Editor will open up.
· Choose export from the file menu after selecting Error code 1935.
· The QuickBooks backup key has to be updated with the new name QuickBooks Backup.
· Prior to completing, don't forget to save the file with the ".reg" extension.
QuickBooks Desktop can be unable to connect to the Internet due to a firewall. This would consequently result in QuickBooks Error 1935. In this scenario, it's crucial that you set up your firewall settings and include significant QuickBooks-related files as exceptions.
· Disabling the firewall or antivirus software before upgrading the QuickBooks Desktop software is an additional feasible solution.
· Try updating QuickBooks Desktop once again after exiting the security program to check whether the error code 1935 has been fixed.
Having covered the different facets of QuickBooks Error 1935, we hope that the different troubleshooting measures helped you fix QuickBooks Error 1935. If you need any more help, just reach out to our experts at 1 800 761 1787.
|
Метки: QuickBooks error 1935 |
Getting QuickBooks Error 1638 resolved |
QuickBooks Error 1638 is an aberration in the QuickBooks program that gives a clear indication that the QuickBooks installation files may be damaged. However, poor internet connectivity can also cause this technical error to appear. Consequent to the appearance of this error, QuickBooks may stop responding to any user inputs and may shut down unexpectedly. The desktop screen may freeze, and you might other issues upon the arrival of this error code. To fully comprehend the causes generating this error and get familiarized with the various methods to fix QuickBooks error 1638, you should read this article all the way through.
• An incomplete or unsuccessful installation of QuickBooks.
• Your computer has been infected by malware or a virus.
• Firewall settings make it impossible for QuickBooks Desktop to operate uninterruptedly.
• Certain technical errors in the Windows Registry.
• Deleting crucial QuickBooks files.
• Close all programs and apps that are running on your device.
• After that, open the Task Manager (ctrl + alt + delete keys) and then close any unnecessary background processes.
• Then, tap on the Windows icon and then click on the search bar.
• Type Control Panel in the search bar and hit Enter.
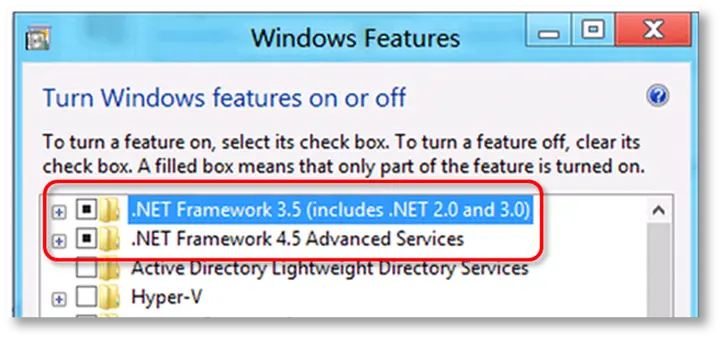
• Under Programs and Features, choose Turn Windows features on or off option.
• Choose the.NET Framework from the list of programs.
• Now, perform the following steps for .NET Framework 3.5 SP1 and NET Framework 4.5 or later:
• Make sure the box next to ".NET Framework 4.5 or later" is checked.
• If it isn't, check the box, click Save, and then restart your PC.
• If it is checked, uncheck it and then save the change.
• After that, check it again, and then turn the computer off and on again.
• Thereafter, open QuickBooks.
• QuickBooks Error 1628 should be fixed. If not, perform the next procedure.
• Download the most recent version of QuickBooks Tool Hub.
• The downloaded file (QuickBooksToolHub.exe) should be double-clicked to initiate the installation.
• Pay close attention to the installation instructions and agree to the terms and conditions.
• After the installation process is done, double-click the Tool Hub icon on your Desktop to open it.
• Choose the Installation Issues tab.
• Finally, choose QuickBooks Install Diagnostic Tool.
• Close the window when the tool is done analyzing and fixing the QuickBooks program. This could take a while.
• After that, restart your computer and see if the QuickBooks Error 1638got vanished.
Hold down the Windows and S keys at the same time.
• The initial step requires typing Control Panel into the search box.
• Then, go to Programs and Features and click on the option to Uninstall a Program.

• Choose QuickBooks Desktop from the list of programs.
• Click on Uninstall/Change and follow the on-screen instructions to uninstall the accounting program.
• The next step is to change the name of the QuickBooks folder.
• Right-click on the installation folder and select "Rename."
• Change the name of the file by adding .old to the end of the name.
• Now, reinstall QuickBooks.
• You can use QuickBooks Clean install Tool to accomplish this process without utmost ease.
This brings us to the end. We hope that the procedures for fixing QuickBooks Error 1638 helped you through. If you need any further help, you can call our experts at 1 800 761 1787 and get all your QuickBooks intricacies resolved.
|
Метки: QuickBooks error 1638 |
Different Methods To Fix QuickBooks Error 6147 |
Users may encounter QuickBooks error 6147 when they try to open company files or while attempting to restore backup files. This comprehensive blog post will answer all of your queries about how to fix QuickBooks error 6147. If you need help from our team of QuickBooks experts, you can call us at our dedicated helpline 1 800 761 1787.

• This error message could appear if the company file is broken.
• You may be using more than 210 characters in the name of the backup file.
• This problem could also be caused due to some issues within the Windows registry.
• QuickBooks Error 6147 may appear due to deletion of important QuickBooks files.
• First, download the QuickBooks Tool Hub and set it up on your system.
• Next, run the tool and head to the option to Run the QuickBooks File Doctor.
• Choose the suspected company file and then scan the file for any error using the file doctor tool.
• Close the File Doctor when the scan is complete.
• Finally, start QuickBooks and open the company file to check if QuickBooks Error 6147 got annihilated.
• The first step requires opening QuickBooks Desktop.
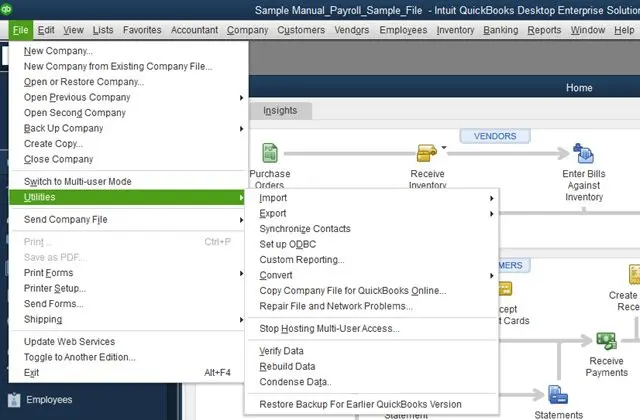
• Now, choose Utilities from the File menu.
• After that, turn off the Multi-User mode Hosting feature. If you see the option to Stop Hosting Multi-User in the next window, choose Yes.
• The company file will now close, and a new window will open. Again, on this window, you should tap Yes.
• After that, you will need to restore the backup file to a different location.
• Open QuickBooks again to see if QuickBooks Error 6147 is still showing up. If it is, then follow the instructions in the next method.

• First, find the folder that harbors your QuickBooks Company files. The folder can be located in the QuickBooks folder.
• Now, head to the Scan settings in Trend Micro Active Scan and choose the folder containing the Company files.
• Use the Micro Active scan to fix QuickBooks error 6147.
• At first, move to the QuickBooks folder.
• Look for the files with the .ND and .TLG extension.
• Choose the files individually, right-click on them and then hit the rename option.
• The next step is to add ‘.old’ at the end of the file name.
• First visit the QuickBooks folder.
• Herein, head to the company file folder.
• Look through the folder to find the ADR file.

· Once you find the file, right-click it and add the ADR extension to its name.
· Now, open QuickBooks, followed by opening your company files.
The information contained in this blog should help you fix QuickBooks Error 6147. Technical help is just call away. You can call us any time at the helpline 1 800 761 1787 and allow our experts to assist you in fixing all your QuickBooks-related issues.
|
|
How to Fix QuickBooks Crashing Issue? |

It is time to end this article. We reiterate our unending technical support for you. If you are still unable to fix QuickBooks keeps crashing issue, just give our ProAdvisors a call at 1 800 761 1787 and they will be more than happy to address your issue.
|
|
How to Manually Fix Microsoft .NET Framework Errors? |
In this article, we will be providing all the information that you need to fixing Microsoft .NET framework error manually, to keep the QuickBooks Desktop software up and running.
The steps given below should help you fix the issue related to the .NET Framework.


This article contained all the essentials for fixing Microsoft .NET Framework errors in QuickBooks, and we hope that this blog helped you get rid of the .NET framework-related errors in QuickBooks.
Meanwhile, if you need any support to take you out of any technical intricacies, then you should get in immediate contact with our QuickBooks error support experts.
|
Метки: fixing Microsoft .NET framework error manually |
What are the ways to get rid of QuickBooks Error 6130, 0? |


The malicious threats can change, delete, or damage QuickBooks files. So, we recommend that you run a full system scan to find and get rid of any dangerous viruses on the system.
The walkthrough provided in this article should help you in the process to fix QuickBooks Error 6130,0. If you need help from our certified team of QuickBooks experts, just call us at the helpline 1 800 761 1787.
|
Метки: QuickBooks error 6130 0 |
How to Resolve QuickBooks QBW32.exe Error? |
To fix this problem quickly, you should restart your computer. After doing that, open QuickBooks and check if the issue got rectified.
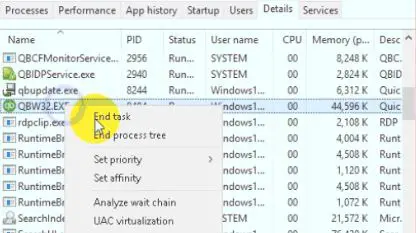


That bring us to the conclusion. This article should help you fix QuickBooks QBW.exe error. If you still come across this error, then all you need to do is call our certified professionals at the helpline 1 800 761 1787.
|
Метки: QuickBooks QBW32.exe error |
Approaches To Troubleshoot Login Issues in QuickBooks Online |
QuickBooks users have been facing certain login issues while using the Google Chrome web browser. The error that pops up obstructs users from using QuickBooks Online. This can be extremely annoying and can lead to unwanted delays in work submissions. We will go through this error elaborately and will also unfold the various approaches to fix login issues in QuickBooks online through Chrome. For live expert assistance, connect with us at the helpline 1 800 761 1787. Our QuickBooks professionals will aid you through the troubleshooting procedure.
• When you log in to QuickBooks Online on Chrome, you see a blank screen.
• Unexpected error while using Google Chrome to log in to QuickBooks Online.
• Problems logging in to QuickBooks Online due to a wrong version of QuickBooks Online on Chrome.
Follow the troubleshooting guidelines given below for an easy resolution of the various login problems in QuickBooks Online
• Right-click on the time and choose "Change date/time."
• Pick the right time zone, date, and time.
• Afterward, press the Enter key.
• Once you're done, try using Chrome to access QuickBooks online and see if the login error is gone.
To fix the problem where QuickBooks Online login issues, you need to make sure you have a seamless Internet connection. While using QuickBooks Online on Chrome if you get the error "Page cannot be found," try going to a different secure website, it reflects that you have an internet related issue. However, if the website loads, that means your Internet connection is working.
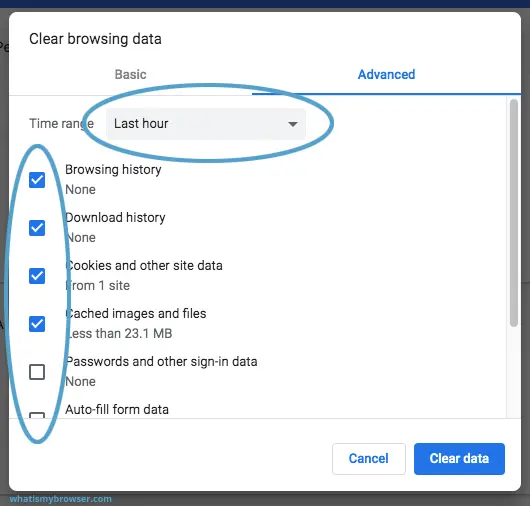
• While in Chrome, press the Ctrl, Shift, and Delete keyboard keys at the same time to open the Clear Browsing Data window.
• Choose "All Time" from the "Time range" drop-down menu.
• Choose the options for Cookies and other site data and Cache images and files.
• To finish the process, click on the Clear Data option.
• Click the "Start" button, then type "Internet Options" into the search box.
• Double-click on Internet Options, then click on the Security tab.
• After that, click on Internet and move the slider to the medium-high position.
• To finish, click the Apply button and then the OK button.

• Start the Google Chrome web browser.
• Press Ctrl, Shift, and N together to start the incognito mode.
• Alternatively, click on the menu and then choose the "New Incognito Window" button.
• Once the private window opens, you can sign in to QuickBooks Online to see if it is successfully signing in without any errors.
• When you click the three dots in the top right corner of the Google Chrome window, you should be able to see a list of options. You must choose "Users".
• After that, click on the option to Manage users and then choose the "Add Person" option.
• After that, type in the user name.
• Next, click "Create" to add a new user.
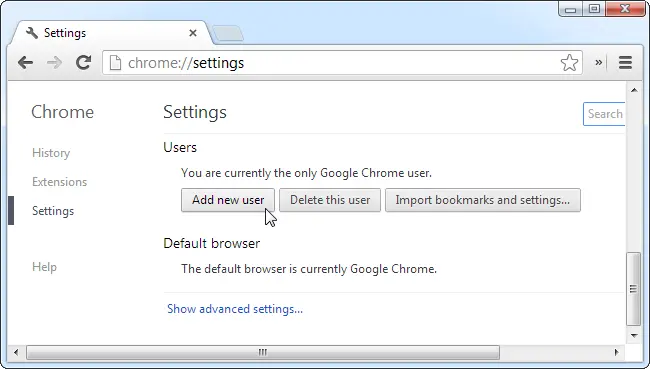
• A new user shows up in the upper left corner of the Chrome window when it is created.
• Subsequently, switch to the new user, and then try to get into your QuickBooks Online account.
That was all related to the different methodologies you should adopt to fix login problems of QuickBooks Online on Chrome. If you need assistance from our certified experts, just give us a call at our helpline 1 800 761 1787.
|
Метки: login issues in QuickBooks online |
Different Approaches To Unfreeze QuickBooks Desktop |

You should implement the troubleshooting guidelines given below to resolve freezing issues encountered while using QuickBooks Desktop.
![]()

That’s all about the different avenues to unfreeze QuickBooks Desktop. If you face any other issues while using QuickBooks, just give us a call at our dedicated helpline number 1 800 761 1787. Our experts will address all your queries in no time.
|
Метки: unfreeze QuickBooks desktop |
Guidelines to Fix QuickBooks Error 6000, 82 |

Perform the solutions given below to fix this error in QuickBooks.


The contents of this article should help you fix QuickBooks Error 6000, 82. If you keep facing issues related to this error, just ring our experts a call at 1 800 761 1787.
|
Метки: QuickBooks error 6000 82 |
How to Fix QuickBooks Payroll Error PS036? |
If you use the software QuickBooks Desktop, you might come across the QuickBooks Payroll Error PS036 while setting up the most recent tax table. It is one of the most common issues that come up when using QuickBooks and can be ascribed to certain noteworthy reasons. When a payroll subscription is not being used, or if some important data in QuickBooks is broken/corrupted, then you may encounter the QuickBooks payroll error PS036. Read this article all the way through to find your answers for fixing this error. You can call our QuickBooks experts at the helpline 1 800 761 1787 to get unwavering guidance.
The various methods for resolving QuickBooks Error PS036 are given as follows:


This article unraveled all the relevant methods for troubleshooting QuickBooks Payroll Error PS036. Hopefully, the error should be resolved on your system after conforming to all the above mentioned methods. For further assistance related to the error, you may call our certified experts at 1 800 761 1787.
|
Метки: QuickBooks payroll error PS036 |
Ways to Fix QuickBooks Multi-User Not Working Error |
When important services for QuickBooks Multi-User, like QBDBMgrn or QBCFMonitorservice, cease to work, users run into many technical issues. These issue show up in the form of different error codes like including H202, H505, or H303. Due to these errors the multi-user mode of QuickBooks could stop working or might crash. QuickBooks multi user not working error can be fixed by following the guidelines laid in this article. If you need our expert help in guiding you through the issue, you may call us at 1 800 761 1787.
The major instigators of the Multi-user error in QuickBooks are given as under:
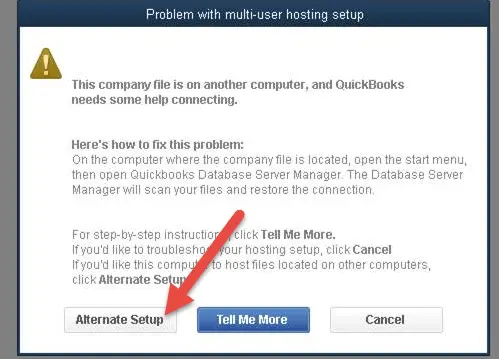
• The multi-user error can show up if QuickBooks isn't on the server PC.
• If the network hosting setup is turned off, the multi-user mode won't work.
• If the Firewall is obstructing the network access to QuickBooks, then also this error may show.
• When the database server is facing some issues and can't open the company file, the multi-user mode is inaccessible and shows the error message.
• Insufficient permissions.
The various troubleshooting approaches to get this error fixed are given as under:
• Shut down the QuickBooks program.
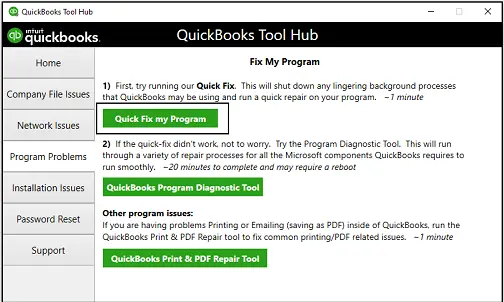
• Get the latest version of the QuickBooks Tool Hub.
![]()
• Follow the instructions on the screen to put the Hub utility on your computer.
• If you are using a 64-Bit operating system, you must install the QuickBooks Tool Hub for 64 Bit.
• If the problem with your program is caused by a broken part, you should first try QuickBooks Quick fix my software.
• At this point, you need to launch the Intuit Tool Hub.
• Then, in the left navigation pane, click on Program Problems.
• Click on Quick Fix My Program from the menu.
• When the process is done, tap the OK button.
• If the QuickBooks fast fix my application doesn't work, you should do the steps below.
• Click the Run QuickBooks File Doctor Tool button in the Company File Issues section.

• You can use the Browse and Search button to find your company file.
• Choose Check your file from the menu, then tap Continue.
• When asked, enter your password, and then click Next.
• It will then start the scanning process, which takes time and depends on how big your files are. When QuickBooks multi-user aborts linked to company files happen, the software diagnoses and fixes them automatically. If the problem still exists after the scan, make sure the folder permissions are set correctly.
• Open Windows Explorer on the computer that is your server.
• Hit on the right button of your mouse after hovering the same over the company file folder.
• Click on the Properties button to see the Security tab.
• Under "Advanced," choose QBDataServiceUserXX.
• Choose Edit from the menu.
• Grant all the necessary permissions.
• To get to the Appdata folder, you must go to the location and type App data in the search box.
• The desktop version of QuickBooks is at C:/Users/(your user name)/AppData/Local/Intuit.
• If you can't find the AppData folder in the users' folder, you will need to show the hidden File.
• Look for "MULTIUSERMODE."
• Put Y (MULTIUSERMODE=Y) on the Multiuser mode line.
• To save the QBWuser.ini file, press Ctrl + S keys.
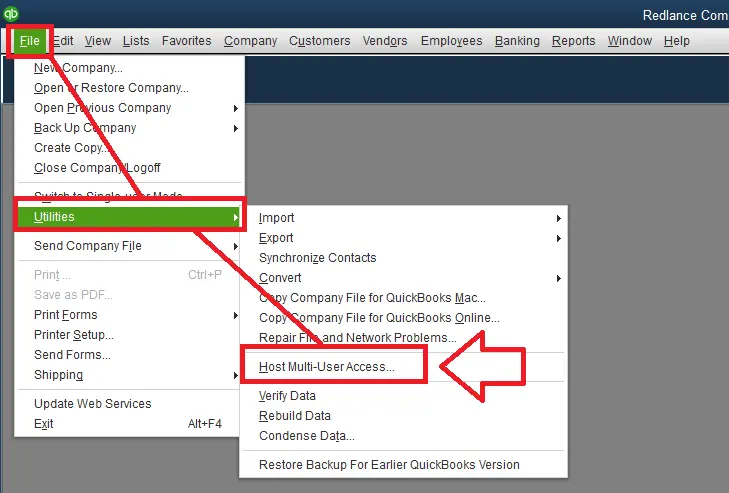
• Choose Utilities from the File menu.
• Then, choose the option to Host Multi-User Access.
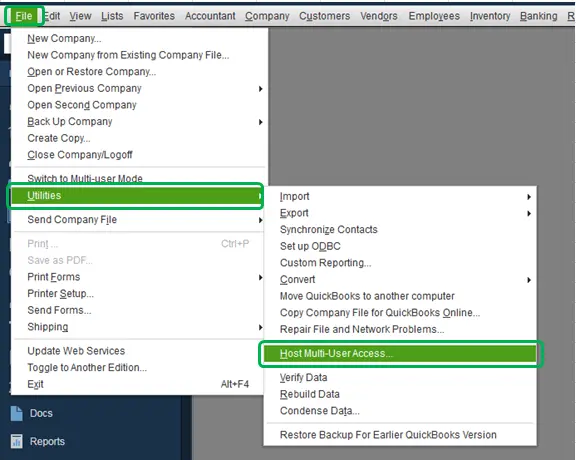
• Click "Yes" to agree with the changes.
• Important: To avoid getting the HXXX series Error code, make sure that the Host multi-user mode is turned off on all workstations.
• Go to the location where the company file is stored.
• The folder C:/Users/Public/Documents is where you can find Intuit, QuickBooks, and Company Files.
• Right-click the .ND and.TLG files.
• Choose the rename button to add the.OLD extension to each file.
• After you restart the PC, start QuickBooks in multi-user mode.
• Press the Windows key.
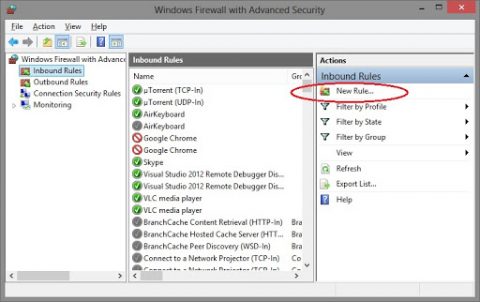
• Type "Windows Firewall" into the search box to find the Windows Firewall setting.
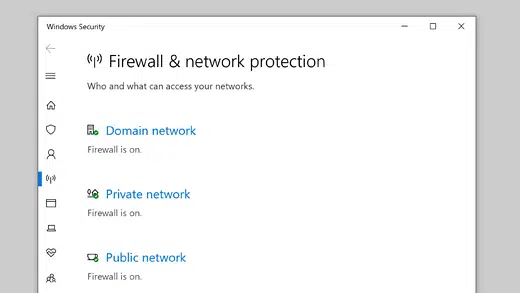
• Choose Firewall advanced options from the list on the left.
• Move to the Advanced options.
• After choosing Inbound Rules, click the New Rules button.
• In the New Rules window, after you choose Port, choose TCP.
• Depending on the version of QuickBooks you are using, add the Port.
• The outbound rules need to be taken out, but the actions from before need to be done again.
o If you are a QuickBooks Desktop 2019 user, then type 8019, XXXX.
o For QuickBooks Desktop 2020, enter 8019, XXXX.
o Type port Numbers 8019, 56728, and 55378–55382 for QuickBooks Desktop 2018.
o Type port Numbers 8019, 56727, and 55373-55377 for QuickBooks Desktop 2017.
• Add QuickBooks to the Firewall.
• All of the steps above are the same, except this time we won't choose a port. Instead, we'll add QuickBooks Program to our inbound and outbound firewall rules.
• Choose New Rule from the list of advanced firewall settings.
• This time, choose the application and then go to the directory where the software's executable File is.
OnlineBackup.exe — IntuitSyncManager.exe — QBUpdate.exe — QBLaunch.exe —QBCFMonitorService.exe — QBServerUtilityMgr.exe — QBDBMgrN.exe — QBW32.exe QuickBooksMessaging.exe — FileMovementExe.exe — FileManagement.exe — DBManagerExe.exe Dbmlsync.exe — AutoBackupExe.exe
• Add QuickBooks to the Firewall.
• All of the steps above are the same, except this time we won't choose a port. Instead, we'll add QuickBooks Program to our inbound and outbound firewall rules.
• Choose New Rule from the list of advanced firewall settings.
• This time, choose the application and then go to the directory where the software's executable File is.
While we reach to the end of this blog related to fixing the QuickBooks multi-user not working error, we hope that the instructions entailed herein helped you in troubleshooting this error. For further help, you should call our helpline at 1 800 761 1787.
|
Метки: QuickBooks multi user not working error |
Leading cause for QuickBooks error 15311 |
Are you finding issues with QuickBooks error 15311? It is a suitable place for you to understand the problem regarding the error and an easy procedure to terminate the error from your system. Similar to other runtime errors, it also appears due to the lag or slow processing of the QuickBooks application. Don't worry; this error is fixable. Sometimes it becomes irritating for the users as they do not get a proper response from the system. Also, we are often unable to detect the error at the Initial Stage.
Later, when users find an error notification on the screen with QuickBooks error code 15311, it takes a whole procedure to fix the error. Hence read the instruction carefully and follow the procedure step by step to Eliminate error 15311.
|
Метки: QuickBooks error 15311 |
Дневник rj933296 |
|
|
| Страницы: [1] Календарь |


