Без заголовка |


Materials:


Row 1: Continue working along the shorter side of the bands as shown. Ch 1 ( not a st here and throughout), (1sc, sc2tog, 1 sc) across the edge of each of the 4 bands. Turn. ---------------12 sc
Row 2: Ch 1, *1 sc , sc 2tog, repeat from * till end. Turn.--------------8 sc
Row 3: Ch 1, 3 sc, sc2tog, 3 sc. Turn-------7 sc
Row 4- 14: ch 1, 1 sc in each st across. ------------7 sc
Fasten off after Row 14. The sc part will now be 3 ½ inches long.


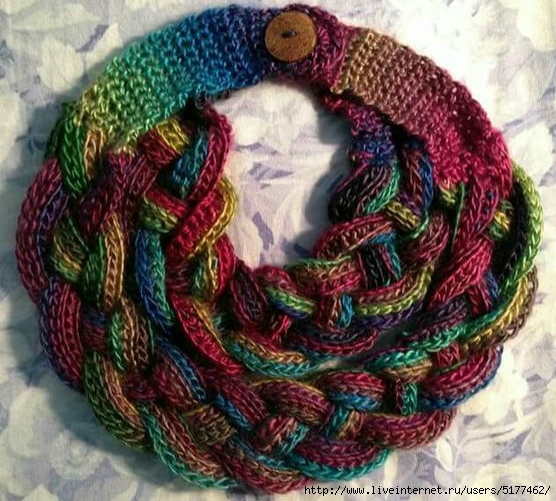
Arrange the shorter sides of the strips as shown, join yarn at the corner of the first band, and proceed to work a sc band along the sides of the 4 bands, following Rows 1-14 above. Fasten off. One layer of your braided cowl is done now. Thread 1 ½ yards of yarn and sew the braid ( on the back side) to hold it in place. Make sure you don't make the stitches too tight. You only need to stitch at places where the bands cross each other. This will make your cowl hold its shape better.
To make the second layer of braid , Ch 86 and follow the same pattern for the first braid. For the sc bands on either side repeat Row 14 three more times rows. So you will have 17 rows in total and it will measure 4 ½ inches. Fasten off. Thread 1 ½ yards of yarn and sew the braid ( on the back side) to hold it in place. Make sure you don't make the stitches too tight.

Row 1: Now place the longer braid over the shorter one and align the edges of the sc bands. Start with the sc bands on the left side. Working through both the layers , sl st to the first st, ch 1 (not a st), 1 sc in each st across. Turn. ------7 sc
Row 2- 3: Ch 1 ( not a st here and throughout) , 1 sc in each st across. Turn.-----7 sc
Row 4: Ch 1, 2 sc, ch 3, 2 sc. Turn.
Row 5: Ch 1, 2 sc, 3 sc in to ch-3 space, 2 sc. Turn.------------Button hole made.
Row 6: Ch 1, 1 sc in each st across. Turn.-----7 sc
Row 7: Ch 1, skip next 2 st, 6 dc in next st, sl st to last st. Fasten off.
Work on the sc bands on the right side now!
Row 1: Working through both the layers , sl st to the first st, ch 1 ( not a st), 1 sc in each st across. Turn. ------7 sc
Row 2-6: Ch 1, 1 sc in each st across. Turn.-----7 sc
Row 7: Ch 1, skip next 2 st, 6 dc in next st, sl st to last st. Fasten off.
Finishing:
Weave in any tails left. Sew on a big button on the right side of the cowl.

Серия сообщений "вязание крючком для полных женщин":
Часть 1 - ажурный джемпер
Часть 2 - ажурная туника
Часть 3 - Ажурное пальто большого размера
Часть 4 - Без заголовка
| Комментировать | « Пред. запись — К дневнику — След. запись » | Страницы: [1] [Новые] |


