How to Age Paper |
Hey all my favorite crafters. It’s Rebecca, from The Bookery, back today with a simple and easy Mixed Media technique tutorial – How to Age Paper! Don’t you just love to make new paper look old? Below are some great Aging Techniques using a household staple – Shoe Polish! I know nothing is safe when an artist gets an idea. But, Shoe Polish? Yes. Now you can raid the shoe shine kit for art supplies.

Aging Paper is probably one of the top five techniques we use here on The Graphics Fairy. The exquisite ephemera and images lend themselves beautifully to all sorts of aging and distressing techniques. I bet you have a few favorite techniques on How to Age Paper and more than a few tools to accomplish them with. Am I correct? WINK!
According to the Dictionary, “Aging is the process of change in the properties of a material occurring over a period of time, either spontaneously or through deliberate action.” That is exactly what I will teach you below: How to Age Paper through a deliberate action known as Age Staining. Shoe polish is, by far, my favorite way to age, distress, and stain paper. Below, I am sharing all my experiments and tips with you for this amazing way to age paper with this waxy jewel. You can also learn several optional methods of Distressing Paper in my Paper Craft Series and in the Ancient Parchment Technique HERE!

Of course, this type of aged paper makes an exquisite technique for greeting cards, scrapbook layouts, junk journals, and all sorts of mixed media projects. I stumbled upon a blogger who uses shoe polish to age everything from tin to picture frames to decoupage images. Just like us, she loves to give an antique look to her work. So my wheels started turning about how to best teach you my favorite aging techniques.
Distress inks are lovely products, but they are fairly expensive. Especially if you get all the colors! Coffee and tea, walnut stain, and stamp ink pads are messy to the max. I know some people even burn the edges of paper, but that can be hazardous. So I am delighted to introduce you to the shoe polish method of aging and distressing paper.

Honestly, I must admit that I am all thumbs when using the standard ink pad method of aging paper. I usually make a mess that needs repaired or redone. UGH! I truly have more control and ease as to where the product goes with these technique. The polish goes exactly where I want and smoothes into the paper with creamy elegance. On the left is an example of a previous attempt to age a piece of ephemera. It’s okay. At the right is the same piece with the Shoe Polish Distressing Technique. WOW…that is some difference, isn’t it?

I have a few different ways of applying the shoe polish to share with you today. I hope you have a can or two of shoe polish and will join me. The best part of this is that you only need a few supplies. Here are the Step-by-Step directions on How to Age Paper.
Best of all, Aging Paper with Shoe Polish can be done with just a few ingredients. And you probably already have most of them.

Shoe Polish – Brown, Black, Neutral/Clear, White
Shoe Polish Sponges
Makeup Wedges
Stencil Brush
Old Rag
Ink Blending Applicators
These sponges do a great job with shoe polish on edges and across the paper for spots of age. Just rub it on, especially along the edges of the pieces of torn paper where it creates nice and dark aging. A Word About Drying – I found that the polish dries almost immediately. Now this is based on how much you apply, of course. I used small amounts (a little goes a long way). After just a few seconds (maybe 10-15) I found it was pretty much set and would not move or manipulate any further. It will not rub off!!!

The finished tag using the Drag Over the Edge Method to Age Paper. This gives a fairly crisp edge and stays on the edges.

The finished tag using the Rub the Edge Method to Age Paper. This is a little softer edge look with the color moving farther into the paper.


The finished tag using the Rub Around the Edge Method to Age Paper. This is the softest look of all for edge aging.

TIP: I actually prefer makeup sponges to blend or rub the shoe polish on the paper in various places until the desired color is achieved. I use a circular or swiping motion with what is left on the sponge after doing the edges. A light coat can really change the appearance of a paper, which I love! This pink receipt looks beautiful with random areas of aging applied to the edgrs and the body:

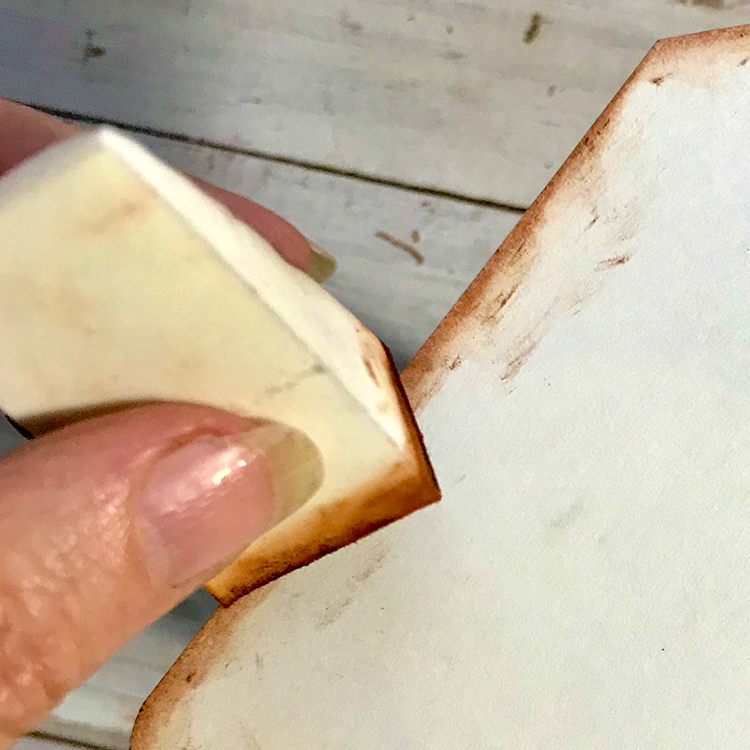
These little wonders do an amazing job with shoe polish on edges and across the paper for spots of age. TIP: The sponge is pretty dense and stiff and allows for a lot of control at the edges. As a control freak, I actually prefer them because they make me look like an expert paper distresser. Just load the sponge with a little polish and apply. I hold the paper in my left hand and gently scrape over the edges in a downward motion with the sponge to distress the edges. WOW! For me this is by far the easiest way to distress edges of paper!! And these small dense shoe polish sponges are my new favorite distressing tool.

The finished tag using the Drag Over the Edge Method to Age Paper. This gives a crisp color stain close to the edge.


The finished tag using the Rub the Edge Method to Age Paper. This gives a very random look and feel to the edges.


The finished tag using the Rub the Body of the Paper Method to Age Paper. This gives an overall age to the entire piece of paper.

I love how this technique looks on the edges of a piece of paper that has been torn. It accents the fibers of the paper beautifully! You can see this below:

I like this method for its subtle, wispy effects. You can actually see the brush strokes. TIP: Too much polish can be a disaster. Gently rub in a circular pattern along the edge of the ephemera. Most of the polish will be on the scrap paper. TIP: Reserve the stencil brush specifically for this technique. Clean it with baby oil and store it with the shoe polish! I adore how this looks when the paper is torn, as you see in the top right image below.


The finished tag using the Rub the Edge Method to Age Paper. This offers a very soft rustic and jagged look to your papers. I love seeing the brush marks.


The finished tag using the Drag the Edge Stencil Brush Method to Age Paper. This gives a more crisp and wispy look to the edges of your papers.


I use Baby Oil and baby Wipes to clean my tools for these methods. The shoe polish contains wax and oils. TIP: Reserve the tools you use for working with shoe polish specifically for these methods. I store mine in a zip bag with the shoe polish. It is handy and my tools are always with the polish!
Want to age the edges of your junk journal pages? This is the way to do it. Use the Stencil the Edge Method above to achieve this look. Does it get any better than this?

After everything is glued down, you can apply shoe polish like paste wax over the entire surface to age and stain it! Wait a few minutes and polish it with a soft rag. Voila! The dark shoe polish rests in the nooks and crannies, accenting each piece.
I don’t have any of this yet, but my mind is exploding with ideas for creating a chalky appearance over ephemera and artwork. I will be sure to use this on a future project and share it with you!
TIP: Remember to scan any of the aged papers for use in future projects!
Hopefully you had fun exploring the wonderful world of How to Age Paper with Shoe Polish Distressing Techniques for Mixed Media with me!! I also create Photoshop Elements tutorials and craft project videos over on The Graphics Fairy Premium Membership site. You can find even more of my books, art, and whimsical shenanigans on The Bookery
| Рубрики: | РУКОДЕЛИЕ_РУКОТВОРЧЕСТВО/скрапбукингПолезные советы, инструкции и идеи для скрапбукинга |
| Комментировать | « Пред. запись — К дневнику — След. запись » | Страницы: [1] [Новые] |


