 |
|
���������� ������-�����
�� ������������ ����� �
�������� �������
DIY ������ - ��� ������������
������ ��������
�������� �� ����������
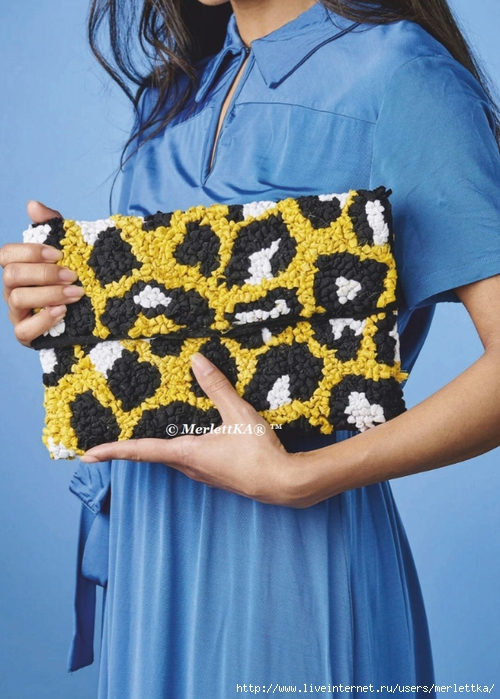
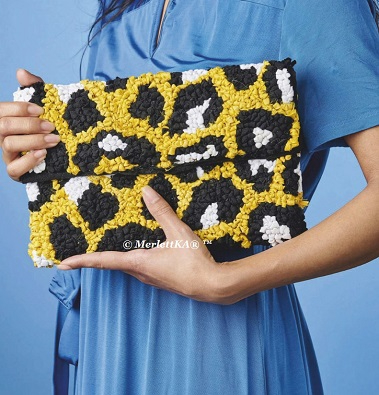
Choose to re-use
Repurpose scrap materials to
create Elspeth Jackson’s rag
rug clutch bag
|

A cute, modern clutch bag via a so-retro-it’s-cool method? Tick x 2.
Bringing rag rugging back, this project transforms old garments into your new favourite bag – make it personal to you, using whatever colours or patterns take your fancy.
You’ll use roughly half a medium-sized ladies T-shirt in each of the colours, so use that as a guide to your fabric quantities.
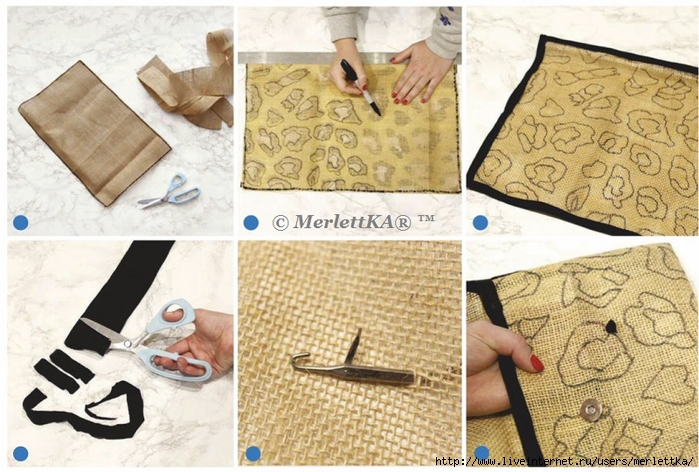
01 Draw a 55 x 28cm (215/8 x 11") rectangle onto the hessian.
Sew a short, wide zigzag stitch along the drawn line to help prevent the fabric from fraying, then cut the rectangle out around the seam.
02 Place the template from page 84 under the hessian. Using the fabric marker, trace the leopard-print shapes onto the fabric.
03 Cut two 59cm (23 ") lengths of bias binding and two 30cm (117/8") lengths.
Place each piece next to the corresponding edge of hemmed hessian, then sandwich the hessian edges between the strips of bias binding and pin in place. Sew the binding around each edge using two rows of running stitch, tucking one length of binding underneath the other at each corner for a neat finish.
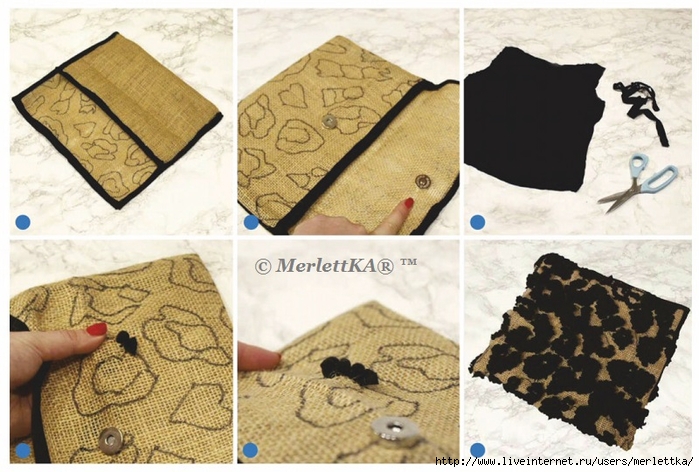
04 Place the hessian right side (RS) up, then fold one short edge in towards the other by 30cm (117/8"), with RS together. Pin the two overlapping edges along the bias binding, then sew.
05 Turn the sewn pouch RS out, then measure and mark a point 10cm (4") up from the bottom of the bag, keeping it central. Secure the back of the magnetic fastening in place at that point, following the manufacturer’s instructions. Fold down the front flap of the bag, mark where the front part of the fastening should sit, and attach it in the same way.
06 To make the fabric for the rag rugging, break down the T-shirts, or items of clothing, into flat pieces by cutting off and setting aside any seams, collars, zips or hems.
07 Working along the length and always folding in the same direction, fold each block of fabric in half, then in quarters, then in eighths, so the fabric forms a tube. Cut through the multiple layers of the tube to create strips roughly 1cm (3/8") wide – these don’t need to be completely straight.
08 Rag rug all the black areas of the pattern first, starting along the outer line of one shape. Push the latch hook into a hole in the hessian from the front to the back. The latch should be just on the underside of the hessian.
09 Place the end of a black fabric strip into the hook, close the latch, then pull the end of the fabric to the front of the hessian. Detach the latch hook from the fabric.
10 Following the shape outline, miss out two strands in the hessian, then push the latch hook into a hole from the front of the hessian to the back again. Hook the fabric strip and pull a small loop to the top of the hessian – the loop should be approximately 0.5-1cm ( -3/8") high. Detach the latch hook from the fabric.
11 Continue in the same way to complete the outline of the shape, missing out two strands of hessian between each loop and the next, then repeat to fill it in. At the end of each fabric strip, pull the end to the top of the hessian and trim it to the same height as the loops to disguise it. Occasionally check the back of the rag rugging as you go – it should always be flat and neat.
If there are any lumps and bumps on the underside, find where they are, pull the excess fabric to the top and snip it to the same height as the other loops.
12 Repeat Steps 8-11 to fill all the black areas of the pattern, then repeat using the white fabric. The piece will only come together at the very end, so don’t worry about it looking messy during the process. Once the black and white sections are complete, fill in the yellow to finish