HOW TO MAKE AMIGURUMI GIRAFFES
MATERIALS
QDrops Cotton Light yarn, 50% cotton/50% polyester, 50g/105m per ball; one ball in Mustard (36) (Yarn A)
QDrops Safran yarn, 100% cotton, 50g/160m perball; one ball each in Yellow (10) (Yarn B), White (17) (Yarn C), Cerise (55) (Yarn D) and Peach (12) (Yarn E)
Q3.5mm (UK 9, US E/4) crochet hook
Q2.5mm (UK 12, US C/2) crochet hook
QTwo pairs of safety eyes, 0.6cm ( ")
QEmbroidery thread in brown, light brown and pink
QYarn needle
QStitch markers
QSoft toy stuffing
TENSION
Tension isn’t important, just make sure the stitches are dense enough so the stuffing doesn’t show through
ABBREVIATIONS (UK) st(s) stitch(es)
ch chain
ss slip stitch
dc double crochet
htr half treble
tr treble
yrh yarn round hook dc2tog double crochet 2 together – (insert hook in next st, yrh and draw loop through) twice, yrh and draw through all 3 loops on hook
magic ring to make a magic ring, hold yarn in your hand and wrap working yarn around forefinger twice to create ring, slip ring off your finger and insert hook to pick up first st, ch1, then work the necessary sts for Round 1 and close the ring by pulling the loose end
FINISHED SIZE
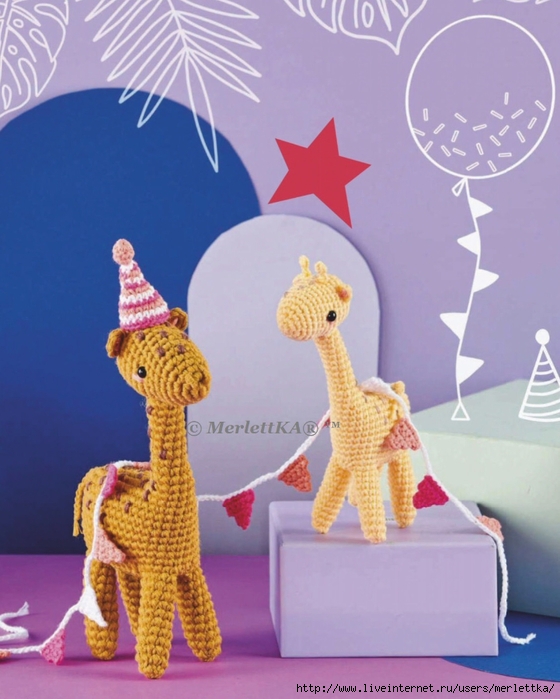
Big giraffe – 20cm (77/8") tall (horns included)
Baby giraffe – 16cm (63/8") tall (horns included) Bunting – 65cm (255/8") long
Just when you thought an amigurumi giraffe was the cutest thing you could craft, throw in a baby, set up a party and watch the cute-o-meter fly off the chart.
Ilaria’s designed this pattern to be used with any yarn you like, so both mama and her little ’un are worked in the same way – they just use different weight yarns.
The chunkier the yarn, the bigger the giraffe, so why not scale it up for a supersized version? Just make sure to use the right hook size.
Instructions
Most of the pattern is worked using the amigurumi method. Work in a continuous spiral without closing off the round with a ss.
Use a st marker in last the st of each round, moving it up as you work.
For the giraffe, the body and legs are worked in one piece starting from the neck, and the belly is worked in rows and stitched to the last round of the body and around the top of the legs. The head, ears, horns and tail are made separately and sewn onto the main parts.
The spots and nostrils are stitched onto the body at the end using simple embroidery stitches.
The pattern uses concise crochet terms, for example 6 dc means work 1 dc in each of next 6 sts.
Giraffe
For the big giraffe, use Yarn A and a 3.5mm hook. For the baby giraffe, use Yarn B and a 2.5mm hook
Head
Start with a magic ring
Round 1 ch1 (does not count as st), 6 dc into the ring, pull tight to close [6 sts]
Round 2 (2 dc in next st, 1 dc) three times [9 sts]
Round 3 (2 dc in next st, 2 dc) three times [12 sts]
Round 4 (2 dc in next st, 3 dc) three times [15 sts]
Round 5 (2 dc in next st, 4 dc) three times [18 sts]
Rounds 6-8 1 dc in each st around Round 9 (2 dc in next st, 1 dc) three times, 12 dc [21 sts]
Rounds 10-14 1 dc in each staround
Insert the safety eyes between Rounds 9 and 10, approximately 9 sts apart on both sides of the increase section of Round 9 – this is the lower part of the head that’ll be sewn to the neck. Use the image as a guide. Stuff the head and continue stuffing as you go
Round 15 (dc2tog, 5 dc) three times [18 sts]
Round 16 (dc2tog, 1 dc) 6 times [12 sts]
Round 17 dc2tog 6 times [6 sts] Break yarn and fasten off
Thread the yarn needle with the yarn end, pass the needle into each front loop of the last round, then pull tight to close and weave in the end
Ears (make two)
Start with a magic ring
Round 1 ch2, 3 tr into the ring, ch2, ss into the ring, pull tight to close [3 sts]
Break yarn and fasten off, leaving a long tail for sewing
Horns (make two)
Foundation ch5
Row 1 starting in 2nd ch from the hook, 1 htr, 3 ss [4 sts]
Break yarn and fasten off, leaving a long tail for sewing
Body and legs
Leave a long piece of yarn before starting the chain – the body starts at the neck, so this’ll be used to sew the head later
Foundation ch10, ss in first ch to join into a ring
Round 1 1 dc in each ch around [10 sts]
Rounds 2-9 1 dc in each st around [10 sts]
Round 10 (2 dc in next st, 4 dc) twice [12 sts]
Round 11 1 dc in each st around Round 12 ch11 (this is the spine of the giraffe), starting in 2nd ch from the hook, 10 dc, 12 dc around the neck (remove the st marker if you are using it), continue working on the opposite side of the spine, 10 dc (place the st marker into the last st) [32 sts]
Round 13 2 dc in each of next 2 sts, 28 dc, 2 dc in each of next 2 sts [36 sts]
Rounds 14-22 1 dc in each st around Now work 3 dc (this should take you to the beginning of the first leg, one st on the left from the middle of the back as shown above, if not, adjust your sts making more or less dc to reach that point), place a st marker and continue with Leg 1
Leg 1
Round 1 5 dc, ch5, ss into the first dc of the leg (the first st after the st marker) to join in a round [5 sts and 5 ch]
Round 2 5 dc, 5 dc along the ch [10 sts]
Rounds 3-11 1 dc in each st around Round 12 dc2tog 5 times [5 sts] Break yarn and fasten off
Thread the yarn needle with the yarn end, pass the needle into each front loop of the last round, then pull tight to close and weave in the end
Leg 2
Miss 6 sts on Round 22 of the body after Leg 1, place a st marker
Make the second leg following the instructions of Leg 1
Leg 3
Miss 2 sts on Round 22 of the body after Leg 2, place a st marker
Make the third leg following the instructions of Leg 1
Leg 4
Miss 6 sts on Round 22 of the body after Leg 3, place a st marker
Make the fourth leg following the instructions of Leg 1
Belly
Join the yarn on the first missed st after Leg 1
Rows 1-2 ch1, 6 dc, turn [6 sts]
Row 3 ch1, 6 dc, ch5, turn [6 sts and 5 ch]
Row 4 miss 1 ch, 4 dc along the ch, 6 dc, ch5, turn [10 sts and 5 ch]
Row 5 miss 1 ch, 4 dc along the ch, 10 dc, turn [14 sts]
Row 6 ch1, 14 dc, turn [14 sts]
Row 7 ch1, 10 dc, turn leaving the remaining sts unworked [10 sts]
Row 8 ch1, 6 dc, turn leaving the remaining sts unworked [6 sts]
Row 9 ch1, 6 dc [6 sts]
Break yarn and fasten off, leaving a long tail for sewing
Stuff the body and legs, then pin the belly to Round 22 of the body. Sew around the body and legs, adding more stuffing to the body before completing the seam. Continue stuffing from the neck until it stays firm and stands up
Tail
Ch10 and fasten off, leaving a long tail for sewing
Assembly
Pin the pieces in place before sewing to check the position. Sew the head to Round 1 of the body, angling it as you prefer – we positioned the baby’s muzzle looking up, and the big giraffe straight on.
Sew the ears to the head between Rounds 13 and 14, approximately 6 sts apart, using the position of the eyes as a reference.
Sew the horns to the head across Round 13, 2 sts apart from each other and 1 st apart from the ears. Sew the tail to the back of the body, then use pink embroidery thread to make a few straight sts onto the centre of the ears, and to add pink cheeks under the eyes. Using brown embroidery thread for the big giraffe and light brown for the baby, stitch spots onto the head, neck and top parts of the body, passing the needle over one dc stitch three times to make a spot. Use the main image as a guide to placement. Embroider the nostrils with bullion knots across Round 2 of the head, roughly 2 sts apart. Use Yarn A for the big giraffe and Yarn B for the baby, and refer to the stitch guide on page 84.
Bunting
This pattern makes a length of bunting with 15 flags. Customise the bunting to make it as long or as short as you like, leaving 25 ch at the beginning and the end, 5 ch for each flag and a 5 ch space
between the flags
Foundation using Yarn C and 2.5mm hook, ch195
Miss 25 ch, join Yarn C, D or E to make the first flag
Row 1 ch1, 5 dc along the ch, turn [5 sts]
Row 2 ch1, miss 1 st, 4 dc, turn [4 sts]
Row 3 ch1, miss 1 st, 3 dc, turn [3 sts]
Row 4 ch1, miss 1 st, 2 dc, turn [2 sts]
Row 5 ch1, miss 1 st, 1 dc [1 st] Fasten off and weave in end
*Miss 5 ch, and join Yarn C, D or E to make another flag, repeating Rows 1 to 5
Repeat from * to last 25 ch
Party hat
Start with Yarn C and 2.5mm hook, and alternate Yarns C, D and E every round. When changing colour, do so on the last yrh of the last round
Start with a magic ring Round 1 ch1 (does not count as st), 6 dc into the ring, pull tight to close [6 sts]
Round 2 1 dc in each st around Round 3 (2 dc in next st, 2 dc) twice [8 sts]
Round 4 1 dc in each st around [8 sts]
Round 5 (2 dc in next st, 3 dc) twice [10 sts]
Round 6 (2 dc in next st, 4 dc) twice [12 sts]
Round 7 (2 dc in next st, 5 dc) twice [14 sts]
Round 8 (2 dc in next st, 6 dc) twice [16 sts]
Round 9 (2 dc in next st, 7 dc) twice [18 sts]
Round 10 (2 dc in next st, 8 dc) twice [20 sts]
Round 11 1 dc in each st around Break yarn, fasten off and weave in the ends
Party hat pom pom
Using Yarn E and 2.5mm hook, start with a magic ring
Round 1 ch1 (does not count as st), 8 dc into the ring, pull tight to close [8 sts]
Rounds 2-3 1 dc in each st around Break yarn and fasten off
Thread the yarn needle with the yarn end, pass the needle into each front loop of the last round, then pull tight to close and weave in the end. Sew the pom pom to the top of the hat to finish.