 ������� ������������������ ����, ������� �����, ��� ��������, 24 ����. �������� ������ � ����� �����!
 � - �������������� ��� ���������� ���������� � �������� ������������. ����������� ��������� ����������: Internet Explorer 6, Fire Fox 1.5, Opera 9.5, Safari 3.1.1 �� ���������� JavaScript. �������� ��� ����� ����
 ��������������������� ������� �������� �� ��� ������ �����
(� ��� 2380 ������� �� ����� ������������ ����� �����)
������ ����� ������������ ↓
accessories accessory bag bags beads beautiful places beauty box cake carton chocolate cooking curtains cushion decor decorative bottles decorative serving dessert embllishment fashion flower flowers food frame frames garden kids room kitchen knitting lamp lampshade light miniature painting paper plastic bottles recycle serving sewing sewing patterns shoes sre storage sweets tableau toys useful vase wall wall art
wall |
���� �� �������� ����������  laboratoria_cv
������������! ���� ��������� ����� ����� ������ ����.

������ ��������, ���������� �������� ��� �������. �� ��� ����� ������� ����������, ����, ���� ��� �������������� �����.
��� ������ �����, ������� 2 �����, ��� ����������� ���� ������ ��������, ���� ���, ��� ����� ��������� ������ � ��������� ���� � ��������.
����� ��������� "Egg Carton":
����� 1 - Bells out of egg carton
����� 2 - Egg Carton Papaer Dough
...
����� 12 - star frame
����� 13 - flowers
����� 14 - wall
�����: wall egg carton |
FAUX metal wall |
� ���� ����� ��� ������ ����� ����������� ��� �������� ������������� ������� ��� ������� � ��������� ������.. � ������� ��� � ���� ��������� � ������������ � ��� ���� ��� , ��������� ������ � ��������� ��������� ��� ��������� � ���������� ���������� :) ������� ���������� ��������� ����������� ����� ��� ���� ��� ������� ����������� :)

��������� ��� ��������� :)
.
�������� ��� ������������� :)
� ���������, ������ !
�����: painting wall |
arranging frames |
http://secondstreet.ru/blog/dekor_sten/nastennyj-kollazh-podborka.html
� ��� � �������, ������� ������� ��� ��������� ������������ ������� �� �����.
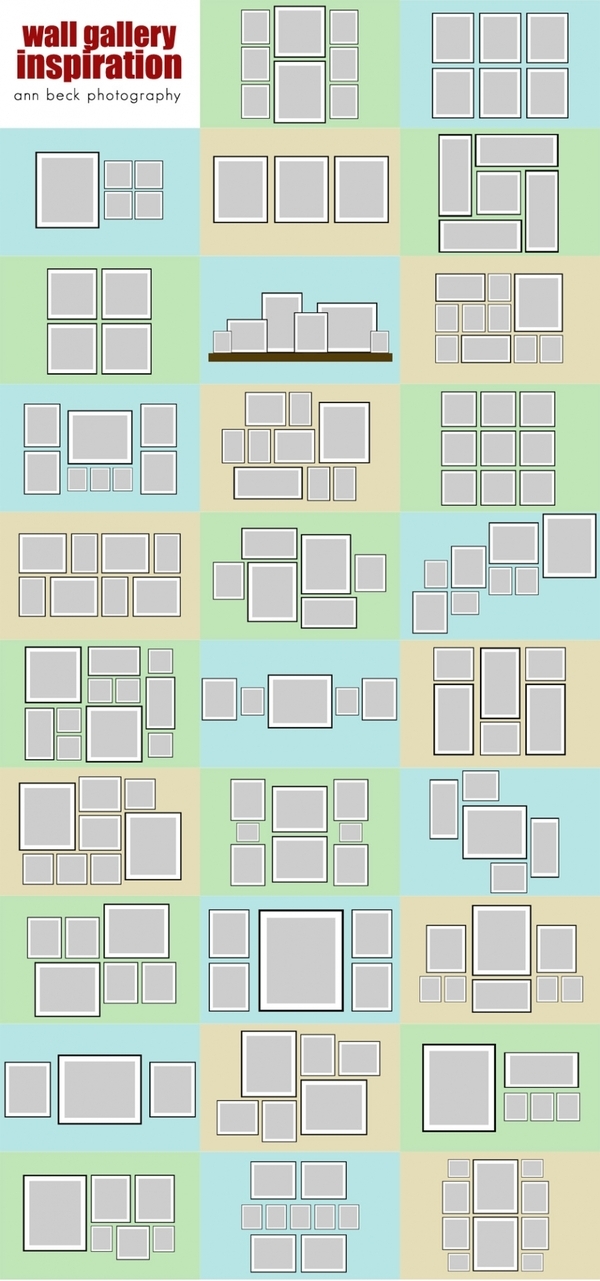
������ �� ���������� �� ������ ������� — ��� ������ ������� ��� ������ ���������. �� ��� ������� � ��������� ����������� ��� �� �����?
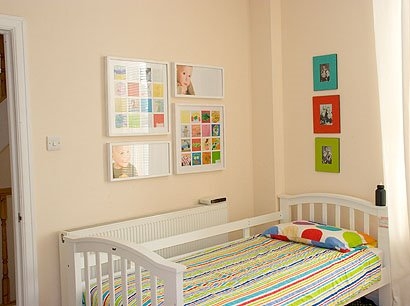
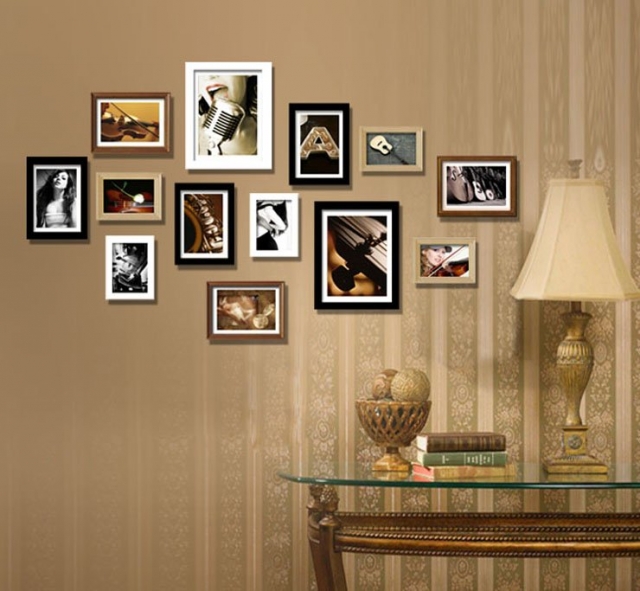
�����: frames wall |
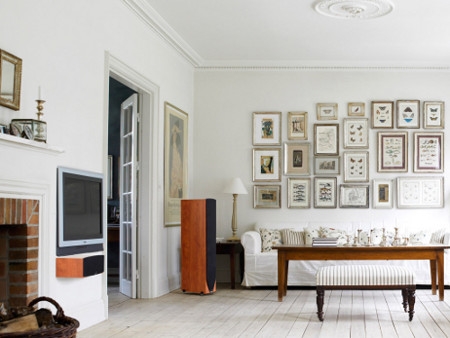
hallway |
“�� �������� ���������” - ��� ����� ��� ����� ������ �� ��������. ����� ����, ��� ������ ����������� � �������� ������������ �� ���������� “�����”.
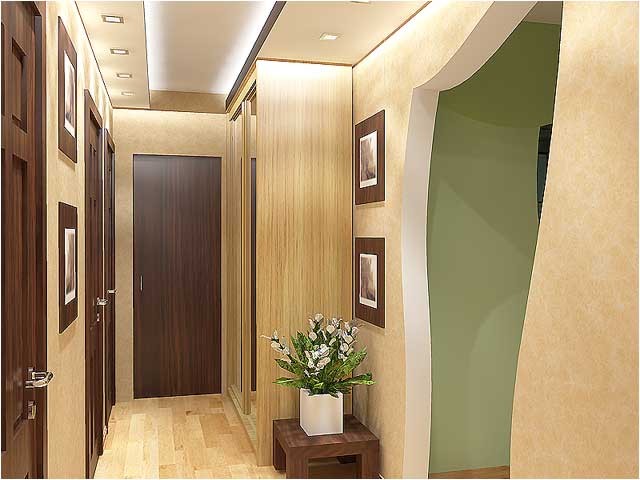
����� ��� ���� ��������� �� ����� � ������, � ����� ���������, ���������� ����� ��������:
�����: wall |
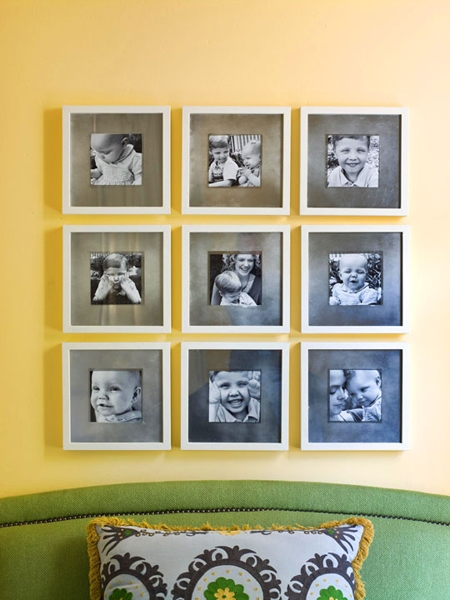
door decoration |
�����: ![]() laboratoria_cv
laboratoria_cv


�� �����
������-����� �����: http://master-klass.livejournal.com/500450.html
�����: wall |
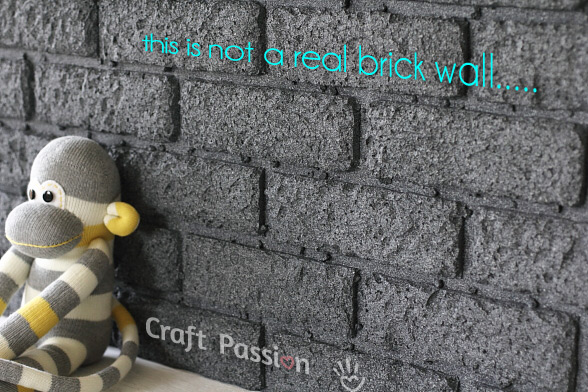
brick wall |
�� ������ ����������, ����� ����! ������ ������� ���������� � ��������� ������, � �� ������� � ����� �� ����������, ��� ��� ����� ���� ���������) ���� �������� ��� ���, ��� ���������� ������������, ��� �������� ������-������ ��� ��� ������������� ����� ��� �������� ��������� ���������� ��������) ������ ���, ����� ��� ��� ���������� ���� � �����. ����� ���������� �� ����? � ���� ��� ������-�������� ����� ��������� � ����� ����� ����? �������� � ���� �������� �������. ��� ����, ��� ������� �����, �������� ���� ������� ������ ����������)))) � ���, ��� ��������) � ���?
����������! ��� ����� ����� �� ��������! ���� ������� ����� ����� �����������))) � ���� �� ���� ������� ������ �� ������ ������, ����� �����.... ��� ������ �� ��� �� ���������� � �� ���������������... ������� ������ ��� �����������. � ��� ���� ��������� � ���� ������ ����� ������� ���������? ��� �����? ���� ���-������ �����, �������� ����������.
����� ��������� "Salt Dough, Mold, clay":
����� 1 - Salt Dough Fish
����� 2 - salt dough
...
����� 24 - imitating malachite
����� 25 - imitating agate
����� 26 - brick wall
����� 27 - another imitation method
����� 28 - different ways to make turquoise
...
����� 31 - gliter bowl
����� 32 - bowl of sand
����� 33 - moon
�����: wall molding |
cloth pin decoration |
���-�� ����� ����� ���������� � ���� ����� ��������� ��� �������� ��������. ��� �� ������ �������� ��, ��� �� ��������� �������, �� ��������� ��������� ��������� ����� ������� ������������ ���� ��� ��������� �� ��� ������. ���, � �������, ��������. �� ���������� �� ��� ������ ��� ���������. ��� � ���� �� �����, �������� ��������, �������, � ���������, �� ������ ������� ������-�� ����� ���������)
���� ���������� ����������� �����, ����������� ����� ������ ����������. � ��� ����� �����, ��� �������! ����� ������� � � ����� ����� �� ����������, ��� ��� �� ��������. ���� ��� ����� ������������ ���, ��� ������, ���� �� ��������)


� ��� ������������ ������� �� �������� � ���� - ���������, ������� ����� � ���� ������������ - �_�������


����� ��������� "Cloth Pin":
����� 1 - Recycle ice cream sticks - links to picasaweb
����� 2 - Miniature cloth pin chair
...
����� 11 - lamp of cloth pins
����� 12 - frame with cloth pins
����� 13 - cloth pin decoration
����� 14 - clothpin chair
����� ��������� "Furniture":
����� 1 - Crafts room in a closet
����� 2 - kids rooms
...
����� 30 - using pallets
����� 31 - ideas
����� 32 - cloth pin decoration
�����: frame wall cloth pin |
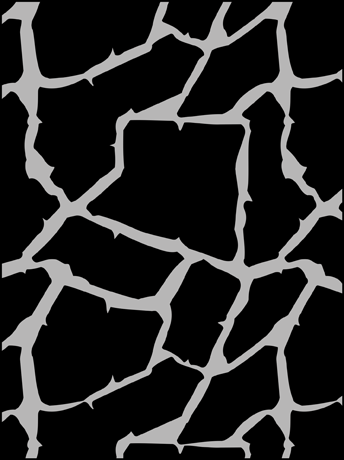
stencil animal skin |
�������� ���� ������� �� ��������� :))) ��� !! � ���� ������ ��������� ��������� ����� :) � � ���� ������ ����������� ��� ��� ��� ���� ���� � ������� ���������� :)) ������� ������ ������������ ���� ����������� :))) �������� ��� ���� ��� !!!!!!!!
����� ��������� ��������� ���� ��������- ����������, �����, ����, �������, �������, ���� � ���� ������
������� ��� ���������� ��� ���������� ��� ������ ���������� :)) ��������� ��� ��������� :)
1.

2.

3.�����
����� ��������� "Dye, stamp":
����� 1 - natural dye
����� 2 - painting easy
...
����� 11 - re fashion a skirt
����� 12 - dye a t shirt
����� 13 - stencil animal skin
����� 14 - dye
�����: painting wall |
wall finish |
������� |
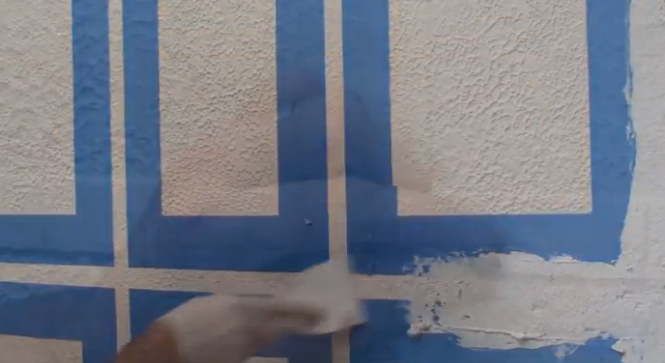
Repairs in the apartment at an end. The front door is set, wardrobe in place, that's just a strip of wall between them, I'd forgotten. Wallpaper there is not a piece. But I'll think of something.

( Collapse )


�����: wall |
wall decoration with egg carton |
�� �������� ���������� ![]() laboratoria_cv
laboratoria_cv
������������! ���� ��������� ����� ����� ������ ����.
����� ��������� "Egg Carton":
����� 1 - Bells out of egg carton
����� 2 - Egg Carton Papaer Dough
...
����� 9 - recycled egg carton
����� 10 - flowers out of egg carton
����� 11 - wall decoration with egg carton
����� 12 - star frame
����� 13 - flowers
����� 14 - wall
�����: wall egg carton |
painting |
������ �������� ������ — ����� ������� �������� ��� ��������� ������������ ��������, ��� ��� ��� ������ ��� ����� � ����� �������� ����� ������������� ����������.

�����: painting wall |
wall painting |
�����: wall useful |
textured painting |
������� |


�����: painting wall |
tiles with figure |
������� |


�����: frame wall |
simple wall stencil |
�������� ��������� �������� �� ����
��� ��� ���������� ������ �����, ����� � ��� ���������� ������������ ������, �������������� ���������������� � �������� ��� �������. ������ ���������� ��������� ��������� ������� �������� ������ ���� �� ��������� ������� (��������).
���� �������� ����� ����� ������� ���������� ������ � ��� �� �������. ��������, ������������� �� ����� ������� ������ �������� � ������, ���������� ������ ������� �������������. ��� � �������. ���� ��� �������, ������� � ����������� ������ �������� ��������� ��������, ������� ��� ������ � ��������.
��������� ����� Allstick ���������� ��������� �������� �� ����� ������ ������, �������� � � ������ �������� ����������.
��������� �������� �� �����
���������


������� ����� �������� ����� ��� ��������� ��������� ��������.
������


����


������� ��� ���� ������������ � ������ ������, �������� � ������.
����� ��������� "��������":
����� 1 - ����� ���� - ���� ��� ��������� �������.
����� 2 - �������-��������.
...
����� 98 - � ��� ���� ������������� ����� ������ ������...
����� 99 - ��� ������� �������� ������� ������ ������.
����� 100 - ���������� ���� ��� ������� �������
����� ��������� "��� ����":
����� 1 - ����������� ������ ��� ����
����� 2 - ����� ���� - ���� ��� ��������� �������.
...
����� 98 - ����� ������-�����: ���������� �� ���� ��������
����� 99 - �������� ������ ��� �������, ������� � ��...
����� 100 - �������� ���������� ������ ������ ������
�����: wall painting |
wall cover |


����� ��������� "�������� �� �����":
����� 1 - �������� �� �����--������-�����
����� 2 - �������� �� �����--�������� ����������
����� 3 - ������ �� ������!�������!���������!
����� 4 - ��-������� �� �����
����� 5 - ���� �� ������� �����.
����� 6 - ����� �� �����.....��������!?????
����� 7 - �����-�������� �� �����.����!
�����: wall recycle paper |
Sponge Painting How-To |
������� |

Sponge Painting How-To
Add visual punch to a plain-color wall with sponging. It's a quick and easy way to achieve a subtle texture and add depth to your walls. And if you mess up, it's easy to fix less-than-perfect spots. Just follow our no-fail steps and study the how-to photos for can-do confidence.


Using a paint roller, base-coat a clean, dry wall with a Jack o' Lantern; let dry. Apply a second coat if needed and allow to dry. Use wide painter's tape to mask around doors, windows, the ceiling, and the floor.
In a paint bucket, mix 1 part Harvest Brown and 4 parts Studio Finish latex glaze. Fill another bucket half full of water for rinsing sponges.
1. Pour a small amount of glaze mixture onto a paper plate.

2. Dampen a sponge with water and wring it out thoroughly. Dip the sponge into the glaze mixture and blot excess onto newspaper. Practicing on a piece of cardboard, dab the sponge lightly, overlapping edges of color and rotating the sponge for a random effect. When comfortable with the color intensity and texture, apply the sponging technique to the wall, beginning in an upper corner.

3. Cover 8-foot-square sections at a time, dipping sponge into glaze mixture as needed.

4. When the sponge becomes saturated with glaze mixture, rinse it in the bucket of water and wring it out thoroughly before continuing.

5. After sponging 8 square feet, dampen a clean sponge in clean water; wring it out thoroughly. Using the damp sponge, dab the wet glaze mixture to remove some of it from the wall so the base coat peeks through; rinse and wring the sponge as needed.
6. When finished removing glaze mixture from one area, continue the technique until the entire wall is finished, then move to an adjacent wall.
More Color Combos and Tips
When sponging, there's no magic formula for selecting the perfect color combination. If you favor subtle texture, choose colors with little contrast and use a dense application so less of the base color shows through.
For bold texture, choose colors that sharply contrast and use a sparse application. Or try anything in between. The key is to experiment with colors and coverage. In the meantime, let our color combinations inspire you.

Base coat: Blue Jean 2062-50
Sponge glaze: Blue Daisy 2062-40

Base coat: Bayberry 2080-50
Sponge glaze: Raspberry Truffle 2080-10

Base coat: Mellow Yellow 2020-50
Sponge glaze: Jack o' Lantern 2156-30

Base coat: Acadia Green 2034-50
Sponge glaze: Cedar Green 2034-40

�����: wall painting |
Asian walls - Grass Cloth Wall |
������� |
Grass Cloth Wall Project
Grass cloth wall coverings are a popular way to evoke the faraway cultures of Asia as well as the rich texture of natural grasses.
A painted grass cloth finish can be a stylish substitute for expensive wall coverings without their potential fraying and easy soiling. Also, by painting instead of wallpapering the design, you can vary the colors to suit your decor.
Grass cloth adds interest to a wide variety of settings. It is a natural choice for plantation- and Asian-theme rooms, but also works in transitional and relaxed modern decor.


�����: wall painting |
Asian-clouds Look Wall Techniques |
������� |
Find out how to accomplish two Asian-theme paint effects: crisp grass cloth and exotic stylized clouds.

Asian Clouds Wall Project
For centuries, Asian artists have captured nature's beauty in a unique, surrealistic style whose bold aesthetics, at once striking and serene, translate well to modern living.
These Asian clouds capture that style, and even if you are a novice artist, you can give them a try. Just express your creativity by painting a freehand design onto the wall.
The trick is to first draw the design on the base-coated wall using a colored pencil. When you are satisfied with the result, apply a stretchable automotive striping tape along the lines.
Brush an orange-red glaze mixture onto the wall using a horizontal dragging motion, then remove the tape to reveal the lines, seemingly etched in gold.
To increase the richness of the color, apply a dark brown stain to the entire wall. Use this technique to create any linear design or motif that complements your decorating style.
Download and Print the Cloud Pattern


�����: wall painting |
Wall Watercolor |
������� |
Wall Watercolor
Like clouds stirring in the sky on an overcast day, color-washed walls bring movement and drama to a room's vertical surfaces. Because the pattern is subtle, it is the perfect complement for a stenciled design. The technique is simple to master and you can layer on as many tones as you like; the more layers you add, the more interesting the finish.

�����: wall painting |
| ��������: | [2] 1 |


