So I just want to say thanks again for all the interest in the fingerprint art! And I'm sorry I made you guys wait so long for the tutorial. Right now Matt is making French toast for dinner so I can take a minute to get this bad boy up.
First off, I think the best way to take a fingerprint is with pencil and tape. So, rub some pencil on a piece of paper. Rub your finger in the graphite. Your fingertip should be fully covered with a thin coat of graphite.

Then you want to press tape to your finger to get the print. You want to do it lightly as you want the print to take to the tape just right and not smudge. You may have to press lightly around the edges of your fingertip in order to get a full print. Scotch tape worked great for me, but Matt has huge hands and fingers and we needed to use packing tape, so if you have one on hand and not the other, both should work just fine. Don't worry if the print doesn't look right, you can start over by rubbing your finger in the graphite again. It took me a few tries to get good, clear prints.
Then you're going to want to stick the tape to white paper and scan the print. Everyone's scanner and software is going to be a little different, but I'll show you how I did mine.
I scanned it, and selected the image:
Once the image was selected, I adjusted the size.
I wanted mine to be about 6x6 to fit into the 5x5 frames I had. So you'll need to adjust the size according to how large you want your image.
This is what it looks like enlarged:
Then, I upload to Picnik.com. I know Picnik gets a lot of flack as not being legit enough, but I don't have Photoshop and it certainly does the trick. If you know Photoshop, you can probably do this a million times better than I'm able to with Picnik.
Once in Picnik, I turn the sharpness all the way up to clean it up a little bit.
Then I up the contrast. If you up the contrast too much, it won't look right, so you'll need to find the right balance for your fingerprint.
Then, you save it and print it and it should look something like the one below. Make sure you print on cheap, flimsy computer paper. You'll see why in just a second.
Then I just traced the fingerprint with a Sharpie.
You're probably thinking that it doesn't look all that great. But if you flip the paper over, it looks much cleaner.
Yup, Sharpie bleeds right through cheap paper. To me it's perfect because it looks just like ink on paper.
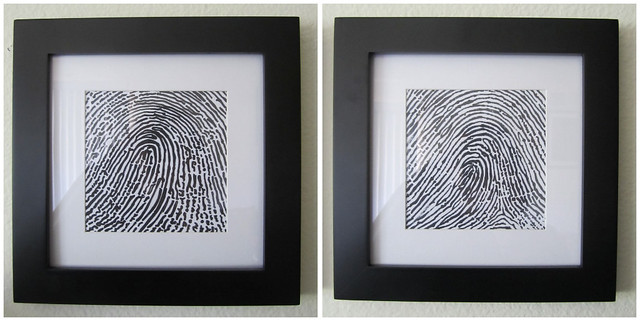
And once you get the fingerprint all colored in and flip the paper over and put a frame around it, you'll get this:
When I started I was worried tracing the fingerprint would be really time consuming, but I finished both in less than an hour. No, it's definitely not perfect, but it beats all of the gorgeous yet ridiculously expensive (at $200+!!) custom fingerprint art on Etsy. I hope no one is disappointed with how ridiculously simple this is!! Please let me know if you have any questions about it!
Oh, and if you want your actual fingerprint and not the reverse (which I did for our original ones), you can reverse the image in the beginning so when you trace the fingerprint and flip it, it's facing the right way. Or you can scan the flipside after it's all traced and scan that, and flip the image.


