-Метки
-Рубрики
- DECOR (1018)
- Frames, wall art, mirror (204)
- Kids Rooms (97)
- Box & basket (95)
- Painting, stamp (85)
- Walls (77)
- Kitchen (70)
- Miniatures (70)
- Cushions (69)
- Curtains (58)
- Baby Stuff (51)
- Storage (46)
- Candles (41)
- Toys & dolls (36)
- Gifts (34)
- Shelves (34)
- Salt Dough, Mold, clay (33)
- Vase (32)
- Furniture (32)
- Bedroom (29)
- Clocks (29)
- Kids Pillows (27)
- Rugs & floor (26)
- Chair Cover (26)
- Bathroom (23)
- pouffe (15)
- Pin Cushions (14)
- Jewelry Display (14)
- Table Setting (14)
- Foil (11)
- Felt & mesh (11)
- Shadow-Box (11)
- Tissue Box (10)
- Table (9)
- Butterfly (8)
- Napkin Folding (5)
- Soap (4)
- Tassels (3)
- FASHION (818)
- Sewing patterns (170)
- Accessories (158)
- Embllishment (150)
- Re-fashion (98)
- Knitting (89)
- Bags (83)
- Beads (71)
- Shoes (65)
- T-shirts transformation (52)
- SRE (52)
- Scarfs (28)
- Buttons (21)
- Zipper (19)
- Shawl (19)
- No-Sew (15)
- Dye, stamp (14)
- Chinese Knots (11)
- Mending (9)
- Zig Zag (9)
- MultiWear & Infiniti Dress (8)
- boho (7)
- girl dress (3)
- Kids (2)
- Beauty (1)
- RECYCLE (694)
- Paper & newspaper (97)
- Plastic Bottles (86)
- Decorative Bottles (79)
- Thread, Rope & Wire (55)
- Blankets, jeans,leather....etc (55)
- Carton (54)
- Kitchen Items (38)
- Branches (32)
- Pipes & Tubes (30)
- Molding (27)
- Tins & Cans (22)
- CDs (19)
- Socks (14)
- Egg Carton (14)
- Sea Shell (14)
- Cloth Pin (14)
- Egg Shells (11)
- Pasta (9)
- Feather (8)
- Tires (8)
- Plastic Spoons (5)
- Towels (5)
- Coat Hangers (5)
- Wooden Spoon (4)
- Drinking Straw (4)
- Books (4)
- Light Bulbs (4)
- Hangers (3)
- China & Kitchen ware (3)
- Dried Flowers (3)
- glass bottles (2)
- IceCeam Sticks (2)
- light bulb (1)
- Corn Husk (1)
- COOKING (310)
- Dessert (140)
- Decorative Serving (111)
- Chocolate (46)
- No-bake (37)
- Egg (33)
- Bread (23)
- Puff Pastry (20)
- Food Decoration (20)
- Potato (18)
- Apple (18)
- Stuffed (17)
- Rolls (17)
- Meat (16)
- Salad (15)
- Sausage (15)
- Chicken (15)
- Marrow (13)
- Ice Cream (12)
- Banana (10)
- Cheese (10)
- Loaf (7)
- Pasta (6)
- Pizza (5)
- Cabbage (5)
- Eggplant (5)
- Fish (5)
- Mushroom (4)
- Rice (4)
- jello (3)
- yogurt (1)
- Toast (1)
- coconut (1)
- Grape Leaves (1)
- Tuna (1)
- LIGHT (148)
- Lamps (107)
- Chandelier (73)
- Baby Lights (8)
- Flower Making (115)
- USEFUL (103)
- health & beauty (67)
- GARDEN (63)
- Vertical Garden (13)
- WEDDING (44)
- Glass (26)
- Pillows (5)
- Baskets (1)
- Backgrounds (42)
- VICTORIAN (35)
- Victorian Lady (10)
- Cushions (7)
- Box (5)
- Bags (2)
- Beautiful Places (32)
- Cats (29)
- LINKS To Crafts (22)
- in minutes (17)
- Computer & internet (12)
- Games (7)
- Alphabet (5)
- PRIVATE (3)
-Приложения
 Дешевые авиабилетыВыгодные цены, удобный поиск, без комиссии, 24 часа. Бронируй сейчас – плати потом!
 Я - фотографПлагин для публикации фотографий в дневнике пользователя. Минимальные системные требования: Internet Explorer 6, Fire Fox 1.5, Opera 9.5, Safari 3.1.1 со включенным JavaScript. Возможно это будет рабо
 ОткрыткиПерерожденный каталог открыток на все случаи жизни
- Настольные игры онлайнМы предлагаем Вам сразиться в любимые настольные игры со своими друзьями, не отходя от компьютера. У нас вы сможете поиграть в дурака, преферанс, тысячу, нарды, шахматы, шашки, крестики-нолики, точки,
-Я - фотограф
-Поиск по дневнику
-Подписка по e-mail
-Друзья
-Постоянные читатели
-Статистика
DIY DON'T BUY!! |


 STEP ONE: Cut off a section of the belt on the non-buckle end. STEP ONE: Cut a section of the belt buckle no end. (To fit my 9-month-old daughter, I cut a 16" section of belt. You may need to adjust this measurement to fit your child.) ( To fit my daughter 9 months old, I cut a 16 " band. You may need to adjust this measure to suit your child.)
 STEP TWO: On the FINISHED end of the piece you cut off (not the piece with the buckle), fold a loop wide enough to easily loop the rest of the belt through. STEP TWO: In the end finish of the piece to be cut no ( the piece with the buckle ), double loop wide enough to easily move the rest of the tape through. Sew. Thing. I sewed mine twice for added security. I sewed mine twice for safety.
 STEP THREE: Finish the two cut ends of your belt. STEP THREE: Finish the operation of two ends of his belt. I happened to have a small scrap of vinyl left over from a previous project, so that's what I used, but you could bind it with any kind of fabric. It occurred to me a leftover piece of vinyl from a previous project , so that's what I used, but it might join with any type of tissue.
 This is what you should now have. This is what must be now.
  STEP FOUR: Attach the loop piece to the longer piece as shown. STEP FOUR: Place the piece of tubing to the longer piece as shown. To fit my daughter, I attached the loop piece 10" in from the end of the buckle, as shown. I overlapped the two belt pieces completely and sewed three lines across for security. To place my daughter, I attached the piece of pipe 10 " from the end of the buckle as shown. I overlap the two pieces and stitched belt completely through three security lines .
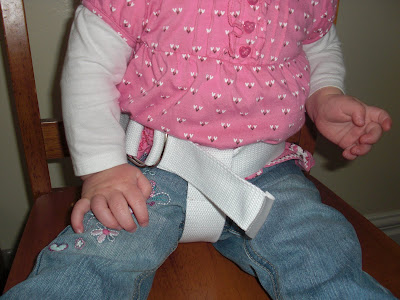
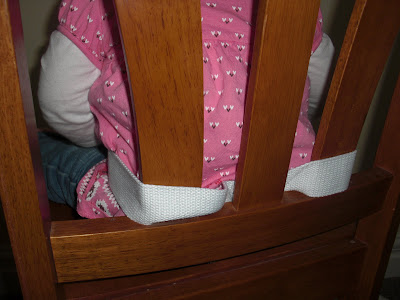
  You're done! There! This photo shows how you will buckle the seatbelt. This picture shows how is the belt buckle . Simply lay the loop piece from the back of the seat to the front, loop each of the two sides around a few bars of the shopping cart in the back rest of the seat, wrap them around your child's waist, through the loop, and buckle. Simply place the round piece of the back of the seat forward , tie each of the two parties on a few bars of the basket on the back seat , wrap around the waist of your child through loop , and buckle . That crotch piece should keep your child seated! That piece crotch should keep your child sitting ! D-ring belts do have a tendency to slip a little so, again, do not leave your child unattended. D -ring belts have a tendency to slip a little so that , once again , do not leave child unattended .
 http://obsessivelystitching.blogspot.com
Серия сообщений "Table Setting":
Часть 1 - Lovely Pieces of China
Часть 2 - lilly tissues
Часть 3 - Beaded tableware
Часть 4 - Unusual China
Часть 5 - DIY DON'T BUY!!
Часть 6 - DIY
Часть 7 - Sea Shell Beauty
...
Часть 12 - making a plate
Часть 13 - Fabric tray
Часть 14 - crochet table runner
| Рубрики: | DECOR/Kids Rooms FASHION/Sewing patterns DECOR/Baby Stuff |
Процитировано 10 раз
Понравилось: 1 пользователю
| Комментировать | « Пред. запись — К дневнику — След. запись » | Страницы: [1] [Новые] |


