-Рубрики
- БЛОГИ И СТРАНИЧКИ (5426)
- аннимашки, картинки, открытки (460)
- бродилки и учебники (48)
- вопросы м ответы по ЛИРУ - Questions LiveInternet (56)
- для блогов и страничек (87)
- иконки (26)
- картинки (7)
- клипарт, скрап-наборы и украшалки (250)
- кнопки (331)
- обои для рабочего стола (38)
- разделители, бордюры (310)
- рамки (1785)
- смайлики (52)
- ссылки на сайты и коллекции (104)
- схемы (8)
- уроки и советы блогерам (806)
- уроки и советы блогерам 1 (450)
- уроки и советы блогерам 2 (32)
- Флешки, муз. открытки (252)
- фоны,текстуры,глиттеры,скрипты,футажи (388)
- эпиграфы,часы., календари,курсоры (201)
- АУДИО и ВИДЕО (124)
- ВКУСНЯТИНА (6606)
- бутерброды,канапе,тарталетки, роллы и т.п. (90)
- паштеты (25)
- вторые и первые блюда (577)
- вторые и первые блюда(сборники) (775)
- выпечка,оладьи,запеканки,пицца,вареники (882)
- выпечка,оладьи,запеканки,пицца,вареники(сборники) (442)
- десерты (1054)
- десерты (сборники рецептов) (293)
- духовка (1)
- микроволновка (30)
- мультиварка (224)
- напитки (405)
- полезности и советы (597)
- разное,ссылки, сайты (151)
- салаты и закуски (518)
- салаты и закуски(сборники рецептов) (660)
- соусы,маринады,варенье,консервация,пряности (384)
- холодные блюда (35)
- ВЯЗАНИЕ (14188)
- аппликации (26)
- болеро,накидки,пончо,шали (252)
- варежки,перчатки,митенки (239)
- выкройки (28)
- вяжем для животных (27)
- детское вязание (374)
- жен.вязание-пальто,куртки (180)
- жен.вязание-пальто,куртки 1 (101)
- женское вязание крючком (299)
- женское вязание крючком (463)
- женское вязание спицами (1315)
- женское вязание спицами 1 (437)
- женское вязание спицами 2 (435)
- женское вязание спицами 3 (436)
- женское вязание спицами 4 (437)
- женское вязание спицами 5 (435)
- женское вязание спицами 6 (438)
- журналы и книги по вязанию (342)
- мех и кожа в вязании (145)
- мужское вязание (227)
- носки,гольфы,гетры и колготки (215)
- обувь вязанная (141)
- отделка:кайма,шнуры,пугов.-петли,резинки,швы (582)
- отделка:кайма,шнуры,пугов.-петли,резинки,швы 1 (354)
- пряжа (149)
- сайты (54)
- советы и др. по вязанию (240)
- ссылки и разное (34)
- сумки (71)
- сумки вязанные 1 (101)
- сумки из разных материалов (67)
- узоры и техники крючком,на вилке,тенерифе и др.1 (402)
- узоры,техники крючком, на вилке,тенерифе и др. (216)
- узоры,техники спицами (1158)
- узоры,техники спицами 1 (435)
- узоры,техники спицами 2 (260)
- ур.вяз.-горловина,ворот,бейки,кокетки (118)
- ур.вяз.-горловина,ворот,бейки,кокетки 1 (49)
- ур.вяз.-горловина,ворот,бейки,кокетки 2 (77)
- уроки вяз. - реглан,рукава,окаты (208)
- уроки вяз. - реглан,рукава,окаты 1 (36)
- уроки вяз. - реглан,рукава,окаты 2 (7)
- уроки вязания (крючок,вилка,тенерифе и др.) 1 (292)
- уроки вязания крючком и др. (195)
- уроки вязания спицами (242)
- уроки вязания спицами 1 (220)
- усл.обоз,переводы,табл,расчеты (210)
- фриформ и фелтинг (валяние) и др.техники (186)
- цветы,листья,насекомые и др. (549)
- шапки,шарфы детские (527)
- шапки,шарфы мужские (107)
- шапки,шарфы,манишки (850)
- шапки,шарфы,манишки и др.1 (462)
- ДЕТЯМ :мультики,сказки,аудио,эл.библиотеки и проче (114)
- ИГРЫ -онлайн, гаджеты (38)
- КОМПЬЮТЕР - ИНТЕРНЕТ (2941)
- уроки и советы (2681)
- уроки и советы 1 (251)
- КРАСОТА и ЗДОРОВЬЕ (2954)
- волосы,ресницы,брови (512)
- глаза (209)
- диета, упражнения и др. (602)
- лицо,шея,губы,зубы (1129)
- полезности, разное (282)
- тело, ноги, руки, ногти (425)
- МЕДИЦИНА (3627)
- заболевания,рецепты народ.мед.,советы (837)
- разное (2829)
- справочники и энциклопедии, журналы (31)
- МУЗЫКАЛЬНАЯ (296)
- иностранная музыка + разное (45)
- исполнители (соло) (53)
- музыка "РЕТРО" и муз.из к/ф (41)
- музыкальные онлайн сервисы (82)
- современная эстрада (19)
- шансон (60)
- ОНЛАЙН-СЕРВИСЫ (725)
- генераторы и конвертеры разные (252)
- генераторы картинок и текста 1 (54)
- генераторы картинок и текста 2 (51)
- генераторы картинок и текста 3 (255)
- онлайн-сервисы различной тематики (127)
- переводчики и поисковики онлайн (39)
- ПОЛЕЗНЫЕ СОВЕТЫ (1285)
- полезные советы и всякое нужное (805)
- полезные советы и всякое нужное 1 (480)
- ПРОГРАММЫ (703)
- Corel (12)
- Editor (66)
- Flash-программы (34)
- Gimp (87)
- Paint, Paint.het (18)
- разные программы (358)
- уроки по разным программам (41)
- РАЗНОЕ (115)
- разное (115)
- РАСТЕНИЯ,природа,насекомые.ДАЧНОЕ (3155)
- болезни и вредителями,препараты (244)
- многолетники : Хосты (71)
- многолетники: гейхеры и гейхереллы (24)
- сорняки (19)
- готовимся к зиме:работы,укрытие,хранение (97)
- грибное (25)
- злаки и осоки (21)
- комнатные растения (430)
- кустарники (191)
- ландшафтный дизайн, делаем сами (676)
- лианы (42)
- луковичные и клубневые (223)
- многолетники (316)
- однолетники и двухлетники (272)
- почвы,компосты,субстаты,грунты,смеси,мульча (117)
- разное (131)
- рассада,подготовка семян,посадки-пересадки,черенки (267)
- сайты (2)
- сезонные работы (59)
- стимуляторы (55)
- суккуленты (24)
- удобрения, подкормка,препараты (204)
- хвойники (40)
- РЕЛИГИЯ,ЭЗОТЕРИКА,АСТРОЛОГИЯ (80)
- РУКОДЕЛИЕ (241)
- вышивка (41)
- из кожи (8)
- макраме и др. техники плетения (8)
- разное (47)
- украшения своими руками (138)
- ТЕЛЕФОН - ТЕЛЕВИЗОР (1151)
- ФОТОШОП и др. программы по аннимации (620)
- бродилки по фотошопу и др.программам (18)
- кисти и фильтры (25)
- многое для фотошопа (21)
- онлайн фотошоп (16)
- плагины для фотошопа (194)
- рамки (11)
- уроки фотошопа (339)
- ЧТОБЫ ПОМНИЛИ (11)
- ШИТЬЁ (3548)
- блузы,топы,туники,жакеты (380)
- блузы,топы,туники,жакеты 1 (133)
- брюки (203)
- брюки 1 (97)
- головные уборы, шарфы и пр. (171)
- декор из ткани,лент,шнуров,пуговиц и др (28)
- детское (141)
- пальто,куртки,плащи,пончо (143)
- перчатки,обувь (60)
- платья,сарафаны,халаты и т.п. (246)
- платья,сарафаны,халаты и т.п.1 (53)
- платья,сарафаны,халаты и т.п.2 (50)
- платья,сарафаны,халаты и т.п.3 (112)
- ПЭЧВОРК (10)
- разное (179)
- разное (модели и выкройки) (153)
- сайты и ссылки (58)
- советы по шитью (184)
- сумки (193)
- уроки шитья (561)
- уроки шитья 1 (53)
- уроки шитья 2 (50)
- усл.обозн,переводы,таблицы,расчеты (46)
- шторы, ламбрекены, постельное белье (104)
- юбки (212)
- юбки 1 (107)
- ЭНЦИКЛОПЕДИИ,БИБЛИОТЕКИ,СПРАВОЧНИКИ,СЛОВАРИ (92)
- ЮРИДИЧЕСКАЯ (189)
-Цитатник
Как подключить и настроить VPN на телефоне с Android В наше время безопасность в интернете — один...
Цветочный узор спицами! - (0)Цветочный узор спицами! Раппорт 10 петель и 20 рядов Количество петель кратно 10 +1 +...
Черно - белый пуловер - (0)Черно - белый пуловер Размеры: 38 - 40 Вам потребуется: полиамидная пряжа(100 ...
Как связать плотную резинку, которая не сползает и не растягивается. - (0)Как связать плотную резинку, которая не сползает и не растягивается. Свяжите полую резинку, черед...
Ажурный женский джемпер, связанный спицами: утонченность и комфорт в вашем гардеробе - (0)Ажурный женский джемпер, связанный спицами: утонченность и комфорт в вашем гардеробе Ажурный ...
-Ссылки
Бесподобный салат с говядиной и морковью по-корейски - (0)
Стильный объемный свитер оверсайз: два варианта вязания узора «Косы» - (0)
Гладим вещи правильно: секреты работы с утюгом - (0)
Цветоводство Хоста (Hosta Tratt.) - (0)
Как отбелить пластиковый подоконник от пятен, жира, грязи без разводов за 5 минут - (0)
-Приложения
 ОткрыткиПерерожденный каталог открыток на все случаи жизни
 Дешевые авиабилетыВыгодные цены, удобный поиск, без комиссии, 24 часа. Бронируй сейчас – плати потом!
 Всегда под рукойаналогов нет ^_^
Позволяет вставить в профиль панель с произвольным Html-кодом. Можно разместить там банеры, счетчики и прочее
Всегда под рукойаналогов нет ^_^
Позволяет вставить в профиль панель с произвольным Html-кодом. Можно разместить там банеры, счетчики и прочее- ТоррНАДО - торрент-трекер для блоговТоррНАДО - торрент-трекер для блогов
 Я - фотографПлагин для публикации фотографий в дневнике пользователя. Минимальные системные требования: Internet Explorer 6, Fire Fox 1.5, Opera 9.5, Safari 3.1.1 со включенным JavaScript. Возможно это будет рабо
-Всегда под рукой
-Музыка
- Боярский М. - Все пройдет
- Слушали: 17410 Комментарии: 0
- Боярский М. - Все пройдет
- Слушали: 17410 Комментарии: 0
- Григорий Лепс - Крыса ревность
- Слушали: 788 Комментарии: 0
- Григорий Лепс - Натали
- Слушали: 3591 Комментарии: 0
- таисия повалий -одолжила
- Слушали: 1315 Комментарии: 0
-Стена
-Поиск по дневнику
-Подписка по e-mail
-Друзья
-Постоянные читатели
-Сообщества
-Статистика
Записей: 47567
Комментариев: 16254
Написано: 69107
Зубчатый край МК |
Зубчатый край МК
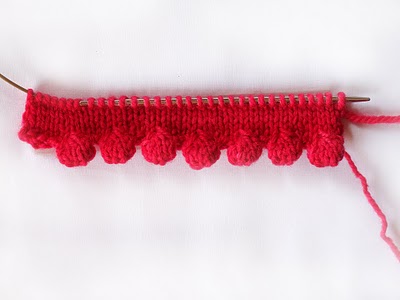
[
Ok, you can pretty much do this Bobble Cast On in any yarn, although perhaps laceweight yarn won't make a bobble, more of a full stop. That being said, the technique is the same irrespective of yarn weight.
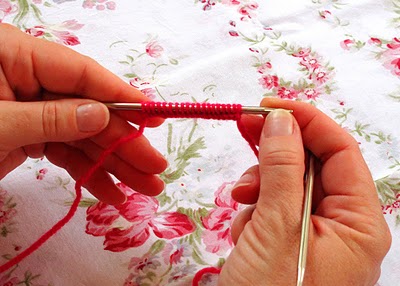
Cast on the number of stitches that you need. I left two side stitches, as you will see later, because it gives the work a little bit of an edge before the fat little bobble appears, and just looks better.
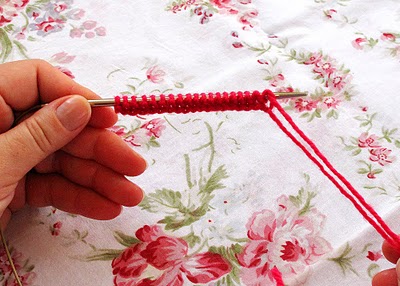
Knit one row, and turn your work around. Above you can see that I have done just that.
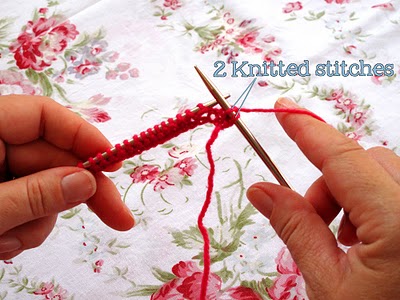
Knit 2 stitches. Throughout the tutorial I will refer to the left hand needle as the LHN, and the right hand needle, as the RHN.
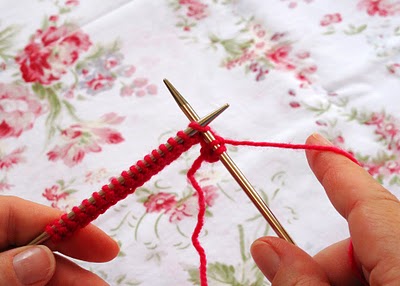
Insert the RHN into the next stitch on the LHN. You are going to knit into this stitch as you would normally, but you don't drop the stitch you have knitted into from the LHN. Just leave the loop of yarn on there .
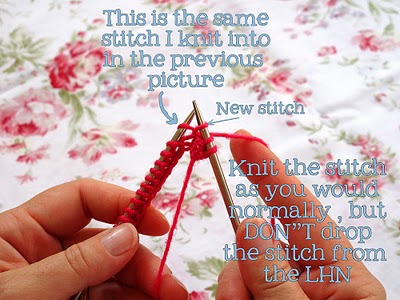
Above, you can see that the new stitch has been made , but the loop of the old stitch is still on the LHN.
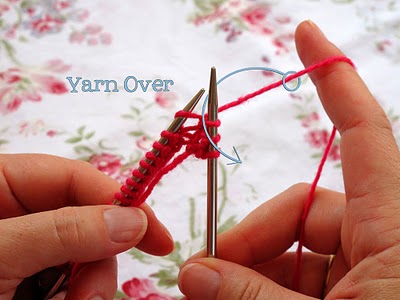
This knit stitch you have just made on the RHN, is the FIRST stitch of your bobble. You will now do a YARN OVER. What this means , is that you aren't going to make a real stitch, more of a little cheat by just wrapping the working yarn around the RHN, in the direction as shown above.
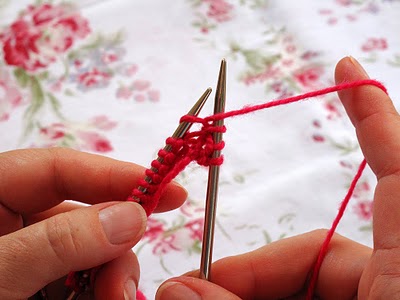
Above, you can see how your work should look once the yarn over has been done. It is so easy to do...it is essentially just bringing your yarn towards you through the two needle points...
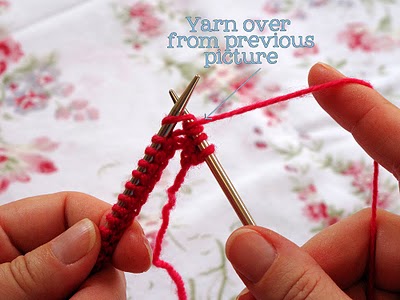
Insert your RHN tip into THE SAME STITCH as in the previous photos, and make a new regular knit stitch. (Notice, how the yarn over will created a clearly seen stitch once you have knitted a stitch after it)
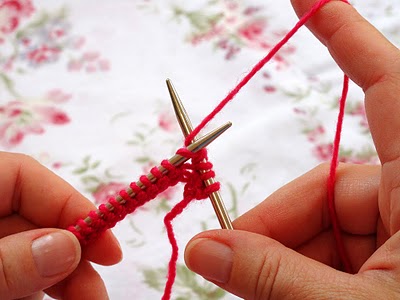
Knitting a new stitch as normal....
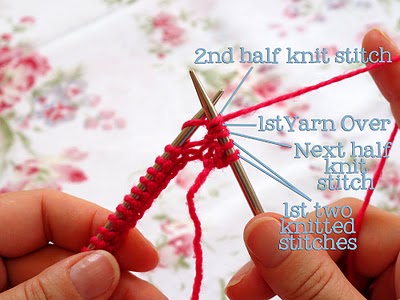
New knit stitch pulled through , but again DO NOT DROP the LHN loop. In the picture above, I have labelled the new stitch a "half knit" stitch because I haven't completed the knitting motion, by dropping the loop form the LHN. You have now made 3 stitches of your bobble.
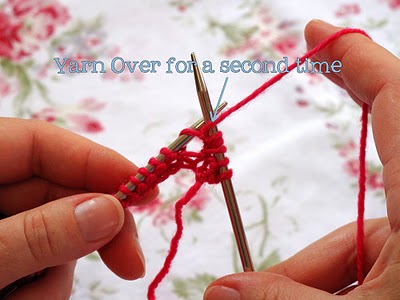
Do a second Yarn Over, just like before....
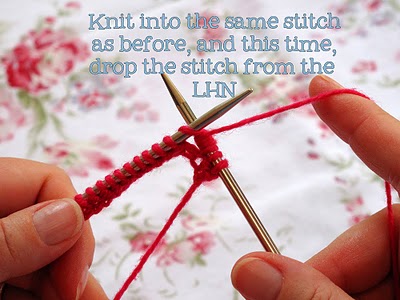
Knit into the same loop on the LHN as before...insert RHN into same loop on LHN...
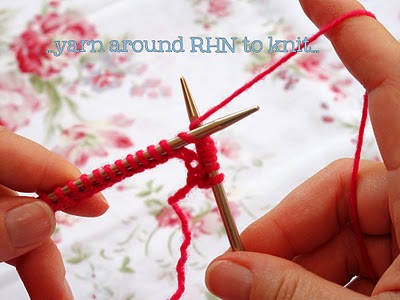
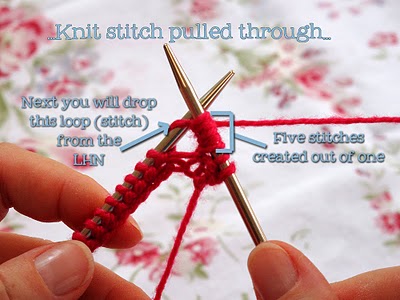
Pull the stitch through but this time, drop the loop from the LHN. You have made 5 stitches for your bobble.
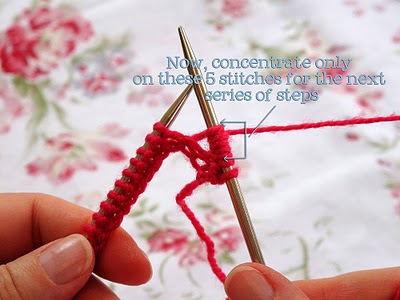
You have 7 stitches on your RHN, of which 5 stitches make up your bobble... You will concentrate only on these 5 stitches for the next rounds, making the bobble come alive :)
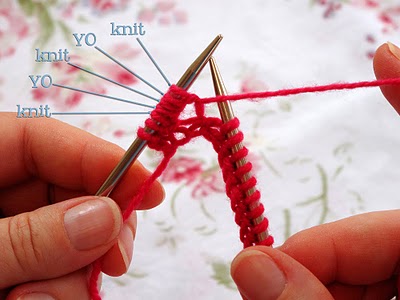
Turn your work around...it should look like the picture above...
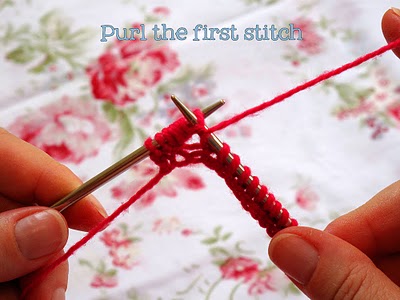
Purl the first stitch.
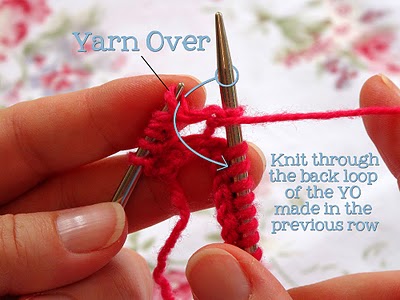
The next stitch was made in the previous round, by a Yarn Over, so I like to knit through the back of it, to give it a little twist . This " through the back loop" purling only happens on this row
, and only on the two stitches that were made by the Yarn Overs in the previous round.
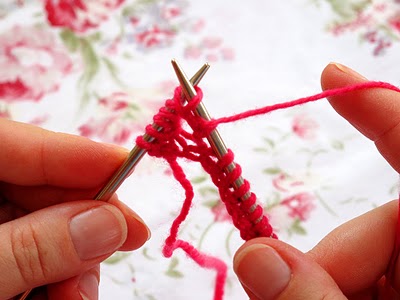
Purling through the back loop...
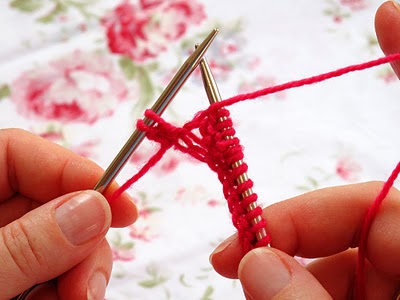
Purl the next stitch as normal, then purl through the back loop of the following stitch and finally purl the last stitch of the 5 stitches that make up your bobble.
Your work should look like the picture above.
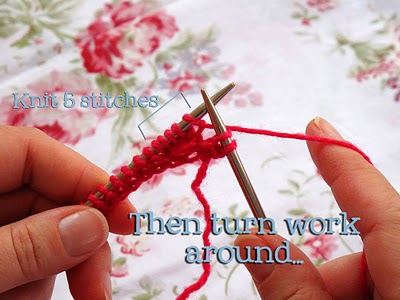
Turn your work around, and knit all 5 stitches. Turn your work around.
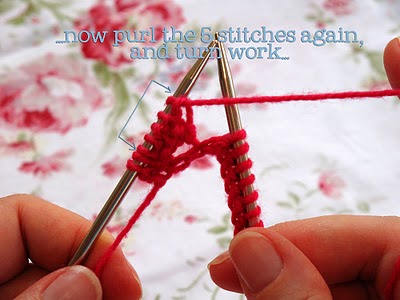
Now purl all the stitches of your bobble again., and turn your work around for the last time.
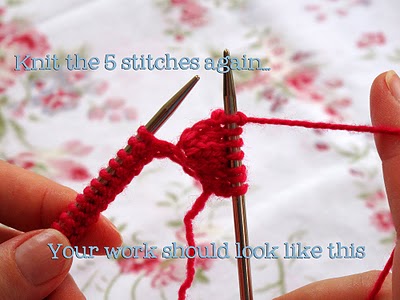
Knit the 5 stitches for the last time. If you push your finger into the back of the bobble to pop it out a bit, you'll see how nice and fat it is
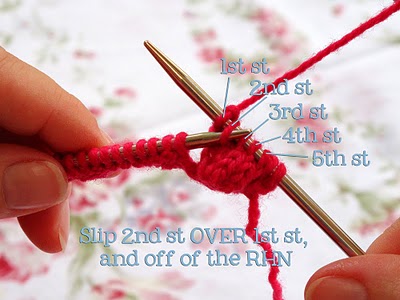
Using your LHN, slip the 2nd st of your bobble, over the 1st st, as seen above.
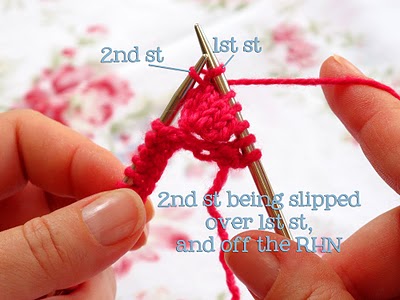
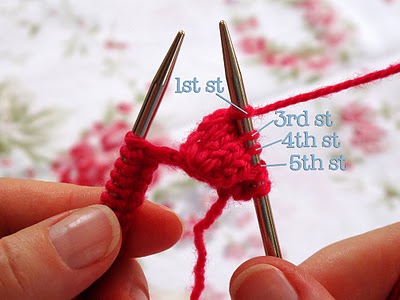
You have a little gap that has formed where the 3nd stitch has been slipped over the first.
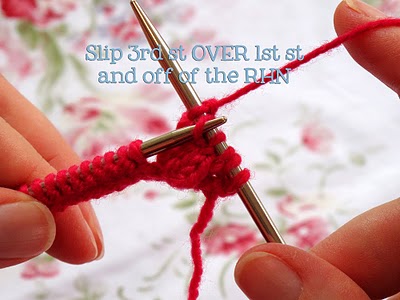
Slip the 3rd st of your bobble, over the 1st st, as before...
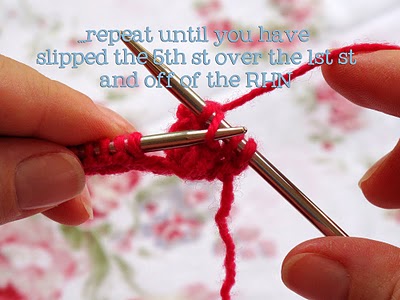
Repeat the above process until you have slipped the 5th st of your bobble over the 1st st. You should have 3 stitches left on your RHN, 2 knit stitches from tight at the beginning of the row, and the single stitch (1st) of your bobble.
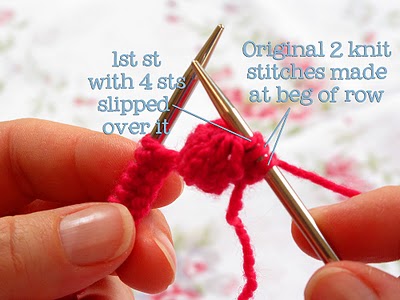
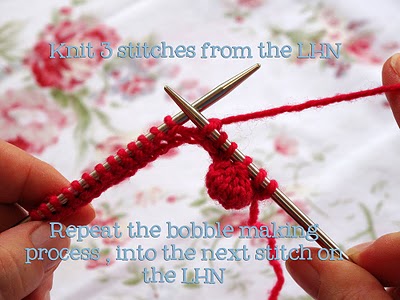
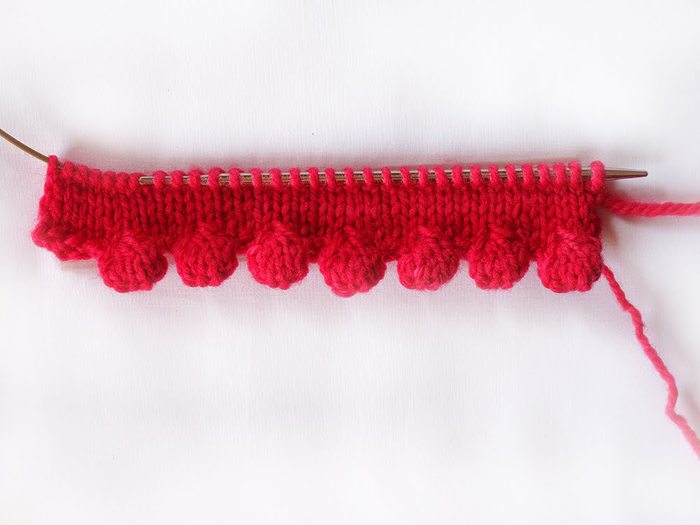
Knit 3 stitches from your LHN, and repeat the bobble making process into the next stitch on your LHN. Repeat until the right amount of bobbles have been made. Carry on with your pattern.
I must say that I really love this bobble cast on (although strictly speaking , it isn't really a true cast on , as you have knitted one row before starting to make bobbles).
Hope you all make many stunning items using this cute Bobble edge, :)
Взято: http://heidibearscreative.blogspot.com/2011/02/bobble-cast-on-tutorial-and-some.html . ]
| Рубрики: | ВЯЗАНИЕ/отделка:кайма,шнуры,пугов.-петли,резинки,швы 1 |
| « Пред. запись — К дневнику — След. запись » | Страницы: [1] [Новые] |


