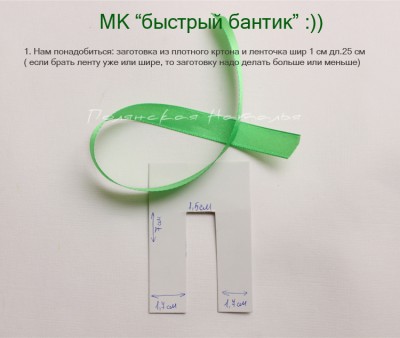
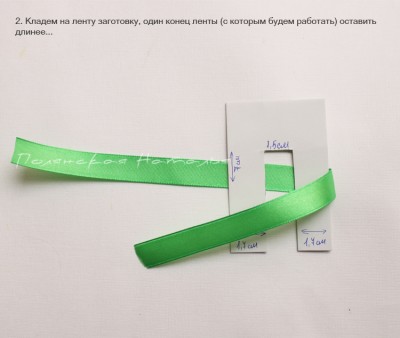
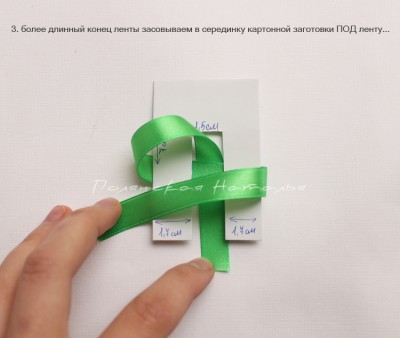
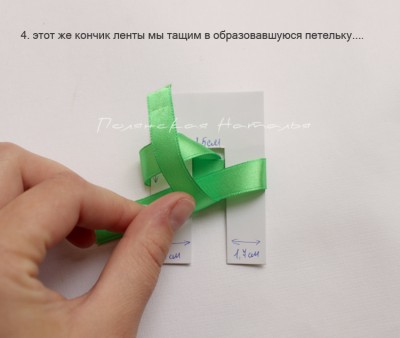
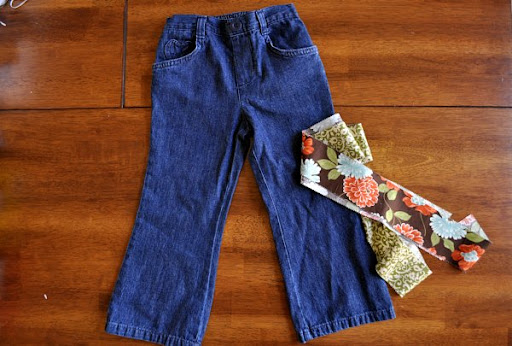
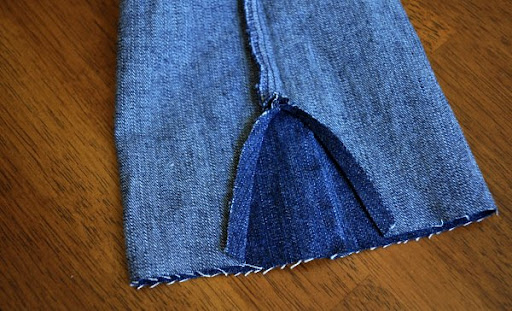
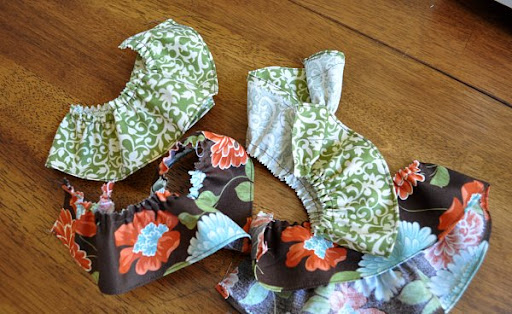
�������� ������� ����� ��������� :) |
�� ������� ����� �������� ���������� ������������ ������-������� ��� �������� �������� �������� ,��������� ��� ���������, ��� �� ����� �������� �� ������ ������� ������� ���������� �������. � ������ ��������� ������-������ ����� ��������, �� � �� ��� �� ������� ������� ���������� ��������:)

|
���������� ���� �� Lionusag |
|
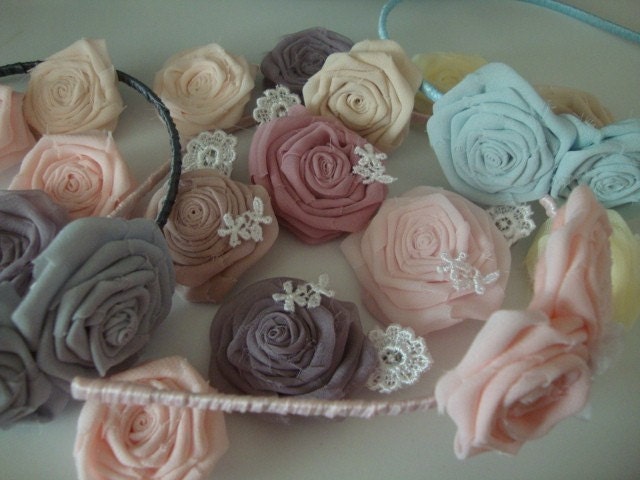
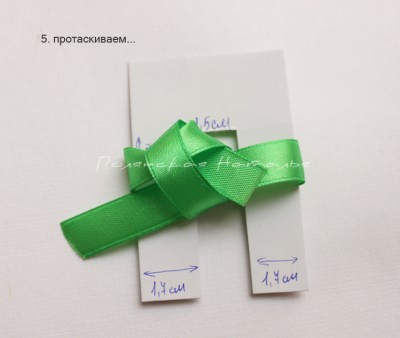
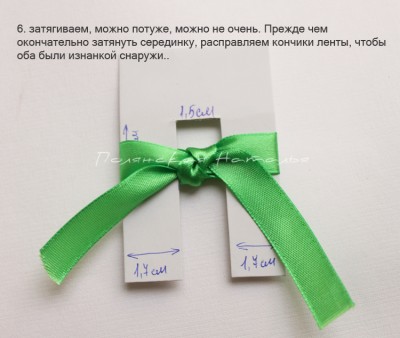
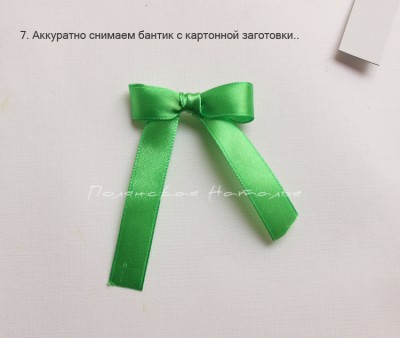
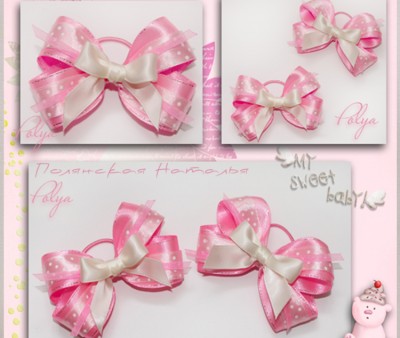
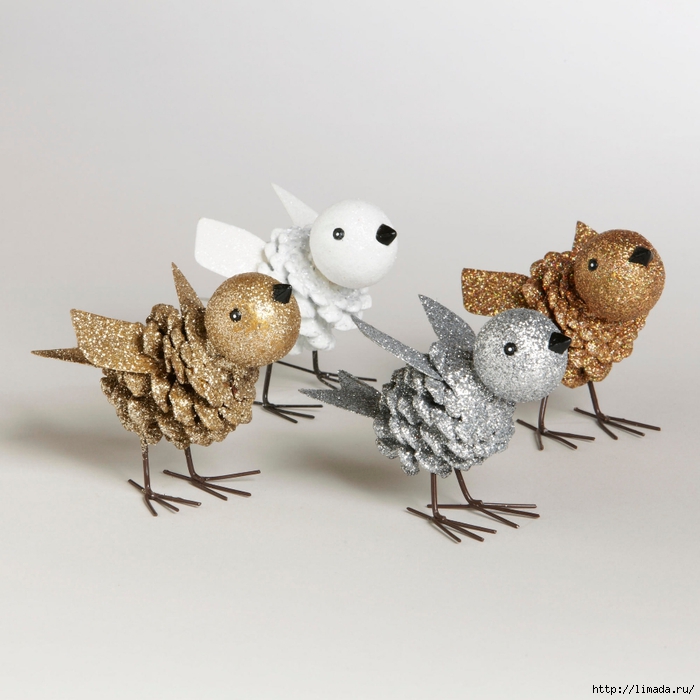
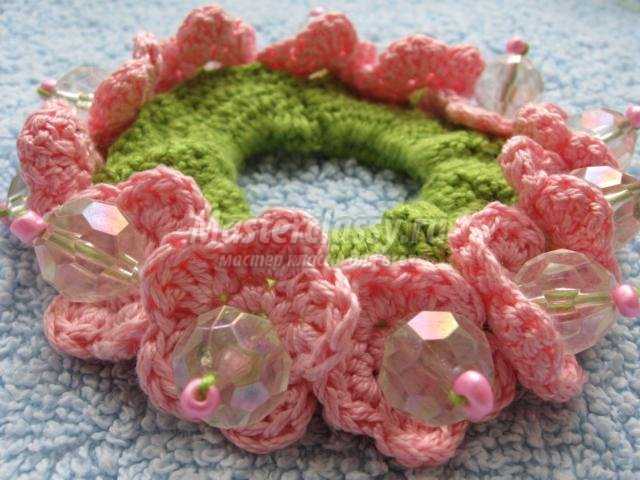
�����-���������� ������ ������ |
�����-���������� ������ ������

�����������:
-�����
-�������
-�������
-������
-�����
-����� � ������ (����)
�����: ����� ���������� ������ ������ �� ����� ������� ����� |
�� - ������ "������ ����" |
|
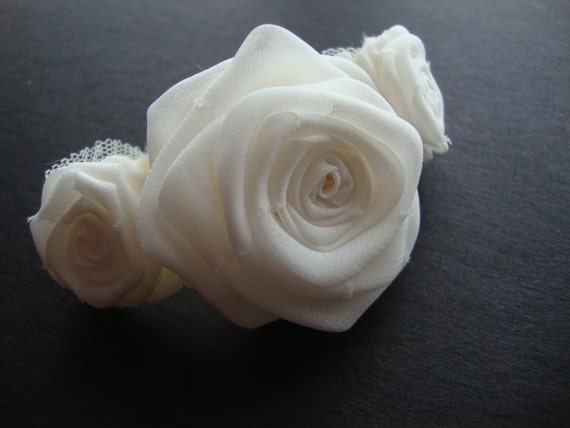
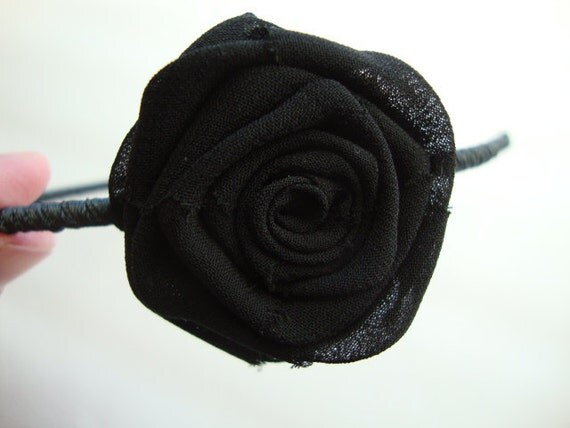
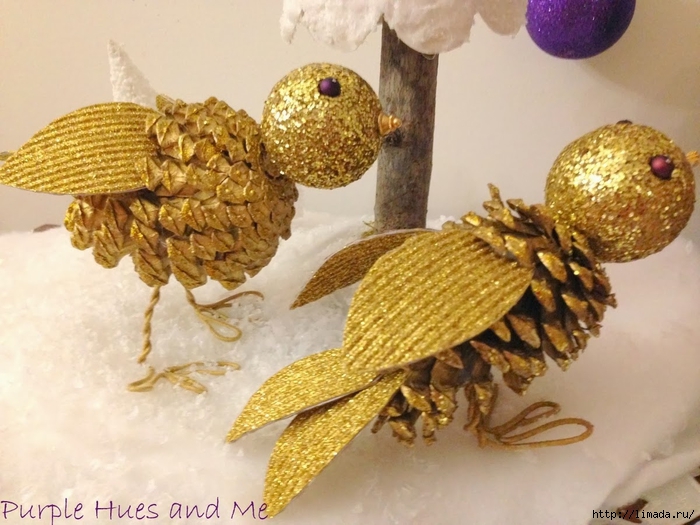
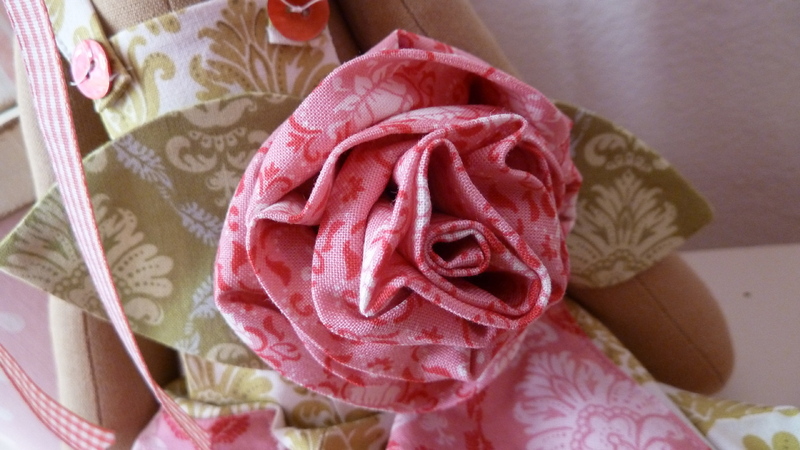
������������� ������ ������ |
 ����� � ������, ���������� � ��������, ����� � ���������� - ��� ��� ������ ����������� ����������� ����. ������ ������� ���� �� ������� � ����� ���������� ������ ���������� ���������� ���� ������� �������. ������ ������ ����� ������ ���������� ����� ������������. � ������� ��������� ������� ���������� ������ �����, �����, � ������, � ������� � ������������. �����, �������, ������ �������, ������ � ������� ������� ��������� ����� ������������� �������. �� �� ������ ��� ����� �����, � ��������������� �� ���� ����� �� ����� �� � �������. ������� � ������ ��������� ���� ����, ��� ����� ������� ������������ ������ ��� ������ ������� ���������. �������� ���� ������ ��������� �������� ���� ��� ��������� ������� ���������� ������, � ������������� �� ������ �����. |
�����: ����� ������ ����� ������ ����� |
������ ������ ������ ������. �� |
��������: http://hobilendik.net/moda/fiyonklu-tac-yapimi/#more-4077
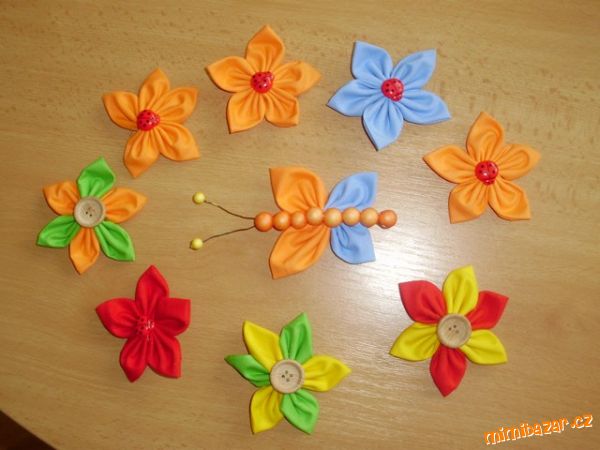
1.

�����: ������ ��� ����� |
�������. ����� ������� |
����������� ��� ������-����� ������������� ���������-���������� ���c� ���������
������������, �������, ������� �����������.
�, �� - �� �������� ��������������!
�����: ������� ����� ������� |
����� �� �����, ������, ����, ������ |
�����: ����� �� ����� ������ ���� ������ |
��������-�������� |

|
�������� �����!!!����� ��������. |

|
����� �� ����� ������ ������ � ��� ������� ������ ����, |
����� �� ����� ������ ������ (��):
��� ������� ������ ����, ������-����� �� ����� ���������,
������� ���� � ��� �������...

|
������� �� ���� |
������� |

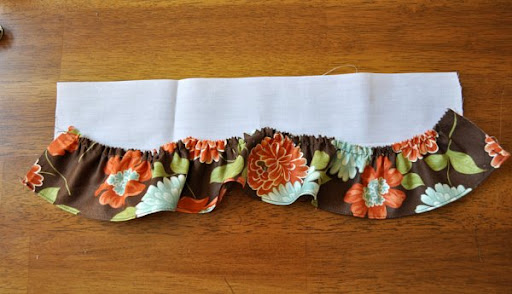
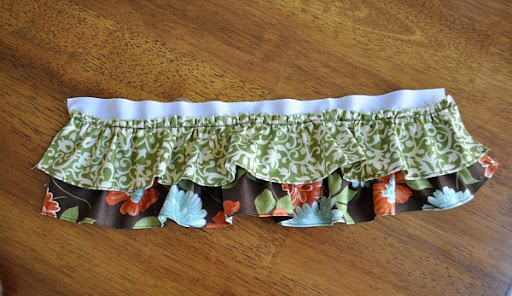
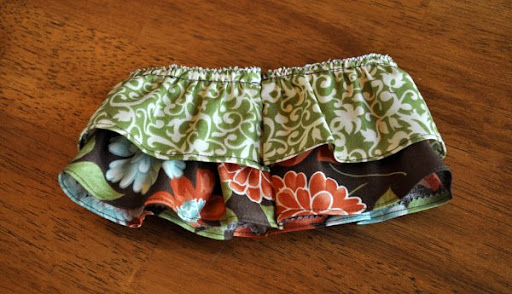
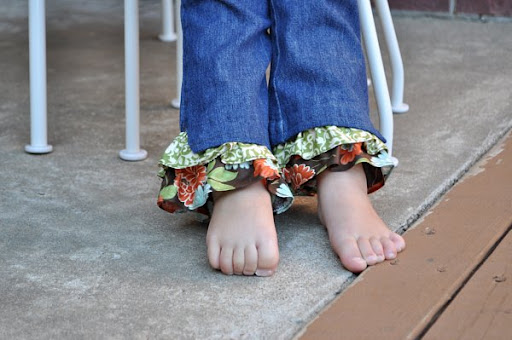
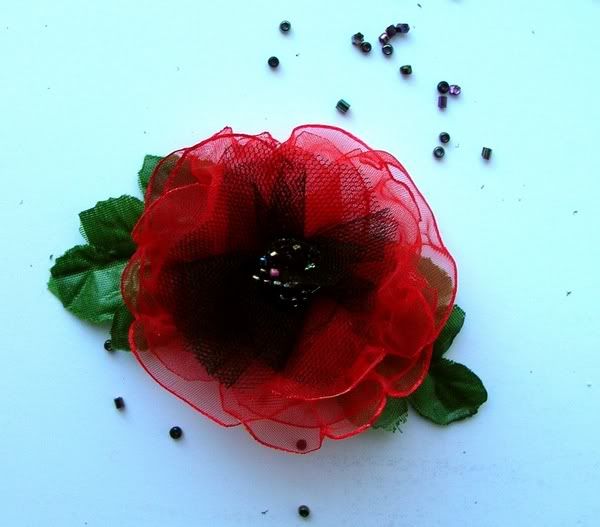
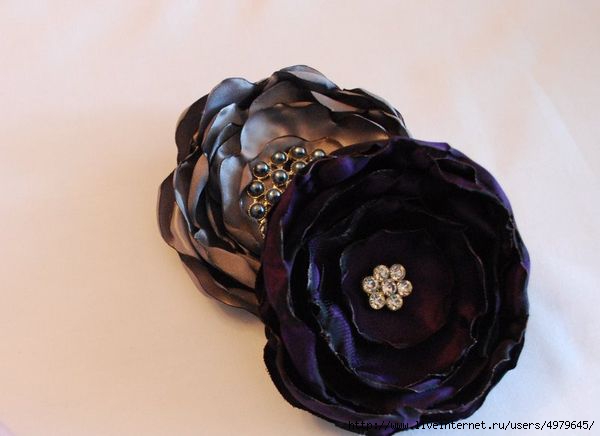
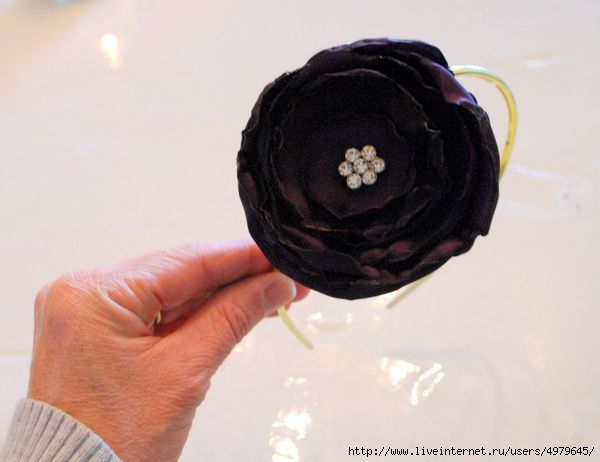
I remembered why I like working with vinyl. There’s no fraying, it holds it shape really well, and some are nice and soft……and almost look like real leather. Almost.
And turns out, I liked the look of it as a hair accessory.
Nice and clean and simple.


Edited: A reader created a template to use for the blue/grey poppy shaped flower and also the red stacked flower. She graciously offered the use of the template to anyone interested. So now you can click on the image below and print it as a pattern, if you’d rather not free-hand the shape. (Thanks Mindi!!!!!)

�����: �� ���� ����� �� ���� ������� ������� �� ���� |
����� |
������� |

This Mother's Day, make something beautiful for Mom. Credit: Megan Reardon

Credit: Megan Reardon

Credit: Megan Reardon

Credit: Megan Reardon

Credit:: Megan Reardon

Credit: Megan Reardon

Credit: Megan Reardon

Credit: Megan Reardon

Credit: Megan Reardon

Credit: Megan Reardon
|
������ Purple |
������� |
Even if you’re still not on board, you have to admit that there is an abundance of adorable baby girl summer attire in your daughter’s closet that you’ve just been waiting to pull out! And what better way to complete that darling summer outfit than a cute as can be dahlia headband?

About a year ago, Megan from Not Martha shared this genius felt dahlia tutorial that immediately landed on my To Make list. However, I didn’t get around to attempting it until a recent car trip. And I didn’t have any glue on hand.

So this is my sewn version.
To make one too, you’ll need-
-a 9×12 sheet of wool felt
-a stretchy headband (I found this one at Michael’s [random, right?], but I’ve also had luck finding plain baby headbands at Target and at Dollar Tree)
-sew on pearl beads
-invisible thread and needle

1. Cut out a whole pile of wool felt petals in three different sizes. As suggested by Not Martha in the tutorial for the glued version, I cut my felt into a few 2″ rows, a couple 1.5″ rows and a couple 1″ rows (and used the leftover to make my circle flower ‘base’). Then, I cut the rows into rectangles and then made ‘petal-ish’ shapes. It’s not an exact science- just freehand it. Be sure to make a point at the top of each petal, though, if you want your finished flower to be dahlia-esque.

2. Fold the bottom of the flower in to make a pinched petal.

3. Secure the pinched petal to the circle base (my circle was about 2″ wide) by handstitching with invisible thread. It worked best to stitch across the base of the petal horizontally and then secure with a vertical stitch as well. I usually did one more stitch just for kicks, so three stitches per flower.

4. Continue around the entire base, using your biggest petals.

5. Repeat entire process for the middle layer, using your middle-sized petals.

6. Finish off petal-ing by handstitching the smallest petals into a top layer. There should be only a small spot in the center that isn’t covered in petals.


7. In that uncovered center spot, stitch a pile of pearl beads (I think I used about 20 total). For full coverage, some of the beads will be stacked on top of each other. Oh, and the back of your flower base will be a mess of invisible thread- haha!

8. Sew around the perimeter of the felt base, securing the flower to the headband. Sew threw the petals- if they aren’t stitched in place, they have the tendency to flip up and get all backwards.


9. Pair this new headband with something summer-y! So adorable!
|
��������-������� |
��������� ��� ����� �������. ��������-�������
|
������� �� ����. |


�����: ������� �� ���� |
������� |
�����: ������� |
������ ������� |
������� |
L'année file avec son lot de rituels ! Concevoir un sac pour la récolte de Pâques en fait partie... Mais cette fois, mes petits doigts se sont activés pour les enfants de La Chipie.
Un sac alliant feutre, feutrine et tissu aux couleurs contrastées.
Facile à réaliser, il nécessite peu de moyens et de technique.
Si la machine fait défaut, les coutures peuvent être faites à la main et les anses, réalisées en feutre.


Fournitures :
- 2 plaques de feutre 30x30cm en 1.5mm ou 2mm d'épaisseur couleur turquoise/chocolat.
- chute de feutrine melon ou chair/bleu ciel et marron
- 20cm de ruban satin bleu ciel et marron.
- tissus coordonnés
- Fil à coudre
- Fil coton à canevas.
- Fil coton à broder.
Gabarits :
 Gabarits
Rappel :
Enregistrer l'image ou le fichier sur le bureau et lancer l'impression via l'assistant pour avoir les gabarits au bon format.
Réaliser les 2 faces Poule :

Découper les pièces pour chaque face selon le gabarit et positionner chaque élément à sa place.

Coudre le bec et la crête au point lancé serré.
Appliquer l'aile au point avant, puis clarifier son contour à la machine au point zigzag.
Réduire la largeur du point et dessiner l'ouverture du bec.

Coudre la pupille à l'oeil par un point en croix, puis appliquer l'ensemble sur le corps au point avant.
Assembler les 3 plumes de la queue et les fixer au corps.
Dessiner les contours de chaque poule au fil coton à canevas de la couleur contrastante.
Fixer les pattes au ruban de satin. Dessiner leur contour au point avant , puis coudre l'ensemble au corps.
Confection et assemblage du fond :

Découper 10 rectangle de 6X4cm dans du feutre (5 de chaque couleur).
Les assembler à la machine au point zigzag large et serré.
Assembler cette bande aux 2 faces poulette au point de feston, avec du fil coton à canevas.
Attention ! La couture commence sur la jonction intérieure du bec.

Confection et Assemblage des Anses :

Découper les anses selon le patron dans les 2 tissus en rajoutant un surplus couture de 1cm.
Cranter la partie courbée et rabattre le surplus de tissu des extrémités sur l'intérieur (ourlet).
Assembler les 2 parties des anses endroit contre endroit à la machine.
Il n'est pas nécessaire de laisser une ouverture pour le retournement qui peut s'effectuer par l'une ou l'autre extrémité.
Retourner et donner un coup de fer sur l'ensemble.

Rembourrer généreusement de ouate et refermer les 2 extrémités des anses à la machine à 1cm du bord.
Fixer les anses au panier au fil coton à canevas, par trois point en croix serrés.
|
����� �� �����. ���������� �������� � �������������� ������������ ���� |
����� �� �����. ���������� �������� � �������������� ������������ ����
����� ��� ����� ���������� ������ ������������ ������ �� �����. �������� � �������� �������, ��������� ����������� �����. ������ ��������� - �����������. ����� ����� - ������� ������� ��� ��������� ������, ����� � �������. ������� ������-�����

|
������� ������ |
�����: ������� ������ |
�������� ������� |
 ���� ���������� � ������������ ����� The Mother Huddle , ��� �������� ����������� ��� «����� �������». �� ����� ���� ��� �� �����, � ��� ���������� � ����������� ������������ ����.
������������� ���� �������� ��� ��������� ������� (��������� ��������� �� ����), �� ������ ����� ���� ������������ � ��� ������ ��������������. � ������ �� � ���?
��� ������ �����������:
���� �������,
���� ������� ������� �����,
����� � ���. 
������ ��������� ������������ �� ��� ����������� � �������� �� ���� ����������: ������ ����� ���� ������ ��� ������, ��� ����� ���������� ���� �� ������. ���� ��� � ��������� �������� ��� ��������� ������� ����, �������� ������� �������� ����� ����� �������� �������� � ���������� �� ������� ����!
������� ������:
�������� ��� ������� ����� 12 �� 100 ��,
�������� ��� � ������ ������� (���� �� ������������ ������� �������� ������, ������ ������� ������ ��� ������), 
������� ��������� ������ � �������� ���� ������, 
������������� ������ � ��������� ��� ���������. 
������ ��������� ���� �������. 
����� ���� ������� ����� � ������ ��������� �������� �� ������� � ������ ���� , 
������������ �������. ��� ����� �� ����� ������: �� ��� �� �������. 
�������� ��� ������������� ������� �����, �� ������� ����� ��������� ���� ������. ����� �������� — ������ ������� ����� ���� 2 �� �� ���. 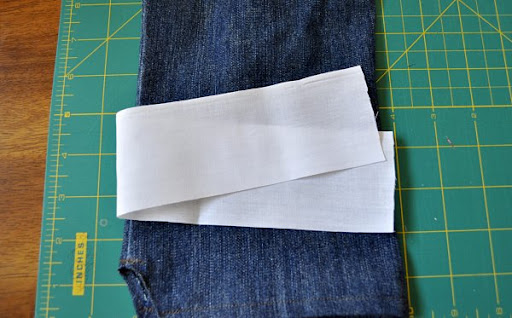
������������� � ������� ���� ������, 
�����, ���� — ������. 
������� ������ � ������ «��������». 
������ ��������� «������» � �������� � ������� �������, 
� ������������ ��������. �������! 
�����: ������ ��� ����� ��� ����� �������� ����� �������� ������ |
������� ������ (�� �� be_main) |


�����: ������� �� ����� |
�������� �� ���� |


����� ��������� "������ ������":
����� 1 - �������������
����� 2 - �������
...
����� 18 - ������� ��� ���
����� 19 - ������������ �����-�������
����� 20 - �������� �� ����
����� 21 - ��������� ��� �������
����� 22 - ������ �� �������
...
����� 37 - �������� ������� �� ������ �����
����� 38 - �������� " ��������� �����" ������ ������
����� 39 - �������
�����: �������� �� ���� |
��� ��������� |
�����: �����RA
��� ���� ����������� ����� �� �������, � �� ������ �������. � ����� ��������� ������������ ����, ��� ��� ����� ����� ��������. � ������ ��� �����������:
�����: ��� �� ������� |
������ �� ����� |
|
������� �� ����������� ������� |
������� ����� ����� ���������� ���������� ���������� ������ � ���� UA. ��� ����� �������� �� ��� ������� � �������� ����� ���������� ����������. ��������� ���������!
�����: ������� |
���������� �������� ������� |
�����: ����� ��� ������� ������� |
������� - ����� ������.������ �����. |
������� - ����� ������.������ �����.
������ ��� ��������� ������, �������� ��� ���������� ��������, ��������� ������, �� �� �������, � ������� �����������, ��� ��� ��� ����� ������� � � ������� � ���������, ����� ������ ����, � ��������� ���� ������ �������, ������������ ,�� ���� ������� ������� ����� �������.
��� ������������ �������� ����������� �������� - ������ ����� � �������, ������, �������, ������ � ����� �������� ������� �����.
1.

�����: ������� |
������� ����� |
�����: ������� ����� ����� ��� |
�� ������� �������� |
����� ����� ��������� � ������� �������.��� ���� �� ���������� ����� ���������� ����� ���������,���� ������� ���������� ���������� � ������� ������������.��������� ������-����� ��������� ���� �� ������ ��������.

|
��������� ������ �� ����� ���� |
��� � ���... ������ ����� ��������! ����, ��������� � ������ �������. �, ������� ��, ������� ������! ��� ����������� �������� �� �����, ��� ��� � �������, � ��� ��� ������ ������� �� ������, ��� ������ �������, ������ ��� � ������� ����� �� ��� - ��������!
� Jenn "Rook No. 17" � ����� http://www.rookno17.com ��� ������ ��� ������� ����� ������, ���� ��� ��������� ��������� ��������������

�����: ������ |
������� ������ |
�����: ������� ������ |
������ �������� |
�������, �������� ����� ����������� ������ �� 5 ���������. ��������, ������ ��� ������� � � ������������. ����� �������� �����, ��������. � ������ �� ������� �������
�������
�����: ������ ������� |
������� |
� ����� ����������� ��� ���� (��������, ������). ������ ��� �������� �� ������. � ������ ������������: �� ����� �������!

� ����� �������� �����

����� ������-������� �, �������, ������� �� ������ - ����� � �����!

|
��� ��������� |

����, ��� ����� ����� ������ ����� ��� �������. ���� � �� ���������� ������ ��������. ��������� ������� �������, ������� ������� � ������ ������, � ���������� ����� �����. ��� �������, ��� ��������� ����� ����� ������ �������� � ����� ���������.
� ������ ��� ���������� ��� �� �������� ���� ��� �� �����. ��� ����� ��� ����������� ������� �����, ������� 5��, ������ ����� � ����������, ������� 5 * 5 �� ������ ����� ,���� ������ ���� � ���, �����,����� �� ������ 6 �� � ���� ������� �������� �����������. ���� ������� �������������� ������������. ��������� ���������.
�����: ��� �� ����� |
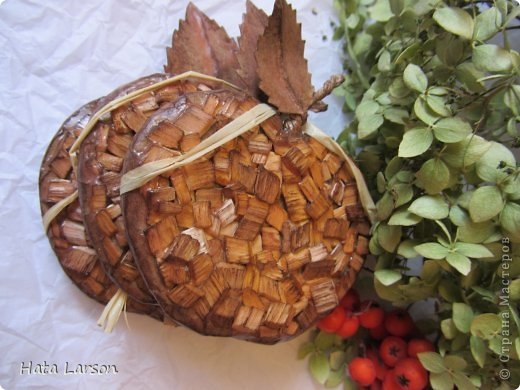
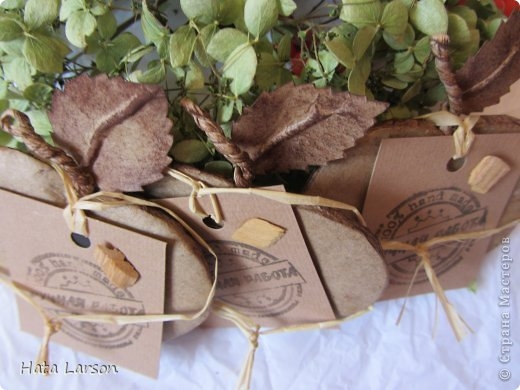
��������� ������� �� ������� |
����������� ������ �������� ������������� ������ �� Hata Larson �� ������ ��������. ����� ������ ��� ���������� - �����������, ���������� �� ������� � �������� (���� �������� ��� ���������� �������), � �������������� ����� ������ � ������. ������� ������-����� �� ������?

�����: �� ������� ������� ������� |
�� ���� |
|
�������� ������ �� �����, �� ��� �������. |
�� ������� � ����� �������� ������� ������. ��� ������� ����� ������ � � ���� �� � ������� ������, � � ������� �������� ���������. ����������. ��� ����� ���������� ������ � � ������ � ���� ���������� ����� ��������.

|
������� ��� ����� � �������. |
� ���� ������� ��������- ��������� ��� ���������? ��������� ������ �������� ������ ������������ ��������� � �������� ���������. �������� �� ����� ������. ��- ����� ������ ���� �� ���� � ��� �� �������. ����������� � ���������:


�����: ������� ��� ����� |
������������ ������� �� ������ |
������������ ������� �� ������

|
������ �������� ������� |


|
������ � ������� |

|
������� � ������� |
|
��������� ������� |
�������,���� ��� ����������� ������� ������� �� ���������� ������� �������.��� ����� �� ������� ����� �������� �������� ,�������,����� �� ���� ��������� ��� ������,�� ����� ������� � �������,������ ��������� �����,� ����� ������� ������ ������� �� �������� ����� �������� ������.��������,���������,�������� � ����������� �����������.


|
������ ��� ����� |
������������, ������� ������� � �������!
��� ���� ���������� � ����� ���������� ����������� ����������� ����� ������. � �� ��������� �������� �������� �� �� ����������.
������� � ����� �� �� ����� �� �������� ���� �����������.
������ ��� �����.
��� �����������:
1. ������� ������
2. ������ �������� �������� ��� ����� ������ ����� � ����� (�� �� ����� �����)
3. ������� ��������
4. �������
5. ����
 ������ �����
|
��� ������� � ��������� �������� |

|
������� ��� �����, ��������� ������� |
������� ������� �����, ��� ������ ������� ����� ��������� ��� ������� ������� � �������. � ���� �� �������� �����, ����� ������� � ������� ���������� «��� �� �����». �������, ���� ��������� �� ������ �� ������, �� ����� ����������� ���������� ������, ����� � ����, ���� ������ ������� �� ������ � �������. ��������� ����� ������ ����� ����������!
��� ����� ��� ���� ����� ��������� ������� ������� ������� ��� �����? �������. ������ � 2, ������ ���� – ����� ������ ��� ����������, ������� ���� ��� ������, ������� ������, ����� � ������������� �������. ����� ������, ����������� ��� �������� �����, �������� ������� ��� �������, �������.

|
������� ����� |
�����: ������� ������� ������� |
������ - ������ |

����� ��������� "������":
����� 1 - ��� ������� ������ ��� ����� �� ������ ������ ������
����� 2 - ��������� ��� �����-������.
...
����� 5 - �����, ������ � ����� ������ ������ - ��
����� 6 - �������� ������-������ �� ������ ��� �����
����� 7 - ������ ������?
����� 8 - ������ ������ - �������� ���������� �������
|
������ |
������� ��� ����, � ������� ������ ��� ����� �������� ������, ���������� ������ �� �����(��� �� ������, �������� �����). ������, �������� ������ � ������ ����������? � ������� ���� ����� ������ ������ �� ����� � �����. ����� ���������� ������, � ������� ����� ������������ ��� ������ ����� � ������� ������� �����. �������� ������ �����!


|