-Рубрики
- ХЕНД MEЙД (967)
- Для ребенка (280)
- Шитье (135)
- Вязание крючком (119)
- Украшения (95)
- Для рукоделия (88)
- Цветы (85)
- Всякие мелочи (84)
- Жизнь старых вещей (83)
- Лепка - глина, фарфор, пластика (82)
- Для дома (79)
- Декупаж (72)
- Ленты, кружева (71)
- Из картона, коробки (53)
- Из бумаги (41)
- Для кухни (35)
- Витражи, роспись (32)
- Вышивка (25)
- Мыловарение (22)
- Плетение из газет (22)
- Вязание спицами (21)
- Тильды, куклы (18)
- Скрапбукинг (18)
- Бутылки, банки (18)
- Переделка одежды (17)
- Шкатулки (16)
- Мешковина (14)
- Бисер, бусины (13)
- Фото для) (9)
- Из пласт. бутылок (8)
- Сумки (7)
- Коврики (7)
- Гипс (7)
- Кофейное (6)
- Конфетное (6)
- Соленое тесто (6)
- Фетровое (5)
- Кожа (4)
- Валяние (4)
- Яичные лотки (3)
- Из пакетов (3)
- Трафареты (3)
- Силикон (3)
- Мозаика (3)
- Картины (3)
- Свечи (2)
- Квиллинг (2)
- Топиарии (1)
- Папье-маше (1)
- Выжигание (1)
- ДЕТСКОЕ (523)
- Украшения (141)
- Заколки, обручи (84)
- Игрушки (79)
- Развитие (68)
- Для детских игр (67)
- Костюмы (64)
- Вязание (41)
- Рисование (36)
- Аппликация (31)
- Чтение (30)
- Уроки (26)
- Шапочки (25)
- Лепка (24)
- Прописи (16)
- Платья и наряды (12)
- Природные материалы (9)
- Поделки (8)
- Из пласт. бутылок (6)
- Английский (5)
- Опыты (3)
- Прически детям (3)
- Бисер (3)
- РЕЦЕПТЫ (315)
- Выпечка сладкая (115)
- Детское (69)
- Десерты (65)
- Закуски (58)
- Выпечка несладкая (46)
- Украшения (34)
- Вторые блюда (31)
- Молочное (19)
- Овощи (17)
- Заготовки (15)
- Рыба (11)
- Курица (11)
- Фарш (10)
- Пельмени, вареники (10)
- Напитки (9)
- Свинина (5)
- Пикник (3)
- Гарниры (3)
- Первые блюда (1)
- ПРАЗДНИКИ (230)
- Новый Год (106)
- Подарки (81)
- Пасха (40)
- Рождество (26)
- Валентина (24)
- День Рождения (12)
- Подарки мужчине (7)
- 23 февраля (6)
- 8 Марта (5)
- Открытки (1)
- ЛЕПКА (185)
- МК (121)
- Для работы (51)
- Идеи (33)
- Рецепты (19)
- Интересное (140)
- Иллюстрации (111)
- Природа (12)
- Ностальгия (11)
- Милашки (7)
- Прикольные (4)
- Креатив (4)
- Красивые места (4)
- Психология (3)
- Реклама (2)
- ДЛЯ ДОМА (133)
- Самоделки (74)
- Хранение вещей (46)
- Домоводство (22)
- Мебель (20)
- Дизайн (20)
- Полки (9)
- Цветоводство (3)
- КРАСОТА (63)
- Для лица (32)
- НатурCosmetics (18)
- Для волос (18)
- Для тела (13)
- Похудение (10)
- Тренировки (6)
- Макияж (1)
- ЗДОРОВЬЕ (16)
- Средства (10)
- Сосуды (2)
- Очищение (1)
- МОИ ТВОРЕНИЯ (5)
- Фотошоп (3)
- Компьютер (2)
- Фотограф (1)
-Поиск по дневнику
-Подписка по e-mail
-Интересы
-Друзья
-Постоянные читатели
-Сообщества
-Статистика
Джинсовый клатч. Мастер-класс |
How to Make a Denim Clutch with a Kiss Lock Frame -- Part 1 FREE Clutch Pattern included!
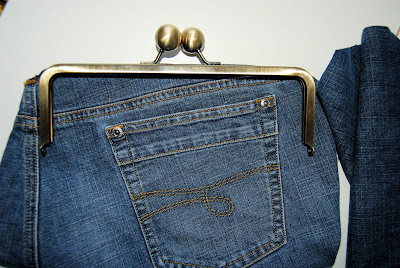
I just returned from a great week vacation and received an invitation to a birthday party in a couple of days for a dear friend. Since I just happen to have an old pair of denims, some cotton batting, muslin, a variety of yellow fabric from which to choose for the purse lining (because her favorite color is yellow), some fusible interfacing, fabric glue (for clutches I only use Gutermann HT2 fabric glue), and a 9-inch kiss lock frame -- I think I'll make her a denim clutch.
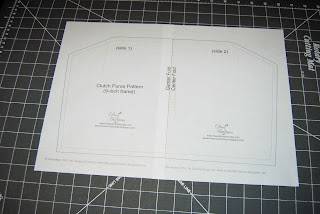
I've included my clutch pattern template with this post so if you would like to make a denim clutch with me then gather your materials together -- I'd love to have you follow along with me. Print off the 2-page clutch template (the original version) located at the bottom of this blog. (Be sure to set your printer to 100% so that it doesn't resize the pattern when printing.) Cut one of the patterns along the "Center Fold" line and tape them together.
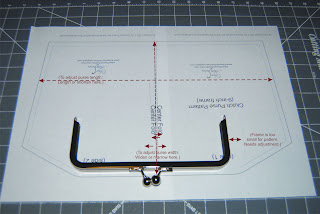
If your clutch frame fits the template, then you're all set to go. If the frame does not fit the pattern (as shown below), you'll want to make some adjustments to the pattern or your purse fabric will not fit the frame.
To widen or narrow the clutch, make the adjustment at the center fold lines. When I created the pattern, I made it long enough to include the denim pocket. If you don't want your clutch to be that long (from frame to bottom), then shorten the pattern at the horizontal red-dotted line.
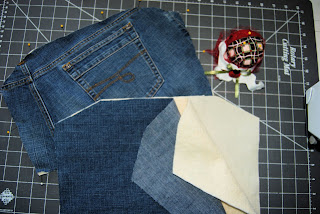
After you are sure your pattern fits the frame and all necessary adjustments have been made to the pattern (if any), cut out the pattern along the solid line. Position the pattern on the pair of denim jeans fabric, pin to secure the pattern, and cut out the fabric front side of the clutch. Cut out a second piece in a similar fashion for the fabric back side of the clutch.
Cut 2 from each of the following fabrics: cotton batting, muslin, lining (for inside your clutch), and interfacing. (As you can see above, I haven't cut my lining and interfacing fabrics yet since I'm not sure how I want to line the inside of my clutch. Tonight I'll give some though as to how I want to embellish the front of the clutch -- which I hope will help me decide what fabric to choose for the lining.)
| Рубрики: | ХЕНД MEЙД/Жизнь старых вещей ХЕНД MEЙД/Шитье |
Понравилось: 1 пользователю
| Комментировать | « Пред. запись — К дневнику — След. запись » | Страницы: [1] [Новые] |


