-Рубрики
- вязание крючком (136)
- сумки (127)
- готовим дома (90)
- конфеты (3)
- вышивка крестом (66)
- подушки (63)
- идеи для вдохновения (52)
- самоделки (45)
- открытки (20)
- к новому году (42)
- оригами (35)
- шитье (34)
- а ты попробуй (30)
- конфетные букеты (1)
- цитаты (27)
- украшения (23)
- медицина (20)
- обереги (19)
- стихотворения (18)
- красивые легенды (18)
- вязанные цветы (16)
- музыка (16)
- уроки фотошопа (16)
- трафареты (15)
- игрушки (14)
- детские книги (12)
- индия (10)
- йога (10)
- пластика (9)
- идеи для дачи (7)
- мандалы (6)
- программы (5)
- видео (5)
- смешное (3)
- музеи мира (3)
- психология (3)
- худеем (3)
- живопись (3)
- путешествия (2)
- история (2)
- комнатные растения (0)
-Музыка
- СВЕЧИ,ШАМПАНСКОЕ,"БОЛЕРО",ПОЛУМРАК...
- Слушали: 378 Комментарии: 0
- Зимняя ночь(Б.Пастернак)
- Слушали: 54047 Комментарии: 0
-Поиск по дневнику
-Подписка по e-mail
-Постоянные читатели
-Статистика
клатч с бантиком |
DIY: Bow clutch sewing tutorial.
** This is for personal use, only. Please do not make this to sell it. Thank you! **
And fiiiinally... the tutorial you've been waiting for. This is my first real sewing tutorial - which scares me a bit, because I've never actually taken a sewing class, so I don't know all the terminology. What I do know is that I've learned to sew lots of things by reading tutorials, so hopefully I can make this simple enough that even you beginners can feel confident making a bag. And yes, a bag with a zipper! It can be done, I promise.There are plenty of photos, so hopefully that will help. If you have any questions, please leave them in the comments section and I'll be happy to clarify.
**Also, please note except where I say, "Sew close to the edge," I am using a 1/2" seam allowance throughout. I have my machine set to this, so I am using the presser foot as my guide to sew 1/2" from the edge of the fabric.
Ok, let's get started!
Supplies you'll need:
1/2 yard exterior fabric*
1/4 yard interior fabric (I recommend a quilting cotton)
9" zipper that matches your exterior fabric
1/4 yard #808 Pellon Craft Fuse interfacing
Sewing thread that matches your exterior fabric
Sewing machine
Scissors
Pins
Iron & ironing board
*I recommend a medium to heavier weight cotton for this. Linen is what I'm using, and it works perfectly. You don't want to use a quilting weight cotton or something really light - it will make the final product too flimsy.
1. Start by cutting your exterior pieces. I use a quilting cutting mat which makes things as accurate as possible.
2. Now cut interior fabric pieces.
3. Cut interfacing.
4. Bring your strap piece to the ironing board.
Sometimes, at the end of this step, if my strap doesn't feel sturdy enough, I'll cut a thin strip of interfacing and tuck it inside the crease before sewing. This is an optional step.
5. Now it's time to sew your strap.
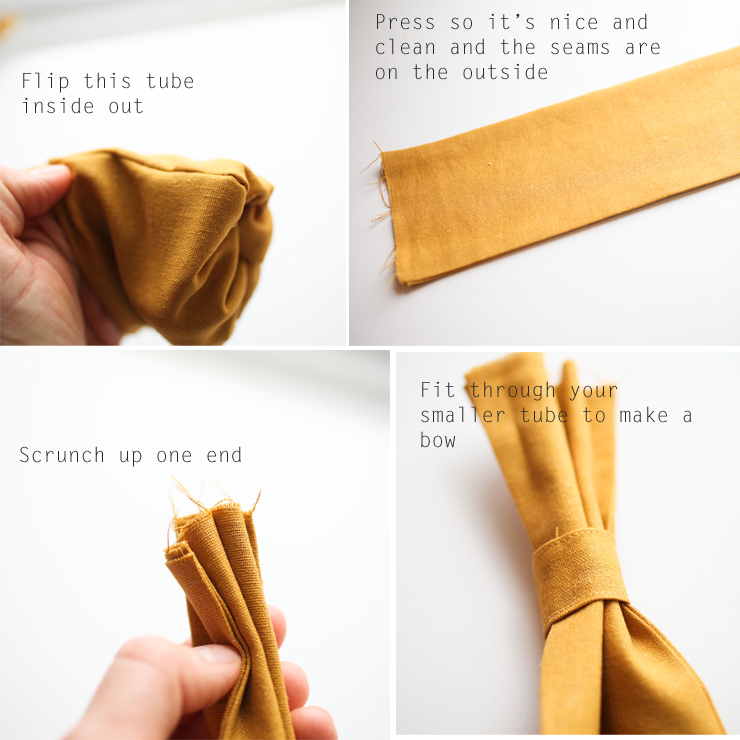
6. Set the strap aside and let's work on the "knot" of your bow.
7. Once you've gotten the "knot," let's work on the other part of your bow.
8. Set your bow aside for now, and grab your interior and exterior fabric pieces and your pieces of interfacing.
9. Now it's time to attach your bow.
10. Set those pieces aside and let's work on installing your zipper.
11. Attach the exterior fabrics to the other side of your zipper.
12. You're on the home stretch! Let's add the strap and finish the bag!
| Рубрики: | сумки |
| Комментировать | « Пред. запись — К дневнику — След. запись » | Страницы: [1] [Новые] |


