��������: http://www.splitcoaststampers.com/resources/tutorials/freestandingpopupcard/
�����:
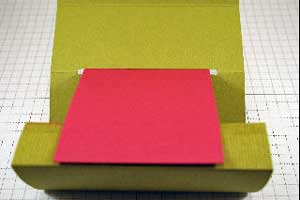
Free Standing Pop-Up Card
by Mary Jo Albright
Create a free standing card that folds down flat.
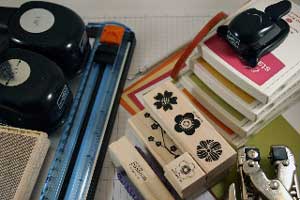
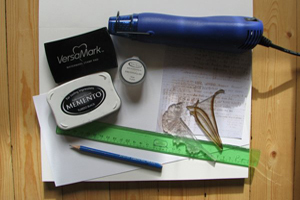
Supplies
- Paper cutter with scoring & cutting blade
- 4-1/4" x 11" piece of cardstock for base
- 2-1/2" x 5" piece of cardstock for tag
- 2-3/4" x 5-1/4" piece of cardstock for tag matting
- Stamps
- Inks
- Sticky Strip™
- Hobby Blade
- Ruler
- Mat Pack
- 1-1/4" & 1-3/8" Circle Punches
- Crop-a-Dile™ tool
- 3/16" corner rounder punch
- Accessories (ribbon, hemp twine, jumbo eyelet, brads, beads, boho blossoms punch, additional cardstock for embellishing)
Step-by-Step
-
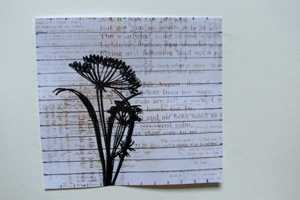
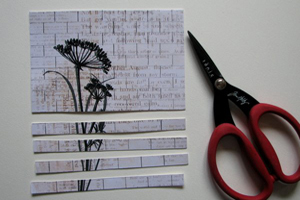
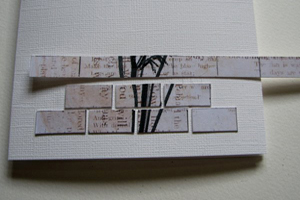
Step 1
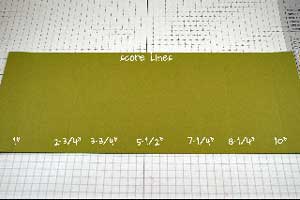
Score the 4 1/4" x 11" piece of cardstock at at 1", 2-3/4", 3-3/4", 5-1/2", 7-1/4", 8-1/4", and 10".
-
Step 2
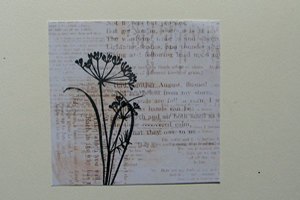
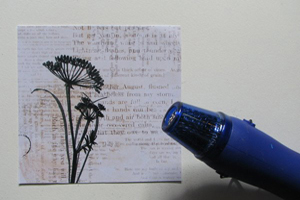
Stamp as desired. If using a background stamp, fold in half on the 5-1/2" line to achieve full-coverage without having to line up the image.
-
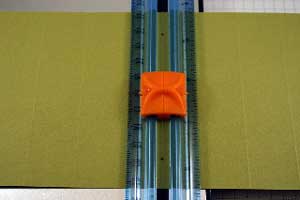
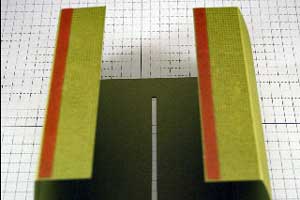
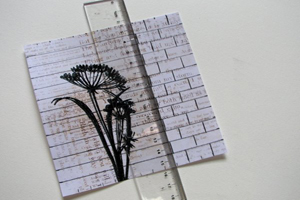
Step 3
Turn cardstock base over to the non-stamped side. On the middle 5-1/2" score line, make a mark 5/8" in from both sides.
-
Step 4
Cut between marked lines to make a slit for your tag.
-
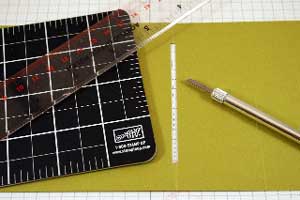
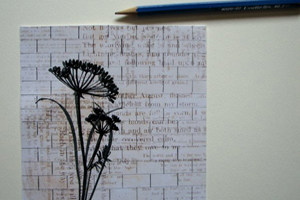
Step 5
You can make this slit larger if your tag has dimension and bulky accessories. Use a hobby blade, ruler, and setting mat to create your desired opening.
-
Step 6
Apply Sticky Strip™ to the stamped side on the end 1" scored sections. You will want to place one strip next to the score line on one, and one strip at the edge on the other side (this becomes important when closing the piece together and for holding the tag in place).
-
Step 7
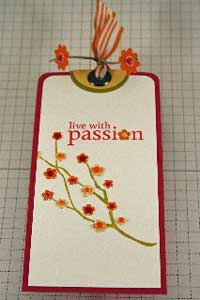
Create your tag with the 2-1/2" x 5" piece of cardstock and adhere to the mat measuring 2-3/4" x 5-1/4". Adhere punched circles to the top. Attach a Jumbo Eyelet. Add ribbon so tag can be pulled up.
-
Step 8
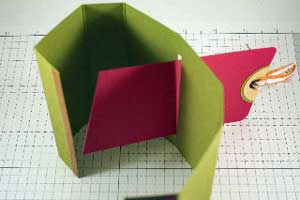
Slide tag into cut slit.
-
Attach tag to one of your Sticky Strips™. Make sure it is centered in the slit and lines up with the bottom.
-
Step 9
Fold up the other side with the Sticky Strip™ and attach to the tag.
-
Step 10
Embellish the 1" cardstock base section to finish of your card.
-
Your card will fold flat.
Your Turn
You've seen the tutorial, now you try it! We've got a section of the gallery set aside for Free Standing Pop-Up Card. Try this technique, then upload your artwork to the gallery. Show us your creations!
Questions and Comments
We'd love to get your feedback or questions. Leave your comment below.
GORGEOUS !!! Great tutorial....very easy to follow !! Thank you so much, Mary Jo!
Corinne (aka Roxy) | Wed Aug 27, 2008 at 5:58 AM
I love this, looks easy, but with great effect, thank you
Beth | Wed Aug 27, 2008 at 6:17 AM
What a fun card...your tutorial is great!!!! I'm looking forward to giving this one a try!!
Joycelyn (Stamps'nCoffee) | Wed Aug 27, 2008 at 6:32 AM
I absolutely love this card!!! The tutorial is clear and concise and will be wonderful to use in a school project.
Thankyou!!!
Deborah | Wed Aug 27, 2008 at 6:33 AM
This is a fantastic design! I love the 3-D style and how it can fold flat! Thanks for the great tutorial!
Sue (suen) | Wed Aug 27, 2008 at 6:49 AM
Oh My!
what a talented lady. . .
I just love your design. I have that stamp set and I can't wait to start on it.
thank you for sharing! Rosie
rosie k | Wed Aug 27, 2008 at 6:50 AM
I'm going to try this - looks like a fun challenge! Thanks Mary Jo!
Lesa (okcapitolgirl) | Wed Aug 27, 2008 at 7:12 AM
I've always wanted to learn how to do this card, that's so much for the great tuturial! Now on to make one and post.
Linda | Wed Aug 27, 2008 at 7:34 AM
ohh these are so fun! I made one of these for DS 1st birthday invites, suprised there wasn't a tutorial yet! YOu did great!
Silvia Mabie | Wed Aug 27, 2008 at 7:52 AM
Beautiful!! What size envelopes do these fit in?
sherri | Wed Aug 27, 2008 at 7:58 AM
It fits into a "medium size" envelope measuring 5-3/4" x 4-3/8"
mary jo albright | Wed Aug 27, 2008 at 8:47 AM
very nice tutorial. I can't wait to try it! Thanks for also posting the final measurements re: the envelope!
Brandie N | Wed Aug 27, 2008 at 9:54 AM
This is so adorable. I just tried it with scrap paper and it works beautifully. Thank you so much for your expert tutorial. Niki
Niki | Wed Aug 27, 2008 at 10:24 AM
This is a totally WOW card! Love the detail and will try to create something similar with my next project. Thank you for sharing you great design and tutorial.
Jeanne | Wed Aug 27, 2008 at 11:27 AM
Beautiful pop-up Mary Jo, can't wait to try it. Thanks for the fun step-by-step instruction.
Stamping Hugs, Jennifer

Jennifer Meyer | Wed Aug 27, 2008 at 11:40 AM
This is really a sweet card. I am going to make it tonight. Thank you for the inspiration.
Holly | Wed Aug 27, 2008 at 12:27 PM
Thanks for the awesome tutorial MJ - love this!!! You are so very talented, love seeing you do this on SCS!! *STAMPIN HUGS* Alex
Alexandra Hobson | Wed Aug 27, 2008 at 1:39 PM
Oh, this looks like fun, I have to try one. And I love that it folds flat! Thanks for the great tutorial.
Cheryl | Wed Aug 27, 2008 at 1:57 PM
LOVE IT! I am always impressed with the new creative cards/projects that everyone comes up with and shares with others. Good work!
Vicki | Wed Aug 27, 2008 at 2:47 PM
I so look forward to your cards and tutorials.
You brighten my day with your ideas and beautiful designs. Thank you for the tutorial.
I'm going to make one tomorrow.
Merrily | Wed Aug 27, 2008 at 4:12 PM
Page 1 of 3 pages 1 2 3 >
Video!


 ����� ...


/glitter.gif)
/glitter (2).gif)
/glitter (3).gif)
/glitter (4).gif)
/glitter (5).gif)
/glitter (6).gif)
/glitter (7).gif)
/glitter (8).gif)
/glitter (9).gif)
/glitter (10).gif)
/glitter (11).gif)
/glitter (12).gif)
/glitter (13).gif)
/glitter (14).gif)
/glitter (15).gif)
/glitter (16).gif)
/glitter (17).gif)
/glitter (18).gif)
/glitter (19).gif)
/glitter (20).gif)
/glitter (21).gif)
/glitter (22).gif)
/glitter (23).gif)
/glitter (24).gif)
/glitter (25).gif)
/glitter (26).gif)
/glitter (27).gif)
/glitter (28).gif)
/glitter (29).gif)
/glitter (30).gif)
/glitter (31).gif)
/glitter (32).gif)
/glitter (33).gif)
/glitter (34).gif)
/glitter (35).gif)
/glitter (36).gif)
/glitter (37).gif)
/glitter (38).gif)
/glitter (39).gif)
/glitter (40).gif)
/glitter (41).gif)
/glitter (42).gif)
/glitter (43).gif)
/glitter (44).gif)
/glitter (45).gif)
/glitter (46).gif)
/glitter (47).gif)
/glitter (48).gif)
/glitter (49).gif)
/glitter (50).gif)
/glitter (51).gif)
/glitter (52).gif)
/glitter (53).gif)
/glitter (54).gif)
/glitter (55).gif)
/glitter (56).gif)
/glitter (57).gif)
/glitter (58).gif)
/glitter (59).gif)
/glitter (60).gif)
/glitter (61).gif)
/glitter (62).gif)
/glitter (64).gif)
/glitter (65).gif)
/glitter (66).gif)
/glitter (67).gif)
/glitter (68).gif)
/glitter (69).gif)
/glitter (63).gif)
/glitter (70).gif)
/glitter (71).gif)
/glitter (72).gif)
/glitter (73).gif)
/glitter (74).gif)
/glitter (75).gif)
/glitter (76).gif)
/glitter (77).gif)
/glitter (78).gif)
/glitter (79).gif)
/glitter (80).gif)
/glitter (81).gif)
/glitter (82).gif)
/glitter (83).gif)
/glitter (84).gif)
/glitter (85).gif)
/glitter (86).gif)
/glitter (87).gif)
/glitter (88).gif)
/glitter (89).gif)
/glitter (90).gif)
/glitter (91).gif)
/glitter (92).gif)
/glitter (93).gif)
/glitter (94).gif)
/glitter (95).gif)
/glitter (96).gif)
/glitter (97).gif)
/glitter (98).gif)
/glitter (99).gif)
/glitter (100).gif)
/glitter (101).gif)
/glitter (102).gif)
/glitter (103).gif)
/glitter (104).gif)
/glitter (105).gif)
/glitter (106).gif)
/glitter (107).gif)
/glitter (108).gif)
/glitter (109).gif)
/glitter (110).gif)
/glitter (111).gif)
/glitter (112).gif)
/glitter (113).gif)
/glitter (114).gif)
/glitter (115).gif)
/glitter (116).gif)
/glitter (117).gif)
/glitter (118).gif)
/glitter (119).gif)
/glitter (120).gif)
/glitter (121).gif)
/glitter (122).gif)
/glitter (123).gif)
/glitter (124).gif)
/glitter (125).gif)
/glitter (126).gif)
/glitter (127).gif)
/glitter (128).gif)
/glitter (129).gif)
/glitter (130).gif)
/glitter (131).gif)
/glitter (132).gif)
/glitter (133).gif)
/glitter (134).gif)


 �������� , �����\ �������� ���� ������� �������� ������, ������� ���� ��� ������...��������