-÷итатник
Lady Boutique Series є4845 2019 »здательство: Boutique Sha язык: €понский ѕопул€рный €...
Ѕез заголовка - (0)Ќовогодние бесшовные фоны »сточник: ѕривет.ру. Ѕлог ћаришки. ...
÷веты из пластиковых пакетов - (0)÷веты из пластиковых пакетов &n...
Morgenmuffel - немецкое выражение, точнее, обозначение - "тот, кто ворчит по утрам". - (0)пока не забыла слово) Morgenmuffel - немецкое выражение, точнее, обозначение - "тот, кто ворчит п...
Ѕез заголовка - (1)———–
-ћетки
-–убрики
- HAND-MADE (3119)
- бисер (161)
- брелки, подвески (8)
- вал€ние (5)
- вышивка (206)
- в€зание (1526)
- ганутель (5)
- декупаж (32)
- джинсы и все из них (1)
- игрушки Hand-made (339)
- идеи подарков (266)
- казанши (3)
- квиллинг (20)
- квилтинг (82)
- киригами (5)
- куклы (127)
- лепка (58)
- макраме (7)
- мастер-класс (393)
- мыло hand-made (13)
- оригами (27)
- плетение (24)
- рукоделие (только фото) (190)
- рукодельные цветы (1)
- свечи Hand-made (10)
- соломка (1)
- сумки (113)
- сумки (2)
- шитье и крой (264)
- Ѕ»ЅЋ»ќ“≈ ј (1451)
- видео (59)
- географи€ (219)
- животные (229)
- идеи и способы заработка (50)
- истори€ (335)
- лингвистика (39)
- литература (177)
- наука (93)
- поэзи€ (5)
- проза (1)
- растени€ (102)
- фотографии (399)
- Ѕ»ЅЋ»ќ“≈ » ON-LINE (244)
- журналы, книги скачать (60)
- полезные ссылки (174)
- ссылки на сайты и блоги, которые интересны мне (13)
- ƒЋя ƒЌ≈¬Ќ» ј (381)
- глиттеры (55)
- ќткрытки (66)
- схемы, фоны (186)
- украшени€ (89)
- ƒЋя ƒќћј (630)
- детска€ (195)
- интерьеры (12)
- ∆«Ћ (221)
- »« Ќ»„≈√ќ ќ≈-„“ќ (158)
- из CD-дисков (3)
- из автомобильных покрышек (2)
- из бумаги (63)
- из газет (19)
- из галстуков (1)
- из картона (3)
- из колготок и носок (5)
- из компьютерных плат (1)
- из пластиковых бутылок (42)
- из пластиковых пакетов (12)
- из прищепок (1)
- из проволоки (1)
- из ракушек (1)
- из фетра (7)
- резиновые перчатки (1)
- »— ”——“¬ќ (630)
- живопись (286)
- музыка (154)
- ќћѕ№ё“≈–, √јƒ∆≈“џ, »Ќ“≈–Ќ≈“ (222)
- ”Ћ»Ќј–Ќќ≈ (191)
- Ћј…‘’ј » (336)
- полезные советы (336)
- Ћ»„Ќќ≈ (27)
- ћои работы (7)
- мо€ жизнь и семь€ (24)
- ћ≈ƒ»÷»Ќј » «ƒќ–ќ¬№≈ (181)
- ѕ≈ƒј√ќ√» ј, ќЅ–ј«ќ¬јЌ»≈ (99)
- ѕ–ј«ƒЌ» » (60)
- –ј«Ќќ≈ (709)
- —јƒќ¬ќƒ—“¬ќ (86)
- ”’ќƒ «ј —ќЅќ… (59)
- ÷»“ј“Ќ» (19)
- мудрые советы (19)
- ёћќ– (442)
-—сылки
-ћузыка
- ѕаганини-вальс номер 4
- —лушали: 433 омментарии: 0
- —писок Ўиндлера, колыбельна€ ангела
- —лушали: 16201 омментарии: 0
-‘отоальбом
-ѕриложени€
 я - фотографѕлагин дл€ публикации фотографий в дневнике пользовател€. ћинимальные системные требовани€: Internet Explorer 6, Fire Fox 1.5, Opera 9.5, Safari 3.1.1 со включенным JavaScript. ¬озможно это будет рабо
 ќткрыткиѕерерожденный каталог открыток на все случаи жизни
- “оррЌјƒќ - торрент-трекер дл€ блогов“оррЌјƒќ - торрент-трекер дл€ блогов
-Ќовости
-¬идео

- ћои дети (музыкальна€ школа)
- —мотрели: 76 (0)

- Ћюсина свадьба
- —мотрели: 591 (1)
-ѕоиск по дневнику
-ѕодписка по e-mail
-ƒрузь€
-ѕосто€нные читатели
-—ообщества
-“рансл€ции
-—татистика
«аписей: 7361
омментариев: 1814
Ќаписано: 9950
Ќебольшие кошелечки-шкатулочки |
»сточник: http://www.craftpassion.com/2012/01/macaron-coin-purse.html
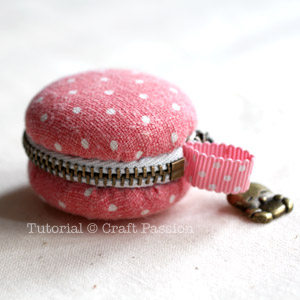
Macaron Coin Purse
Just can’t help for not making these sweet little macaron coin purses when one of Craft Passion’s Facebook fans showed them to me. Thanks to XYZZhandmade for her inspiring handmade and some tutorial links in Japanese, this, this, this and this. No, I can’t read Japanese but I can guess from the pictures on how to sew it. Here is the English version of tutorial on how to sew this macaron coin purse where I add more details in the sewing.
The space inside the coin purse is quite limited but good enough to place some small jewelries like earrings, rings; may be to keep some small coins, folded money; a place to keep small piece of note that wrote your shopping list and reminder etc. Or, simply use it as a key chain or hanging ornament. Or, turn it into something enormously cute, like this.
I have tried both nylon and metal zipper, each gave different feel and effect on the macaron coin purse. Nylon zipper is easy to sew since you can just cut the zipper to the correct length. Zipping and unzipping is easier on nylon zipper too. Aesthetic wise, I like metal zipper though it requires more works to do. If you find zipping on metal zipper is craggy due to small circular shape, rub the zipper’s teeth with some wax or candle, then zip and unzip a few times, you will find zipping is smoother after the waxing.
 Get ready all the materials and tools needed to sew a macaron coin purse.
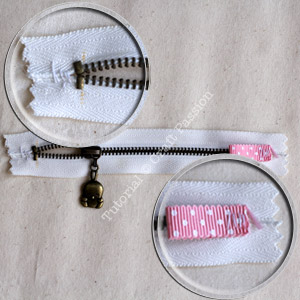 Sew to join the zipper tape together above the top stops.
Fold the ribbon into half and sew it on the bottom stop with ends facing zipper end.
 Fold the zipper right side together and sew to join it into a ring.
 Trim the zipper ends to 1/2″ seam allowance from the stops.
Fold the 1 1/2″ square fabric into half then fold a seam allowance of 1/4″.
 Encase the seam allowance and bind it by sewing the fabric onto it.
 Bend the binder to the bottom stop side and sew it on the zipper.
 Turn to the right side and this is how your zipper is going to look like.
 Make small running stitches along the edges of the zipper. Pull to gather.
Repeat on the other side.
Set aside.
 Cut away the button studs from the back plates. Be careful and point the stud away from you and /or anyone while cutting it. This little tiny metal can really shoot far.
Set aside.
 Trace circles to the fabrics with pencil or fabric marker.
2 3/4″ circle on main polka-dot fabric and lining fabric, cut 2 from each fabric.
2″ circle on batting, cut 2.
 Apply a thin layer of glue on the cover and attach it to the batting.
Make 2.
Let dry or until safe to work on it.
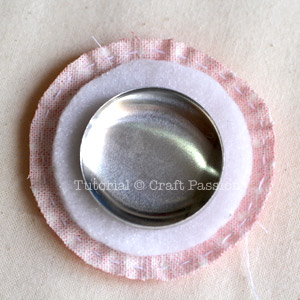 Make small running stitches along the edge of the fabric. Place the cover onto the fabric.
 Pull the thread and gather the fabric onto the cover snugly. Knot the thread.
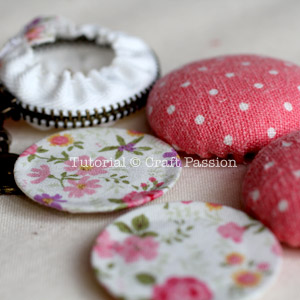 Repeat the same to another cover and 2 back plates.
 Use an erasable fabric marker to plot a circle along the back of the cover. The line should be on top of the metal edge of the cover.
 Slip stitch the cover to the zipper, about 3/8″ from the center line of the zipper.
The further you sew from the zipper, the bigger the coin purse space is.
 Completed 1 cover, repeat the same to the other side.
 Turn to the inside, place the back plate on and slip stitch it to the zipper.
Repeat the same on the other plate.
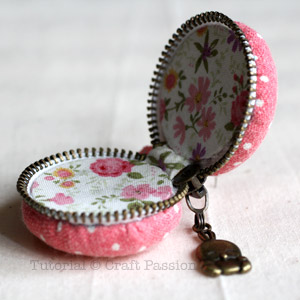 A completed macaron coin purse. The storage space is quite small, good for keeping ring, and bracelet. Or, merely use it as a key chain or hanging ornament.
If you can find a small circle mirror of about 1″ to 1 1/4″, glue it on the back plate and turn this macaron coin purse into a small cosmetic mirror.
 View from the bottom stop of the macaron coin purse.
 Another view when the coin purse is placed vertically.
Have a nice day & happy sewing ![]()
| –убрики: | HAND-MADE/идеи подарков HAND-MADE/мастер-класс |
ѕроцитировано 2 раз
| « ѕред. запись — дневнику — —лед. запись » | —траницы: [1] [Ќовые] |


