�������� �� ������ �������� ��� - �������, ��������, �������.... |
������� |
�� ���� �� ���� ����� ����� ������ ��������� �������� �� �����.
����� �������� �������� � ����������������.
����� ���� ��� ���� ���������� ��� ������ ��������� ���������� � ���� ������ 20-30 ��� �����.......� �������� ���� ������� ������� � 1980 �� 1996.


������� �� Pierre Balmain
|
���������� ������ �� ��������� ������ ����� (��) |
������� |
�����: ��������� ����� ������ �������� ���� ��� ������ ������� ������ ������ �������� ������ �������� ����� handmade |
��� ����� ������ �� ������ ������ (Madeleine Vionnet) |
������� |
Madeleine Vionnet (1876 - 1975) �� ��� ������, ��������� ��������������� � ��������������-����������� ������, ������� �������� �� ������������ � ����������� �������� ���� ����� ��������� � �������.
�� ��������� ��������� ����� �������� � �������� ��������� �������. �� ����� ����� ���� ���������� ���� �������� �������� �������. ������ �� ��� ��������� ������ � ����������, ��� ��� ��� �� ����������, � ��������� ����, ������ ���� ������. ����- ��� �����-�������� �������������� ��� �������:
�������� ����-�� ����������!

������ �� 4-� �������. ������� �� �����������, �� ����� �������� ��������.

|
����� ���������� "�������- �������!" |
������� |
�� ��������� ��������� ����� �������� ���� ��� ������� ������������!
����� ���������� "�������- �������!" ����� ����� ������������ ��� ���� � ��� ������ �������.


�����: ���� ��� ������ ������� ������ ������ �������� ������ ���������� �������� ����� handmade pillow ������� ���������� owl cosmetic bag |
���� ����� ������� |
���� «������� ��������» ��� ������ ����! ��������� �� ��� ����������. |

�� �� ������ ����������
������ ������ ������ ����������� ���� ��������� �������. ����� �������� ����� ������ �� �����, �� ������, �� ������� � �������, � ����� ��������� � ����� ����� ���������� ���������� ���������� – ����� ��������� ����������!
����, ��� �����������:
�����: ���� ������� ����� ��� ����� �� |
Were has she been? |
������� |
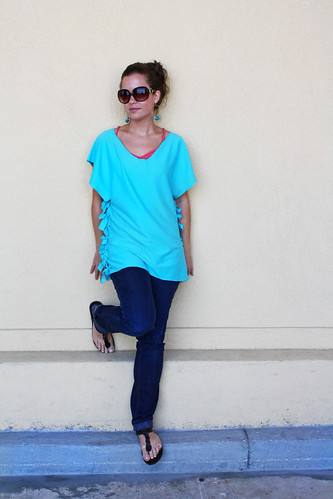
���� ��� ����� �� ����. �� ��� ����� ����� ����� ���������.
� ������ ������� � ������ ����� ������ � �����������. �������� �� ���� ������� � ������� � ��� ���� ��� �������� "Gap")))) ������ ��� ������ ������ �� Aldo. ��� ����� ��� �����������. ������������ �������� ��� ��� ������ ���� �������� �������. ��� �� ����� ���� ������. �� S. ������ ���� ����. ��� ������������ ��������. ������ ������ ������, ��� � �� ������, ��� ����� ��� ����������....�� 30%

����� ������ ������ �������.
������ ������ �������� ����������� �����. ����� �� ���� � ������ ��� ����� ��������. ��� ���� ���������� � ���� ������������!
�� �������� ����� ������ ������� ����� ����� ������� � ����� ������. � ��������� �� ����������. ���������� ����� ���������� �� ��� ������.

������-�� � ���������� �� ������ ������ ��� ������� ���-�� ������. ���� ����� ��������� �� ����.
������ ������� - ������ ����: Ralph Lauren "Romance". ����� ��� ��� ��������, ������ ��� ������� �������- ��� ������.

�����: ralph lauren "romance" ���������� ����� ������� ����� ������ ������ aldo ����� |
���� ��� ������ ������� ������ ������ 2 |
������� |
������ ���� ������������� ������� ���������� ���������� ������ � ������� � ������ � ������������� �����. ��� ������� ������� �� �������, �� ������� ����� ����� ����� ������ ��������� � �� ������ ����� ����.

�����: ����� handmade ������� ������ ��������� ������ ������ �������� �������� pillow ���� ��� ������ |
���� ��� ������ ������� ������ ������ |
������� |

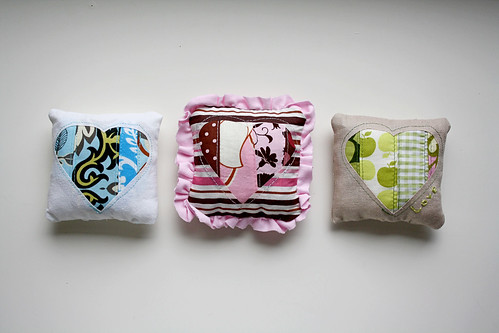
�������� �� ������ ���������� ���������� ���� ��� ������ �������! ���� ������� �� ������� �� ����� ����� ��� ������� ���� �����! � �����, ��������-��������������,� ����������� ������ ��� ����� �������� ������� � ����� ���� ��� ������!

�����: ����� ������� ������ ����� ������� ��������� ��������� ������ ����� �������� |
������ ������, ��������� ������ �� �����!! |
������� |
���...������ ��������� ����! ��� � ���������!!!
�� ������� ������ ������� ��� ����� � ���������! ����������� ���� � ����� �� ����� �������� ���������. ����� ���������� ���� ������ ��������� ��������-��������� � �����������.
��������� �� ��� ��� �������.)))
����� ������, � ��������� ����....������� ��������� ���� � ���������(������� ��� �����, ��� ��� ��� ����� �����). �� ��� ���� ������ ������ � ������� ����- ����� ����������)) �� ���������� ���� � ���������� ����. ��������� ���� ���������.
��� � ���� ;) ������ ������ ��� ���� �����


��������� �� �������� �� |
������� |
This is a little tutorial I came up with on how to sew a zippered pouch with a pleat. I am sure that many others do this differently but this is the method to my ‘madness’ so to speak.
The very first thing you need to do is to choose your fabrics. For this tutorial I have chosen to use Amy Butler Kashmir in Olive and line it with a beautiful coordinating blue Kona Cotton
You will need to cut out 2 pieces for the outer fabric, 2 pieces for the lining and interfacing for each piece, they should all measure the same. I choose to do a basic size pouch which starts out with pieces that are 10” wide. NOTE: I will be using a 7” zipper.
 Ok, now iron the interfacing onto the fabric as you normally would. I have chosen to only line the outer fabric and I have used a light to medium weight fusible interfacing. If this pouch were going to hold electronics etc I would use a thick fleece interfacing so that there would be appropriate padding.

Making the pleat:
To start off mark the center of the fabric as I have done here in this photo (my center is 5”)
You will want to go over 1" from the center and mark then go over one more inch from that and mark (see photo A) . Bring the two marks together and pin, this makes one half of your pleat(see photo B ).Repeat for the other side of pleat. 

Do this for all 4 pieces and then you are ready to start putting in the zipper!
 Putting in the zipper:
First thing you do is lay the outer fabric down right side facing up, then lay the zipper upside down along the top edge of the outer layer of fabric (the zipper pull should be facing down to the outer layer of fabric)
Then lay the lining piece on top of that with the wrong side facing up.
To recap the zipper should be sandwiched in between the two pieces of fabric, the front side of the zipper should be touching the right side of the outer layer of fabric. The fabric pieces should be right sides touching. Here is a little pic to hopefully make this clearer.
 Now pin all along the piece making sure to line up the edges of all three pieces and also making sure to pin the folds for the pleat, the pleats on both pieces should line up pretty closely.
Next step is to sew all the pieces together making sure to use your zipper foot on your sewing machine. Here is a close up of my piece being sewn up.
 Now, this is what you should have when you turn the piece with right side out:
 Now repeat this step for the other side.
Once you have done this for both sides my next step is to stitch along the top edge of each side. Here is a photo to show you what I mean.
 You want to make sure to keep your stitches as straight as possible because this seam is seen on the finished product.
The next step is sewing the pouch together. First you will lay it out with both outer pieces together and the lining pieces together and you will pin all the way around. You want to make sure to fold the zipper ends towards the lining, here is a pic to demonstrate.
 Make sure to open the zipper at least half way before you finish pinning the piece together (picture C). You will be so upset if you forget this step because you will have to take all of your stitches back out to get the zipper open so you can pull it right side out!!
Once you have the piece pinned all the way around you are ready to sew it together. You are going to leave an opening in the bottom of the lining so you can pull the outer layer through. Picture D shows how you are going to sew all the way around leaving an opening at the bottom of the lining.


Once you have finished sewing around the piece next you will be turning the piece right side out. Carefully reach inside the opening in the bottom of the lining portion and grab the outer layer of fabric and pull through, here is a pic to demonstrate
 Once you have the piece turned right side out you will want to fold in the seam and iron the opening in the bottom of the lining and sew closed. You can either hand sew it closed using an invisible stitch or you can sew it closed with your sewing machine. Congratulations you have just completed your cute little zippered pouch with a pleat. Here is what my finished product looks like.

�����: ������ ������ ����� ����� ����� ������ ����� �������� ��� ����� ������� |
������ ����� ������� ��� ���������. |
������� |
�����: ����� ������ ����� ������ ������ �������� ����� ����� ��� ������ ���������� |
����� ����� ��������� ��� ������! ������ ����� |
������� |
�����: ����� ������ ����� ������ ������ ������� �������� ��������� |
����� ������ ������ �� |
������� |
�����: ����� ������ ����� ������ ������ �������� ����� ����� |
��� �� 7 �����. ������ ����� |
������� |
�����: ����� ��� ������ ����� ������ ������ �������� |
��� ������ ������� ��� ��������� (� ���������) |
������� |
Want to meditate and do more yoga in the new year? Learn how easy (and inexpensive) it is to make your own props, and get started!!, Just follow the easy-to-follow illustrated instructions here at http://www.FineCraftGuild.com. OM!!!!
A zafu is a cushion that is specially designed for seated meditation. Most of us simply call it meditation pillow, meditation seat or cushion, but the official term is ‘zafu’. Now you know…
It proofed quite difficult to find some half-decent instructions to make them, however, I found them! The information in this free how-to craft tutorial is from “To Forget the Self: An Illustrated Guide to Zen Meditation” by John Daishin Buksbazen, published by the Zen Center of Los Angeles, a book which is now out-of-print *.

Fabric: Sturdy material like a cotton/polyester blend:
Filling: Kapok fiber (or buckwheat hulls for a firmer seat)

Three inches after the first set of pleat markings, make the second set, as indicated above. Continue doing this till you have 14 pleats. When you finish, the last pleat marking should be 3 inches from the right edge. (If you wish to have narrower pleats, of course, simply increase the number of pleats.)
b) Next, iron the pleats and pin them. They should all be folded and ironed in toward the left-hand side. For each set of pleat markings, fold the third in toward the first as shown, and then pin as shown at below:


Namaste!
�������� http://www.finecraftguild.com/how-to-zafu-meditation-pillow/
�����: ��������� ���� ��� ������ ������� ��� ��������� |
��� �������� |
������� |
������ �����!!! ��� ����� ���� ����� �� ����!!! ����� ����� ������ ��������))
��� ��� ����� ���������� ������� ������(�� ��� ������ ���� �������), ������ �������
��� � ������)))
�����: ����� ����� ����� ������ ������� ������ ������� ���������� ���� ������ |
��� ������ ������� ��� ���������� |
������� |
������� ������ ��������� ��� �� ����� ���������:
����� ����� � ������ � ������� ��� �������. ��� ��� �� ���� ����� � ��� ��� ������)) ����� ������ ����, ����� �������.
I was a mentor for one of the youth at our church. At Confirmation they are each given a different bible verse, special to them, to mark the occasion.
 I wanted to give my Confirmand (the sweetest girl) a gift with her bible verse so I decided to make a little zippered pouch with the bible verse sewn inside. I printed the verse onto printable fabric (purchased on a roll from Joann’s) and sewed onto the lining before stitching the pouch together.
I also covered the lining pieces and the piece with the scripture with iron on vinyl before I sewed. I wanted her to be able to use it for make-up etc. Another bonus was that it doubled as the “gift bag” for this beautiful handmade cross .

To make a pouch begin with 4 pieces of fabric (two of outer fabric, two of lining fabric) all cut the same length as the full length of your zipper and any width you choose. Make a zipper sandwich. Place 1 piece of lining fabric face up, then the zipper and then the outer fabric right side facing down. Line up the three edges.

Make a zipper sandwich. Place 1 piece of lining fabric face up, then the zipper and then the outer fabric right side facing down. Line up the three edges. When finished and you pull fabric the back, it will look like this. Repeat this for the other side(edge) of the zipper. Make sure the fabric goes all the way to the end of the zipper.

Bring both pieces of lining to one side and both pieces of your outer fabric to the other side. Un-zip zipper at least halfway so you can turn it once it is stitched. If you forget to un-zip the zipper you won’t be able to turn your pouch right side out.

The zipper teeth should be pinned toward the lining side. I lay the zipper ends on top of each other with teeth facing the lining side and pin. Turn right side out. Stitch opening closed by machine or slip stitch by hand.
Push lining inside and you are finished!
��� ��� � ���� ����������


������ � ���� ������ � ���� ����� ����������

�����: ����� ����� ������� ���������� �������� ������� ������ ��� ������ ������� ��� ����� ���������� |
| ��������: | [1] |