-Рубрики
- Вышивка (681)
- Природа (цветы, овощи , фрукты,деревья) (162)
- Праздничные мотивы (119)
- журналы, узоры (106)
- Животные (63)
- Пейзажи (47)
- Портреты, люди (46)
- Скатерти, салфетки (41)
- Подушки, чехлы на стулья (31)
- Строения, архитектура, транспорт (28)
- Вышыванки, рушники (26)
- Буквы, цифры (21)
- Детская вышивка (20)
- МК по вышивке (13)
- Вышивка на одежде (5)
- Вышивка лентами (5)
- вышивка бисером (4)
- Иконы (4)
- Творческие МК (68)
- из веревки (33)
- Тильды (14)
- бумажно-газетное (12)
- Рисование (3)
- подарки своими руками (20)
- Вязание (8634)
- Вяжем деткам (81)
- узоры крючком (69)
- Узорами спицами (68)
- ирландское кружево (37)
- филейное вязание (10)
- Японское вязание и его обозначения (4)
- вяжем перчатки,варежки,митенки (164)
- вяжем сумки,клатчи (450)
- Вяжем шарфы,шапки,береты,манишки (1068)
- вяз.кофточки,блузы (208)
- вязание мужчинам (101)
- вязанные мелочи для дома (275)
- Вязанные носки,гетры,сапожки, тапочки (597)
- Вязанные шали,палантины (475)
- вязаные аксессуары (217)
- вязаные болеро,шраги,накидки (323)
- Вязаные жакеты (949)
- Вязаные жилеты, безрукавки (472)
- вязаные игрушки,подушки (512)
- вязаные пальто,кардиганы,куртки (435)
- вязаные платья, юбки, сарафаны,костюмы (683)
- вязаные свитера, джемпера, пуловеры (1222)
- вязаные топы, маечки (341)
- вязаные туники (361)
- журналы по вязанию (503)
- купальники,парео, белье (24)
- отдельные детали вязания (232)
- пледы,коврики (196)
- салфетки,скатерти,занавески,кайма (223)
- видеоуроки,МК по вязанию спицами и крючком (114)
- идеи для дома (216)
- Декор (83)
- Цветы для дома и улицы (76)
- полезные советы (40)
- Дизайн, мебель квартиры (9)
- Кулинарные рецепты (14283)
- фруктовые пироги,кексы... (1573)
- кабачки, баклажаны, цуккини,тыква (1275)
- печенье, мелкая выпечка (632)
- Хлебопечка и хлебобулочные изделия (563)
- блюда из курицы,индейки,утки (500)
- картошка (450)
- сладкоежка (331)
- Капусточка (290)
- сладости (266)
- Завтраки (181)
- торты (136)
- Рецепты из ЖЖ (90)
- Молочные Блюда (64)
- макароны (47)
- Бобовые (42)
- пряные блюда (34)
- холодные супы (30)
- кулинарные штучки (27)
- алкогольные напитки (22)
- мороженое (9)
- готовим в микроволновке (7)
- блины, оладьи,вареники (443)
- блюда в горшочках (19)
- овощное попурри (901)
- блюда с творогом (869)
- вегетарианство (41)
- грибная пора (312)
- десерты (532)
- закуски,салаты (1816)
- запеканки (447)
- Здоровое питание (130)
- из лаваша (196)
- погребок и заморозка (814)
- корейские блюда (91)
- крупяная страна (269)
- микроволновка (10)
- морепродукты (231)
- мучное, выпечка (1229)
- мясные блюда (883)
- напитки (148)
- национальные кухни (116)
- несладкие пироги,пирожки (1573)
- пароварка,мультиварка (140)
- первые блюда (238)
- постная кухня (275)
- праздничные блюда (180)
- рыбный день (829)
- соусы (555)
- субпродукты (242)
- сырная страна (433)
- украшаем блюдо (5)
- фрукты (536)
- яичные блюда (81)
- модные штучки (58)
- рукоделие (1093)
- аксессуары (56)
- браслеты, заколки (50)
- домашние мелочи (24)
- макраме (2)
- из бумаги (133)
- из ткани,ленты (390)
- к Дню Валентина (50)
- к Пасхе (177)
- мыловарня (10)
- Новый год (387)
- страны и города мира (20)
- Шитье (1017)
- Игрушки, подушки (340)
- все для дома (194)
- МК, уроки по шитью (36)
- реставрация одежды (31)
- Тапочки,обувь (27)
- детские вещички (18)
- постельное белье (17)
- кухонные мелочи (73)
- платья,халаты,сарафаны,туники (59)
- шьем сумки (269)
- шьем шторы, занавески (11)
- юбки (6)
-Музыка
- ПОЁТ АННА ЦУКАНОВА
- Слушали: 1485 Комментарии: 0
- Елизавета Демидова (дуэт Кветка - мара) - Не надо слов
- Слушали: 1533 Комментарии: 0
-Поиск по дневнику
-Подписка по e-mail
-Постоянные читатели
-Сообщества
-Трансляции
-Статистика
Записей: 26613
Комментариев: 274
Написано: 27053
Косметичка в горошек |
Here is a quick little tutorial for making a zippered pouch with a lining. It isn't that hard and I always feel like I have really accomplished something when I am finished ---and they make great gifts!
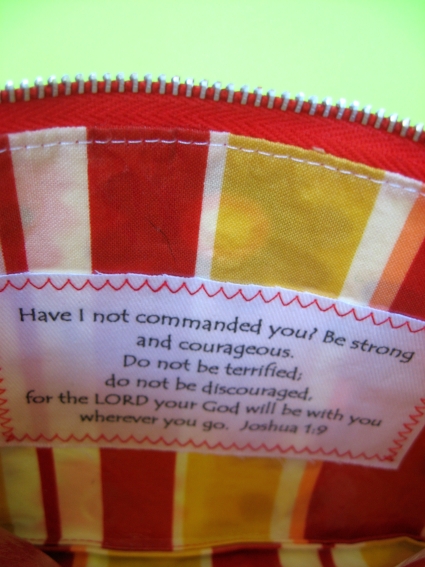
I was a mentor for one of the youth at our church. At Confirmation they are each given a different bible verse, special to them, to mark the occasion.
I wanted to give my Confirmand (the sweetest girl) a gift with her bible verse so I decided to make a little zippered pouch with the bible verse sewn inside. I printed the verse onto printable fabric (purchased on a roll from Joann's) and sewed onto the lining before stitching the pouch together. I also covered the lining pieces and the piece with the scripture with iron on vinyl before I sewed. I wanted her to be able to use it for make-up etc.
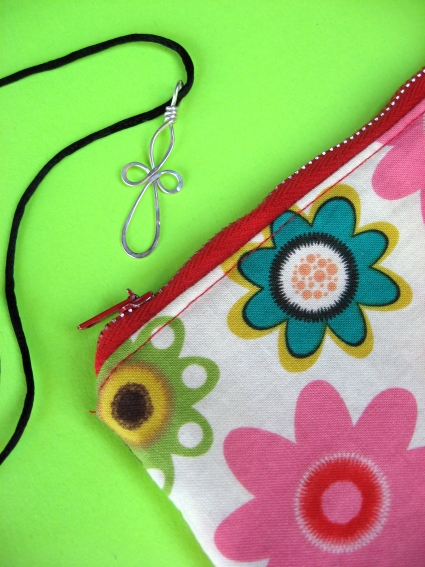
Another bonus was that it doubled as the "gift bag" for this beautiful handmade cross .
Zippered Bag Tutorial
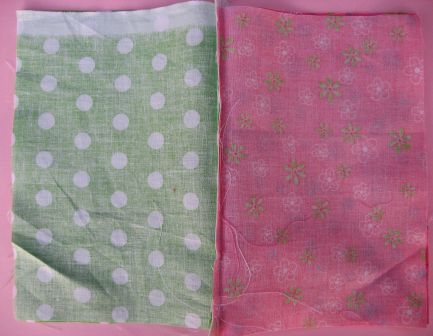
To make a pouch begin with 4 pieces of fabric (two of outer fabric, two of lining fabric) all cut the same length as the full length of your zipper and any width you choose.
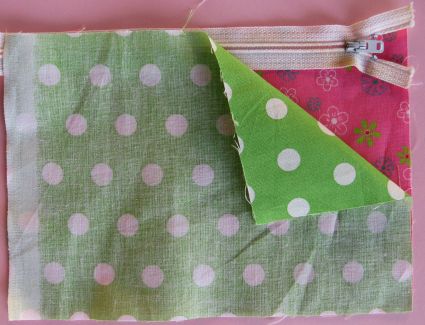
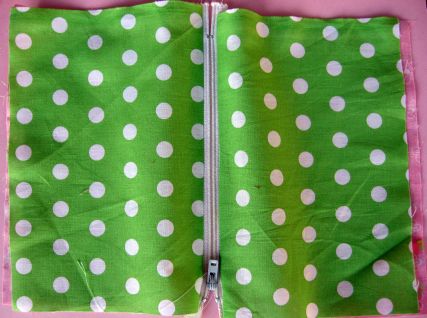
Make a zipper sandwich. Place 1 piece of lining fabric face up, then the zipper and then the outer fabric right side facing down. Line up the three edges.
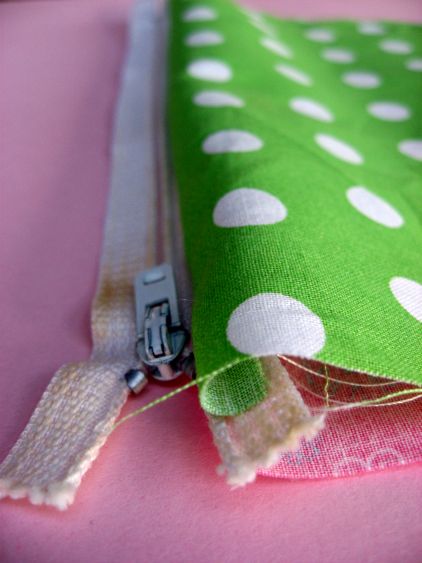
With a zipper foot sew across the top between the edge of your zipper sandwich and the zipper teeth (closer to the zipper feet).
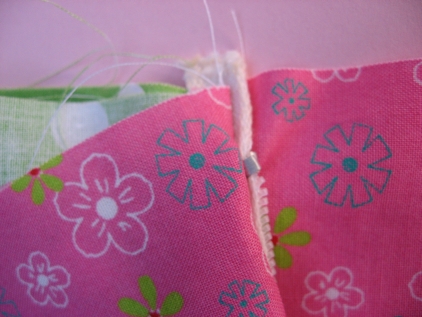
When finished and you pull fabric back it will look like this. Repeat this for the other side(edge) of the zipper. Oops the fabric should go all the way to the end of the zipper.
When both sides are completed it will look like this. Hopefully you will have pinned before sewing and all of your edges will match up beautifully (unlike mine). You can top stitch along the zipper now, if you like.
Bring both pieces of lining to one side and both pieces of your outer fabric to the other side. Un-zip zipper at least halfway so you can turn it once it is stitched. If you forget to un-zip the zipper you won't be able to turn your pouch right side out.
The zipper teeth should be pinned toward the lining side. I lay the zipper ends on top of each other with teeth facing the lining side and pin.
Sew all the way around 1/4 inch from the edge. Make sure you sew on the outside of the metal parts on each end of the zipper, this will be easy to do if you cut your fabric the total length of the zipper. Leave a two inch opening at the bottom of the lining side. Clip corners.
Turn right side out. Stitch opening closed by machine or slip stitch by hand.
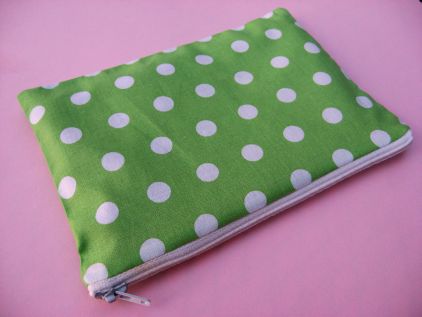
Push lining inside and you are finished!
These would make cute Valentine's Day gifts with a little love note printed inside!
| Рубрики: | Вязание/вяжем сумки,клатчи |
| Комментировать | « Пред. запись — К дневнику — След. запись » | Страницы: [1] [Новые] |

