


В этом МК я расскажу как можно "сплести" лапти для примитивки из мешковины, а также про один из способов сделать кукле "настоящие" сапожки.
Интересно? Тогда "смотрим подробности"(опция внизу поста слева)
КУКЛА ТАНЮША |
|
ТЕКСТИЛЬНАЯ КУКЛА. ГРУНТОВОЙ ТЕКСТИЛЬ |
|
|
МК ЧАСТЬ 2 РОСПИСЬ ЛИЦА И СОЗДАНИЕ ПРИЧЁСКИ |

|
ВОЛОСЫ ДЛЯ КУКЛЫ СВОИМИ РУКАМИ |
|
Про куклы |
|
СОВЕТЫ ПО ГРУНТОВКИ КУКОЛ |
НИКОГДА не смешивайте 2 разных краски при грунтовке кукол )))
Я сделала 2 тушки. 
Обе покрыла ПВА(не разбавляла) 

|
КАК СДЕЛАТЬ ПОДВИЖНЫМИ ЛАПЫ, РУКИ МЯГКОЙ ИГРУШКИ |
|
РЕАЛИСТИЧНЫЕ ГЛАЗА |
|
КАК СДЕЛАТЬ КАРКАСНУЮ КУКЛУ. МАСТЕР-КЛАСС ИРИНЫ УМНОВОЙ. |
|
ВОЛОСЫ ДЛЯ КУКОЛОК ОТ ЛИЛИЯНЫ |

|
Оформляем личико текстильной куколке. |
|
ГЛАЗКИ ДЛЯ ИГРУШЕК. |

Описание автора Анны Карелиной. #секреты_от_мастеров@toysknitted
|
КРАСИВЫЕ ГЛАЗКИ С РЕСНИЧКАМИ. |
|
ГЛАЗКИ ДЛЯ КУКЛЫ |
|
Урок по изготовлению лица куклы |
|
КАК СДЕЛАТЬ ГЛАЗА ДЛЯ ИГРУШЕК ИЗ ПУГОВИЦ |

|
ВЯЗАНЫЕ ГЛАЗКИ |

|
ДЛЯ ИГРУШЕК. ГЛАЗКИ, НОСИКИ И ДРУГОЕ. |
|
УТЯЖКИ |

|
СХЕМА ВЫШИВКИ ГУБ |

|
КАК НАРИСОВАТЬ ЛИЧИКО ТЕКСТИЛЬНОЙ КУКЛЕ |
|
КАК СВЯЗАТЬ КРЮЧКОМ КРАСИВЫЕ ГЛАЗА ДЛЯ КУКЛЫ |
Метки: кукла глаза |
КАК НАРИСОВАТЬ ЛИЧИКО ТЕКСТИЛЬНОЙ КУКЛЕ |
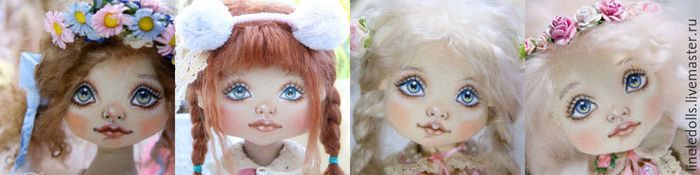
С чего начинается кукла? Конечно, с приятного глазу милого кукольного личика.
|
ОЧЕНЬ ПОДРОБНЫЙ МК ПО КУКОЛЬНОЙ РУЧКЕ!! |
Опять с заграничного сайта! Ну очень подробно!!!!!!!! Стащила отсюда! Классный сайт по куклам! http://members.home.nl/asrai/cursus-en.htm
|
The hand I made for this lesson is from the palm of the hand to the finger tips about 1.80 inch. It is a bit bigger than I usually make, smaller gave some photographic problems 'cause I don't have a macro lens. |
 |
 |
|
The size of the hands depend on the size of the head. The length of a hand is equal to the length from chin to halfway the forehead. A face is usually about 2 hands wide. This can always vary a bit depending on the kind of doll. You start off by making 2 cylinder shaped rolls of fimo, in this lesson they are about 2.6 inch long and 0.60 inch thick (pict. 1). Sculpt one end in a kind of spoon shape by pressing the clay with your thumb. Sculpt the hand thinner to the "finger tips' by pushing it more flat (pict. 2). |
|
 |
 |
|
For this lesson I'll continue with the making of the right hand. Try to work simultaneously on both hands because it is hard to make an equal looking hand afterwards. To make a wrist, roll the clay between thumb and point finger like pict. 3 You now have a roughly shaped hand with a part arm. Make the arm thinner if necessary. Smooth the hand nice and round. The hollow part is the inside/hand palm of the hand (pict. 4). |
|
 |
 |
|
At pict. 5 you see the back of the hand. You will now make 3 incisions with a knife for separating the fingers. The thumb will be added later. Because this will be a right hand, the incision for the little finger is cut a little further than the other incisions, take your own hand as example. Bend the 2 outer fingers gently side wards so you have more space (pict. 6). Hold the fingers between your point finger and thumb. While warming the clay by the warmth of your hands, very gently roll the fingers slightly back and forth, so the inside of the fingers will also become round. You can use a sculpting tool for the areas that are difficult to reach. |
|
 |
 |
|
When the two outer fingers are smoothed, you start with the middle two. Bend them slightly apart and again roll them gently back and forth to round off the edges on the inside of the fingers (pict. 7). Do this very slowly, it is important that while you are doing this, the clay will be warmed by your fingers so they don't rip at the beginning. Use a sculpting tool to smooth the areas that are hard to reach (pict. 8). |
|
 |
 |
|
Because of the smoothing of the fingers they usually will get a little too long, cut them off at the right size (pict. 9). Round off the finger tops again (pict. 10). |
|
 |
 |
|
The fingers of the hand should now look something like pict. 11 We will now continue with the inside of the hand. Make the dimple of the hand a little more distinct by pressing the palm slightly with your thumb and smudging clay towards the wrist. (pict. 12). |
|
 |
 |
|
Press the clay on the wrist like in pict. 13, so you will clearly see the difference between the wrist and where the handpalm begins (pict. 14). |
|
 |
 |
|
Next step is making a thumb. Sculpt a pear shape piece of fimo, make an incision in the broad part of the thumb' (pict. 15) Pull the parts a bit side-wards and place the thumb on the hand as in pict. 16. |
|
 |
 |
||||||||||||||||||||||||||||||||
|
Push the thumb firmly against the hand, blend the seams on all sides with a sculpting tool and smooth with your fingers (pict. 17-18). When the thumb is too long or thick, cut off a piece and re-shape the thumb. |
|||||||||||||||||||||||||||||||||
 |
 |
||||||||||||||||||||||||||||||||
|
Nails can be made in many ways. You can draw lines with a knife or other sharp tool. You can also slantwise cut off a piece of a lemonade straw and use this to make an indent of a nail. For this lesson I used a little hollow chisel. They are normally used for chiseling wood but they are also very handy (when you turn them around) for making nail prints on clay fingers (pict. 19). Use a sharp tool to correct the lines if necessary (pict. 20). |
|||||||||||||||||||||||||||||||||
 |
 |
||||||||||||||||||||||||||||||||
|
Don't forget to attach the lines at the fingertips, so the nails will look like they lay on the finger (pict. 21). This is very precise work. We will now continue with the palm of the hand. You can make it as detailed as you like, it also depends on the pose of the doll and if the palms of the hands are visible or not. If they are not visible you can keep it more simple. Place a C-shaped slice of fimo on the palm and an extra slice at the beginning of the thumb (not too thick) as in pict. 22. |
|||||||||||||||||||||||||||||||||
 |
 |
||||||||||||||||||||||||||||||||
|
Press the slices and the seams firmly, gently blend the seams using a sculpting tool (pict. 23) make sure the palm looks natural. When all the seams are blended (pict. 24), moisten your finger and smooth the hand palm by rubbing it with your finger. |
|||||||||||||||||||||||||||||||||
 |
 |
||||||||||||||||||||||||||||||||
|
Now it is time to add some lines to the hand palm, you can use a thin sculpting tool for this (pict. 25). Look at your own hands where the lines should be. Add some lines at the beginning of the fingers using a mini tool or a toothpick (pict. 26). |
|||||||||||||||||||||||||||||||||
 |
 |
||||||||||||||||||||||||||||||||
|
Also draw lines on the inside of the fingers, again watch your own hand closely to see how this looks. (pict. 27). The inside of the hand is finished now, we turn the hand around and continue with the back. It depends on the kind of hands you want, how you will proceed. If you want real smooth elegant hands, you better not add big knuckles. Just a few 'knuckle lines' at the place of the knuckles will look nice too. If you want more detailed hands you proceed like this. Place thin slices of fimo in the middle of each finger and slices just under the fingernail. You also add slices fimo on the knuckles of the hand (pict. 28). |
|||||||||||||||||||||||||||||||||
 |
 |
||||||||||||||||||||||||||||||||
|
Carefully blend the seams with your sculpting tool until the seams are smoothened. (pict. 29-30), don't forget the sides of the fingers. Try to hold on to the shape of the knuckle, don't blend too wide, or it might end up looking more like a tumor than a knuckle... ;-). This is very precise work that will take some time. |
|||||||||||||||||||||||||||||||||
 |
 |
||||||||||||||||||||||||||||||||
|
It still looks a bit rough at this point. Moisten your finger and 'polish' the fingers to make them smooth, without fading out the knuckles (pict. 31). Between the knuckles on the hand, you draw some lines with your sculpting tool towards the arm, to accentuate some of the muscles (pict. 32). Rub the lines with a finger to blur and make it look more natural.
|
|||||||||||||||||||||||||||||||||
Метки: кукла |
МОЯ ЛЮБИМАЯ КУКЛА.ТРИКОТАЖНОЕ АТЕЛЬЕ. |
Метки: кукла одежда |
ВСЕ ДЛЯ КУКОЛ |
|
ОБУВЬ ДЛЯ КУКЛЫ |
|
ЯК НАМАЛЮВАТИ ЖІНОЧЕ ОБЛИЧЧЯ? |
|
СОЗДАЕМ «КАРАМЕЛЬНЫЕ ГУБКИ» ДЛЯ КУКОЛ В ТЕХНИКЕ «СКУЛЬПТУРНЫЙ ТЕКСТИЛЬ». УТЯЖКА ГУБ |
Метки: кукла |
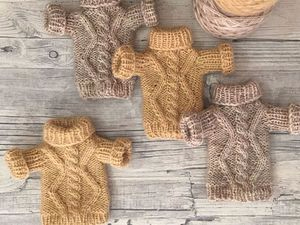
ВЯЖЕМ УЮТНУЮ КОФТОЧКУ ДЛЯ ИГРУШКИ. МАСТЕР-КЛАСС |
|
ВЫШИВАЕМ КРАСИВЫЙ И АККУРАТНЫЙ РОТИК КУКЛАМ |

|
ВЫШИВАЕМ КРАСИВЫЕ ГЛАЗКИ КУКЛАМ |

|
КАК СШИТЬ КУКОЛЬНЫЕ САПОЖКИ ИЗ КОЖЗАМА НА КОЛОДКЕ |
|
МК - ВОЛОСЫ ИЗ НИТОК ДЛЯ ТЕКСТИЛЬНОЙ КУКЛЫ... |


|
ВЯЖЕМ СПИЦАМИ ГЛАЗКИ ДЛЯ ИГРУШЕК. ОПИСАНИЕ И МАСТЕР-КЛАСС. АВТОР АННА КАРЕЛИНА |
Метки: игрушки |
Цитата сообщения vkp
Нереальный скульптинг лица из полимерной глины |
Цитата |

2 просмотров |

|
|
Комментарии (0) |
СОЗДАЕМ КУКЛУ В СМЕШАННОЙ ТЕХНИКЕ. |

|
КАК СДЕЛАТЬ РЮКЗАК ДЛЯ КУКОЛ |
|
ОБУВЬ ДЛЯ ПРИМИТИВОВ. 2 МК В 1, ИЛИ КАК ЭТО ДЕЛАЮ Я. МК |
В этом МК я расскажу как можно "сплести" лапти для примитивки из мешковины, а также про один из способов сделать кукле "настоящие" сапожки.
Интересно? Тогда "смотрим подробности"(опция внизу поста слева)
|
"КАРАМЕЛЬНЫЕ ГУБКИ" |


Серия сообщений "Мастер классы":
Часть 1 - "КАРАМЕЛЬНЫЕ ГУБКИ"
|
СОЗДАЕМ КУКЛУ. ВИДЕО-УРОК №1: ЛЕПИМ ЛИЦО. |
|
КАК Я ДЕЛАЮ ЭСКИЗЫ И ЧЕРТЕЖИ |
|
.ШАРНИРНАЯ КУКЛА. BJD. ЭСКИЗ. УРОК №1. |
|
РЕАЛИСТИЧНЫЕ ГЛАЗА ДЛЯ КУКОЛ СВОИМИ РУКАМИ |
|
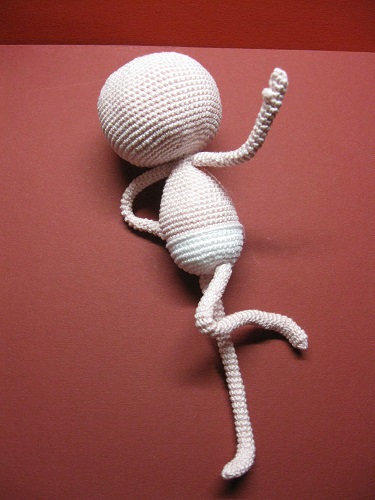
КАК СДЕЛАТЬ КУКОЛЬНУЮ ГОЛОВКУ ИЗ ХЛОПКА, МАСТЕР КЛАСС. |
Оигинал статьи здесь >>> , далее текст автора Ариша :

Сразу предупреждаю, что мастер-класс носит скорее обзорный характер и не показывает всех тонкостей.
Зато даёт возможность понять основные этапы изготовления кукольной головки.
Итак я работаю с обычным хлопком (американским). Чаще всего из хлопка делают головки двухклинки (лицо один клин, и задний клин может состоять из двух половинок, так же, такая выкройка может иметь вытачки) ,четырёхклинки (это как у меня — два клина впереди, два сзади) , шестиклинки (похожи на тыковки). Выкройки вы можете найти в интернете.
Поговорим о том, как это делаю я .
|
«РУКОДЕЛЬНЫЕ ЧУДЕСА» IRINA THAARUP (ИРИНА ТООРУП) И МАРЫСЯ СЕМИЦВЕТ |
|
ПРОДОЛЖАЮ ТЕМУ КРАСИВОЙ ГРУДИ У КУКОЛ. |
ОДНА ИЗ НЕУДАЧНЫХ ПОПЫТОК - но здесь понравилось использование бисеринки под сосок!!!
УСТРЕМИСЯ К СОВЕРШЕНСТВУ!
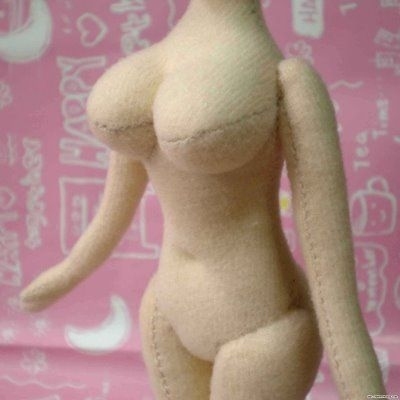
Делюсь своим опытом, а если у Вас есть дополнения - пишите! Пусть картина станет максимально ясна для всех желающих шить кукол.
Просмотрела множество мастер-классов и отметила, что фотографии часто перепутаны. Выкройки не просты, а если еще фото в МК взяты с разных фасонов, то как управиться начинающему кукольнику?
Сегодня мы рассмотрим известные мне варианты выкроек для пошива грудастых кукол. Выбираем, учимся, показываем свои работы для других!
Разрешается размещение собственных фотографий в комментариях к этому сообщению.
Делимся опытом.
|
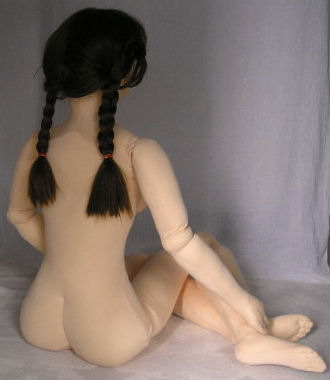
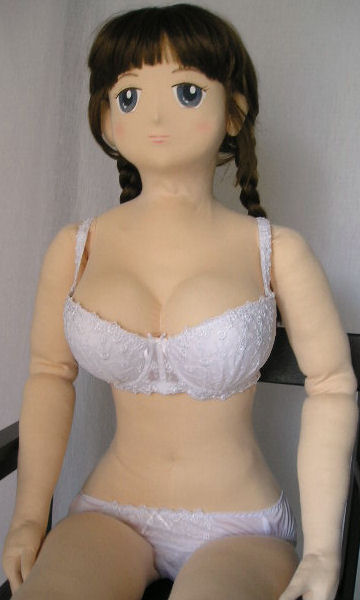
ШЬЕМ ПЫШНОТЕЛЫХ КУКОЛ С НОСИКОМ. |
Давно думаю о том, что Тильдам не хватает главного женского атрибута - груди. Если Вы тоже так считаете, то можно посмотреть вместе со мной материал с сайта kids.nunodoll.com/lifesize/girl08.html
В результате мы должны получить вот такую модель:
|
ПРОСТОЙ И ПОНЯТНЫЙ МАСТЕР-КЛАСС ПО УТЯЖКЕ ЛИЦА ТЕКСТИЛЬНОЙ КУКЛЫ. МК |
|
МК ПО КУКОЛЬНОЙ РУКЕ ИЗ ПЛАСТИКИ |
|
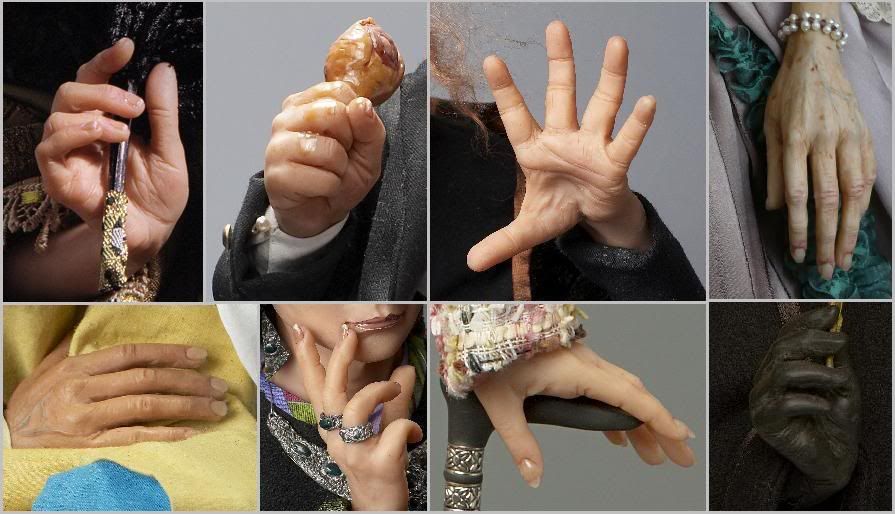 В истории искусства есть множество примеров, когда лицо на картине или в скульптуре изображено гораздо более виртуозно, чем руки. Обратная же ситуация практически не встречается. Из этого можно сделать вывод, что руки - самая сложная для изображения часть тела. Мой опыт преподавателя и зрителя говорит, что и в нашей маргинальной кукольной норке те же проблемы. И хотя руки моих кукол тоже не исключение, я все же надеюсь, что этот МК будет кому - нибудь полезен. |
|
