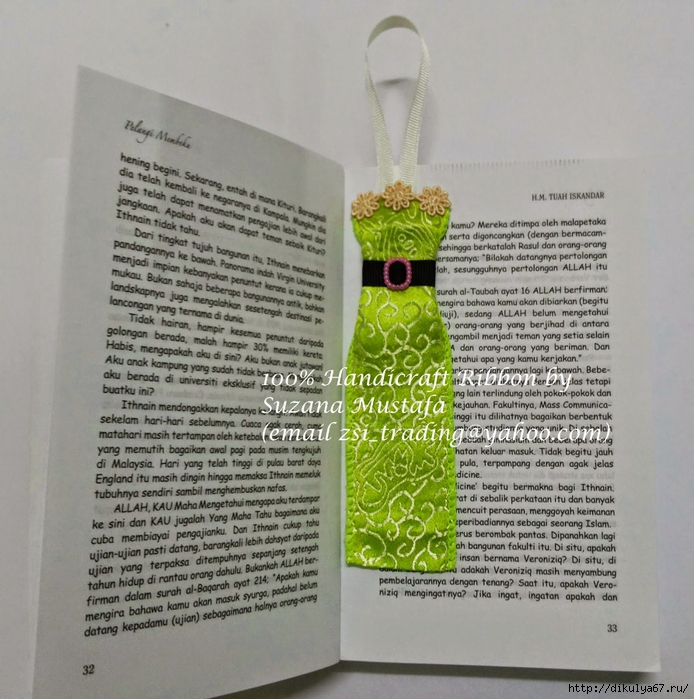
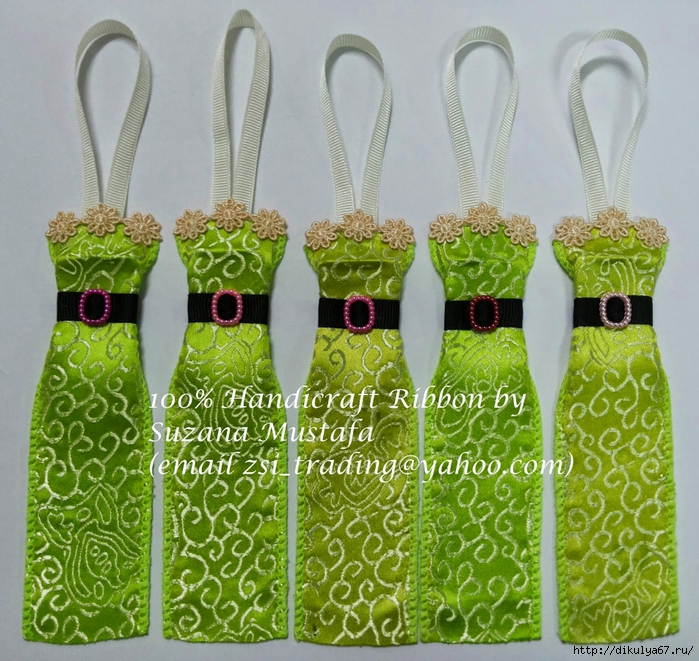
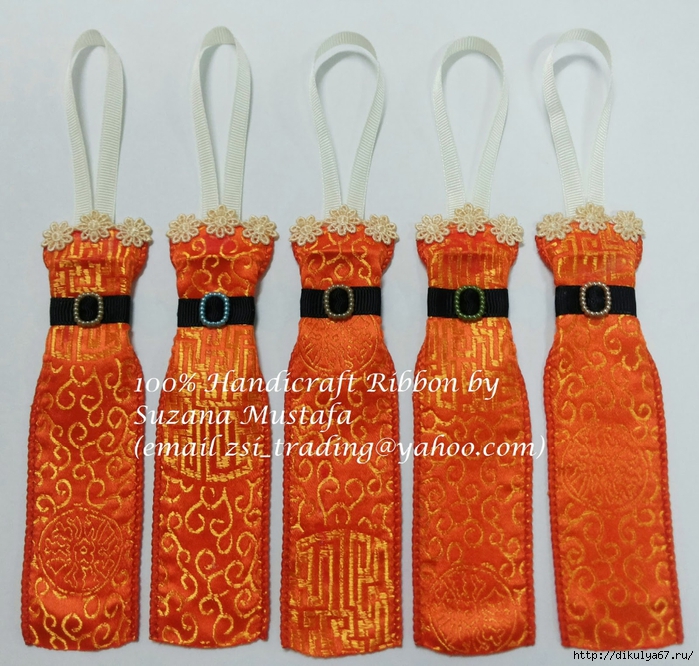
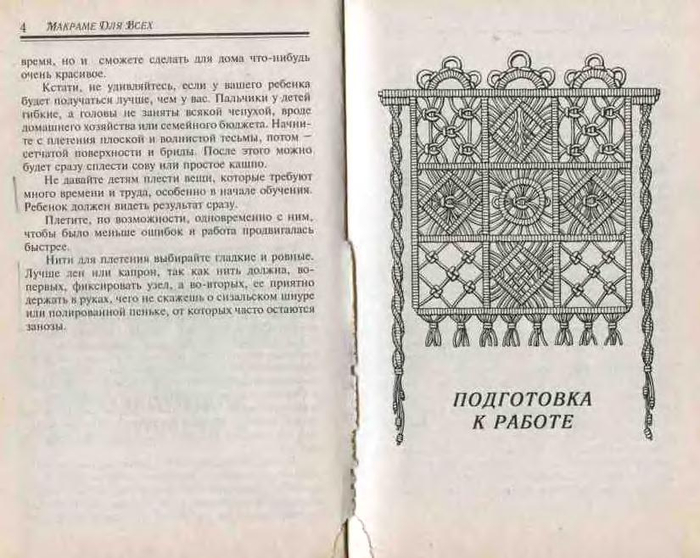
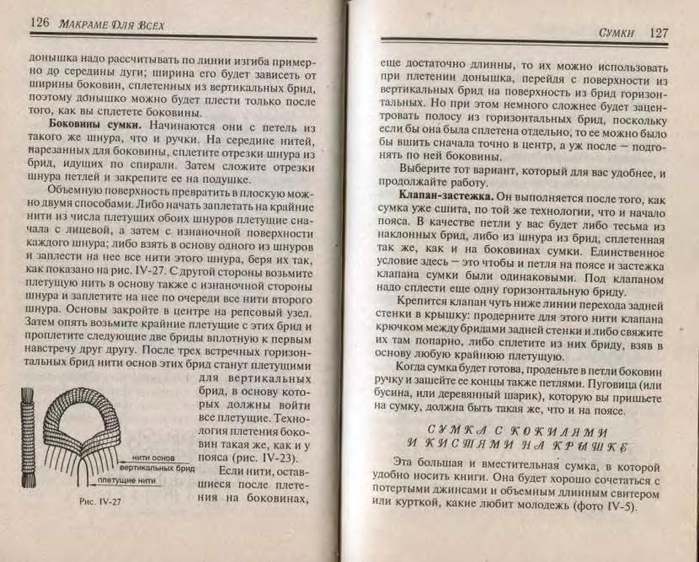
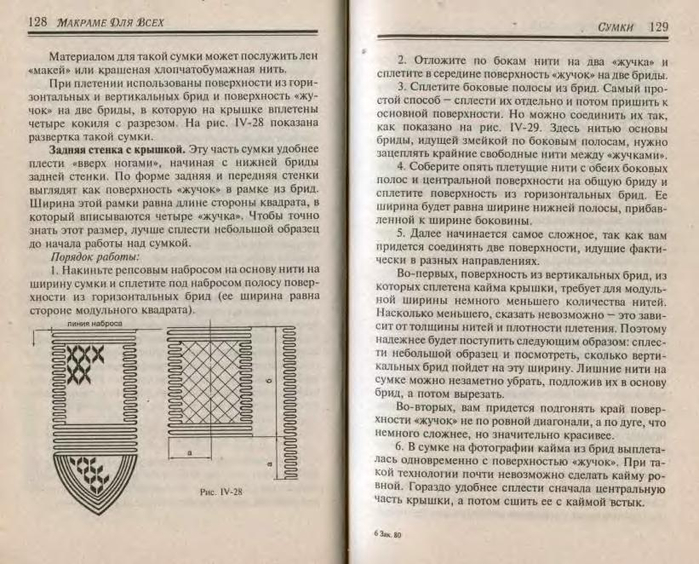
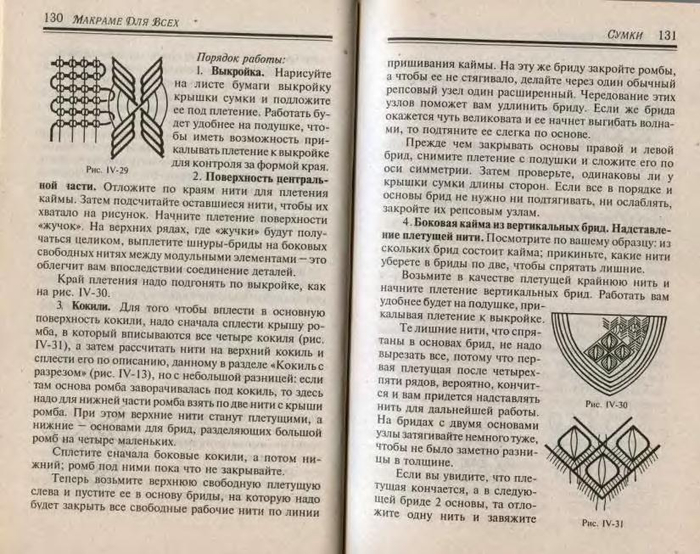
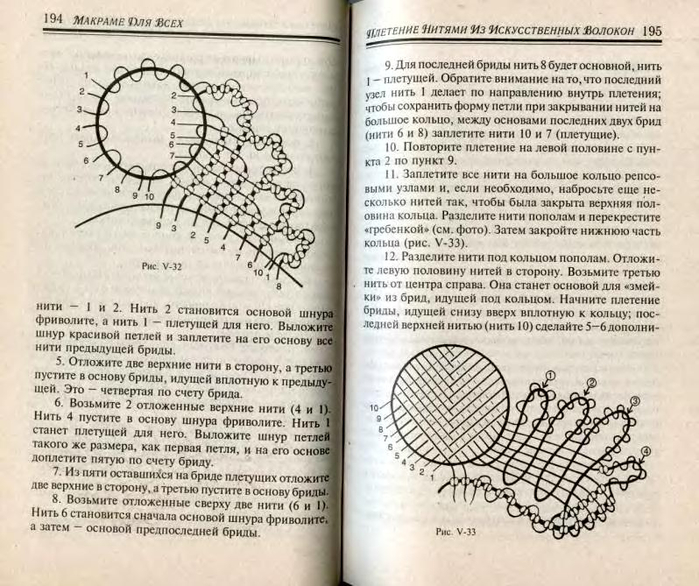
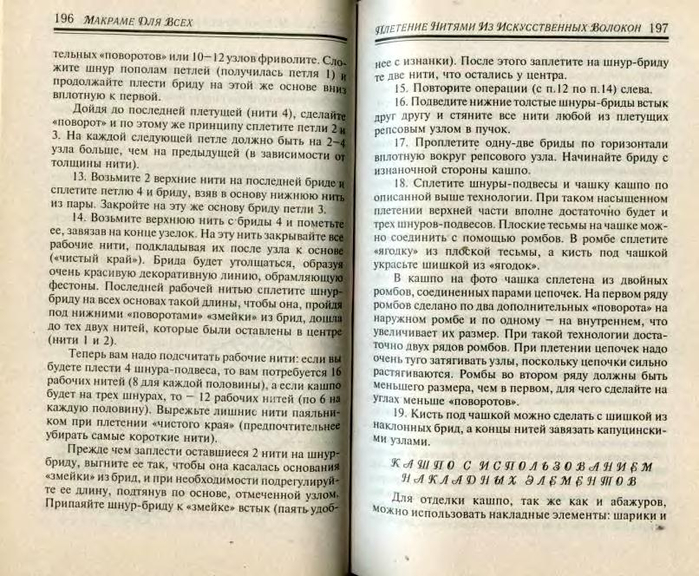
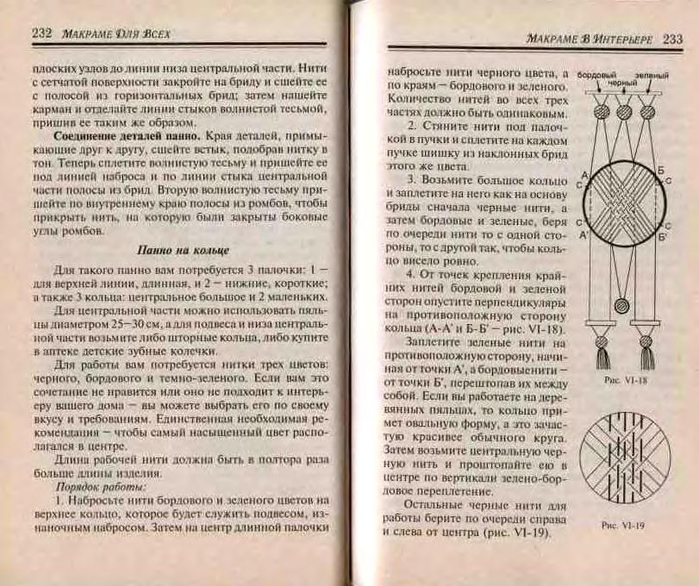
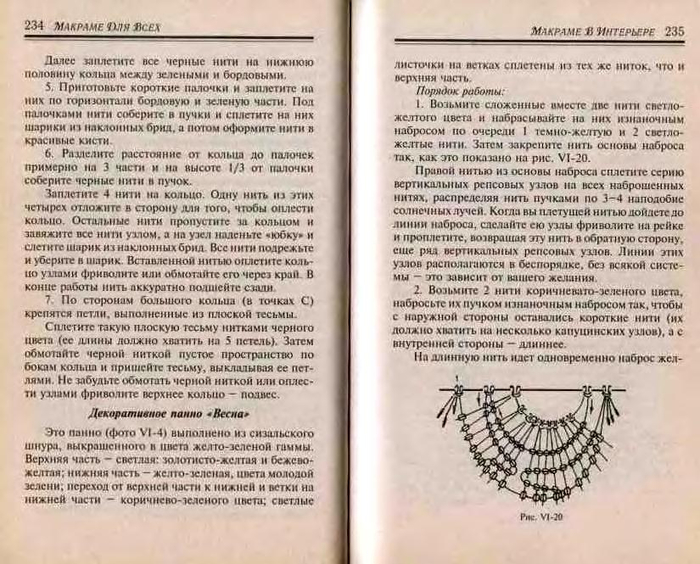
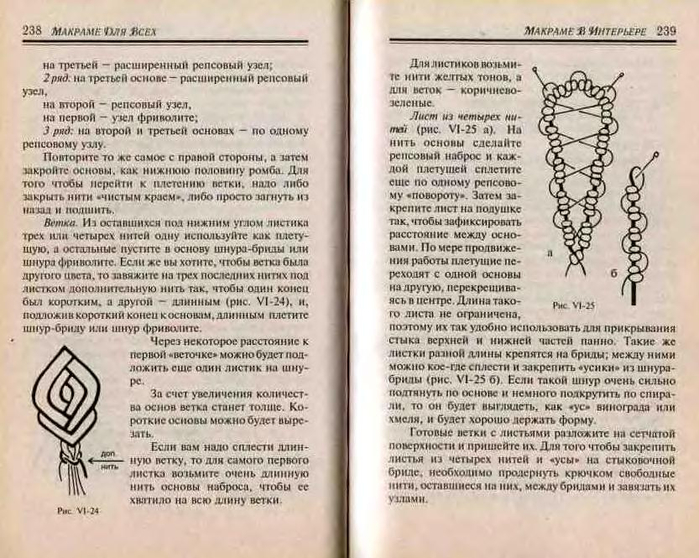
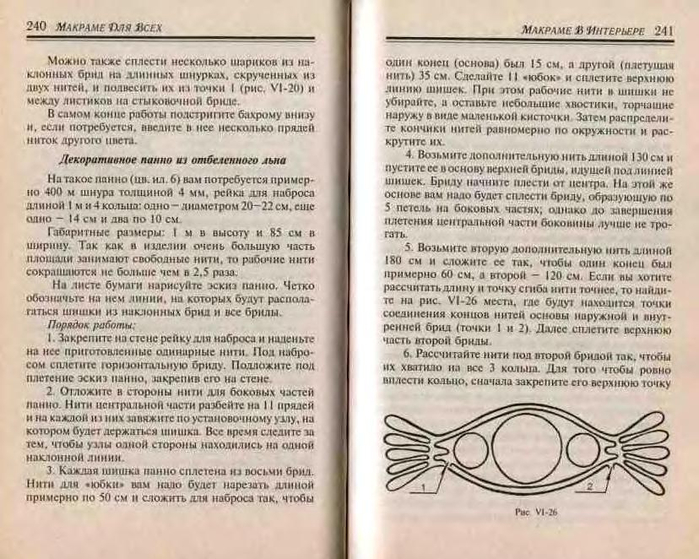
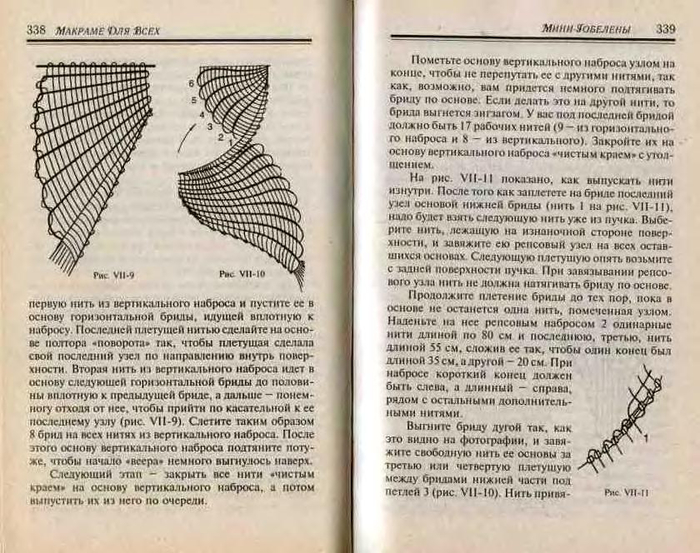
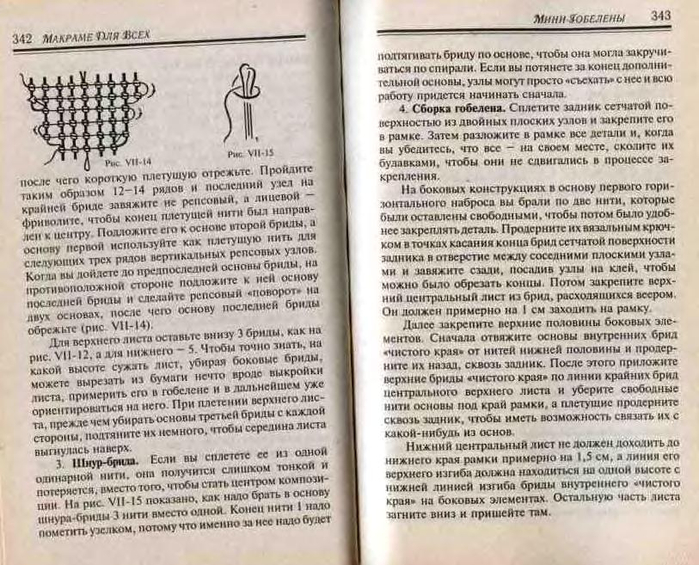
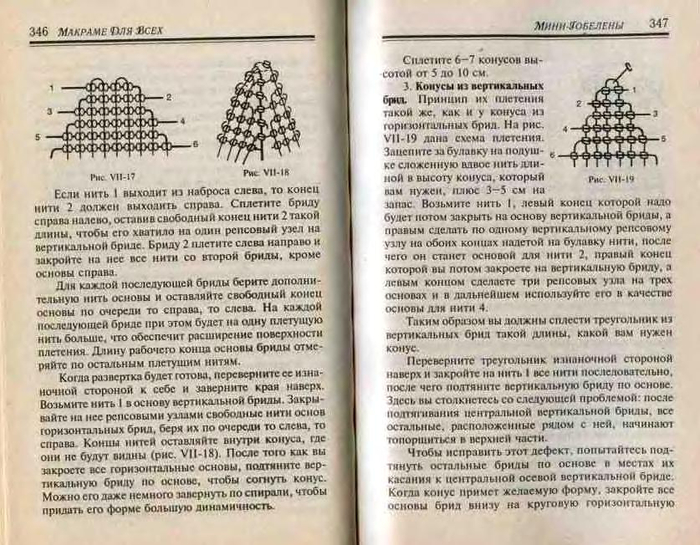
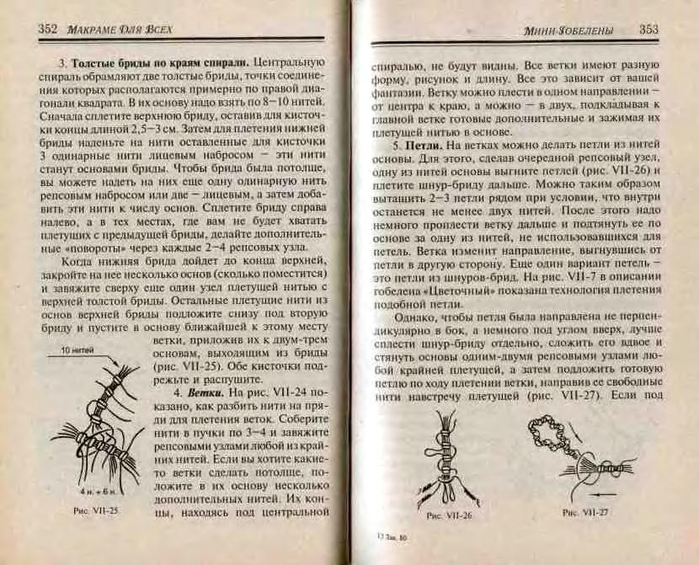
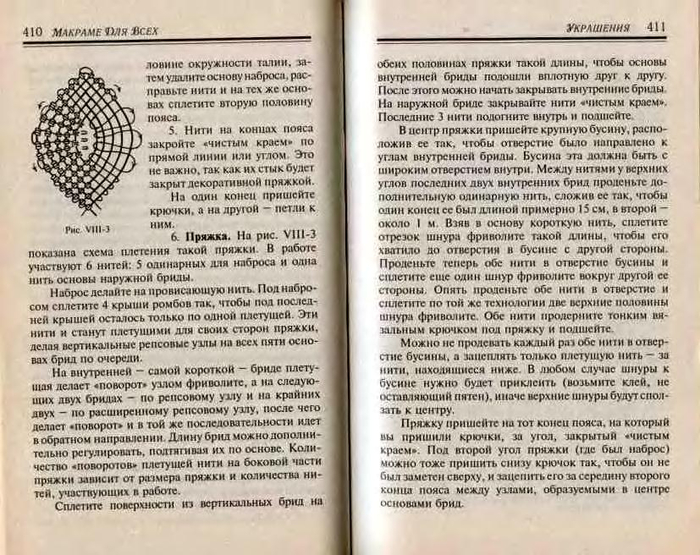
����� �� ������ ������ ������ |
������� ��� � ������� �������� ��� ����� ������ �� ������? ��� ���, ��� �������� ����� ���������� � ����������� �� ������ ������ ���������� ������.
|
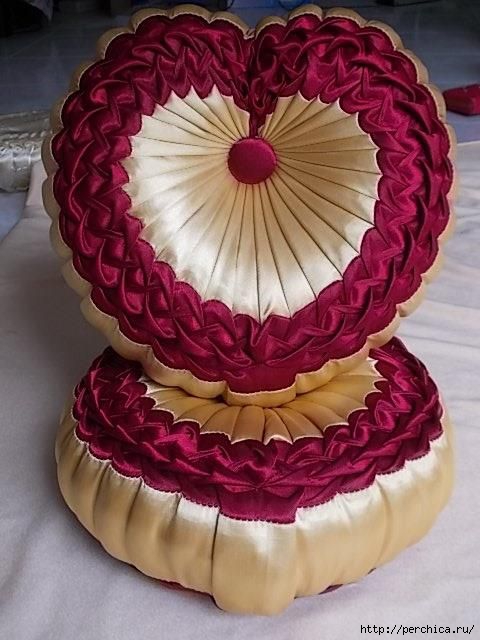
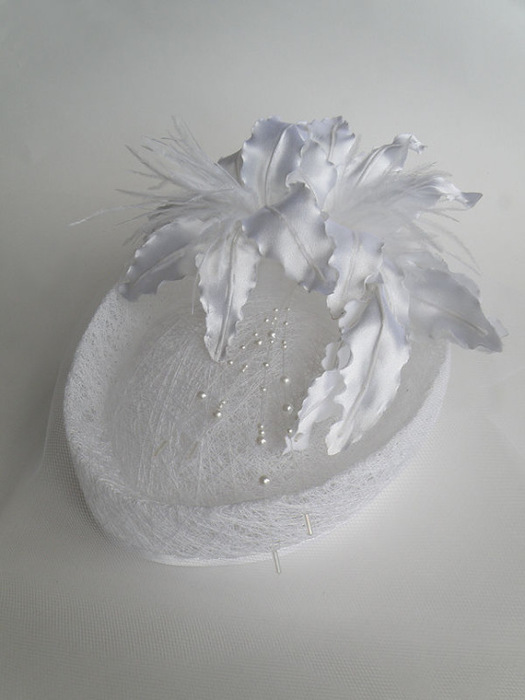
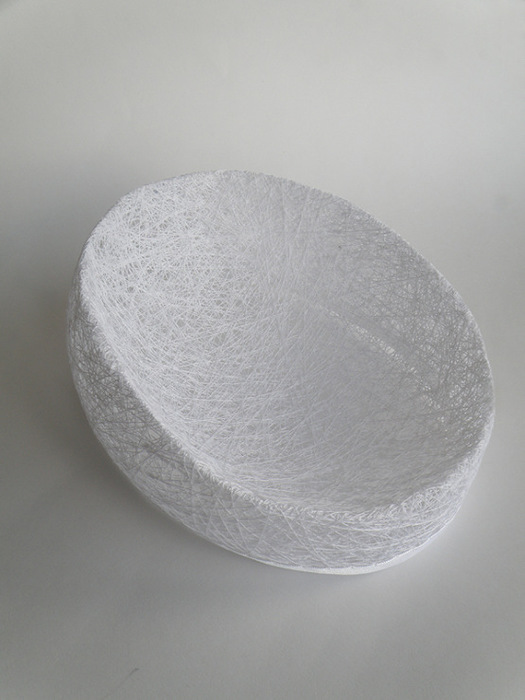
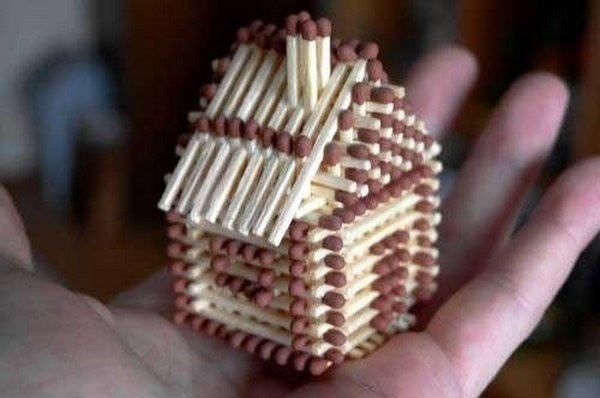
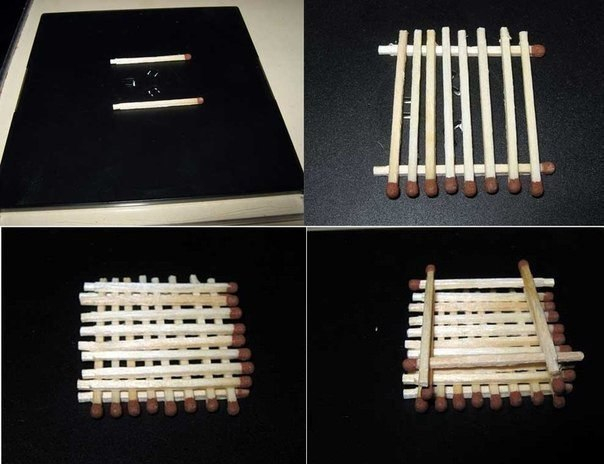
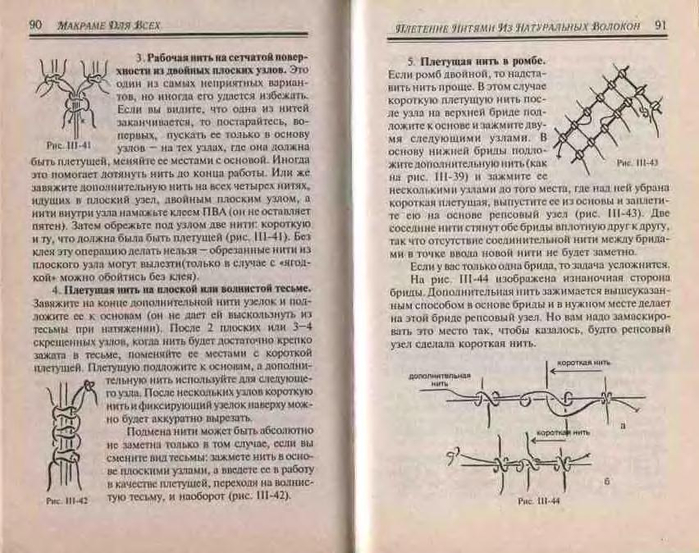
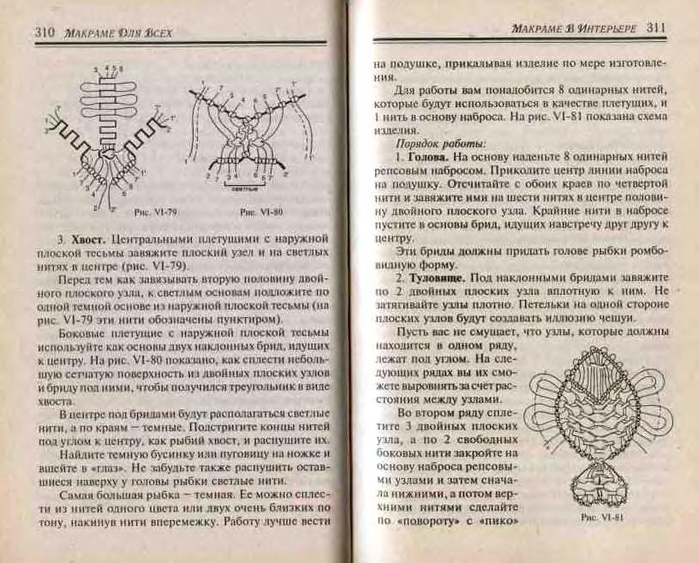
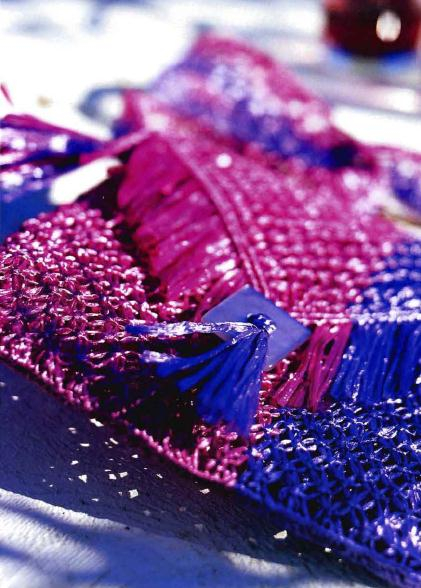
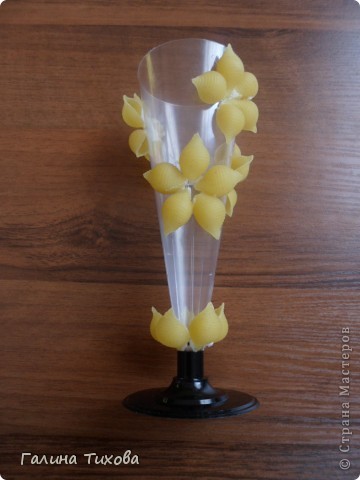
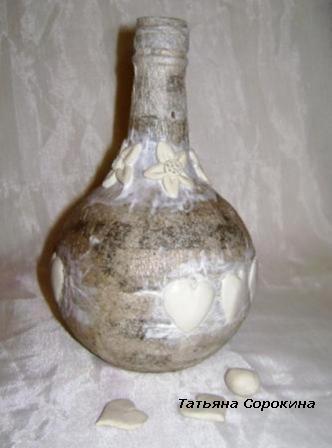
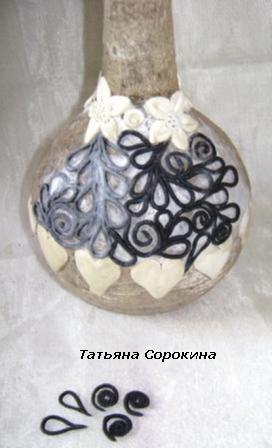
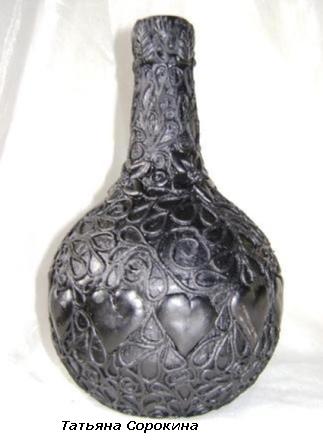
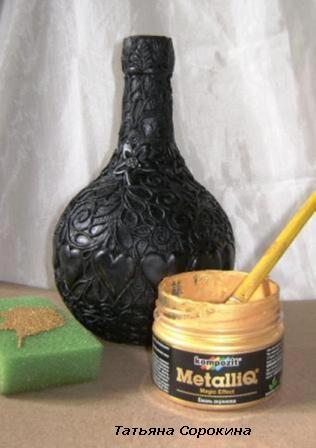
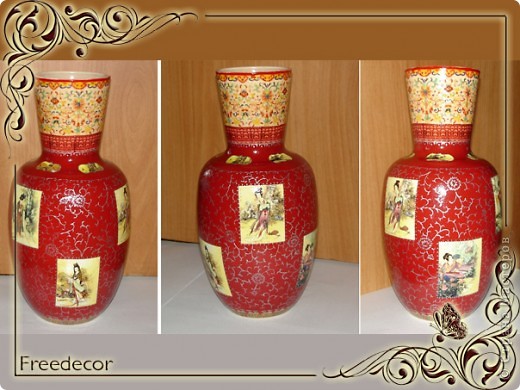
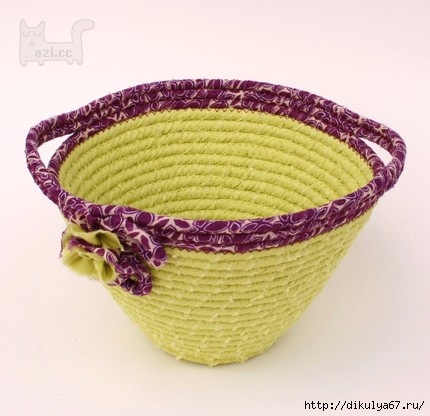
����������� �������� �����. ������ - ������ |
����������� �������� ����� �� ���� �� ������.
��, ��, ������ ���, ��������� �������������. �������� �� ���? ����� �����, �������� � ������. ������, �������, �������������, �� ���������� ������� �����������...������ ��������� ������� ����������.
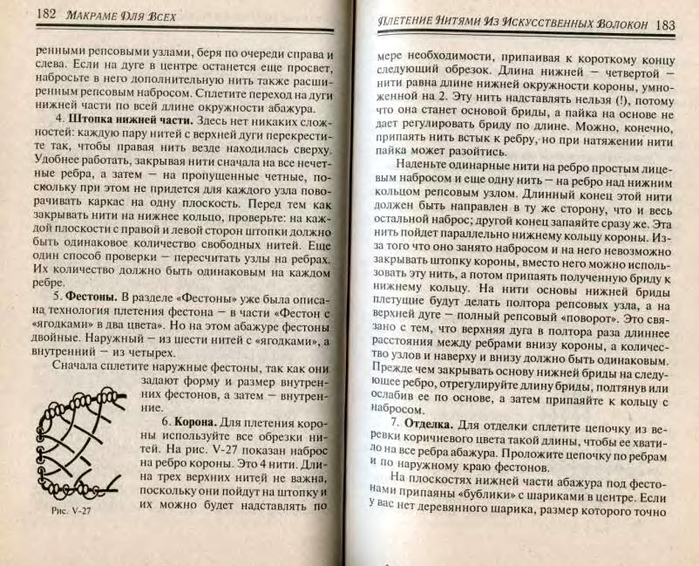
�����, �� ������ ������� ������ - ������ ������������ ��������� ������, ����������� ��������� ������.
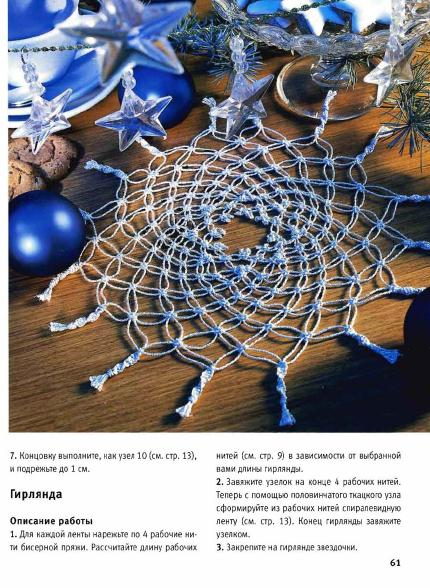
�������������!
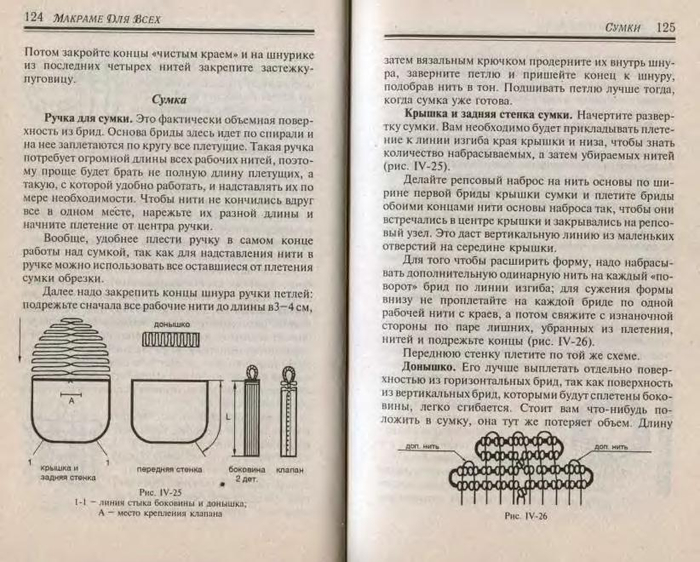
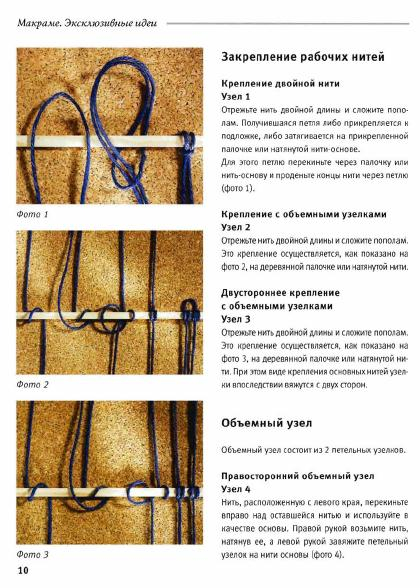
������ �����
������� �����
�������������� �����
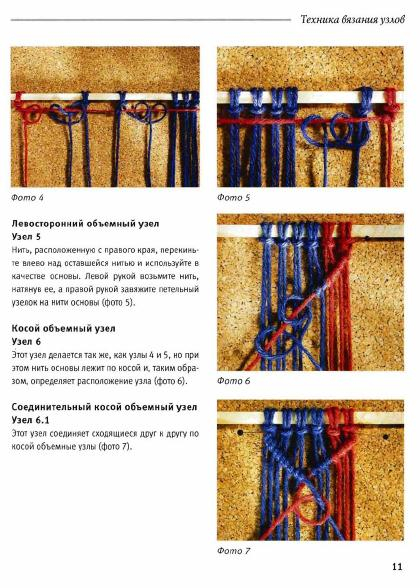
��� ������� ����� ������������ ����� �������� ����� ������� ������������ � �������� ����, ������� ������ � �������� �� ������� ������� ::

|
������� ��� ���� |


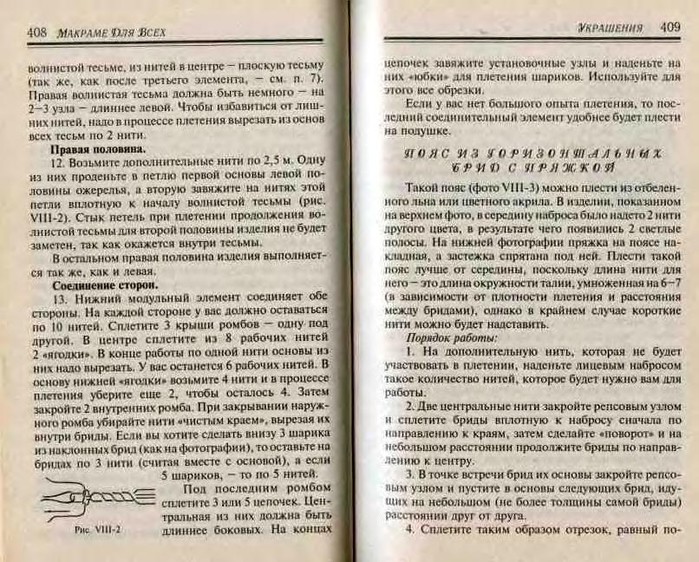


|
� ���� ������ ������� |
|
�������. ������������ ���� |


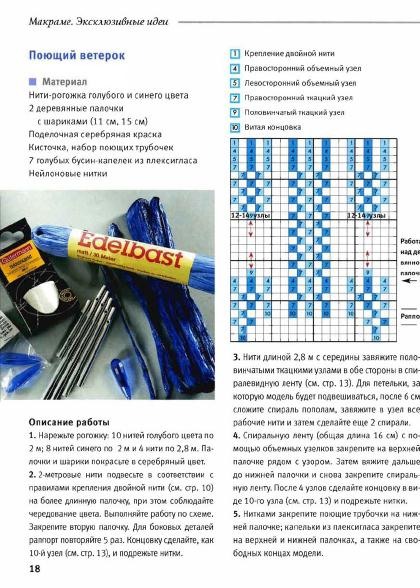
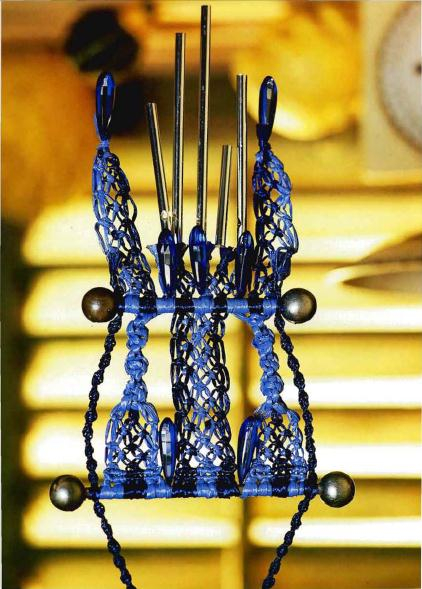


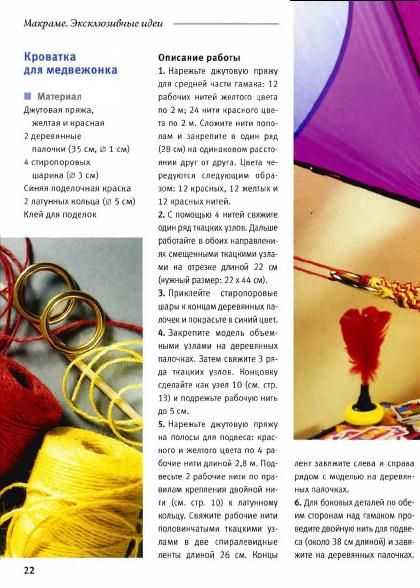


����� ��������� "������� ":
����� 1 - ����������� � �������
����� 2 - ������� ��� ����
����� 3 - �������. ������������ ����
����� 4 - ������� � ������ � ����������� ���������
����� 5 - � ���� ������ �������
|
���� �� ������������ ������ � ������� - �� |
���� ������� ����������� ����� ����� ���������� � ������������ �������, ��������� ��� ����������.
��� ������ ��� ������������: ����������� �����, �������� ��������, ������� ������������� � ����������� ����� ����������� � ����������� ������, � ����� ����� «������ ����».
������� ���������� ����� ������� ������ �������: ����� �� �������-�������.
����� ������� ����������� ����������� ������� �� ������ �������, ������� ����� ������.

|
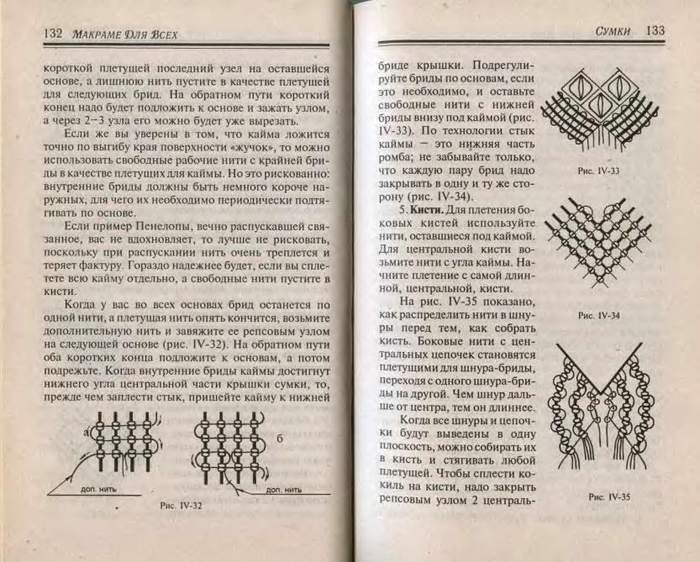
������� ������ |

|
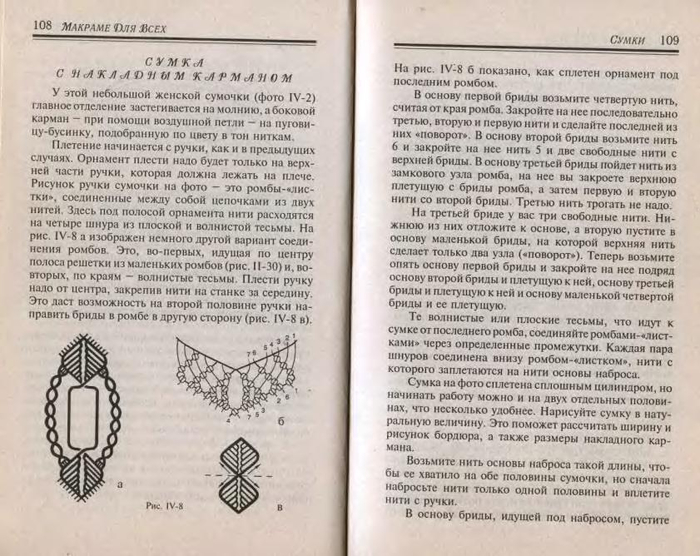
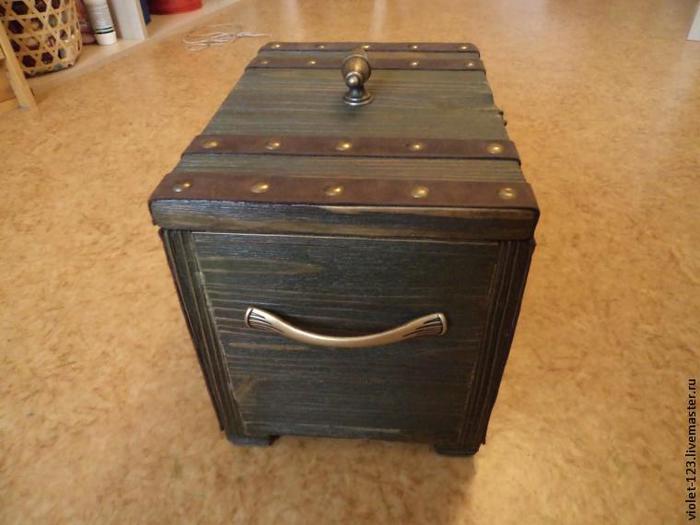
���������� ���� ��� ������ - ���� � �������� �� ����� ������ ������ |

|
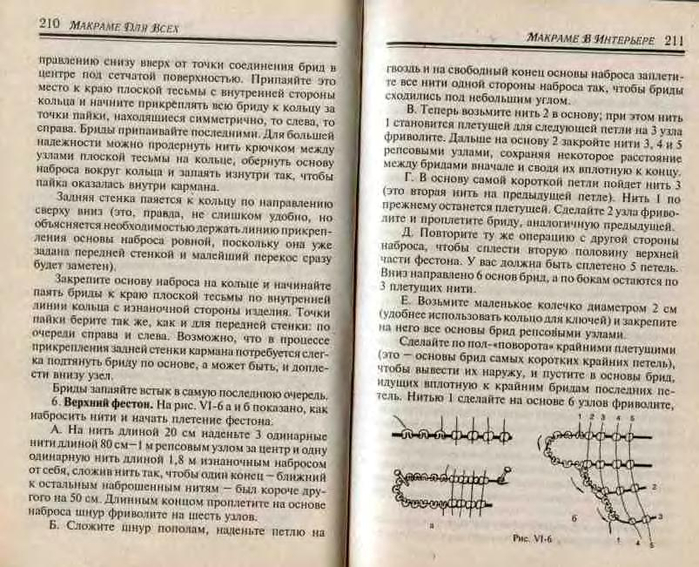
��� ��������� �������. �����. |

|
��� ������� ������ |

A few years ago, I had great fun creating some great big clouds to be used at the entrance to The Farm Chicks Show. But before we got them to the show, we had fun with them at home. The boys thought they made cool photo ops.
But how do you make a cloud?
It's actually pretty easy, as long as you have some time and a bit of patience.
To start, cover your work surface with a big sheet. Tape as many blown-up white balloons together as you like, to form your perfect cloud.
Next, mix up a big batch paste of water and flour and whisk until smooth.

Gather up lots of newspaper or newsprint paper and tear into thick shreds (3"-6"). Dip shreds into the paste, removing excess paste as you lift from bowl, and smooth all over the balloons, until they are fully covered.

Allow to dry completely. (This can take up to 24 hours).
Next, cover the clouds with pillow stuffing (polyester fiber). To do so, use a spray adhesive, and spray little sections at a time, and adhere little bunch by bunch of the stuffing. Repeat, again and again, until the cloud is all covered.

And just like that, a cloud is born.
 Image from The Farm Chicks Show by Christina G. Photography
|
������� �� ����� |
|
����� ������ ������ |
|
HALLOWEEN TRICKS & TREATS 2015 |
|
������� �����, ��� ��������� ������� � ��� ���� ��� �����) |
��� ���� ����� ��������� �������? � ��� ��� ����) �� ��� ����� ������� ���������� ���������� � �������� �� ����� ��������� ��� ���������� � ���� ��� ��������� ���������. ����� ������-����� �������� ��� �����. ��� ������ ��� ����������� ������� ��� ����� � �������� ��� ������ ����.

|
�������� �� �������� ��������� ��� �������������� � ������ |
|
|
|
|
|
|
|
|
|
|
|
|
|
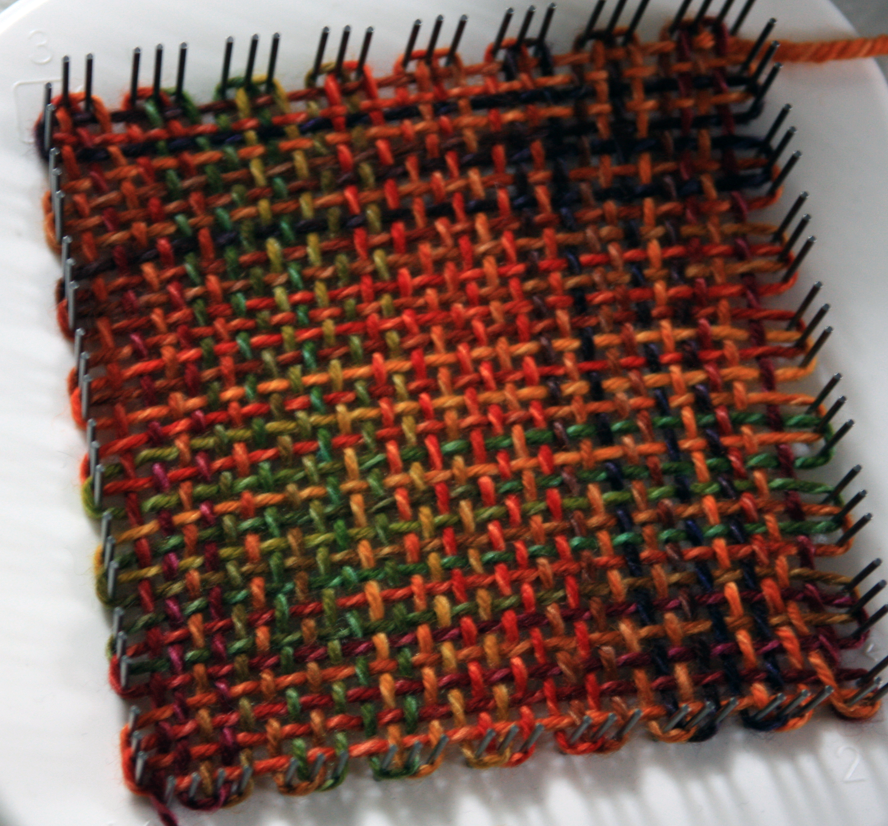
���� �� ������� ������� |

����� ����� ������� ��� � ������ �����, ������� ���������� ����� ��������� ������ � ���������, � ��� ������� ���������� ����� �������� �������� ��� ��������� ������ ����.
��� ����� ����, ��������� �� ������ ������� �������, ������ ��������� ���������� � ����� ��������.
|
����� �� �������� (������� ����-���) |
|
������� ������. ������-����� ������� ��������� |


����� ��������� "������-�����":�� ����������
����� 1 - ��������� ����� ���������� ��������.
����� 2 - ������� ������. ������-�����.
����� 3 - ����.�������� ��������.
����� 4 - ����� � ��������
...
����� 13 - ������ ���������. ����-���. ������-�����.
����� 14 - ����. ������ �������. ������-�����.
����� 15 - ������� ������������...
|
����� ������� ���������� |
����� ������ - ����� ���� �����������- ����� ������� ����������� ����������
|
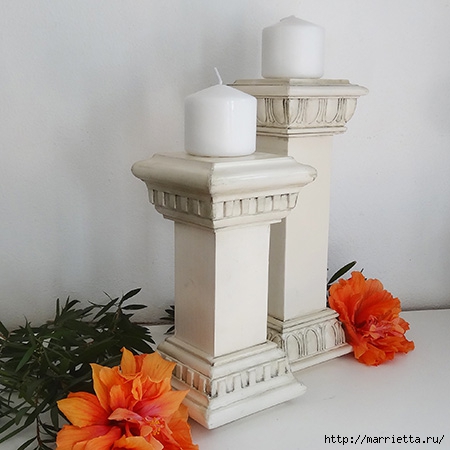
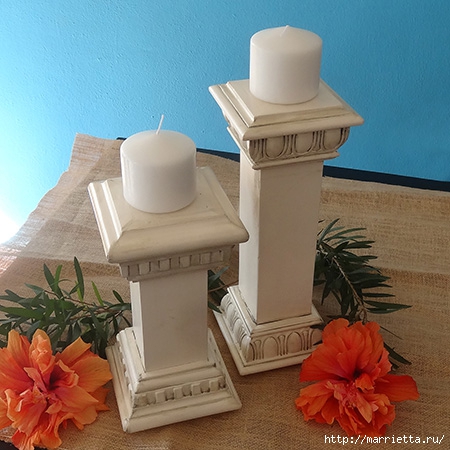
��� ������� ������������� ����. |

|
�������������� ������� |

|
������� ��������� 2011 |

|
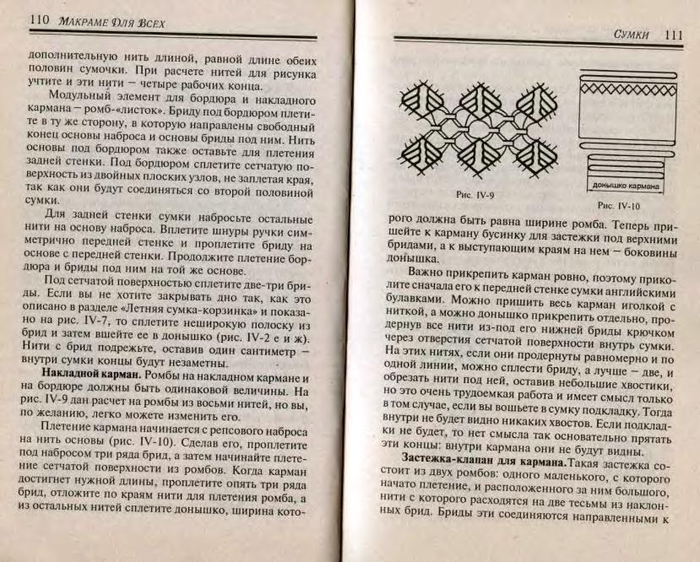
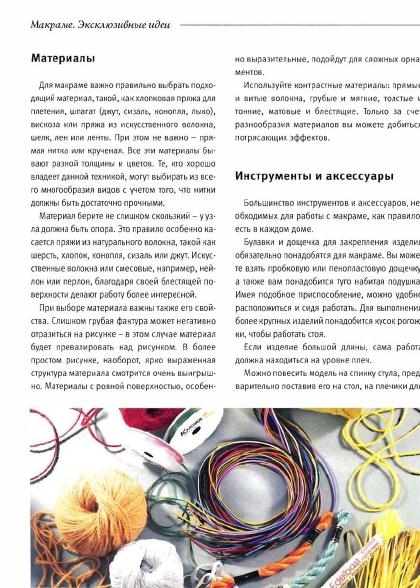
�������� ������� |
����� ��������
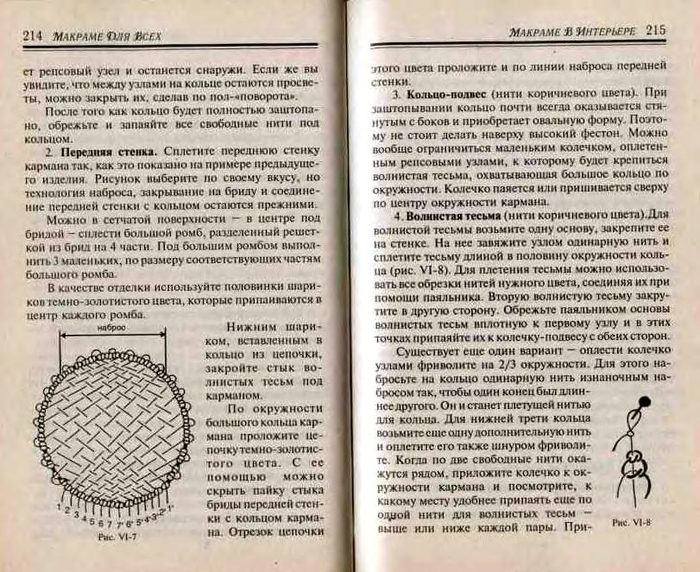
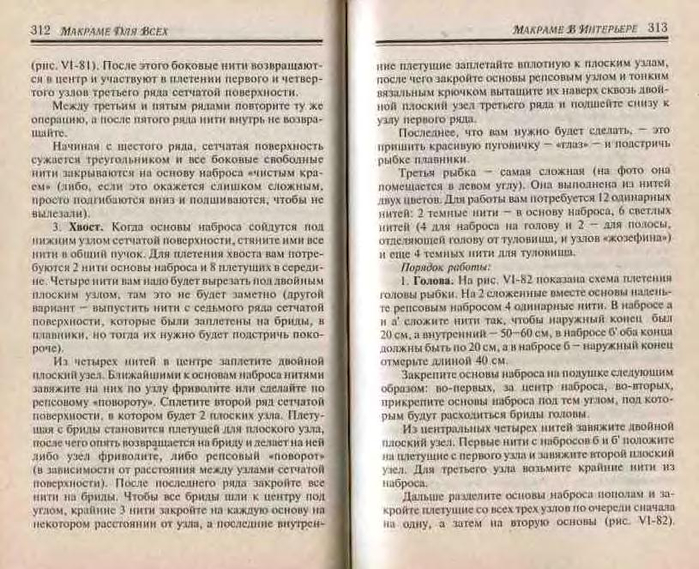
���������� ������ �������� ������� ��������. ��������� �������� ����� ��������� �����������. �������� �������� � ����� ��������� �� ���������� ������������������ ������� (Weddi-gen), ������� � ������� – ������� � ������ �������� � 25, 30 � 40. ��� ����������� ���������� � ��������� ������� � ����� ���������� ��������� ������� ��� ��������� � ������� �������. ��� ������� �������� ���� ����������� ���� ��� ��������� � ������ ��������. �������� ���� ����� ��� ��������� �� ����������� ��������. ���� ����� � �������.
������� �������
����. ���������� ������� ��������� �� ������� �������. � ������� ������������� ������. �� ���������� � ��� ������, ���� ��� ����� ��� ���������������� ������. � ����������� �� ����� ������� �������� ������� ��� ������ ������������� ������. ������������� ������ ��������� ����� �������� � �������� �������� �������� �� �������. ������� ���������� ������� ��� ������� �������, �� ���������� �� ������ � ��������� �� ������� ������, ����� �� �������� ����� �� ������.
� ������� ������������ ��������� ��� ��������������� �������. ��������� ������� � �������� ����� �� ������. ������������ ������� (�� ��������� ����� � �� �����) ������� ����� ��������� ����������� ���������� (��������� ���������� ������ �������). ������ �������� �� ������� ���������� �������� ���� � ����������. ����� 2-�� �������� ����� �������� ������� ����������� ����������.

|
�������� ��������� ���� "��������� ���������". |
������ ���������:  ����� �����������
 |
��� ������ �����������:
|
1. ��� ������ ������� ����������� � �������������:
���� � ������������ � ������� ������ ��� �������. ��������� ����� �����
���� ��� ��� ����������� ��������� ��������� ��������� ������ ��
���������� ������������.

2. ����� ���� ��������, � ������� ����� ��������� ���
������� ����������� ���� ��� ����� ��������� ������� �������� ����� �
��������� ����� (����� ������� ���� ����������), ����� �� ����
���������.


|
���� �� ������ �������� � ����������� �������� � �����. �� |

��� �������� ������������ ���������� � ����. �� ����� ������� � ��������� ��� � ����. ��� ����� ���� ������ �� ����� � �� ������ ����������. �� �������� ���� ����� �� ������ ������ � ������� ������ ������. ���� �� ��������� ���������� ���������� ����������� �������. ���� ����������� ����������� ����� ���������� �������� � ������ �� ����!

|
��������� ��� ��������� �� �������� ��������, �� |
 �� ������� ����� ������ ������������ ����� ���������� � �����, �������� � ����������. �, ����� ��� �� �������� � �� ������, �� ����� ���������� ����� – ���������� � ����� ��� ����� �������������, ��� �������. ������� ����� ����������, ����� � ������, ����� �� �������� ��������.
|
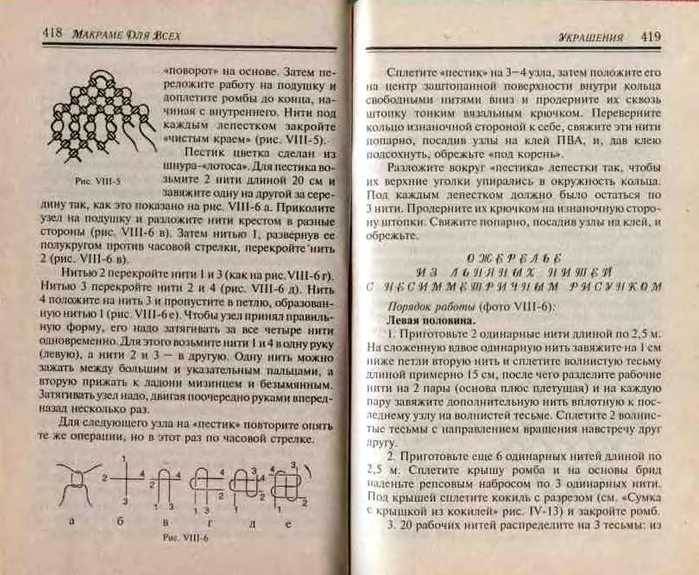
�������� �������. ��� ��� �������� ����� ��� ���� � ������ |
|
������� �� ������ �� |
����� ����� hobbyroom.perm.ru
��� ���������� �������� ����� ����� �������� ������� �����������. ��� ������� ����� ��� ��������� �������� �������, ��� �������� ���� (�������, ���� � �.�.)

����, ��� �����������:
|
���� ������ �� �������� ������ |
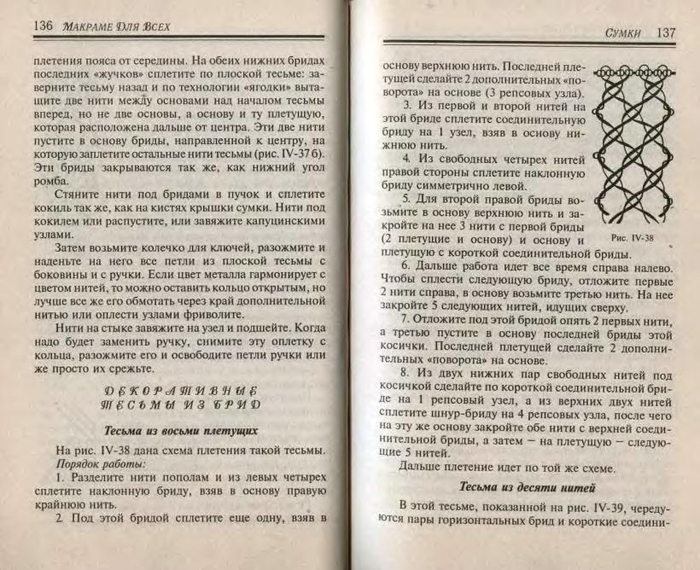
|
������ ������ �� ������������� (�� ������� "������ ����" 05-2015) |
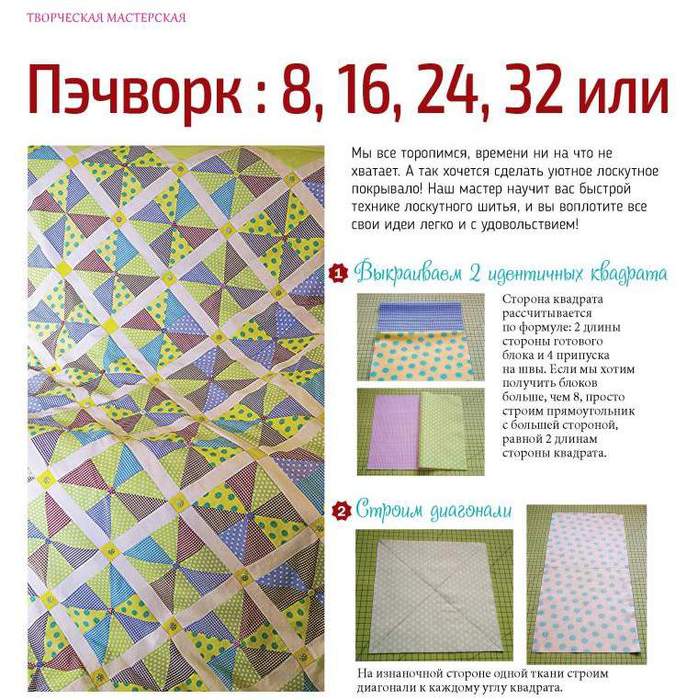
����� ��������� "��������� ����� ��":
����� 1 - ������������ ���������� � ������������
����� 2 - ������ �������� ���������. ����� �.�������
...
����� 39 - ���������� Burda. ����� �� �������� (16-19)
����� 40 - Prairie-Point Pizzazz - ����� � ������ ����������� �� ����� ������
����� 41 - ������ ������ �� ������������� (�� ������� "������ ����" 05-2015)
|
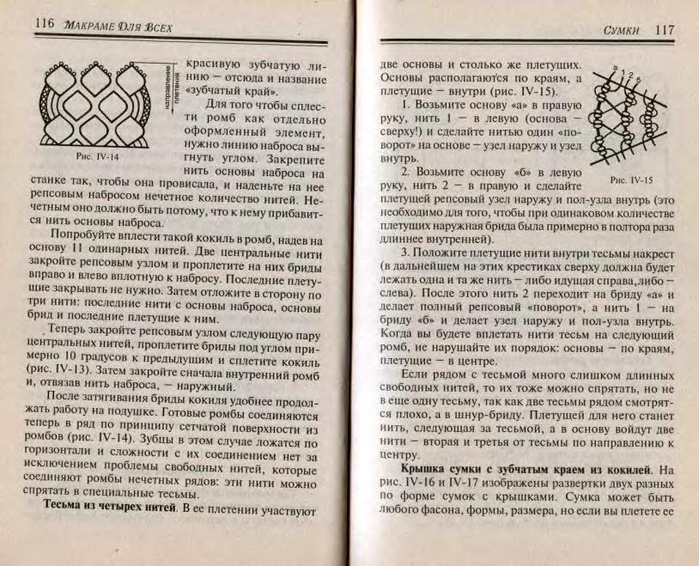
��� ������� �������� ����� ������ ������ |


|
�� ����������-������)) |

����� ��������� "�� ����������-������))":
����� 1 - �� ����������-������))
����� 2 - �� ����������-������))
����� 3 - �� ����������-������))
����� 4 - ��� ������� �������.
����� 5 - �� ����������-������!
...
����� 16 - ��������� ������� �������� ������:
����� 17 - �� ����������-������!
����� 18 - ��� ��������� ��������� �� 1 ������
|
������ ��������� ... ������ |
����� ��������� "������":
����� 1 - ������ �� ����� ����
����� 2 - ������
����� 3 - ������� �����. ����� ��.
...
����� 38 - ������� �� �������
����� 39 - ������ "���� �����"
����� 40 - ������ "�������!"
|
�������� ������� �� ������� � ����� |
�������� ������� �� ������� � �����. ����� ���� � ��������� ������-�����.

|
����� ������� � ������� |
|
���������� �������� |
�
�
| �� | � |
�

�
�

�
�

�
�

|
��� ������� ������ ��� ������� |
|
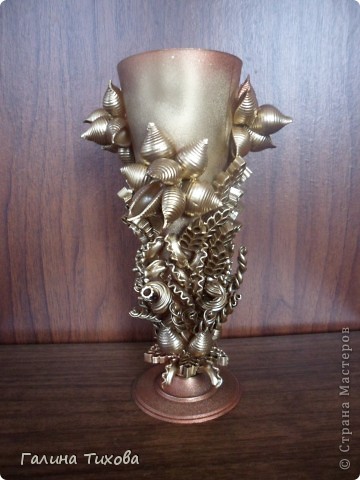
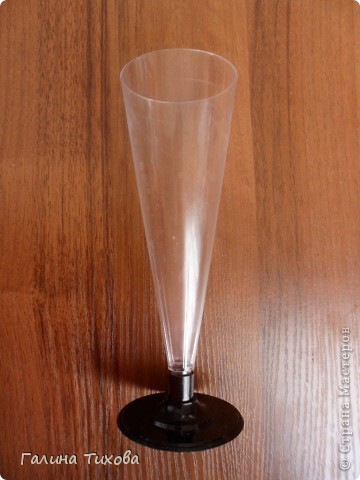
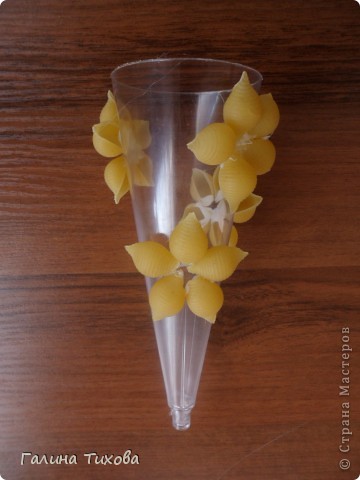
�������� ��� ���� �� ���� |
|
���������� �������� |

��� ����������, ���������� ��������, ���� ���������� � ������� (������) � 18 ��������. ������������� ��������� ��� �������� ��������������� �� ����� ���������� ����, ����� ����� �������������� ������������� ������.
����� ���������� ������� ���������� �������� � ������� ������������ �����. ����� �������� �������� ����� �������� � ����� �������������� �� ������ ��� �������� � ������, �� � ��� �������, ������, ��������� ��� �������� �������, ��������� ��������, ����� ��� ������ ��� ������� � �.�
|
������� : ��������-������� |
������ ������� ������������ �������� � ������� ������������ ����� ������ � ������������ ������ ��� � ��������� ������� ����� ��� ������� �����:

�������� ���� ��������� ������ ��������� — ������� ������ ������ � ����� ���������� �� �� ������.

�� ������ ��������� ������� � ��������������� �������, ��������� �������� �����. ����� ��������� �������� ��� ����� �� ����� �.. �����. �� ������ ������ � ���������� ������� ������� — ��������.

������, ��� �������, �������� �� �����. �� ������� ������� ��������� ��� ���������� �������� ������� ������. ����� ������� � ��������� �������, � ���������� ����� ��� ������.. ����� ����� ����� ���������� ����� ���������.

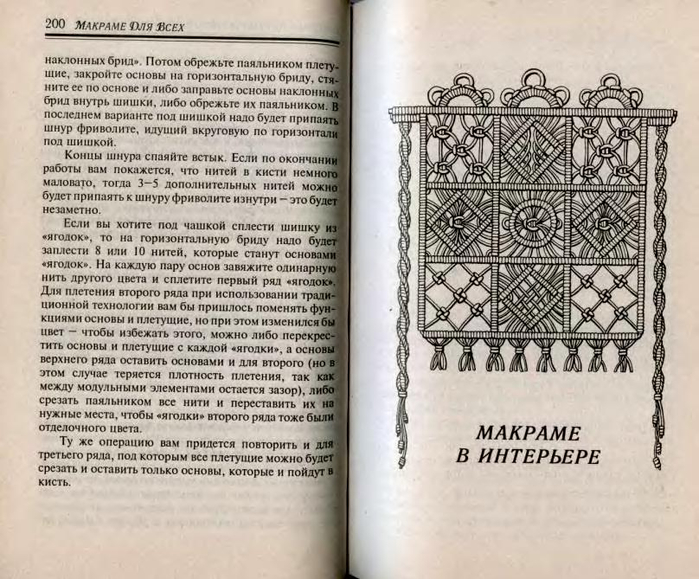
������ ����� ���� — ������� ����� �� �������� �����, ����� � ������� ������ � ������ «���������» ���� ������ ����� ����. � ��������� ���� ����� ������� ��� � ��������� �������. ����� ������� �����, ������� �������� �� ��������, �� ����� � ������ �������� ����� ������.. ������ ��� ����� ��������� ���� �����, � ������ ������ �����, � ��������� ����� ���������� �����.

������� �����!

��� ���� ����� �������� � ��������� �� ������� ������� — � �������, ����� �������, ����� �������� � ���� ������� � ���������.��� ���, ��� ������� �������, ������� �� ���� ������� ������� ������ ���������� ����� �����.

: ������ Denbow ����� ���������� ��������� ��� ������������ ����� �������:
��������� �� ����� �� ���������� ������ ����������� �������� �����!

����� � ����������, �������� �������� � �������:

���������. ����������� ��� ������:

��� ������� ������� �� ������ �������� �����:

�������� ������� �������, ���������� ��� ���� �� ������ ����� �������� ����� ������ ������ ���� ����-������.

����� �������� ���� � ������ � ������ ���������� ���� ������,

� ������ ����� ���� ������ ��� � ��������� �������.

� ������������ � ����������, ������ ���� ����:


�������� ������� �������� ���� ������ �� ���� ������:

��� ��������� ��������� �� ���������� �����.


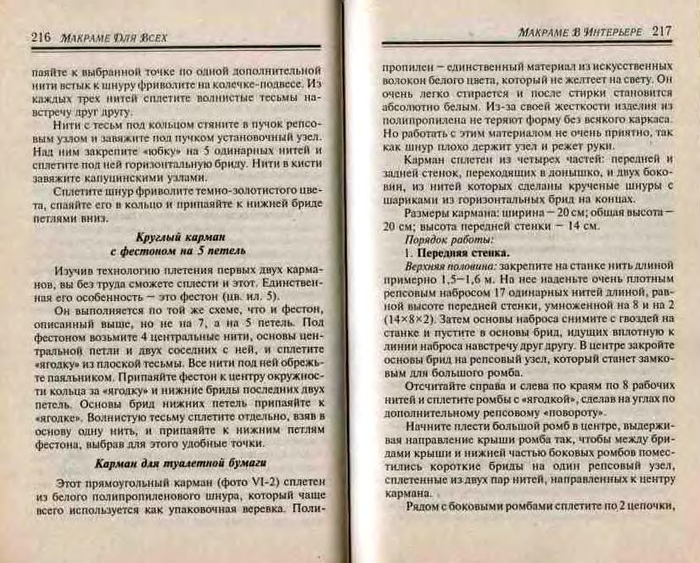
�������� ��������� �������� ������ ���������� ������������.


����� ���������. �������� ��� ��������:

������ ����� ������ �� �������������� ��������� �� ������.

���������� �����, �� ����. ����� ����� ����� ���� �������� �� �����.

� �������� �������.

��� ���� ������� ������� �������.

���������


|
����������� �� ���������� ������� � ���������� ��������� |
����������� �� ���������� ������� � ���������� ��������� ��� ��������� �� ����� ������� ������� ������ ������. ������������� ���� ��� ��������� ��������� � ��������� �����! ���� ��������, ����� �� �������� ����� ������� ��������� ��� ������, ������ ����������� ���������� ���� �������� �������
|
���� ��... ��������! |
����� �������� �������� ������ �������� ��������� �������� ����� �� ����������� ��������������. �� ���� �� ������ ����� �������������� ��� �� �������, �� � ������� ����� ���� � ���������, �� ��� �� ����� ����� �� ��, ��� �����, �������, ������ ��� ���������, ���-�� �� ����� �������. � ��� ����� ��������� �� �� ����� ��������������, ������� ����� "����������" �� ���� ����� �������������� � ��������� �� ��������.
��������: http://fotki.yandex.ru/users/mad1959/view/573071/?page=2
��� ������ �� ���� ������ �������: http://fotki.yandex.ru/users/mad1959/album/184914/
� ��� ������ �� ��������� ����� "������� ������": http://fotki.yandex.ru/users/mad1959/album/172535/
|
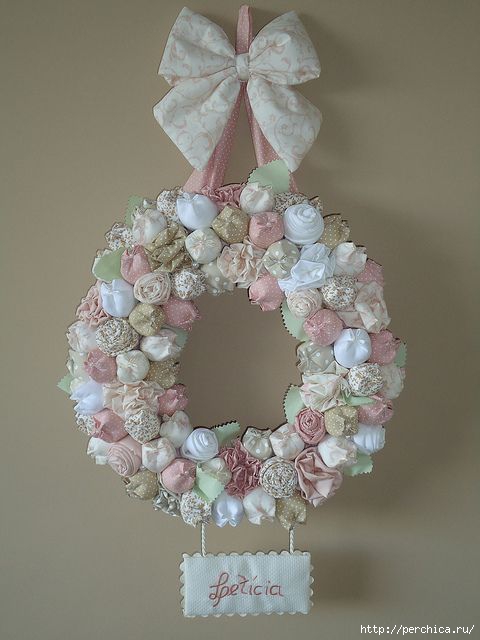
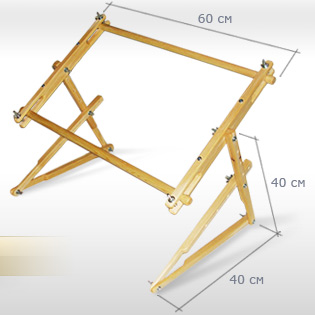
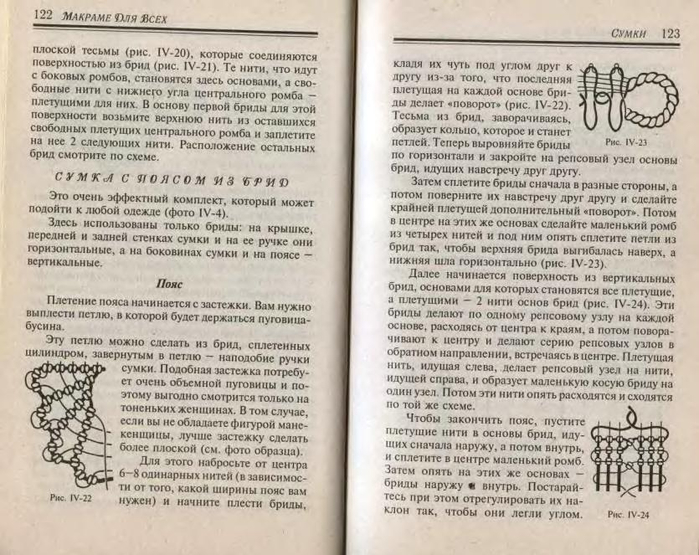
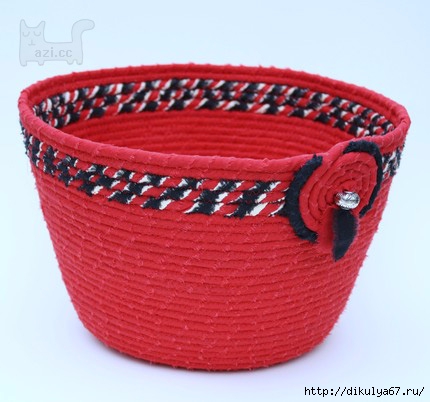
������-����� "��������� ������" |
��� ������������ ������� ������� ��� ����������� ��� �� ������� ����� ��������� ������� �������. ���� ������ ����� ������: ������ 28 ��, ������ 24 ��, ������� 20 ��, �� �� ������ ���������� ��� ������� ������ ��� �������. ����, ������������� � ���������, ������������ ������ ���� �� ������, ����� � ������, � ����� ������ �����. ��� ������� ������ ����� � ������� �������: ����� 3 ��, ������� 3 ��, ������ 2 ��.
|
����� �� ������ � ������� |
��������:������,������
� ����������� ���� ����� ����� ������ �������� ���������� ������� ��������� �������� �� ����� � �������� ������� �������� ����������. ���� ������ ��������� ������ ������ ������� �����.
��������� � ���������� ������� �������� ����� �����.

|
��������� ����� �� ����� ��������� ����� �� ��������� ������. |
������ ������ (Elspeth McLean), ������������� ���������, ����������� ������ � ������, ������� ��������������� ������� �� ������� � �������� ������� ��������� ������, ������� ����� ������� ���������� ������.
����� ������� �������� ������� — ��� ����� ��������������� ���������, ������� ������� �� ����� ������� ������ � ������ ���������������� �����������. �������� ����� ����� ����� �� ��� ������. ������ ������ ���� �������� ������� ����� ������� �������, ��� ������ �� ������ ��� ����� ������������� � ��������������.
�� ������ ���������� ���������, � ������ ��������� ����� �� ��������� �������.


|
�� ������� �� ����,�������� |
|
|
See the small looms index page for many other tutorials and projects using flower looms and other small hand held looms.
Back stitch can be used to fasten the centre of your flower, or as a decorative feature stitched all the way to the edges. |
 |
(If you want to stitch the centre of your flower using a different colour stitch the centre with a new length of yarn and leave a tail to darn in later) 1: To stitch the centre of your flower using the same yarn as your petals, pass your needle under the threads of the petal on the opposite side of your flower to the last petal you wound. For example, the last petal I wound is at the bottom of the photo on the left. |
 |
2: Pass your needle under the same threads again and come up in the centre of the loop. |
 |
3: Pull tight to form a knot. |
 |
4: Pass the needle under all of the threads for the next petal. |
 |
5: Pass your needle under the same petal again, plus the next petal on the left. |
 |
6: Repeat step 5, passing your needle under the last petal, plus the next petal on the left each time. Continue doing this all the way around as many times as you like. If you're only going to work one round make sure to stitch the first petal twice. |
 |
7: To finish off your thread, pass it under the last petal and leave a loose loop. |
 |
8: Pass your thread through the loop |
 |
9: Pull the knot tight. |
 |
10: Pop your flower off the loom and darn the loose ends into the back so they won't show. |
Copyright Sarah Bradberry March 2007. All rights reserved. You may not edit, email, publish, or distribute the contents of this page in any form without the prior permission of the copyright holder. If you would like to share the information on this page you may do so by giving the link to this page which is http://www.knitting-and.com/small-looms/daisy-backstitch.htm
Video copyright August 8th, 2011. You may embed this video on other websites using the YouTube embed code if you desire.
Small Looms Index
Home
E-mail Sarah
����� ��������� "�������,���":
����� 1 - ��� ���������
����� 2 - ��� ���������
...
����� 5 - ����� �� ����? ��� ������!
����� 6 - ��������� ��������������,����� �������
����� 7 - �� ������� �� ����,��������
����� 8 - ������ �������,...
����� 9 - ����� �� ����
...
����� 29 - ���� (��������) . ����� ������ �� �������� �������.
����� 30 - ��������� ������� ��������. Nanduti Lace
����� 31 - �������� �� �������
|
�������� ����� �� ������� |
|
>������� ��������. �� |
���� � ��� ���� ������� ������� � ������� ������� ����� ��������, ����� �� ����������� ������� ������� ��������� ���������� ������� �� ��������� ������� ��������. ��� ����������� ������ ���� � ��������))))))))))

|
��� ����� �� ������� �������. |
|
��������� ���� �� ������ ����� � ����� ������� |


�� ������� ��� ���, ��� ����� ������� ����� � ����-������ ��� ������ ������ ���� �������: ����������� � ������������. ������� �� ����������� ���������. ����������, ��������, ���������. � ����� ��� ����� ��������� �����: ���������� � �����������. � �� ������� ��� ����� ��������. � �������������� ������������ �����
��� ��� ����� ����? ������� � ����������. ��� ������ ������ ��������� ������ ������

����, �������� ������ ����������� (����������� �������) ��� ������ � ������������ � �������� ��������. ���� ������� ������� �� �������������. ��� �������� �����, ����� ��� �� ����� �������. ����� ������, ��������� � ��������- ������ ��� ���� ������������� - ����������� �� �� ����, ��� ��� �����������.
������ �������� ����������� ��� ����� �����. ��-������, ��� ������� ����� - �������. ��-������ - ��� ���������� ������ - �����, ������� ����� ���������� � ������� ������� � ����� ���������� ����� ��������, ������� ���������� ������ �������
�� ���� ���� - ����������� ������� ����. �������� ������� ������. � ������ ���� ��������������: ������ �� ��� ������� ������, ������ � ����� ����������� ������� ��� �������. �������� �� �� ������ ����� � �������� ������������ ��������.
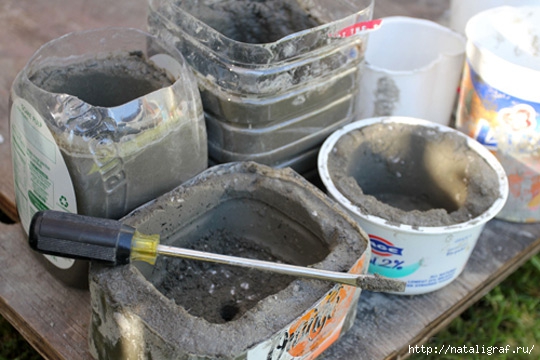

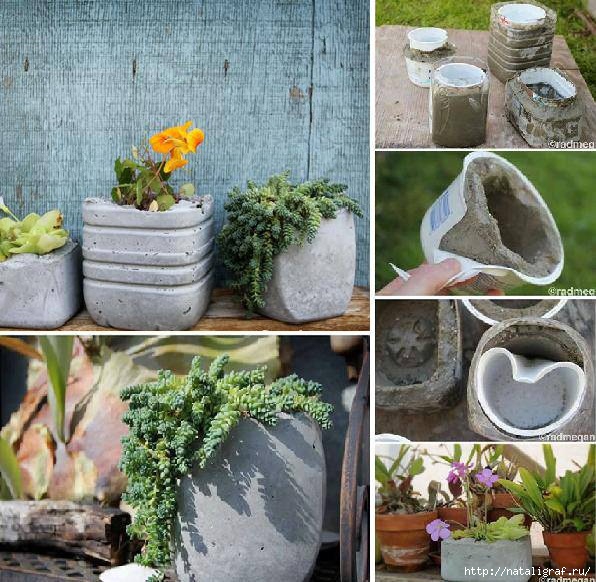
��-radmegan.com
� ����� �� ������ �������� ��������� ���������� ������ ���, ����� ����� � ����� ���������. ���� �����-������ �� �������� �������� �� ������ ��� ��������� � ������� �������� �������. ��������� ����������� ���������, ��� ��� �������.
|