 ��������������������� ������� �������� �� ��� ������ �����
 � - �������������� ��� ���������� ���������� � �������� ������������. ����������� ��������� ����������: Internet Explorer 6, Fire Fox 1.5, Opera 9.5, Safari 3.1.1 �� ���������� JavaScript. �������� ��� ����� ����
 ������-���� "������� �����"���� ������ ������� ���� ���� �����, ��, � ���������, ��� �� � ����� ������� ���������. �� ��������� ����� ������� ������ � ������ �������, ������ � ������ �� � ��������� ���������� ���������� �������
 ������-���� "Empire"�������� ���� ��������� ����� � �������������� �������� � ����� ���������� ����������� ����������� � ���� Goodgame Empire.
����� ���� ����������� �������, �������� �� � ������� �� ������ �������. �
������-���� "Empire"�������� ���� ��������� ����� � �������������� �������� � ����� ���������� ����������� ����������� � ���� Goodgame Empire.
����� ���� ����������� �������, �������� �� � ������� �� ������ �������. � ������ ��� ������������� ��� ^_^
��������� �������� � ������� ������ � ������������ Html-�����. ����� ���������� ��� ������, �������� � ������
������ ��� ������������� ��� ^_^
��������� �������� � ������� ������ � ������������ Html-�����. ����� ���������� ��� ������, �������� � ������
������ ������� |

I was browsing around the Anthropologie website the other day and came across these fabulous Tri-Loop Chandelier earrings. I hardly ever wear large earrings, but these are just so pretty they just pulled me in. Unfortunately, I don't have an extra $300 lying around to spend on a pair of earrings I would love, but not wear very often. So - I decided I could make them.
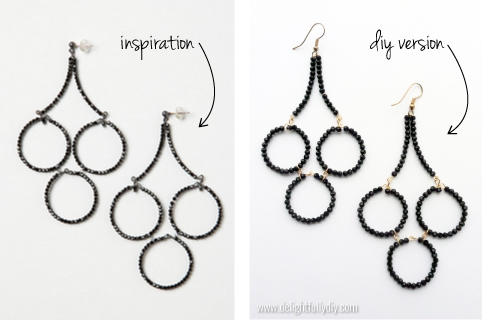
Since I've been trying to work on beading projects that use supplies I already have, and I had some gold wire and earring hooks I decided to use gold instead of silver like the original pair.

You will need:
212 - 3mm cut glass black beads
4 - gold head pins
12 - tiny gold jump rings
gold beading wire (I can't remember which kind this is, but just make sure you have something sturdy enough to hold it's shape)
2 - gold earring hooks
beading tools

Start by putting one bead onto one of the head pins and securing it by making a loop with the wire at the top, cutting off any excess wire. (If you're unsure how to make the loop here is a quick tutorial from Fusion beads.) You'll need two of these for each earring.
Next, form a mini-chain by attaching 3 of the jump rings together. You will need two of these per earring as well.

To start the first beaded circle, make a loop at the end of your wire. Then, form the wire into a circular shape, about 3 inches in diameter. I did this by wrapping it around a spool of thread. It doesn't have to be perfect - you just want to make sure it's round. Cut the wire, leaving a little more than you need just in case. You will need 3 of these for each earring.

String 10 beads onto the wire, add one of your jump ring chains, and finally add 16 more beads. Each circle has a total of 26 beads.

Finish the other end of the beaded circle (circle A) by making a loop with the wire. (You may need to cut off some excess wire first) Eventually the loops on each end will be joined, but don't do it yet.
To make circle B, repeat the steps again, this time adding 16 beads first, then another of the jump ring chains, and finally 10 beads. Finish by making a loop on the end of the wire.

Start the final circle (circle C) by stringing two beads. Then, connect circle C to circle B by going through the unattached end of the jump ring chain. String 23 more beads, then attach circle C to circle A the same way you did with circle B. Finally add the 1 remaining bead.

Finish the end of circle C with a loop in the wire. This time, connect both looped ends of the circle to close it.
Now we're ready to start on the last piece of the earring! Start by cutting a piece of wire about 4 inches long and once again making a loop at one end. Then, string 13 beads onto the wire.

Next, wrap the wire around a pair of round nose pliers to make a half loop at the top (this is where you will attach the earring wire). String 13 more beads and finish by looping the wire. I just lightly bent the wire to get it into the shape I wanted.


Repeat the same step with the other circle. Now all three circles should be closed.
Open the loop on one end of the top piece and connect it to the head pin bead on the corresponding side. Then, do the same with the other side.

To add the earring hook - open the loop at the bottom of the earring hook, link it through the half loop/turn at the top of the earring, and close it.

These earrings measure a little over 3 inches long and about 2 inches wide. Even though they are kind of large, they are really lightweight and super pretty!
| �������: | �������������� � ��/������ ��������� � ���������� |
| �������������� | « ����. ������ — � �������� — ����. ������ » | ��������: [1] [�����] |


