Традиционный японский переплет - 2 |
http://beccamakingfaces.com/category/bookbinding/
http://beccamakingfaces.com/category/bookbinding/page/13/
japanese stab binding #44: fair isle
japanese stab binding #41: ‘albuquerque’
japanese stab binding #39 and #40: tiara and double arrows
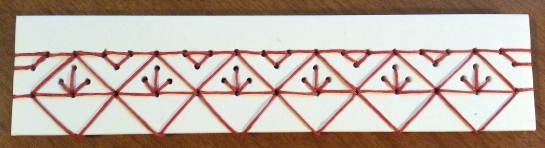
“Tiara”… 28 holes. Beginner bind.


japanese stab binding #38: snail

japanese stab binding #34: cobwebs

japanese stab binding tutorial: stars

The theory of japanese stab binding
…or at least how I understand it. I’ve had many questions since I began posting my own Japanese stab bind designs: about how I create them, the thought process behind the designs and sewing mechanisms, the tools I use, etc. I’ll break down my personal process in another post; for this one I want to explain some of the basics for those of you just starting out in the world of bookbinding and are looking for a style that allows for incredible expression.
If you have researched bookbinding at all, you will have most likely come across the basic Japanese stab bind (JSB). It looks like this: four holes, four wraps around the spine, and a wrap around each edge.

Fold line
The most import part of the traditional JSB to remember is what I call the ‘fold line’. This is made by the holes that are farthest away from the spine, or closest to the content on the inside of your book. It is vital that they be in a straight line, otherwise your book will end up with a crooked fold and the cover will be more likely to tear.

Having thread run along the fold line is helpful because it keeps the cover from tearing off as easily – there is more surface for the cover to bend against, instead of just single holes. It also keeps with the traditional JSB look. I’ve only sewn a handful of binds that didn’t have thread reinforcing the fold line, but the holes were even.
“Butterfly” bind.

Edges and spine
It isn’t absolutely necessary to include the edge wraps, but good practice to do so. If you have a tendency to sew loosely, or if you ever have trouble making your knot tight enough, it is important to include the edge wraps. They also help with reinforcing the fold line, and keep the book together better. The spine needs to always have some kind of wrap. As you can see from the example binds in this post, there are numerous ways to do this.
Holes
The absolute minium of necessary holes would be one hole…but you would end up with a fairly wobbly and shaky book and your design would be limited to a triangle. Two holes would still create a weak bind, but if the book were quite small, or had only a few pages, it would probably work. But good news: there is no maximum limit to how many holes your design can have, and it doesn’t matter if it is an even or an odd number. You are only limited by your patience, persistence, and stamina when it comes to drilling all of those holes! I would say my patterns have an average of 30 holes each.
“Crocus” has 53 holes.

**A potential problem area is how close your holes are to each other…the closer they are, the more likely your book block will rip when you pull the thread tight. And NOTHING is more disheartening than when that happens! I try to keep my holes at least .25″ (or 7 mm) apart. On occasion I will place them closer, but I then sew the book very, very carefully.
Process
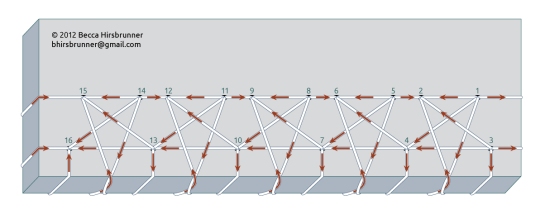
This is where it gets a bit complicated to explain by using words and not physically demonstrating (maybe one day I’ll try to create a video tutorial).
The traditional JSB with 4 holes has the sewing start at hole #2. But if you have a complicated design, it’s easier to start at the very edge. The central objective of JSB is to sew your entire bind while never repeating the same line; in other words, never having two threads between the same two holes.

To achieve this, you essentially sew half of the design in one direction, then at the halfway mark you return back to the start by sewing the pattern in reverse. You must get the concept “over-under-over-under”…then, “under-over-under-over” firmly in your mind. This is fairly easy to figure out on a geometric pattern – and it can become convoluted with an organic/non-geometric design very rapidly! The ease or difficulty is very much dependent on what the design is and who is sewing it.
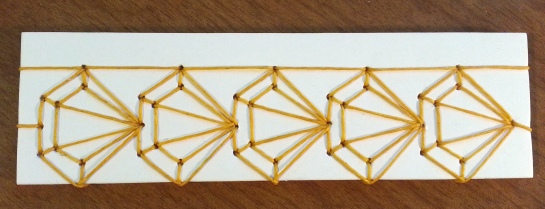
For example, below is “mushroom”, which is a geometric pattern with 5 repeats. The first ‘mushroom’ segment is completed before the second is begun. In fact, because of the gap between each segment, each mushroom is sewn exactly the same way. If they had been touching at the fold line, the needle direction of the second mushroom would have been completely opposite of the first (every ‘enter’ would become an ‘exit’). The third mushroom would have been like the first, the fourth like the second, etc.

In “peacock”, an organic pattern, the sewing starts in the middle, creating the feather’s rachis first, then the center circles, then the final circle with fringe coming off of it. It looks complicated, but once you have mastered the concept of ‘over-under-over under,’ it isn’t too difficult to figure out.

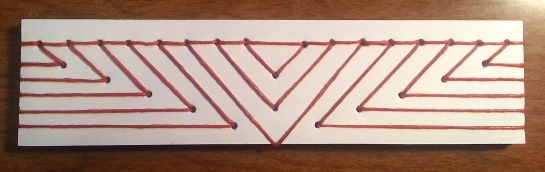
“Woven” is an exception to the rule: it is a geometric pattern, but the sewing actually goes from one side to the other and back again just to complete one ‘V’ shape. But the edges and the sides still use the ‘over-under-over-under’ approach.

======
Early in my experimenting I decided that straight perpendicular lines by themselves were boring. I figured out that the spine could be wrapped with a ‘V’ shape by crossing one loop with another previous loop (or loops). So far the only shape that seems impossible is a circle, but I’m working on it!
I hope this is helpful. If you ever run into a snag with your own pattern or design (or with one of mine) send me an email. And send pictures of your creations, I would love to see!
japanese stab binding #33: hot air balloons

japanese stab binding #31: woven

japanese stab binding tutorial: butterfly


japanese stab binding #30: dovetail

japanese stab binding tutorial: kissing fish


japanese stab binding #27: kissing fish

japanese stab binding #26: peacock

japanese stab binding #25: notches

japanese stab binding tutorial: plugs


| Рубрики: | Скрапбукинг |
| Комментировать | « Пред. запись — К дневнику — След. запись » | Страницы: [1] [Новые] |


