Клипарт png для дизайна - Зимние, новогодние рамки-вырезы 16 PNG | min 1900x2900 | 300 dpi | 126....
ПАННО - техника "Ляпочиха" - (0)ПАННО - техника "Ляпочиха" Ляпачиха - старинная русская техника лоскутного шитья, абсолютно не тр...
Кофе дизайн. Векторный клипарт. - (0)Кофе дизайн. Векторный клипарт. Кофе дизайн. Векторный клипарт. Оригинальный рисованный клипарт н...
Дина Рубина - Рассказы и новеллы - (0)Дина Рубина - Рассказы и новеллы Дина Ильи́нична Ру́бина (род. 19 сентября 1953, Та...
Кошкин дом - (0)))) за 15 минут. Кошке очень нужен свой уютный домик, ей ведь тоже хочется иногда уединиться, ...
 Я - фотографПлагин для публикации фотографий в дневнике пользователя. Минимальные системные требования: Internet Explorer 6, Fire Fox 1.5, Opera 9.5, Safari 3.1.1 со включенным JavaScript. Возможно это будет рабо
 ОткрыткиПерерожденный каталог открыток на все случаи жизни
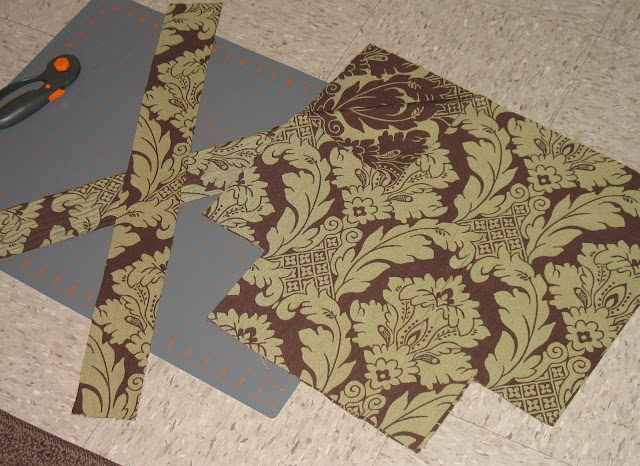
Сумка цветастая. МК |

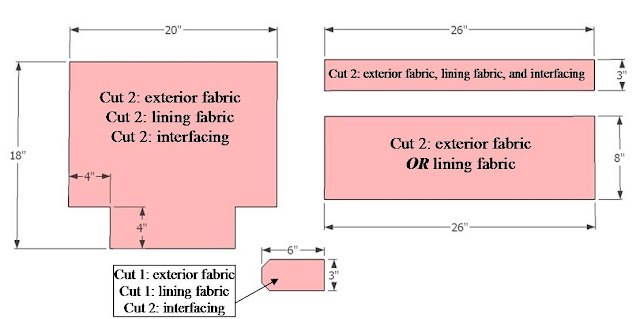
 Lining fabric:Cut 1: 20x18” rectangle for main body of bag, with 4x4” square cut out of bottom corners
 3. Mark placement of magnetic snap by measuring 4.5” from top center of bag and attach bottom half of magnetic snap using manufacture's instructions.
 5. Right sides together, pin and sew exterior fabric strap to lining fabric strap. Sew ¼” seam down each side, leaving ends open. Turn right side out, press, and topstitch along each side close to edge. Repeat for other strap.
 6. Sandwich bias tape over top edge of interior pocket fabric and sew close to edge, forming a casing for the elastic.
 8. Thread elastic through backside of casing and backstitch at both ends to secure. Pin wrong side of pocket to right side of main body lining 5” from the top of the lining, matching up side edges, and topstitch two rows along lower pintucked edge. Stitch pocket to lining at sides.
 10. Repeat steps 6-9 using 2nd interior pocket and 2nd piece of main body lining fabric.
 13. Leaving a 4-5” opening, stitch along upper edge of bag, through exterior fabric, lining fabric, straps, and closure tab. Turn bag right side out, trim seam to reduce bulkiness if needed, and press. Hand stitch opening of bag closed and top stitch 1/2" from edge. Top stitch another row 1/4" from top edge.
 14. Take a good long look at your bag because you are done and can start filling it up!
http://sewmuchado.blogspot.com/search?updated-min=2008-01-01T00%3A00%3A00-07%3A00&updated-max=2009-01-01T00%3A00%3A00-07%3A00&max-results=50
| Рубрики: | сумки |
| Комментировать | « Пред. запись — К дневнику — След. запись » | Страницы: [1] [Новые] |


