-Музыка
- Мирей Матье - Влюблённая женщина
- Слушали: 20289 Комментарии: 6
- Алла Пугачева - Позови меня с собой
- Слушали: 5833 Комментарии: 0
- Tsaritsa moya preblagaya
- Слушали: 63 Комментарии: 0
- Оооофигенная музыка,спер у Интресс:)
- Слушали: 418242 Комментарии: 0
-Рубрики
- церковное рукоделие (53)
- рукоделие (45)
- крой и шитьё (36)
- бисероплетение (35)
- кулинария (34)
- Пасха (25)
- Разное (18)
- украшение дома (17)
- вязание крючком (16)
- волосы (13)
- www (13)
- мыловарение (12)
- lent (11)
- Новый год (11)
- вязание спицами (10)
- Житие (9)
- крестины (9)
- маникюр (9)
- Мастер-класс (9)
- интерьер (9)
- цветы (6)
- candles (5)
- вышивка (5)
- бубончики (5)
- how is clean your house? (3)
- goldwork (3)
- Просфоры (2)
- вышивка биссером (2)
- Janome (2)
- Allotment (1)
- Fish (1)
- come dine with me (1)
- cupcakes (1)
- Halogen oven (1)
- enjoy yourself (1)
- orchids (1)
-Поиск по дневнику
-Подписка по e-mail
-Статистика
Другие рубрики в этом дневнике: церковное рукоделие(53), цветы(6), украшение дома(17), рукоделие(45), Разное(18), Просфоры(2), Пасха(25), Новый год(11), мыловарение(12), Мастер-класс(9), кулинария(34), крой и шитьё(36), крестины(9), интерьер(9), Житие(9), вязание спицами(10), вязание крючком(16), вышивка биссером(2), вышивка(5), волосы(13), бубончики(5), бисероплетение(35), www(13), orchids(1), lent(11), Janome(2), how is clean your house?(3), Halogen oven(1), goldwork(3), Fish(1), enjoy yourself(1), cupcakes(1), come dine with me(1), candles(5), Allotment(1)
nail art |
Это цитата сообщения Снорка [Прочитать целиком + В свой цитатник или сообщество!]
|
Nail Art Design Tips |
Дневник |


Nail Art Design Tips
Designing nail art for yourself and for your friends is a fun and fulfilling activity. Your ability to create new and complicated designs gives you the freedom to have a different kind of nail art for every occasion. And if you think you can, one’s ability to beautify nails can even be a financially rewarding endeavor. Here are some tips that you can use to further enhance your nail painting abilities.

First and foremost, color combination is the key. Not all colors look good with each other. To help you make your nail art designs more striking, trying using a color wheel or color chart to see the color groups that works well with each other. Also, do not be afraid to use unusual colors like metallic shades or polishes that glitters. Sparkling nail colors can be very flattering in evening affairs as they give more edge to your over-all style.
Another thing that you must think about is the three O’s of the moment: outfit, occasion and over-all look. Your nails should be cohesive with your outfit and not look as though it just sprouted on your fingers tips from out of nowhere. If you are about to go to a formal gathering, be sure that your nails will look as though it belonged there. And if you are about to go clubbing with your girl friends, pick a nail art that will convey fun and enthusiasm.
Experiment with your nails. If you really want to stand out, why not try nail piercing? Add to the wonderful colors and designs of nail art, nail piercing is a wonderful way to accessories your nails. Attaching gold hoops or silver studs on your fingernails can add that extra glitter you need to awe the crowd. But if you decide to have a nail piercing, you must use the proper nail piercing tools and not just ordinary needles, pins or razor blades. Without proper tools, there is a tendency that your nails will get damaged or you can even hurt yourself. The right piercing tools can limit the possibility of your nail piercing getting lost if they are valuable.
If you are saving some cash or stencils are just not available, you can use stripes of band aid to help you create wonderful patterns on your nails. Painting a base color and letting it dry and then forming details using strips of band aid then painting another color over it can truly surprise you when the strips get removed and reveal a striking pattern.

And if you have long nails, try painting the underside of your fingernails with the contrasting shade of the color you used on the top side. This technique will look great more so when you are on the dance floor.
Equipments are very essential in nail art. If you want to have good results every time you decorate your nails, taking care of your equipment and using them correctly is a responsibility one must never neglect. Also, to ensure that you will have the result you need, use equipments that you are most comfortable with. If you prefer using a bobby pin or toothpick instead of a fine nail brush in creating details for your nail art, then do not frustrate yourself in using a fine nail brush that will never work for you.
When creating nail art, be sure to have A LOT of patience, more so if you are just a novice. Do not expect it be able to create color blends or putting rhinestones on your nail for your first try because like every endeavor, nail art needs time and practice to master.
|
Без заголовка |
Дневник |
Step 1:
Apply a base coat prior to nail polish application. Apply 2 coats of Nail Fantasy color no. 66 which is peach shade with specks of gold.

Step 2:
Apply a clear polish or a top coat, any polish that is not thick in consistency, I am using Sally Hansen's Clear Polish.

Step 3:
Making sure to apply the clear polish one finger nail at a time. While the clear polish is still wet, drop 5 dots of Prettynails' white nail art pen, do not worry if the dots spread out a bit. It should be that way so the flowers will turn out as part of your nail polish. Continue dotting below the petals.

Step 4:
Making sure to work fast, while the white dots/petals are still wet, drop another colored nail art pen on top of the white dot. I chose Prettynails' Nail Art Pen in purple. Using the tip of the art pen or a needle to spread the colors together and connect it going inwards.
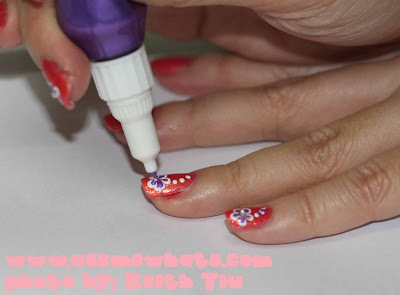
Step 5:
You can choose to drop a different shade for flower bud. I opted for a clear rhinestones. Press it in and the rhinestones will stay with you for weeks :)

Step 6:
To protect your hard work, apply a coat of your favorite Top Coat.

Enjoy your flower nail art with a twist of 2 tones!
You can create same flowers with different color combinations!

|
AMW Nails |
Дневник |
Step 1:
I requested for 1 base of Platinum polish then apply 2 coats of Mint colored polish as base. Paltinum polish is perfect as base for any light colored nail polishes.

Step 2:
Using ELF'S Plum Polish, create a French Tip.

Step 3:
Using L.A. Colors Art Deco in White, create another line just below the ELF Plum polish color. You can stop here if you want a simple Mint Chocolate nails!

But I want to go further
Using pink nail art pen, create flowers by pressing 5 dots.

Do not forget the needle method

Step 5:
Using a purple nail art pen, dot the middle of the pink dots to create flower buds and go further by adding on purple dots as "illusion" to more flowers.

Step 6:
Apply 1 coat of glittery polish to create a nice shiny nails. I am using Caronia's.

Step 7:
Apply a coat of top coat to protect the nails. This nail art will last at least a week!

Enjoy your Minty Chocolate based nails
with a hint of daintiness!

|
Без заголовка |
Дневник |

|
Romantic V-Day Nails |
Дневник |
*winks*
I actually enjoyed the outcome of this week's nail art design. I hope you enjoyed the steps that I've done for you nail art addicts out there! Again, thanks for always embracing my nail art designs!
|
nail art |
Дневник |
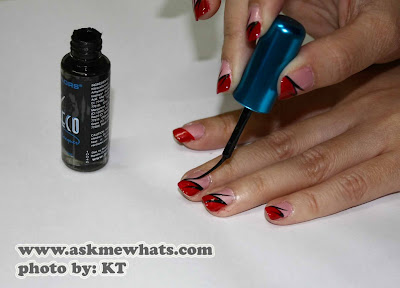
not forgetting the most important thing...
your mug of tea or coffee


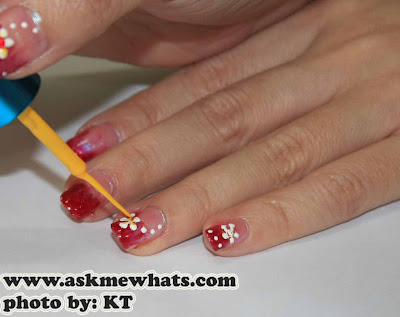
I used white as it shows up well on the red enamel.


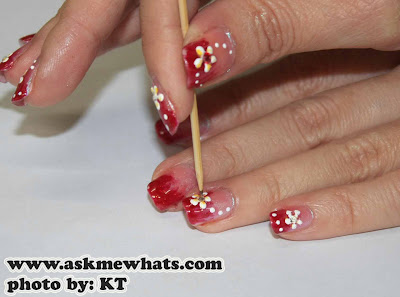
Dip the brush into water, then into your chosen colour of paint, again I used white so you could see it properly.
The dots on this nail aren't 100% round or perfect by any stretch of the imagination, but when you're learning it doesn't matter, art is in the eye of the beholder (that's my excuse and I'm sticking to it lol)


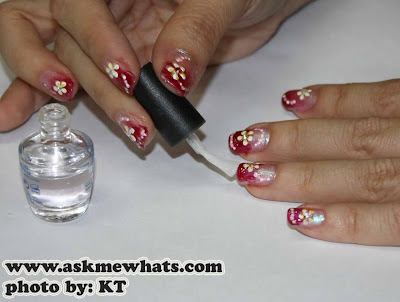
Apply a generous application of your chosen topcoat, inset the rhinestones, wait a couple of minutes then pop on another application of topcoat and voila, a nailarted nail.

here's the links for the individual pictures...
|
Нейл-арт |
Это цитата сообщения very_sweet [Прочитать целиком + В свой цитатник или сообщество!]
Нам понадобится: 3-4 лака, иголка, зубочистка, палитра (любая пластиковая поверхность, которую не жалко. Я часто использую коробки от дисков)
Подбор лаков для таких рисунков предполагает следующее:
а)лак основной,
б) лак, резко отличающийся от основного тоном, но находящийся в одной с ним цветовой гамме,
в) лак белый,
г) лак с блестками. Конечно, это не правило, а рекомендация, тут возможны варианты, все зависит от вашей фантазии
Я выбрала такие лаки: розовый, красный, белый, прозрачный с красными блестками.

Теперь приступим:
1. открываем лаки (кисточку не достаем, только отвинчиваем) и расставляем в том порядке, как будем их использовать. Работать нужно БЫСТРО.
2. Наносим основной тон (на один ноготь). Тут же на мокрый лак ставим капли вторым лаком, туда же третьим и четвертым
3. Берем иголку и острым концом начинаем растягивать капли. Лучше придерживаться одного направления. Не нажимайте слишком сильно на иголку, чтобы не царапать ноготь. Не отрывайте иголку от ногтя, пока "штрих" не завершен. "Штрихи" повторяете столько раз, сколько сочтете нужным.
4. Проделываем ту же операцию с другими ногтями. Этот метод отличается тем, что рисунки никогда не будут одинаковыми, при определенных стараниях, они могут быть лишь похожими. Но даже, если и этого не случилось, ничего страшного, чаще всего "неодинаковость" не портит общего впечатления
5. Когда все ногти накрашены (лаки можно закрыть), берем нашу палитру и ставим на нее крупную каплю красного лака и лака с блестками. Берем зубочистку и начинаем с помощью точек и мазков дооформлять наш рисунок. Вот тут надо придерживаться примерно одного сценария, чтобы различия основных рисунков зрительно сравнялись.

6. В конце, когда лаки подсохнут, рекомендую покрыть ногти закрепителем или просто прозрачным лаком.
Все готово

К сожалению, на фотографии не видны оттенки цветов, белый и розывый выглядят одинаково, блестки не играют, но в жизни.....!!!!! Попробуйте, это совсем не сложно!
Буду рада, если этот урок кому-то пригодится.
Автор:LediNadi
Тут показаны точки которые нужно поставить лаком, а стрелочками - это движение зубочисткой (иголкой)

Метки: нейл-арт |
| Страницы: | [1] |


