This download is hosted on a free file share site, so there are very annoying pop-up ads. So sorry.
Here is a sewing pattern I drafted for a 5" 'my little pony' plush. It is for a basic pony intended to have yarn hair. Feel free to add on to this pattern to make your own customized ponies!
This pattern doesn't currently have illustrated instructions. Ya, I'm lazy. I'll get to it maybe sometime later. However I did take time to computer illustrate the pattern and seam allowance.
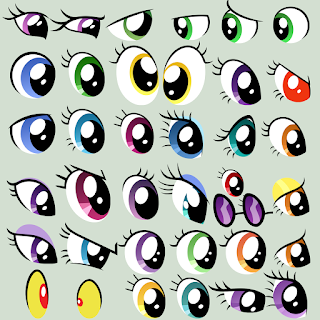
If want to make the pony smaller print at 30% and use felt without a seam allowance. Overhand stitch the edges together. It takes longer but is very cute. Here are different character eyes for you to use as a reference.
ЖМИ СЮДА by datNaro on deviantART
Directions:
1. Cut out all your pieces. Mark with a pencil on the wrong size were all your seam lines are.
2. Get some yarn or fabric strips for hair and sew the ends together in a straight line to form the mane. For the tail knot the ends together.
4. Sew ear together good sides facing. Leave bottom open. Turn out. x2
5. Sew together the 'head back' to the 'head sides'. x2
6. Match these head side pieces to the 'head top'. Sew from the tip of the nose to the ear opening. Insert the ear. Continue to the end of the neck. x2
7. Once the head sides are together you add the little chin at the bottom of the snout. Sew together in a half circle.
8. At this point you can embroider on the smile, and the eyes. You can also hand stitch on felt eyes at the very end if you prefer, or even draw then on using puffy fabric paints or regular acrylic craft paint with is machine washable after 48 hours.
9. Attach 'inner front leg' to the 'under belly'. The front legs get places near the neck. You will attach them at the semi circle. x2
10. Attach 'inner back leg' to the 'under belly', at the semi circle at the end of the under belly.
11. Attach the body side pieces to the under belly. (add the bum 'cutie mark' now if you are embroidering.) Start at the tip of the neck to down the leg, stop at the bottom of the hoof. Leave an opening for the hoof. Sew up the leg and down the other leg... up the leg across the bum and down the other leg... up the leg STOP leave a spot open for stuffing... then down the leg and so on, until the belly is attached to the top of the body. (IMPORTANT NOTE: you will want to leave a small portion of one side of the belly open to turn out your plush then stuff later.)
12. Add on each hoof (make sure the good side of the hoof fabric is facing INSIDE the plush). With a sewing machine you can place the hood bottom flat and sew around the hoof very carefully in a circle. x4
13. Sew the neck to the body.
14. Pin on the main and tail. the fabric and yarn will be on the inside of the body. Sew from the top of the head to the bum.
15. It's almost complete. Just turn it right side out, stuff using a pencil or a long tool and hand stitch the opening at the belly closed. Add on eyes now if you have not already and that 'cutie mark'!


