вязаный цветочек |
 ОПИСАНИЕ НА АНГЛИЙСКОМ
This Poinsettia pattern is Donationware – the pattern is available for free, but if you like it please consider sending me a donation to show your appreciation:
Send me a donation and receive the easy-to-print PDF version of the pattern as a thank you!

Donations of any size are much appreciated. Just add the amount you wish to donate, and, once you have checked out and paid, your pattern will instantly be available to download from your PlanetJune account.
The complete pattern and instructions are available below, regardless of whether or not you choose to pay for them ![]()
This is a PlanetJune original crochet pattern. Feel free to use items made from this pattern however you wish, but I’d appreciate credit as the pattern designer. Please do not reproduce the pattern anywhere else; instead post a link to http://www.planetjune.com/blog/free-crochet-patterns/poinsettia/
| ch | chain |
| sc | single crochet (double crochet for UK/Aus) |
| st | stitch |
| sc2tog | single crochet decrease (insert hook into stitch and draw up a loop, insert hook into next stitch and draw up a loop, yarn over and draw through all 3 loops on hook) |
| FL | front loops |
| BL | back loops |
• Do not join at the end of each round; rounds are worked in continuous spirals. • Use a stitch marker to mark the beginning of each round. Move the marker up each time you start a new round.
• E US/3.5mm crochet hook • Small amount of worsted weight yarn in red, green and yellow • Yarn needle to weave in ends • Stitch marker
I used worsted weight yarn and a size E hook, which produced a large 6.5″ diameter flower. Try using a finer yarn or crochet thread with a correspondingly smaller hook to give a more compact flower.
Large Poinsettia:
Small Poinsettia:
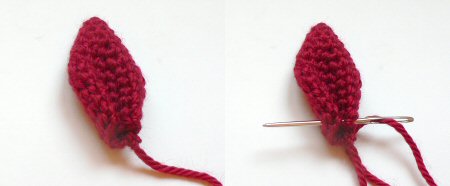
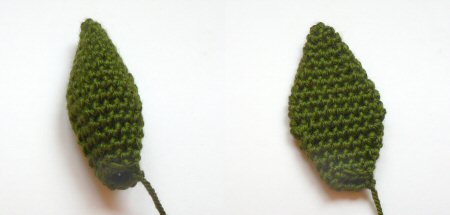
Style A Make a magic ring, ch 1. Rnd 1: 4 sc in magic ring. (4 st) Rnd 2: (2sc in next st, sc in next st) twice. (6 st) Rnd 3: (2 sc in next st, sc in next 2 st) twice. (8 st) Rnd 4: (2 sc in next st, sc in next 3 st) twice. (10 st) Rnd 5: (2 sc in next st, sc in next 4 st) twice. (12 st) Rnd 6: (2 sc in next st, sc in next 5 st) twice. (14 st) Rnds 7-8: sc in each st around. (14 st) Rnd 9: (sc2tog, sc in next 5 st) twice. (12 st) Rnd 10: (sc2tog, sc in next 4 st) twice. (10 st) Rnd 11: (sc2tog, sc in next 3 st) twice. (8 st) Join with sl st to next st. Fasten off, leaving long end of yarn.
Style B Make a magic ring, ch 1. Rnd 1: 4 sc in magic ring. (4 st) Rnd 2: (2sc in next st, sc in next st) twice. (6 st) Rnd 3: (2 sc in next st, sc in next 2 st) twice. (8 st) Rnd 4: (2 sc in next st, sc in next 3 st) twice. (10 st) Rnd 5: (2 sc in next st, sc in next 4 st) twice. (12 st) Rnd 6: (2 sc in next st, sc in next 5 st) twice. (14 st) Rnd 7: (2 sc in next st, sc in next 6 st) twice. (16 st) Rnd 8: sc in each st around. (16 st) Rnd 9: (sc2tog, sc in next 6 st) twice. (14 st) Rnd 10: (sc2tog, sc in next 5 st) twice. (12 st) Rnd 11: (sc2tog, sc in next 4 st) twice. (10 st) Rnd 12: (sc2tog, sc in next 3 st) twice. (8 st) Join with sl st to next st. Fasten off, leaving long end of yarn.
Style C Make a magic ring, ch 1. Rnd 1: 4 sc in magic ring. (4 st) Rnd 2: (2sc in next st, sc in next st) twice. (6 st) Rnd 3: (2 sc in next st, sc in next 2 st) twice. (8 st) Rnd 4: (2 sc in next st, sc in next 3 st) twice. (10 st) Rnd 5: (2 sc in next st, sc in next 4 st) twice. (12 st) Rnd 6: (2 sc in next st, sc in next 5 st) twice. (14 st) Rnd 7: (2 sc in next st, sc in next 6 st) twice. (16 st) Rnd 8: (2 sc in next st, sc in next 7 st) twice. (18 st) Rnds 9-10: sc in each st around. (18 st) Rnd 11: (sc2tog, sc in next 7 st) twice. (16 st) Rnd 12: (sc2tog, sc in next 6 st) twice. (14 st) Rnd 13: (sc2tog, sc in next 5 st) twice. (12 st) Rnd 14: (sc2tog, sc in next 4 st) twice. (10 st) Rnd 15: (sc2tog, sc in next 3 st) twice. (8 st) Join with sl st to next st. Fasten off, leaving long end of yarn.
Centre Make a magic ring, ch 1. Rnd 1: 6 sc in magic ring. (6 st) Rnd 2: in FL only, (sc, ch2, sc) in each st around. (6 st) Rnd 3: in remaining BL of Rnd 1, 5 sc in each st around. (30 st)
The stitches of Rnd 3 will want to crinkle up into a loopy ruffle – let them do this! You want them to stick up to form the centre flowers of the poinsettia.
Style A

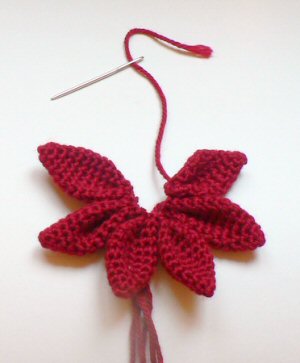
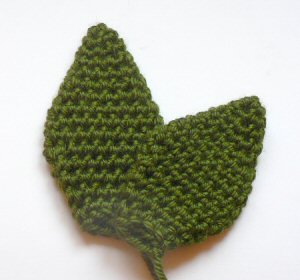
Styles B and C
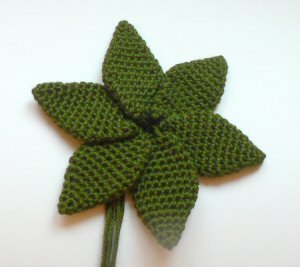
Final Assembly
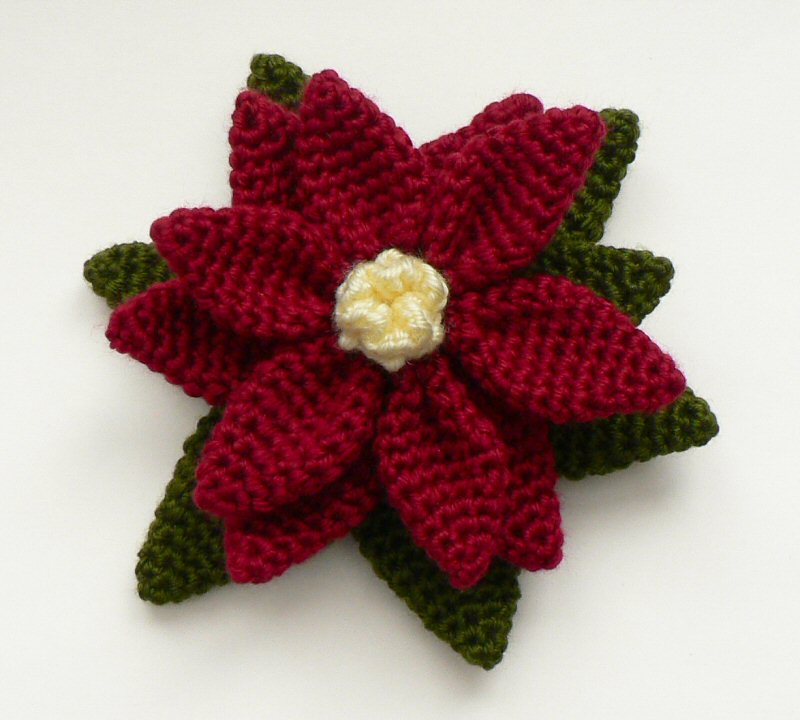
You should now have two (or three) rings of petals/leaves and one yellow centre. To finish assembling, arrange each layer by pulling the loose yarn ends through the centre hole of the previous layers, so they are all at the back of the flower. The layer order is (bottom to top):
Large poinsettia: C-B-A-centre Small poinsettia: B-A-centre
Rotate the layers so their angles are offset and all the leaves are visible.
Divide the yarn ends at the back into two groups and tie the two groups in a secure knot. Depending on what you’d like to do with your flower, you can weave in all the yarn ends, leave them long to tie it onto something, or trim them down.
I hope you enjoy this pattern. Please leave me a comment below if you do!
http://www.planetjune.com/blog/free-crochet-patterns/poinsettia/
| Рубрики: | рукоделие/цветы |
| Комментировать | « Пред. запись — К дневнику — След. запись » | Страницы: [1] [Новые] |


