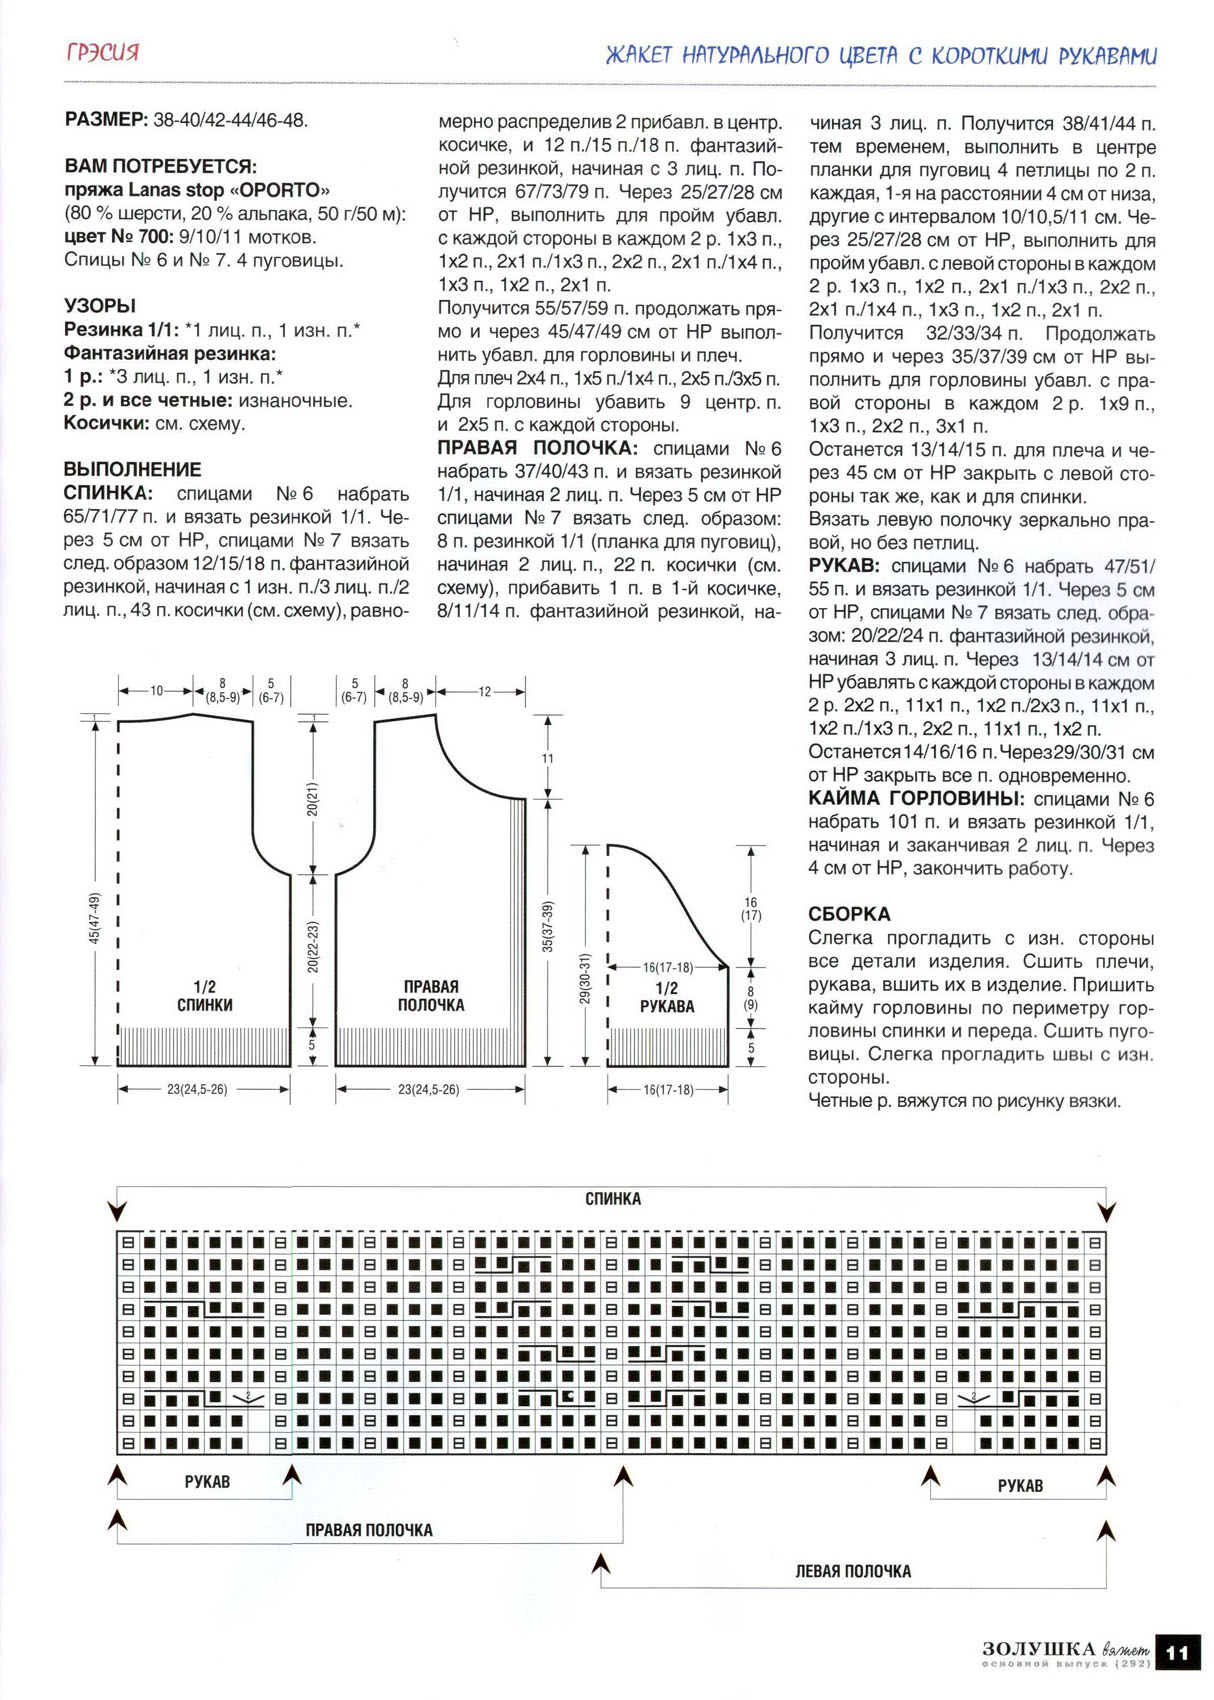
Без заголовка |

|
|
Без заголовка |


|
|
Без заголовка |


|
|
Без заголовка |
Makes about 16 cookies
1 cup all-purpose flour
1 teaspoon baking soda
¼ teaspoon salt
1 stick (½ cup) unsalted butter, at room temperature
½ cup creamy peanut butter
½ cup granulated sugar
1/3 cup light brown sugar
½ teaspoon vanilla extract
1 egg
½ cup rolled oats
1 cup semisweet chocolate chips
1. Preheat oven to 350 degrees F. Line two baking sheets with parchment paper and set aside.
2. Whisk together the flour, baking soda and salt; set aside.
3. On medium speed, cream together the butter, peanut butter, granulated sugar, brown sugar and vanilla extract, about 3 minutes. Add the egg and beat to combine. On low speed, gradually add the flour until just combined. Stir in the oats, and then the chocolate chips.
4. Use a large cookie scoop (3 tablespoons) and drop dough onto prepared baking sheets about 2 inches apart. Bake for 10 minutes, or until the cookies are lightly golden. Cool completely on the baking sheet and then store in an airtight container at room temperature.
http://www.browneyedbaker.com/2010/02/24/peanut-bu...atmeal-chocolate-chip-cookies/
|
|
Без заголовка |
|
|
Без заголовка |
|
|
Без заголовка |

One of the traditional treats for Easter in the Netherlands is a “paasstol”: a bread filled with raisins and almond paste. The same bread is also made with Christmas and then called “kerststol”. Other than the name, there is no real difference. In many cases the filling also contains candied fruits and hazelnuts, but I prefer just raisins. A similar bread is made in Germany and then called “Stollen” (Weihnachtsstollen, Christstollen).
Instead of proper almond paste, a store-bought stol will in many cases contain ‘confectioner’s paste’ (“banketbakkersspijs”) which is actually made from beans instead of almonds. It is of course cheaper but doesn’t have the real taste of almond paste.
For the filling
300 grams (11 oz) raisins
pinch of ground cardamom
pinch of ground cinnamon
pinch of white pepper
4 Tbsp rum
150 grams (6 oz) almond paste (if you can’t buy it, you can make it yourself from 75 grams (3 oz) almonds, 75 grams (3 oz) sugar, and an egg white in the food processor)
For the dough
25 grams (1 oz) fresh yeast
200 ml (8 oz) milk
250 grams (9 oz) flour
15 grams (1/2 oz) sugar
1 egg
10 grams (1/3 oz) grated lemon zest
50 grams (4 Tbsp) butter (soft)
6 grams (1 heaped tsp) salt
For the frosting
30 grams (2 Tbsp) butter
confectioner’s sugar
Put the raisins in a bowl with the rum and the spices, and stir. Let stand for at least half an hour.
Make a dough from all the ingredients listed and knead it by hand for 5 minutes (dust your hands and the work surface with flour).
Let the dough rise for 10 minutes.

Drain the raisins (if not all the rum has been absorbed). Roll out the dough with a rolling pin to a thickness of about 1/2 cm (1/4 inch). Spread out the raisins on top. Now roll up the dough and knead it some more.

Let the dough rise in a warm place (the oven with the light turned on works great for this) for 20 minutes.

Flatten the dough and make a groove in the middle with a rolling pin. Knead the almond paste, shape it into a cylinder and put it in the groove. Fold over the dough to close the loaf.

Let the stol rise in a warm place for 30 minutes. Preheat the oven to 180C/350F. Bake the stol in the middle of the oven on a baking sheet lined with parchment paper for 40 minutes.

Let the stol cool on a rack. While it is still hot, put some butter on top and spread it out with a knife as soon as it melts.

Sprinkle generally with confectioner’s sugar to make the frosting.

The stol is ready to eat once it has cooled down to room temperature. I like to eat it just like it is, but some people like to put butter on a slice of stol or take out the almond paste and spread it over a slice with a knife.
http://stefangourmet.com/2012/04/08/dutch-easter-bread-paasstol/
|
|
Без заголовка |

So far, this is one of the easiest recipes for recreating the German bread experience. This bread uses half white and half whole wheat flours, some sourdough for taste, and caraway seeds. Two rises make this bread light and easy to slice. It's perfect for serving with soup or for Abendbrot. This bread freezes well.
Makes one, large Bauernbrot "Laib" or loaf.
Sourdough Notes: To make sourdough culture beforehand, see this resource. The sourdough culture used in this recipe was started with Goldrush sourdough starter and kept in the refrigerator. It had been fed and then refrigerated one day prior to using. It was taken straight from the refrigerator and mixed with the other ingredients immediately.
Dough:
Mix flours, oats, salt, caraway and instant yeast together in a large bowl. Add the sour milk, yogurt and sourdough culture and begin mixing. This is easier if you have a stand mixer, but you can do this with a large spoon, too. Mix until dough forms a ball, adding water if needed. The dough should be slightly sticky.
Continue kneading, either with the mixer or on a lightly floured board for 5-7 minutes. Let the dough rest for 5 minutes, then knead again for 1 minute. Form into a smooth ball and place in an oiled bowl, turning to coat the top. Cover with a clean dish towel and let rise in a warm place until doubled.
Turn out onto a lightly floured board and form into a typical long loaf as follows:
Place on parchment paper on a baking sheet or cardboard, dust top with flour and let rise until doubled. About 30 minutes before you plan on baking, slash the top with a sharp razor blade or lamé at least 1/4 inch deep.
Heat oven to 500°F for 1 hour prior to baking. Use a baking stone if you have it, according to manufacturer's instructions.
Otherwise, place an old pan on the bottom rack and set the second rack in the middle.
Place the bread on the middle rack (still on the parchment or floured baking pan), pour 2 cups of hot water into the old pan and close the door.
Using a spray bottle filled with water, spray the sides of the oven after two, five and seven minutes. Turn oven down to 450°F. Bake for 20 minutes.
Turn oven down to 350°F and bake for another 20 to 30 minutes, or until a temperature probe measures 190-200°F or loaf is brown and sounds hollow when tapped.
Remove and let cool 2 hours before slicing.
|
|
Без заголовка |
|
|
Без заголовка |
|
|
Без заголовка |

2 large eggs, room temperature
1/4 cup whole milk, room temperature
1 teaspoons pure vanilla extract
1/4 teaspoon saffron threads
3/4 cup, plus 2 tablespoons (3-1/2 ounces) cake flour
3/4 cup (5-1/4 ounces) granulated sugar
1 teaspoon baking powder
1/2 teaspoon fine sea salt
8 tablespoons (4 ounces/1 stick) unsalted butter, cut into 4 pieces, softened
Plum Filling, recipe to follow
Chai Frosting, recipe to follow
1/2 cup pistachios, finely chopped (for garnish, optional)
1. Adjust oven rack to lower-middle position and heat oven to 350℉. Grease two 6-inch cake pans with butter or cooking spray and cover pan bottoms with rounds of parchment paper. Grease parchment rounds, dust cake pans with flour, and tap out excess. Set aside.
2. Beat eggs, milk, vanilla and saffron with fork in small bowl, set aside. Combine flour, sugar, baking powder, and salt in bowl of standing mixer fitted with paddle attachment; mix on lowest speed to blend, about 30 seconds. With mixer running, add butter one piece at a time; mix until butter and flour begin to clump together and look sandy and pebbly, with pieces about the size of peas, 30 to 40 seconds after all butter is added.
3. Add about 2/3 of egg mixture and mix on low speed until incorporated, 5-10 seconds. Increase speed to medium-high and beat until light and fluffy, about 1 minute. Add remaining egg mixture in slow steady stream, about 30 seconds. Stop mixer and thoroughly scrape sides and bottom of bowl. Beat on medium-high until thoroughly combined, about 20-30 seconds.
4. Divide batter equally between prepared cake pans; spread to sides of pan and smooth with small off-set spatula. Bake until cake tops are light golden and skewer inserted in center comes out clean, 20-22 minutes. Cool on rack 10 minutes. Run a knife around pan perimeter to loosen. Invert cake onto large plate, peel off parchment, and re-invert onto lightly greased rack. Cool completely before icing.
1/4 cup (2 ounces) light brown sugar
3 tablespoons unsalted butter
Pinch of fine sea salt
5 medium size plum (I used fortune plums), pitted and cut into eight wedges
1 tablespoon rum
1/8 teaspoon cinnamon
1. Add sugar, butter and salt in a 12-inch skillet and cook over medium heat until sugar is melted. Add plum wedges, increase heat to medium-high and continue to cook until mixture resembles a chunky jam-like consistency, about 6-8 minutes
2. Remove from heat and stir in cinnamon and rum, cool to room temperature.
1 cup whole milk
5 chai tea bags
1/4 teaspoons ground cardamom
1/4 teaspoon ground cinnamon
3/4 cup (6 ounces) packed light brown sugar
1/8 teaspoon baking soda
2 tablespoons all-purpose flour
3 tablespoons cornstarch
1/4 teaspoon fine sea salt
1 teaspoons pure vanilla extract
1/2 teaspoon pure almond extract
12 tablespoons (6 ounces/1-1/2 stick) unsalted butter, softened, cut into small pieces
1. Add milk, tea bags, cardamom and cinnamon in a small sauce pan and bring to a simmer. remove from heat and let steep for 30-45 minutes, cool to room temperature. Remove tea bags and measure 3/4 cup, set aside.
2. Combine sugar, baking soda, flour, cornstarch, and salt in medium bowl. Slowly whisk in milk mixture until very smooth. Pour mixture into medium saucepan. Cook over medium heat, whisking constantly, until mixture boils and is very thick, 5 to 7 minutes. Transfer milk mixture to clean bowl and cool to room temperature, about 2 hours.
3. In stand mixer fitted with whisk attachment, beat cooled milk mixture and extract on low speed until combined, about 30 seconds. Add butter, 1 piece at a time, and beat until incorporated, about 2 minutes. Increase speed to medium-high and beat until frosting is light and fluffy, about 5 minutes. Refrigerate until firm, about 45 minutes.
1. Adjust the quantity of tea bags base on the strength of your tea.
2. Milk base can be made ahead and refrigerate for up to 2 days.
3. Frosting can be refrigerated in airtight container for 1 week. When ready to use, let stand at room temperature until softened, about 1 hour. Beat with stand mixer on medium-high speed until light and fluffy, about 1 minute.
1. Cut each cake in half horizontally. Place one cake layer on the bottom of cake stand or serving platter, spread approximately 1/3 plum filling over cake layer and top with another layer. Repeat with filling and cake layers until top with the 4th cake layer.
2. Spread or pipe frosting on top and side of cake. Garnish with pistachios. Refrigerate cake for 30 minutes, Serve.

|
|
Без заголовка |

Preheat your oven to 350°F. Grease and flour two 9" cake pans, or a 13" by 9" baking dish.
Using an electric hand or stand mixer, beat the eggs and sugar in a large bowl on medium-high speed until thick and very light in color; about 6 to 8 minutes. Don't be shy about this—you can't overbeat whole eggs like you can with whites.
Add the mayonnaise and vanilla extract, and beat on medium speed until combined.
Add the flour, baking powder, baking soda, cocoa powder and salt, and beat on low speed until combined. The mixture will look thick and fudgy.
Add the water and mix on low speed until it's incorporated. The batter will be much thinner. Pour the batter into the prepared pan(s) and bake for about 30 minutes (check it at about 25 minutes), or until a toothpick inserted in the middle comes out clean.
Allow the cakes to cool on a rack, in their pans, for 10 to 15 minutes or until they are cool enough to handle. Invert them onto the rack and allow to finish cooling to room temperature.
Enjoy! The cake may be frosted at this point if you like; I usedSmitten Kitchen's delicious chocolate-sour cream frosting, which is incredibly easy to make and works wonderfully with this cake.
http://www.seriouseats.com/recipes/2010/04/chocolate-mayonnaise-cake-recipe.html
|
|
Без заголовка |
|
|
Без заголовка |

Crochet Hemp Basket
Amended on 19 September for better clarificationDifficulty Level: Intermediate, must know how to crochet sc, slst & ch
Finished size: approx. 11″ (D) x 5″ (H)
Gauge: Not essential as long as the hook size matches the medium worsted yarn weight.Materials & Tools:
1. Ace Manila Twisted Rope (75853), 1/4″ x 50′ or equivalent
2. Yarn, Lion Brand, Lion Cotton Yarn/color: Natural (beige) #760-098, or, cotton twine that is able to crochet.
3. Crochet hook: 4mm
4. Stitch marker
5. Quick dry adhesive glue
6. Scissor
7. Clothespin or clip
Abbreviations:
ch = chain
ch sp = chain space, the space between 2 sc that are link by chain stitch, could be 1 ch or 2 ch
sc=single crochet
st = stitch
slst = slip stitch
sk= skip
mm= move markerCrochet Hemp Basket Pattern:
[figure inside {} bracket indicates total stitches on the round]
R1 : ch2, sc8 on second ch from hook, ch1, place marker. {8}
** sc from row 2 onwards means sc around rope, otherwise as per instruction **
R2 : *sc on next st, ch1*, repeat * 8 times, mm. {16}
R3 : *sc on next ch sp, ch2*, repeat* 8 times, mm. {24}
R4 : *sc on next ch sp, ch1, sc on same ch sp, ch1*, repeat* 8 times, mm. {32}
R5 : *sc on next ch sp, ch2, sc on next ch sp, ch1* repeat* 8 times, mm. {40}
R6 : *sc on next ch sp, ch2*, repeat* 16 times, mm. {48}
R7 : *sc on next ch sp, ch1, sc on same ch sp, ch1*, repeat* 16 times, mm. {64}
R8 : *sc on next ch sp, ch2, sc on next ch sp, ch1* repeat* 16 times, mm. {80}
R9 : *sc on next ch sp, ch2*, repeat* 32 times, mm. {96}
R10 : *sc on next ch sp, ch1, sc on same ch sp, ch1, sc on next ch sp, ch1*, repeat* 16 times, mm. {96}
R11 : *sc on next ch sp, ch1, sc on next sp, ch2, sc on next ch sp, ch1*, repeat* 16 times, mm. {112}
R12 : *sc on next ch sp ch2, sc on next ch sp, ch2, sc on next ch sp, ch1*, repeat* 16 times, mm. {128}
R13 : repeat R12.
R14 : *sc on next ch sp, ch2*, repeat* 48 times, mm. {144}
R15 : repeat R14.
R16 : *[sc on next ch sp, ch2] repeat 4 times, [sc on next ch sp, ch1] repeat 2 times, sc on same ch sp, ch 1*, repeat* 8 times, mm. {144}
R17 : *[sc on next ch sp, ch2] repeat 4 times, [sc on next ch sp, ch1] repeat 3 times*, repeat* 8 times, mm. {144}
R18 : *[sc on next ch sp, ch2] repeat 5 times, [sc on next ch sp, ch1] repeat 2 times*, repeat* 8 times, mm. {152}
R19 : repeat R18.
R20 : *[sc on next ch sp, ch2] repeat 6 times, sc on next ch st, ch1*, repeat* 8 times, mm. {160}
R21 : repeat R20.
R22 : *sc on next ch sp, ch2*, repeat* 56 times, mm. {168}
R23 : repeat R22.
R24 : *[sc on next ch sp, ch2] repeat 5 times, [sc on next ch sp, ch1] repeat 2 times, sc on same ch sp, ch 1*, repeat* 8 times, mm. {168}
R25 : *[sc on next ch sp, ch2] repeat 5 times, [sc on next ch sp, ch1] repeat 3 times*, 3sc on next ch sp, crochet “handle” (see instruction below), 3sc on next ch sp, repeat* 3 times, 3sc on next ch sp, crochet “handle”, 3sc on next ch sp, repeat* 2 times, mm. {174}
R26 : repeat R25, twist rope at the handle section.Handle (work without rope) : *slst, ch, slst*, repeat* 6 times, leave 6″ rope as handle
Cut rope 1″ – 2″ from the last stitch, glue it down and clip the end to the basket body until it is securely fastened.
Glue the rope’s start end with adhesive too.
Weave and hide yarn end.
 3 basic materials to work on, the manila rope, yarn or twine and a crochet hook.
 Crochet basic round according to the pattern (R1).
 On round 2 onwards, all single crochet (sc) stitches in the pattern means single crochet on the rope.
Place the yarn under the rope.
 Insert hook into the loops of the previous round’s stitch, yarn over (yo) the yarn from the top of the rope.
 Pass through the loops of the previous round’s stitches to complete the sc around the rope.
 Crochet the base follow the pattern above. This is the 2nd round, remember to place a marker so you will know where is the beginning stitch of the round.
 Third round. Adjust the rope end nicely and fit into the base.
Crochet the rest as per pattern above.
 The look of the basket from the bottom.
 Complete till Round 24, just before making handles on the final 2 rounds.
 You will see the increment stitch as this, sc on next ch st, ch1, sc on same ch st, ch1.
 Round 25, handle construction. The handle is 6″ but if you want longer handle, you can always adapt to your length.
 Round 26, wind and twist the rope on the handle.
 This is the 3 sc stitches before and after the handle.
 Apply the glue at the rope end, clip it to the basket until it is dry and securely fastened.
http://www.craftpassion.com/2012/07/crochet-hemp-basket.html/2
|
|
Без заголовка |
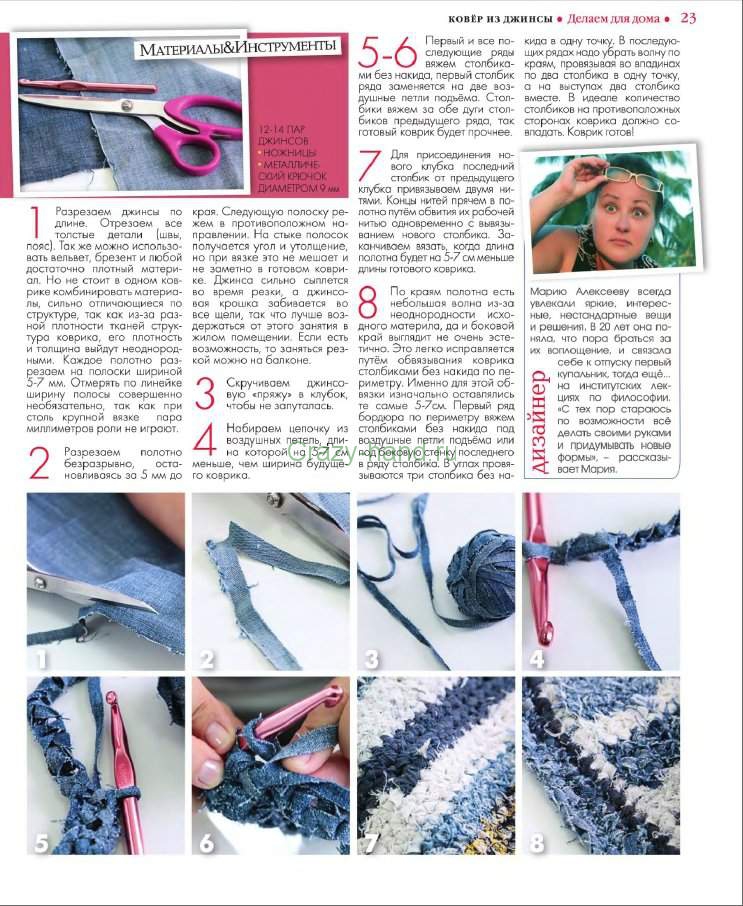
Создание джинсового пуфика из пластиковых бутылок + Фото

Такой пуфик из обычных пластиковых бутылок сможет стать отличным дополнением любого интерьера. Данные пуфики не скрипят и выдерживают тяжесть! Предлагаем вам ознакомиться с мастер-классом по созданию такого пуфика. В данном случае чехол для пуфика сшили из старых джинсов технике пэчворк (можно использовать любой материал).
Для создания такого пуфика вам потребуется:
- 18-ть пластиковых бутылок на 2 литра
- старые джинсы
- картон и скотч
Процесс создания джинсового пуфика из пластиковых бутылок
При использовании бутылок из-под «Кока-Колы» или «Фанты», размер пуфика будет следующим: сиденье около 30х30 см, боковины - 30х35,5 см.
Нарежьте джинсы на цветочки и треугольники. Размер для треугольников - 27-18-18 см.

Сшейте чехол для пуфика.
Сверху пришейте или приклейте при помощи клея для ткани аппликации из цветочков.
Возьмите одну бутылку и вставьте ее в другую обрезанную.

Все бутылки необходимо собирать вместе и зафиксировать скотчем.
Вырежьте соответствующие куски из картона и обложите ими пуфик, фиксируйте скотчем.
Положите на сидение поролон (можно также добавить еще пару слоев картона)

Отрежьте длинную полоску от джинсов и пришейте ее по краю чехла для пуфика. Проденьте веревку или шнур.
Пуфик из пластиковых бутылок готов!
Автор: Элейн Iorio
http://www.tutdizain.ru/idei/233-sozdanie-dzhinsov...-plastikovyh-butylok-foto.html
|
|
Без заголовка |
|
|
Без заголовка |


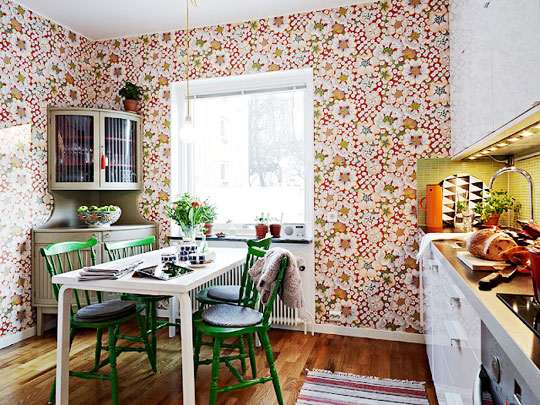
This dark wall in an otherwise white apartment makes a huge difference- think how sterile it would look if it was all white.

Tones of blue really warm up this room

Just a few shades darker can make all the difference

The marble mantle piece really stands out

Moody black and gold

The bright pop of neon pink lifts this room also note the rich jewel colours they’ve used for accessories

This tiny kitchen is anything but bland- all white would have been the obvious choice.

although this room has white walls all the woodwork and a lot of the furnishings are dark- this has the same effect of warmth and luxury

http://blog.llidesign.co.uk/tagged/wallpaper
|
|