-Рубрики
- 001__Календарь (3)
- 002__Вязалочки (2267)
- Аксессуары (135)
- Амигурами + платья для кукол + игрушки (129)
- Вазочки__Шкатулочки (48)
- Варежки__перчатки__митенки__манжеты (90)
- Вдохновлялочки - идейки (72)
- Всё в кучу (16)
- Деткам (95)
- Для милого дома (82)
- Жаккард (81)
- Журналы__Книги (89)
- Закрытие__Прибавление__Убаление петель (24)
- Интернет ресурсы (41)
- Кайма_+_Обвязка края_+_Ленточное кружево (103)
- Коллекция__Цветочки__Бабочки__Сердечки (108)
- Костюмчики (4)
- Купальники_+_Шорты (38)
- Мужу (72)
- Наборный край (69)
- Ну оооооччень ) (350)
- Отделка вязанных изделий (47)
- Отделка, оформление__Проймы__Горловины (24)
- Пальто (10)
- Платья (37)
- Похвастушки (13)
- Программки (14)
- Пуловеры (109)
- Пышные столбики (52)
- Реглан (20)
- Советы (22)
- Сумочки (32)
- Тапочки_+_ Носочки_+_Гетры_+_Пинетки (121)
- Ткань + вязание (14)
- Топики__Туники (40)
- Узоры спицами__Ажур (66)
- Узоры спицами__Косы - кельтские узоры (49)
- Узоры спицами__Листочки (45)
- Узоры спицами__разные (70)
- Узоры__крючок квадрат (5)
- Узоры__крючок разные (41)
- Укороченные ряды (7)
- Украшалочки (28)
- Уроки__крючок (23)
- Уроки__спицы (24)
- Шали_Палантины_Шарфики_Воротнички_Манишки (228)
- Шапочки (201)
- Швы__Соединение деталей (14)
- Школа вязания (91)
- Шнурочки, тесёмочки (45)
- Юбочки (120)
- 003__Другие виды вязания и плетения (356)
- Вилочка__Линеечка (78)
- Вышивка ковровой техникой (7)
- Вязание с бисером (19)
- Коклюшечное Вологодское кружево (22)
- Перуанское вязание__Брумстик (12)
- Плетённые браслетики__пояски (41)
- Соломоновы узелки (5)
- Тенериф, лума (46)
- Филеечка (8)
- Фриволите_+_Macrame (67)
- Энтерлак (11)
- Японские узелки (44)
- 004__Винтажная сказка (588)
- Идеи (104)
- Мешковина (96)
- Принты, картинки, фоны (205)
- Состариваем и окрашиваем (64)
- 005__✄ ❖ Вышивка ❖ (257)
- Ришелье (23)
- Японская вышивка - сашико. (1)
- Доза эстетического наслаждения (451)
- 001__Поэтическая страничка (203)
- 010__Рецептики счастья (4)
- 002__Музыкальная шкатулка (50)
- 003__Вечерний кинозал (48)
- 004__Смешинки (42)
- 005__Аудиокниги (13)
- 007__Женский образ (31)
- 009__Рукодельница (про... и для...) (26)
- 006__Устав от прозы и стихов...положим кисть в пал (29)
- 008__Цветочное (34)
- Здоровье (267)
- Аптека (28)
- Глазки (20)
- Зелёная аптека (29)
- Масла (10)
- Массажи и волшебные точки (27)
- Народная медицина (80)
- Пищевые расстройства (5)
- Подручные помошники (59)
- ПРОСТУДА. ВСЕ О НЕЙ (11)
- Рецептики (26)
- Ручки (7)
- Соль__Сода (10)
- К празднику (161)
- 23 февраля (10)
- 8 марта (1)
- День рождения (5)
- День святого Валентина (6)
- Идеи подарков (29)
- К детскому (6)
- Наш нарядный дом (48)
- Новогоднее (107)
- Поздравления (22)
- Советы__2013 (25)
- Компьютерная помощь (522)
- Musik_+_Video (24)
- Альбомы (9)
- Быстрый умный интернет (49)
- Вирус (5)
- ИНТЕРНЕТ РЕСУРСЫ (28)
- Ли ру__уроки (95)
- Обучение работе на компьютере (29)
- Программки (25)
- Рамочки (44)
- СМАЙЛИКИ, ПОДПИСКИ И Т. П. (60)
- Сохраняем на комп (20)
- Схемки (147)
- Флэш (38)
- ЧАСИКИ (46)
- Чистим (5)
- Ли ру__уроки. (4)
- HTML формулы (3)
- Мир вокруг (2)
- Приметы (2)
- Мой ребёнок (122)
- Для старшей (22)
- Игры (10)
- Поделочки (37)
- Пригодится (6)
- Рисуем (14)
- Стишки (9)
- Православие (267)
- Вопросы и ответы (30)
- Детям (12)
- Молитвы (122)
- О святых (53)
- Пасха (25)
- Храмы и красивые места России (7)
- ღПсихология удачиღ (336)
- Астрология (15)
- 001__Заговоры (14)
- 002__Волшебные ритуалы (31)
- 003__Магия Лунная (20)
- 004__Магия разная (32)
- 005__Энергитическая защита и сглаз (25)
- 006__Мантры (20)
- 007__Денежки (19)
- 008__Симорончики (18)
- 009__Нумерология (5)
- 010__В поисках истины (62)
- 011__Тайм-менеджмент__FlyLady (38)
- 012__Тесты (19)
- 013__Мы вместе (22)
- Гадания__Значения ) (19)
- Магия нашего дома (13)
- Фэн - шуй (4)
- Рукоделия (311)
- Аксессуары (79)
- Бантики (24)
- Бисероплетение (34)
- Всё в кучу (7)
- Декор/Бутылок и посуды (15)
- Журналы (2)
- Из лампочек (1)
- Канзаши-японские украшения (2)
- Квиллинг (1)
- Мукосоль_+_Фимо (17)
- Оригами (7)
- Пластиковая бутылочка (5)
- Плетём коробочки (6)
- Приглашения (30)
- Скелетирование листиков (4)
- Цветочки текстильные (118)
- Скрапбукинг (293)
- Чайные домики, клетки (73)
- Из картона (70)
- Упаковка (51)
- Цветочки из бумаги (108)
- Советы__всё в кучу (19)
- Уютный дом (218)
- Балкончики (3)
- Домоводство (21)
- Интерьерчики (63)
- Крахмалим (5)
- Насекомые (4)
- Подручные помошники (13)
- Пятна (43)
- Рабочие места (4)
- ЦВЕТОВОДСТВО (71)
- Фотошоп (628)
- Art (13)
- PNG (129)
- Анимация__уроки (7)
- Детский сад, школа (13)
- Интернет ресурсы (15)
- Надписи (182)
- Новогоднее (45)
- онлайн фоторедактор (10)
- Программки (32)
- Скрап набор (6)
- Трафареты (105)
- Уроки (52)
- Фоны (33)
- Художники иллюстраторы (57)
- Цветовая гамма (38)
- ✄ ❖ Шьём ❖ (286)
- Было - стало (39)
- Деткам (43)
- Для милого дома (26)
- Игрушки (37)
- Из фетра (5)
- Мерки (30)
- ✂•••Швейные премудрости (77)
- Это интересно (90)
- Об интересных людях (26)
- Фото (39)
- Это уже не клад - а склад (0)
- Я буду лучше (153)
- Кожа (36)
- Косички (13)
- Красивые волосы (42)
- Лицо (41)
- Макияж (10)
- Подручные помошники (23)
- Тренировочки (16)
- Я-женщина (99)
- Одежда - как способ бытия... (60)
- ♨-«Кулинарный Эдем»- ♨ (155)
- Всё в кучу (20)
- Заготовочки (4)
- Из морепродуктов (5)
- Из мяса (5)
- ☕ Напиточки ☕ (20)
- Новогоднее (19)
- Печенье (2)
- Пироги (26)
- Пицца (1)
- Рулетики (5)
- Салатики (9)
- Сладости конфетки (11)
- Соус (3)
- Специи__Приправы__Пряности (17)
- Супы (4)
- Таблицы объёмов (4)
- Тортики (10)
- Украшения блюд (41)
-Новости
-Ссылки
-Музыка
- Hana's Eyes by Maksim Mrvica
- Слушали: 27518 Комментарии: 0
- Мой красивый день
- Слушали: 99 Комментарии: 0
- Мой красивый день
- Слушали: 57 Комментарии: 0
- Мой красивый день
- Слушали: 51 Комментарии: 0
- Мой красивый день
- Слушали: 52 Комментарии: 0
-Фотоальбом

- Островочек рукоделия
- 12:19 26.01.2016
- Фотографий: 5

- Зима...
- 11:15 01.02.2013
- Фотографий: 7

- Девочки мои...
- 11:12 01.02.2013
- Фотографий: 4
-Друзья
Друзья онлайн
Alevtina10
Булгакова_Татьяна
Друзья оффлайнКого давно нет? Кого добавить?
-Лала-
gallaluna
gerany
gla-mur
Juli_Boozoolook
Kamelius
Lenyr
Leykoteya
Liepa_Osinka
LIKA9966
Liudmila_Sceglova
mari_tais
Mariella27
Martina25
Mila111111
mimozochka
Rietta
Rost
SelenArt
SvetlanaT
tatMel
TVORYU
Zinaida-k
АНЖЕЛИКА_1966
галина5819
Глебова_Елена
Дневник_Тамара
Домовушка_Луша
Егорова_Таня
ЕЖИЧКА
Живая_река
Иносенсия
интервал
Капочка_Капа
Клуб_Красоты_и_Здоровья
Клуб_мастериц
Литвинова_В_И
Лю-ся
Мама_Дина
Марриэтта
мир47
Н_НИНА
Нина_Тур
оля-душка
Ромашковый_ангел
Рябина-рябинушка
Сима_Пекер
Таточка-Танюша
Топ_Менеджер
Феврония52
-Постоянные читатели
Elena_73 FaithMona Godeciya Lena_174 Marta-martishka Mila111111 N-LaDushka Nytta23 Rasima_S Svetlana_Sharapova TATIANA_36 Tanja-- Valentina_Volynkina blackLilly drakoshka-2013 gerany gla-mur kaen05 koko_shik liveinternetru milanochka_bormina natali28999 nitozka1960 sheilamona svetur ya_Olushka Аленушка_Ромашкина АниноН Анэтка Валентина_Кашевич Весна_ДВ Домашний_калейдоскоп Елена_Виллик Канинхен Ларица Леночкааааааа Любовь_земная_ЛИКа Мама_Лизуни Марина_Сибирякова ОЛЬГА_СУХЕНКО Сударушка_71 ТАКУША Таня_Красильникова ирина_лебедушка кияшка люда_скорпион свет7 таь ты_не_ошибся чего-ты-хочешь
-Сообщества
Читатель сообществ
(Всего в списке: 25)
Рукоделие_Оленьки63
design_club
Фоны_для_вас
-Dize-Mania-
СкАзОчНыЙ_мИр_КаРтИНоК
Наши_схемы
_ПрОсТо_ДлЯ_ВаС_
Темы_и_схемы_для_Вас
Красивые_Мелочи
Женя_Максимова
открытки
All-for-photoshop
Art_Avenue
АртБазар
Cool-Quotes
CoolArt
GIF
inspiration-co
Laboratory_of_Art
Live__ART
DM_Private
PastimeArt
Photoshop_Tricks
Madame_Frames
Мир_клипарта
-Трансляции
-Статистика
Создан: 16.09.2010
Записей: 6551
Комментариев: 226
Написано: 6898
Записей: 6551
Комментариев: 226
Написано: 6898
Без заголовка |
Цитата сообщения Luyda52
Зубчатый край МК
[
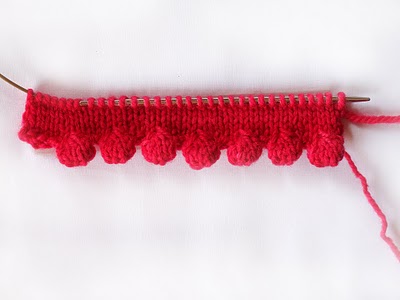
Ok, you can pretty much do this Bobble Cast On in any yarn, although perhaps laceweight yarn won't make a bobble, more of a full stop. That being said, the technique is the same irrespective of yarn weight.
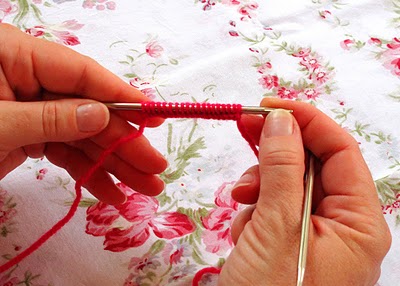
Cast on the number of stitches that you need. I left two side stitches, as you will see later, because it gives the work a little bit of an edge before the fat little bobble appears, and just looks better.
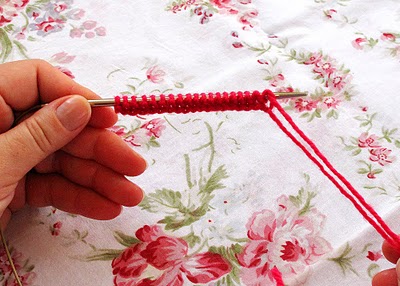
Knit one row, and turn your work around. Above you can see that I have done just that.
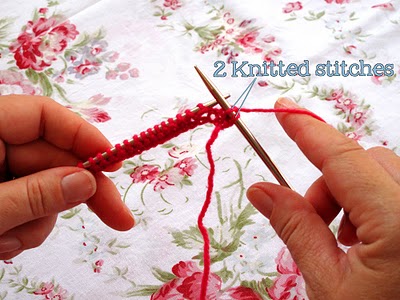
Knit 2 stitches. Throughout the tutorial I will refer to the left hand needle as the LHN, and the right hand needle, as the RHN.
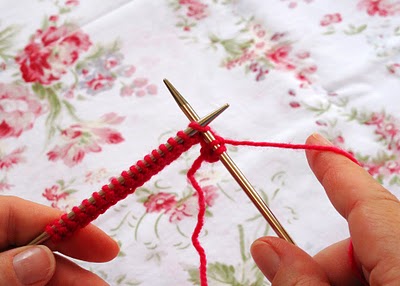
Insert the RHN into the next stitch on the LHN. You are going to knit into this stitch as you would normally, but you don't drop the stitch you have knitted into from the LHN. Just leave the loop of yarn on there .
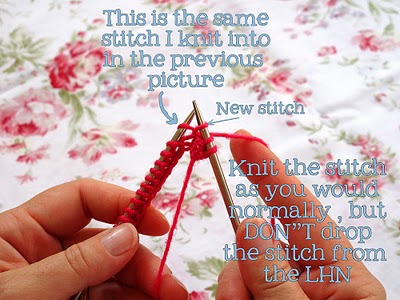
Above, you can see that the new stitch has been made , but the loop of the old stitch is still on the LHN.
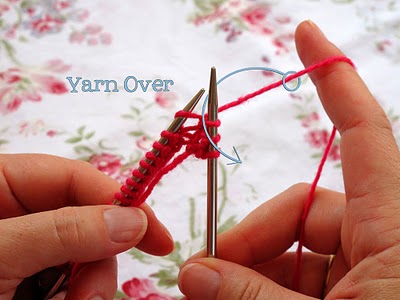
This knit stitch you have just made on the RHN, is the FIRST stitch of your bobble. You will now do a YARN OVER. What this means , is that you aren't going to make a real stitch, more of a little cheat by just wrapping the working yarn around the RHN, in the direction as shown above.
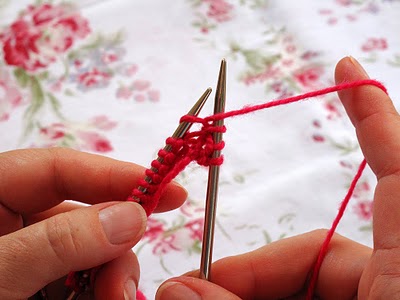
Above, you can see how your work should look once the yarn over has been done. It is so easy to do...it is essentially just bringing your yarn towards you through the two needle points...
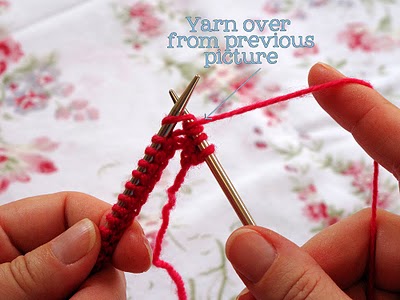
Insert your RHN tip into THE SAME STITCH as in the previous photos, and make a new regular knit stitch. (Notice, how the yarn over will created a clearly seen stitch once you have knitted a stitch after it)
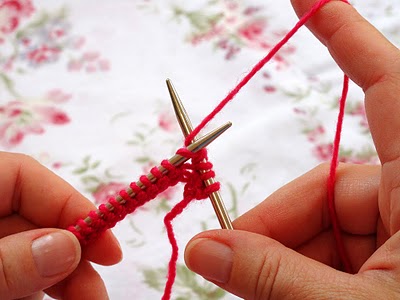
Knitting a new stitch as normal....
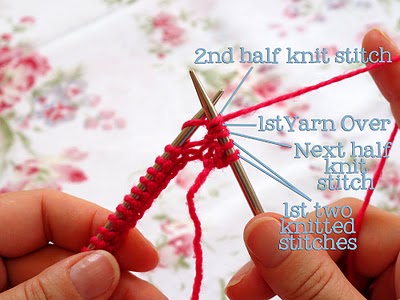
New knit stitch pulled through , but again DO NOT DROP the LHN loop. In the picture above, I have labelled the new stitch a "half knit" stitch because I haven't completed the knitting motion, by dropping the loop form the LHN. You have now made 3 stitches of your bobble.
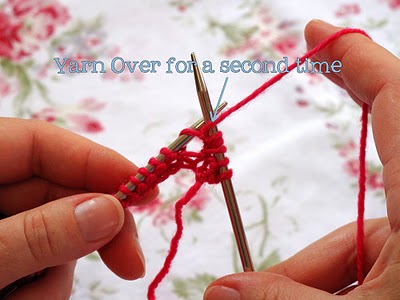
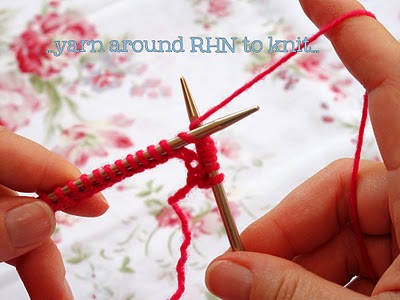
Do a second Yarn Over, just like before....
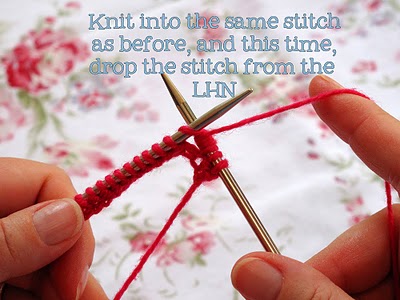
Knit into the same loop on the LHN as before...insert RHN into same loop on LHN...
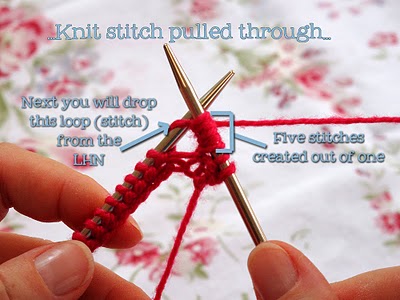
Pull the stitch through but this time, drop the loop from the LHN. You have made 5 stitches for your bobble.
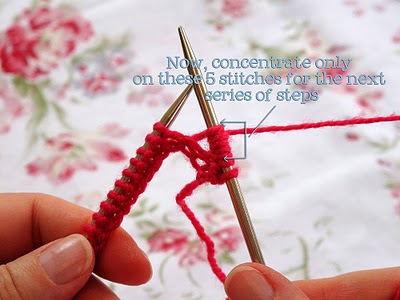
You have 7 stitches on your RHN, of which 5 stitches make up your bobble... You will concentrate only on these 5 stitches for the next rounds, making the bobble come alive :)
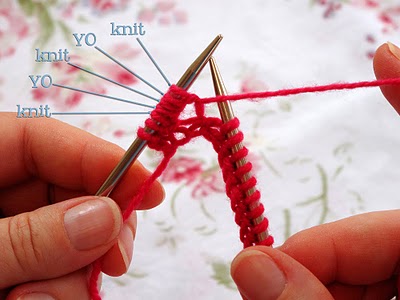
Turn your work around...it should look like the picture above...
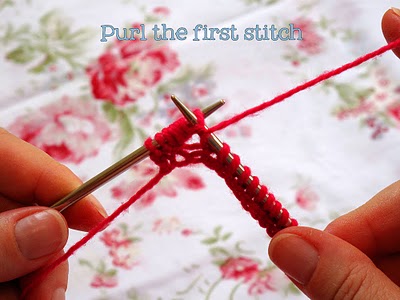
Purl the first stitch.
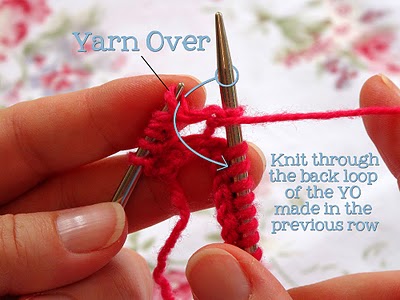
The next stitch was made in the previous round, by a Yarn Over, so I like to knit through the back of it, to give it a little twist . This " through the back loop" purling only happens on this row
, and only on the two stitches that were made by the Yarn Overs in the previous round.
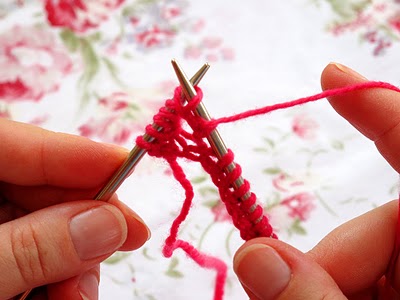
Purling through the back loop...
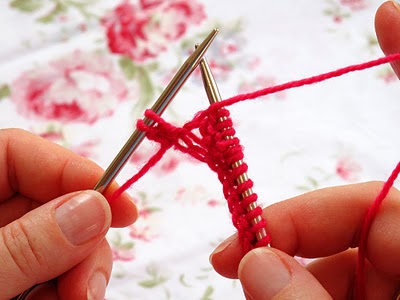
Purl the next stitch as normal, then purl through the back loop of the following stitch and finally purl the last stitch of the 5 stitches that make up your bobble.
Your work should look like the picture above.
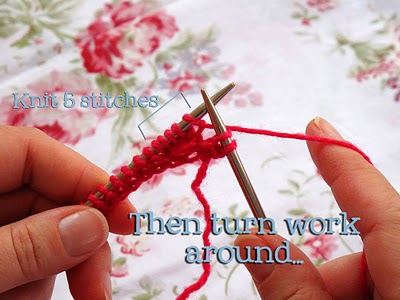
Turn your work around, and knit all 5 stitches. Turn your work around.
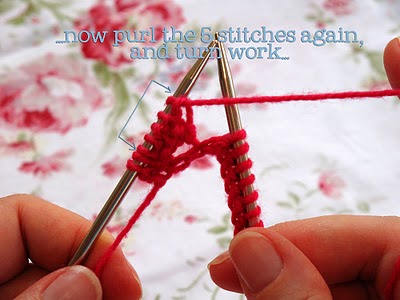
Now purl all the stitches of your bobble again., and turn your work around for the last time.
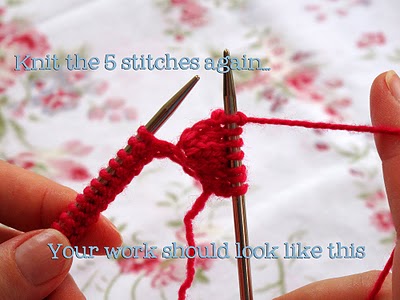
Knit the 5 stitches for the last time. If you push your finger into the back of the bobble to pop it out a bit, you'll see how nice and fat it is
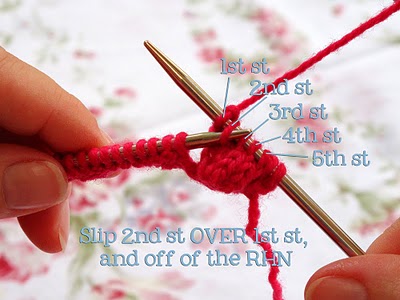
Using your LHN, slip the 2nd st of your bobble, over the 1st st, as seen above.
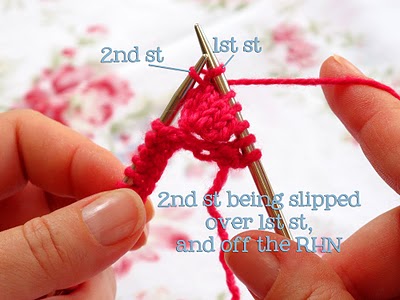
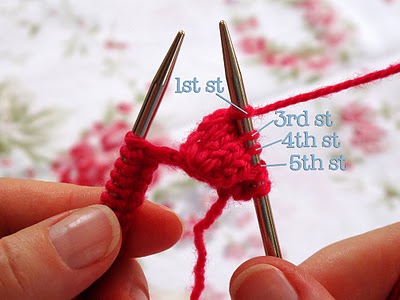
You have a little gap that has formed where the 3nd stitch has been slipped over the first.
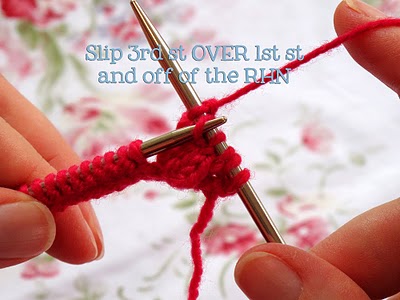
Slip the 3rd st of your bobble, over the 1st st, as before...
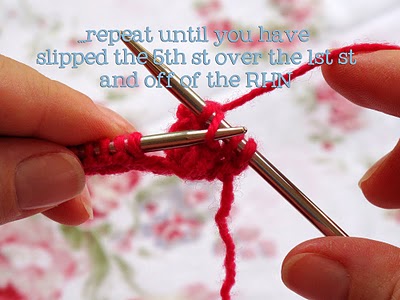
Repeat the above process until you have slipped the 5th st of your bobble over the 1st st. You should have 3 stitches left on your RHN, 2 knit stitches from tight at the beginning of the row, and the single stitch (1st) of your bobble.
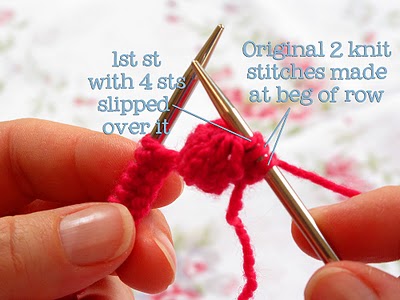
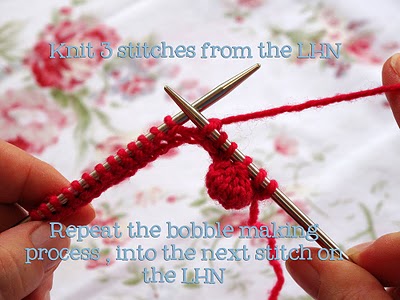
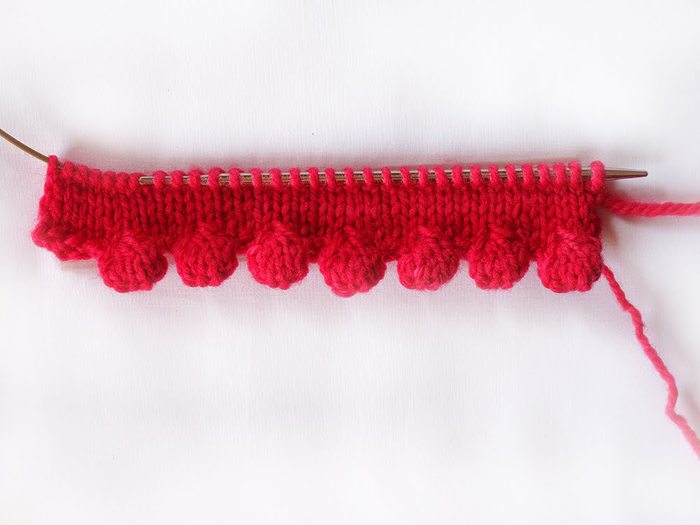
Knit 3 stitches from your LHN, and repeat the bobble making process into the next stitch on your LHN. Repeat until the right amount of bobbles have been made. Carry on with your pattern.
I must say that I really love this bobble cast on (although strictly speaking , it isn't really a true cast on , as you have knitted one row before starting to make bobbles).
Hope you all make many stunning items using this cute Bobble edge, :)
Взято: http://heidibearscreative.blogspot.com/2011/02/bobble-cast-on-tutorial-and-some.html . ]

[
Ok, you can pretty much do this Bobble Cast On in any yarn, although perhaps laceweight yarn won't make a bobble, more of a full stop. That being said, the technique is the same irrespective of yarn weight.

Cast on the number of stitches that you need. I left two side stitches, as you will see later, because it gives the work a little bit of an edge before the fat little bobble appears, and just looks better.

Knit one row, and turn your work around. Above you can see that I have done just that.

Knit 2 stitches. Throughout the tutorial I will refer to the left hand needle as the LHN, and the right hand needle, as the RHN.

Insert the RHN into the next stitch on the LHN. You are going to knit into this stitch as you would normally, but you don't drop the stitch you have knitted into from the LHN. Just leave the loop of yarn on there .

Above, you can see that the new stitch has been made , but the loop of the old stitch is still on the LHN.

This knit stitch you have just made on the RHN, is the FIRST stitch of your bobble. You will now do a YARN OVER. What this means , is that you aren't going to make a real stitch, more of a little cheat by just wrapping the working yarn around the RHN, in the direction as shown above.

Above, you can see how your work should look once the yarn over has been done. It is so easy to do...it is essentially just bringing your yarn towards you through the two needle points...

Insert your RHN tip into THE SAME STITCH as in the previous photos, and make a new regular knit stitch. (Notice, how the yarn over will created a clearly seen stitch once you have knitted a stitch after it)

Knitting a new stitch as normal....

New knit stitch pulled through , but again DO NOT DROP the LHN loop. In the picture above, I have labelled the new stitch a "half knit" stitch because I haven't completed the knitting motion, by dropping the loop form the LHN. You have now made 3 stitches of your bobble.

Do a second Yarn Over, just like before....

Knit into the same loop on the LHN as before...insert RHN into same loop on LHN...


Pull the stitch through but this time, drop the loop from the LHN. You have made 5 stitches for your bobble.

You have 7 stitches on your RHN, of which 5 stitches make up your bobble... You will concentrate only on these 5 stitches for the next rounds, making the bobble come alive :)

Turn your work around...it should look like the picture above...

Purl the first stitch.

The next stitch was made in the previous round, by a Yarn Over, so I like to knit through the back of it, to give it a little twist . This " through the back loop" purling only happens on this row
, and only on the two stitches that were made by the Yarn Overs in the previous round.

Purling through the back loop...

Purl the next stitch as normal, then purl through the back loop of the following stitch and finally purl the last stitch of the 5 stitches that make up your bobble.
Your work should look like the picture above.

Turn your work around, and knit all 5 stitches. Turn your work around.

Now purl all the stitches of your bobble again., and turn your work around for the last time.

Knit the 5 stitches for the last time. If you push your finger into the back of the bobble to pop it out a bit, you'll see how nice and fat it is

Using your LHN, slip the 2nd st of your bobble, over the 1st st, as seen above.


You have a little gap that has formed where the 3nd stitch has been slipped over the first.

Slip the 3rd st of your bobble, over the 1st st, as before...

Repeat the above process until you have slipped the 5th st of your bobble over the 1st st. You should have 3 stitches left on your RHN, 2 knit stitches from tight at the beginning of the row, and the single stitch (1st) of your bobble.


Knit 3 stitches from your LHN, and repeat the bobble making process into the next stitch on your LHN. Repeat until the right amount of bobbles have been made. Carry on with your pattern.
I must say that I really love this bobble cast on (although strictly speaking , it isn't really a true cast on , as you have knitted one row before starting to make bobbles).
Hope you all make many stunning items using this cute Bobble edge, :)
Взято: http://heidibearscreative.blogspot.com/2011/02/bobble-cast-on-tutorial-and-some.html . ]

| Рубрики: | 002__Вязалочки/Наборный край |
| Комментировать | « Пред. запись — К дневнику — След. запись » | Страницы: [1] [Новые] |


