>Наливные яблочки) |
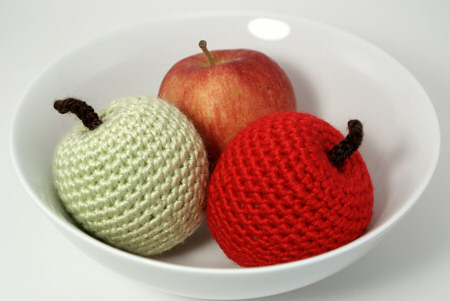
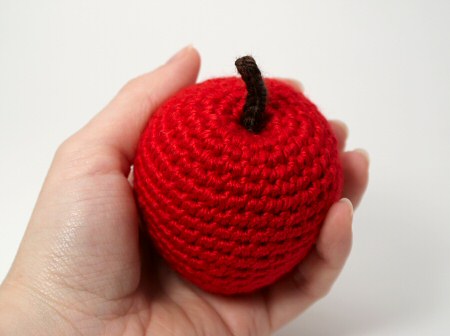
Амигуруми-яблоки
| ch | chain |
| sc | single crochet (double crochet for UK/Aus) |
| sl st | slip stitch (single crochet for UK/Aus) |
| st | stitch |
| sc2tog | single crochet decrease (or try an invisible decrease instead for a better finish) |
With red or green yarn, make a magic ring, ch 1.
Rnd 1: 6 sc in magic ring. (6 st)
Rnd 2: 2 sc in each st around. (12 st)
Rnd 3: sc in each st around. (12 st)
Rnd 4: (2 sc in next st, sc in next st) six times. (18 st)
Rnd 5: (2 sc in next st, sc in next 2 st) six times. (24 st)
Rnd 6: (2 sc in next st, sc in next 3 st) six times. (30 st)
Rnd 7: sc in each st around. (30 st)
Rnd 8: (2 sc in next st, sc in next 4 st) six times. (36 st)
Rnd 9-12: sc in each st around. (36 st)
Rnd 13: (sc2tog, sc in next 4 st) six times. (30 st)
Rnd 14: sc in each st around. (30 st)
Rnd 15: (sc2tog, sc in next 3 st) six times. (24 st)
Rnd 16: sc in each st around. (24 st)
Rnd 17: (sc2tog, sc in next 2 st) six times. (18 st)
Rnds 18-19: sc in each st around. (18 st)
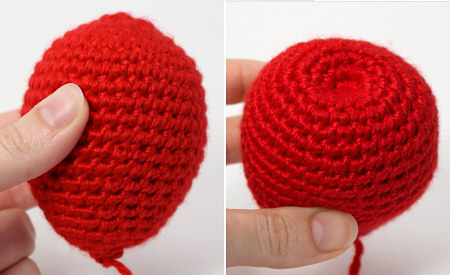
Rnd 20: (sc2tog, sc in next st) six times. (12 st). Stuff apple through hole.
Rnd 21: (sc2tog) six times. (6 st). Cut the yarn, leaving a long (approx 12″/30cm) yarn end.
Note: Your apple will look more like a lemon at the moment, but don’t worry: that will all change in a moment!
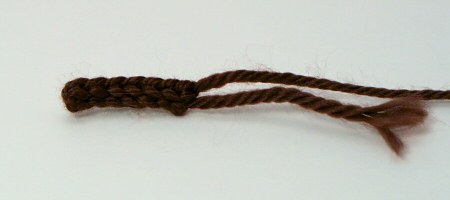
With brown or black yarn, ch 7.
Row 1: sl st in 2nd chain from hook and in each remaining chain. (6 st)
Note: I like to work into the back bumps of the chain, but you can work into the chain normally if you prefer.
Cut yarn, leaving a long (approx 12″/30cm) yarn end. Draw end through last loop and pull tight to fasten off.
Using a yarn needle and the long yarn end from the apple, close up the remaining hole at the bottom of the apple. Use a finger to push the top of the apple down to form a dimple (don’t worry if it won’t stay in this position).
Pass the yarn from the bottom up through the apple to the magic ring at the top centre, then insert the yarn needle at the top, one stitch away from where it exited the apple, and pass the yarn end back down through the apple to the bottom. Draw the yarn tighter until you like the shape and the top dimple stays in place. Knot the yarn at the bottom of the apple so it stays in this position (the knot will be covered later).
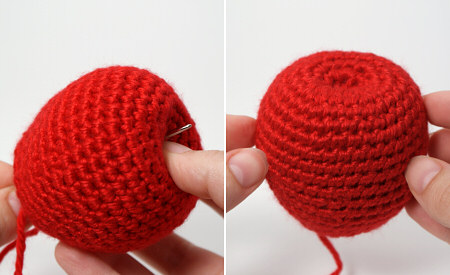
Pass the yarn end through the apple, coming out somewhere along the apple’s side. Draw the yarn tight, and snip the end close to the apple. The yarn end should retract back inside the apple after it is cut.
Using a yarn needle and the long yarn end from the stalk, pass the yarn through the apple from top middle to bottom middle, so the base of the stalk sits in the dimple at the top of the apple.
Make 3 small overlapping stitches at the bottom of the apple, to form an asterisk shape.

Pass the yarn end back up through the apple to the top. Knot the yarn end and the starting tail from the stalk together. Thread both ends onto the yarn needle and pass them through the apple, coming out somewhere along the apple’s side. Draw the yarn tight, and snip the ends close to the apple. The yarn ends should retract back inside the apple after they are cut.
источник: www.planetjune.com/blog/free-crochet-patterns/amigurumi-apples/
| Рубрики: | Igrushki/vyazannie |
| Комментировать | « Пред. запись — К дневнику — След. запись » | Страницы: [1] [Новые] |


