-Цитатник

Верена - (0)

Альбом "Venera Special". Модное вязание №3 2017г «Venera Special. Модное вязание» ...

Верена - (0)

V. Stricktrends №2 2022г Вдохновленные последними тенденциями на международных подиумах, мы пр...

Верена - (0)

V. Модное вязание №1 2022г Журнал для тех, кто предпочитает смелые и эффектные модели для ручн...

Верена - (0)

Журнал "Venera" №6 2019г Россия Журнал для тех, кто предпочитает смелые и эффектные модели для...

Верена - (0)

Журнал "Venera" №7 1990г Журнал Venera – журнал для творческих женщин, посвященный вязан...

 -Метки

animal-free receptes ажур ананасы бабушкин квадрат быть женщиной верена всеми фибрами души вышивание вышивка вязание крючком вязание спицами газетоплетение декор декупаж дети дети- цветы жизни джемпер крючком жакет жакет крючком женственность жилет журнал здоровая спина золотые слова игрушки идеи интересно йога кардиган клубника книги конфетка коробка кошки куклы кундалини лепестки лимон лирика любовь мантра масло медитации мишки мк мотивы мудрые мысли музыка-энергия мультфильм новый год носки крючком носочки оверсайз орехи ошо пальто перчатки печенье пинетки пирог платье плед подарки подушка притча пуловер пуловер крючком реглан рисование рождество роспись свитер свитер крючком секреты вязания скрап собаки ссылки сумка сыр сыроедение тапочки творог топ торт туника узор узоры фриформ фрукты хлеб чакры шаль шапка шарф шитье шоколад энергия юбка юмор ягоды

 -Видео

белочка
Смотрели: 63 (7)
Купашки:)
Смотрели: 67 (0)
Умывашки:))
Смотрели: 54 (8)

 -Фотоальбом

Посмотреть все фотографии серии Вышивка
Вышивка
15:58 16.02.2014
Фотографий: 22
Посмотреть все фотографии серии Вязание
Вязание
12:26 21.01.2014
Фотографий: 18
Посмотреть все фотографии серии Разное творчество
Разное творчество
16:10 23.10.2012
Фотографий: 6

 -Поиск по дневнику

Поиск сообщений в Ananta

 -Статистика

Статистика LiveInternet.ru: показано количество хитов и посетителей
Создан: 12.01.2010
Записей: 3024
Комментариев: 5570
Написано: 11867


Хотите сделать монстрика? - Wanna make a monster?:)

Воскресенье, 12 Июня 2011 г. 20:42 + в цитатник


Wanna make a monster? Хотите сделать монстрика ?

В случае необходимости перевод можно осуществить припомощи гугл переводчика. перевод с английского языка.


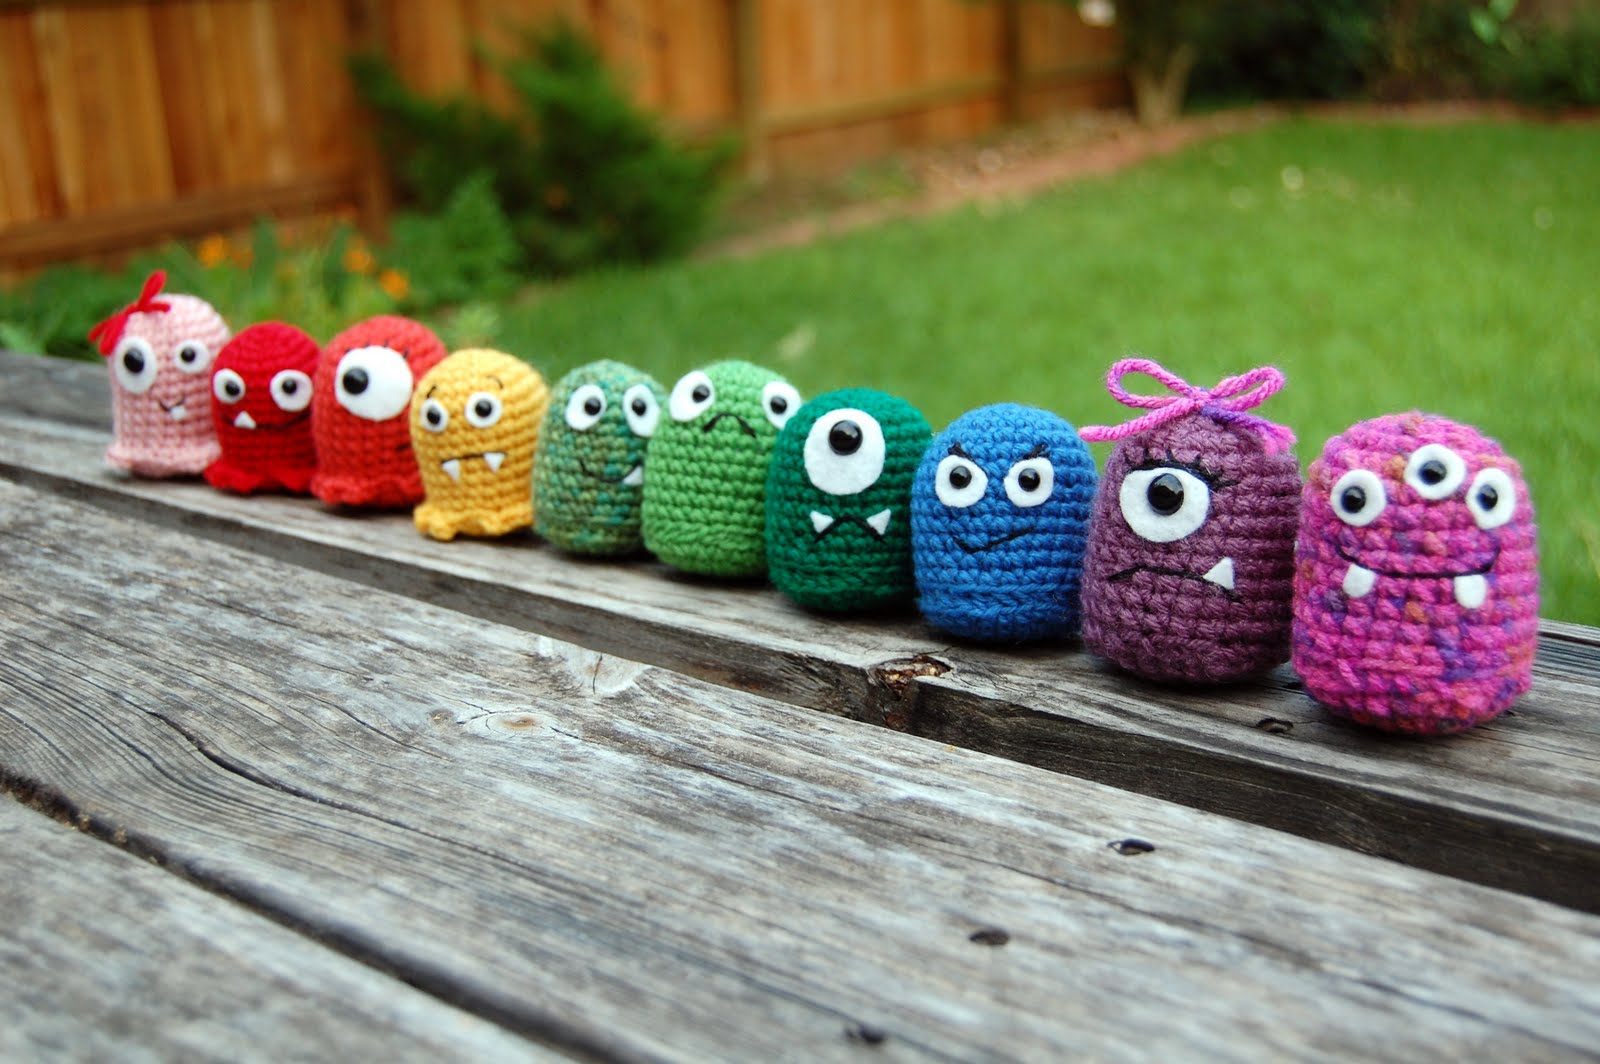
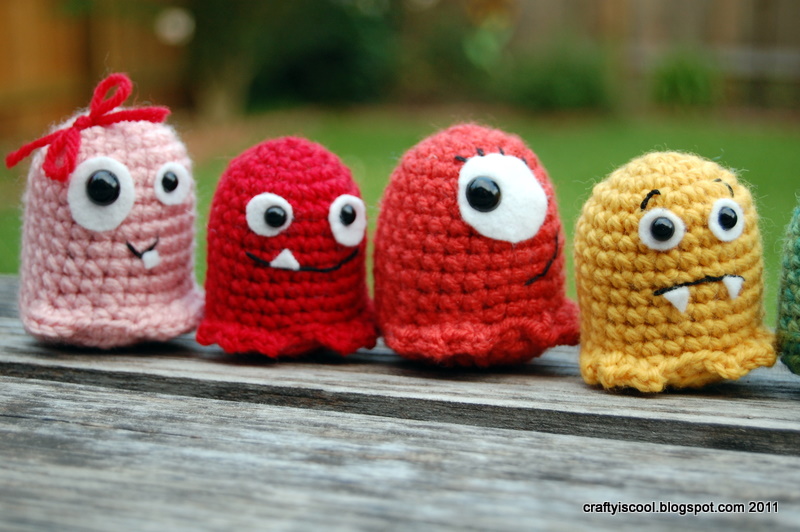
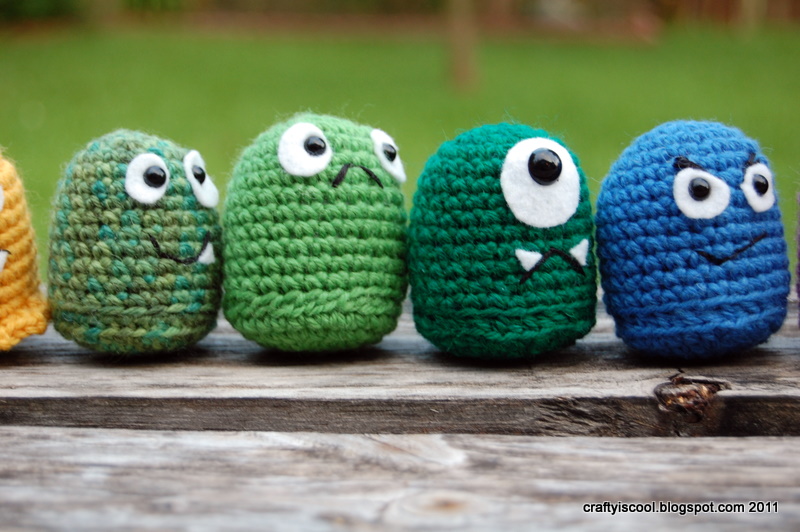
Time for another tutorial! I made this lineup of baby monsters for my Basic Amigurumi class at The Knitting Nest.  I think they're a pretty good beginner project because it teaches how to start crochet in the round, how to single crochet, how to increase, and basic construction and customization of amigurumi.  Let's begin, shall we?


Baby Monster's Guide to Basic Amigurumi
 
You'll need the following stuff:
  • Small amount of worsted weight yarn
  • Size E Crochet hook (or your favorite)
  • Plastic safety eyes (I used 6 mm, but you can use whatever makes your monster happy!)
  • Polyester fiberfill stuffing
  • Embroidery floss
  • White felt
  • Craft glue
  • Scissors
  • Yarn needle
  • Embroidery needle
Head/Body:
Begin by making a ring with your yarn as shown. 
 
Insert the hook into the front of the ring and hook your working yarn (the yarn coming from the the ball) with the hook.  Pull up a loop through your ring.


Wrap the working yarn around the hook from behind and pull through the loop on your hook.  This is called a chain stitch and is written in a pattern "ch 1".


You will now single crochet six stitches into the ring. Insert the hook into the front of the ring and pull up a loop of working yarn to the front. Two loops are on your hook. Wrap the working yarn around the hook from the back and pull through the two loops. This is one single crochet stitch into the ring.  Do five more single crochets into the ring.


Pull the short yarn tail to close the ring and the stitches will come together to form a circle of stitches. This is the base for the rest of your monster.


To make the circle grow, you will increase by crocheting two times into each stitch. Insert your hook under both loops of the next stitch as shown.


Pull up a loop. Two loops are on your hook. 


Wrap the working yarn around your hook.  Pull through the two loops.  This is one single crochet stitch. Now single crochet into the same spot again. This is an increase. It is usually written "2 sc into next st" and for this round you will repeat this for every stitch until you have 12 total stitches in the round. Count the stitches by counting each "v" around the circle.


The next round, you will increase in every other stitch. This means that you will put two stitches in the first stitch, one stitch in the next, two stitches in the next, and so on. At the end of the round you should have 18 stitches.
 
For the last increasing round, you will increase in every third stitch. This means you single crochet two times in the first stitch, then single crochet in the next two stitches only once, then single crochet two times in the next stitch, and so on around until you have a total of 24 stitches.
 
After you have finished increasing, you will have a flat circle with 24 stitches around. This circle magically becomes a cylindrical shape as you single crochet around into each stitch for 9 rows.
 
 
Using a stitch marker, crochet around 24 stitches, move the marker to the loop on your hook, then crochet around 24 again, then move the stitch marker to the loop on your hook, and repeat until you have 9 rows. Of course, if you want your monster taller you can do more than 9 rows and if you want him to be on the short side, do fewer than 9 rows.


Finish your monster's body off by slip stitching into the next stitch. All this means is that you cut the yarn with a few inches left, insert your hook into the next stitch, pull up a loop, and pull that loop all the way through the loop on your hook. 


Base:
To make the base of the monster, repeat the steps from the beginning to make a circle of 24 stitches.
 
Before sewing the pieces of your baby monster together, you must attach the eye(s).  Cut the felt piece as desired.  One large circle, two small circles, etc.  At the spot where you want to insert the black eye, cut a tiny slit and insert the post of the safety eye.  Place the eye where you want it on the body piece and push the post through. 


Put the washer inside the body and fit it over the post.  Push hard and snap the washer onto the post all the way down.


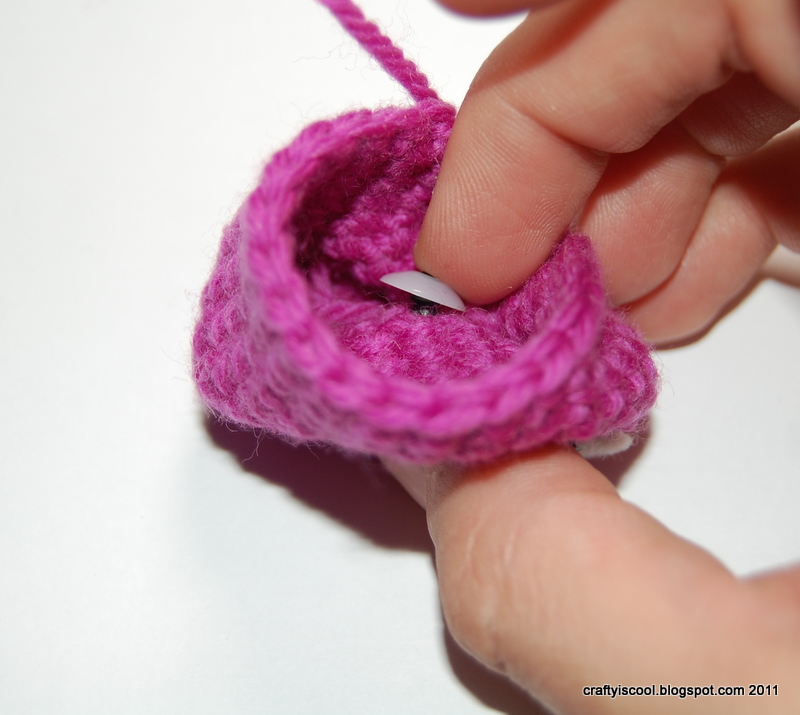
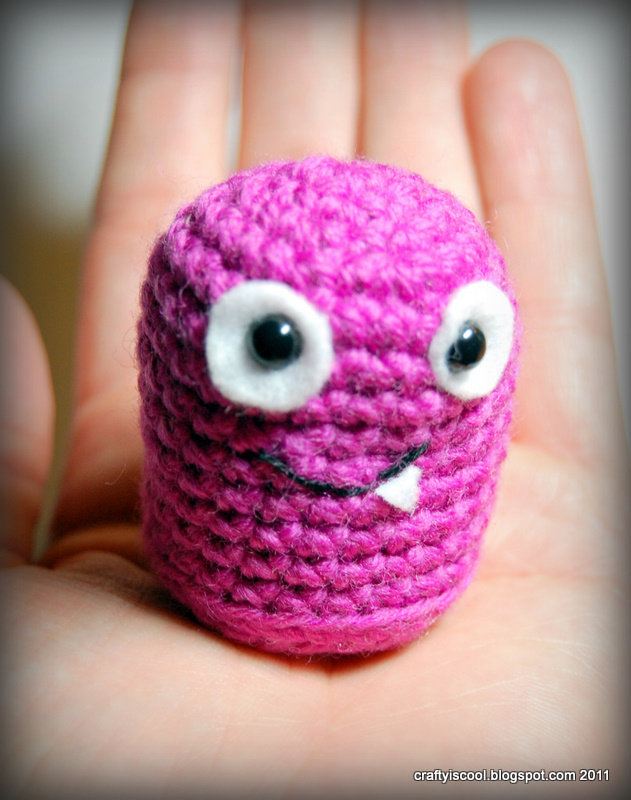
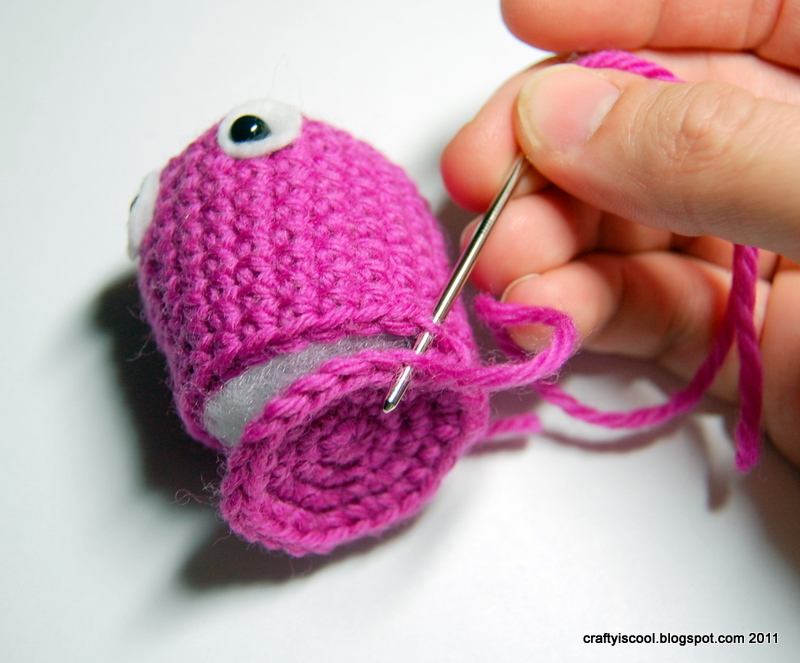
Insert a small amount of stuffing into your monster. Fit the bottom piece over the bottom of the body. Use the long yarn tail and a yarn needle to stitch the pieces together, lining stitches up and sewing between them. As the hole closes up, add more stuffing as desired.


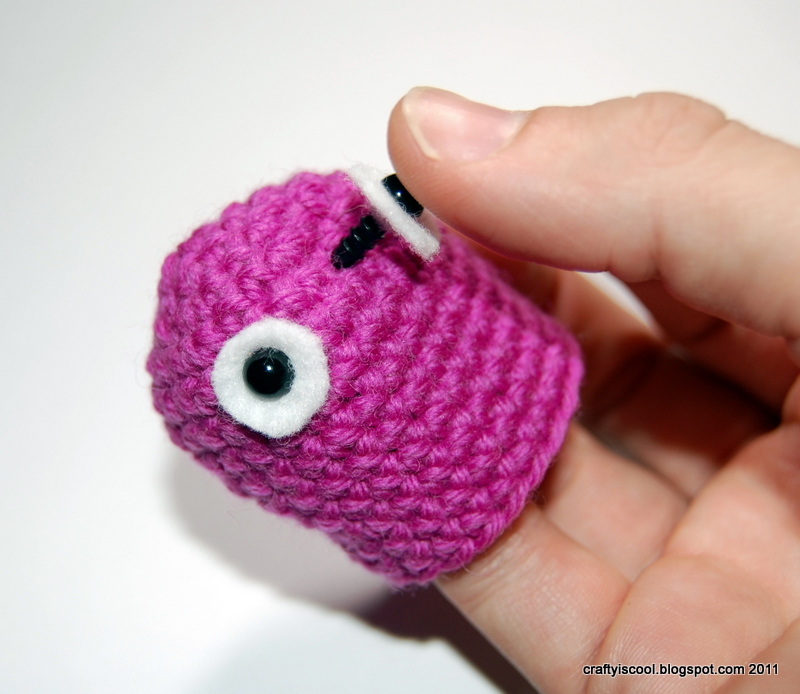
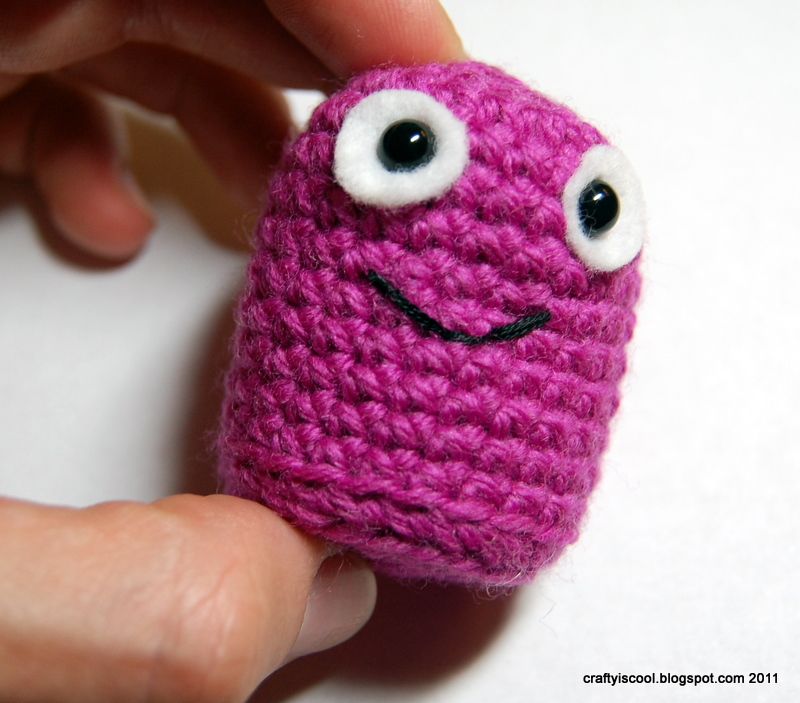
Now its time to design your monster’s expression. Use the embroidery needle and embroidery floss to stitch a mouth, eyebrows, eyelashes, etc onto your monster’s face.


Give him a tooth or two by gluing a little piece of felt onto his mouth. Use your imagination! You can sketch out your design first so he’ll look just right.


Glue or sew down the edges of your monster’s eyes.


You can add a bow by tying a strand of yarn into a bow and stitching it onto your monster’s head with the same color.


Here's how the pattern would look written out:
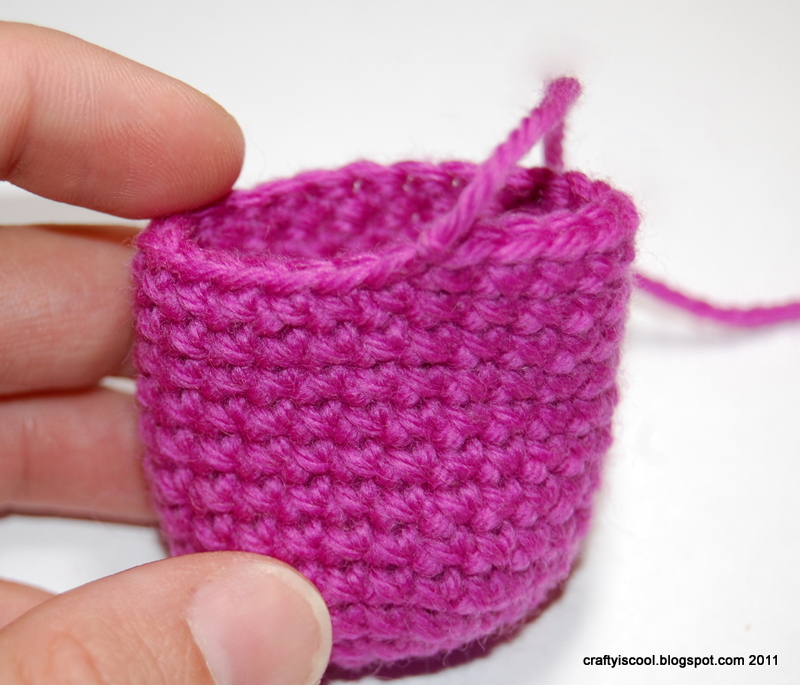
 
Head/Body:

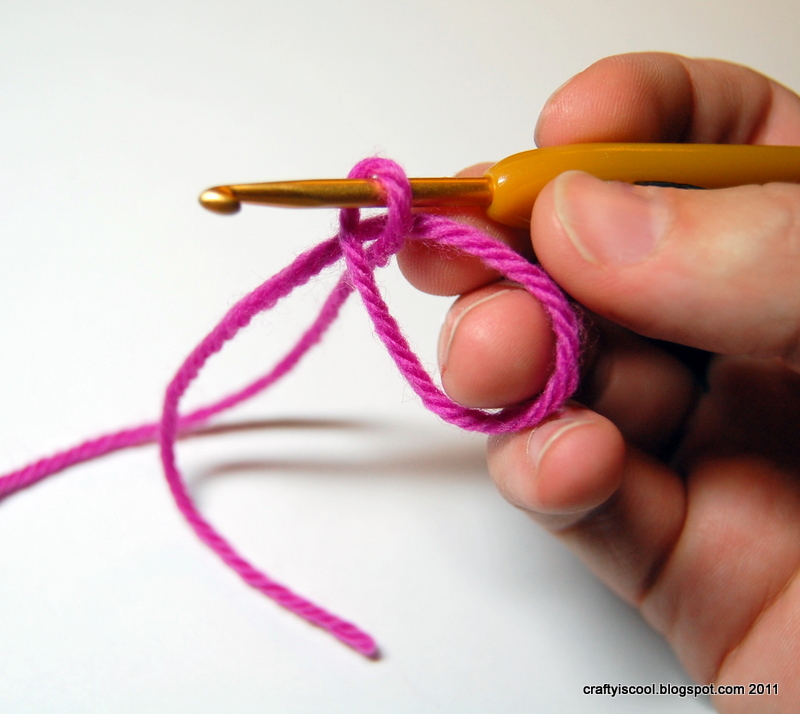
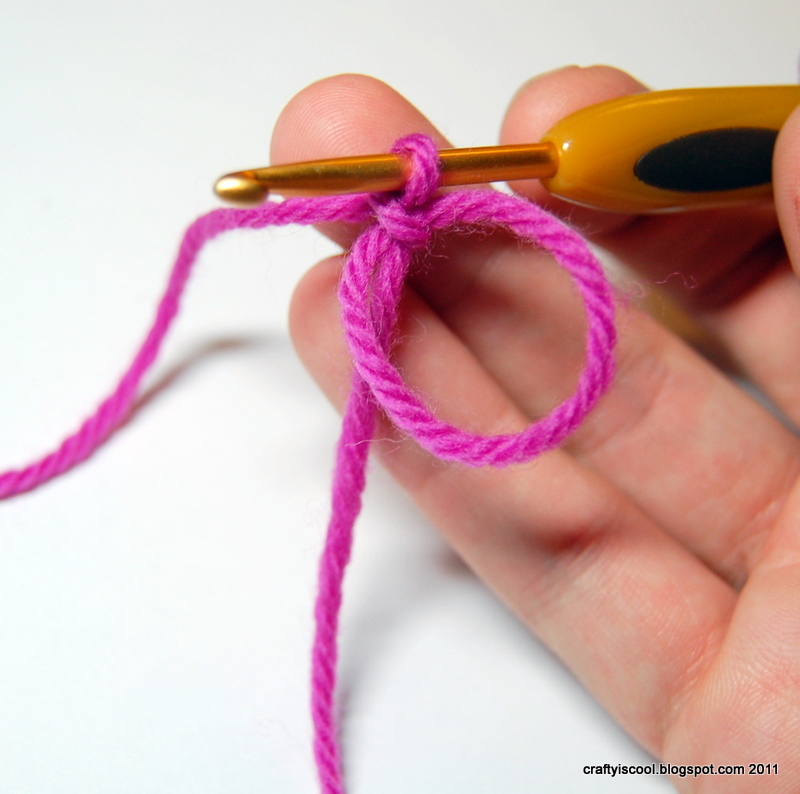
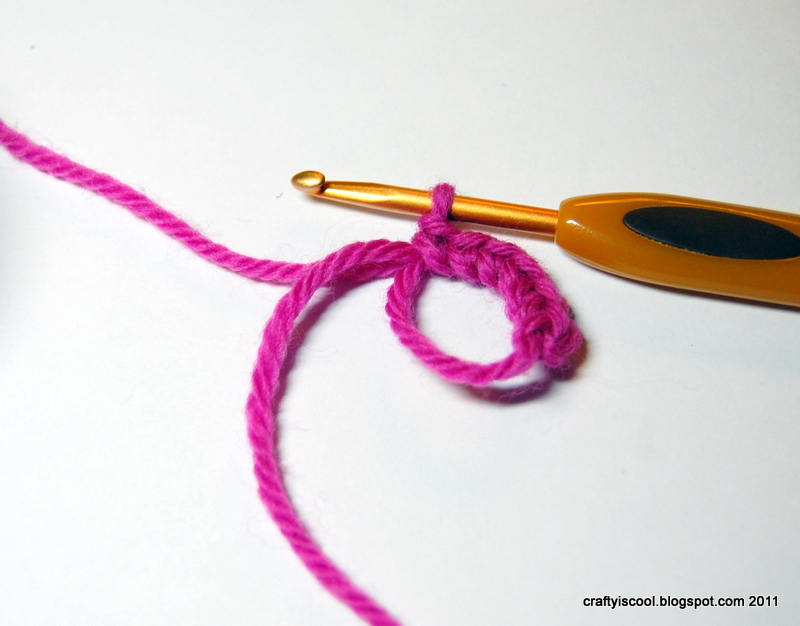
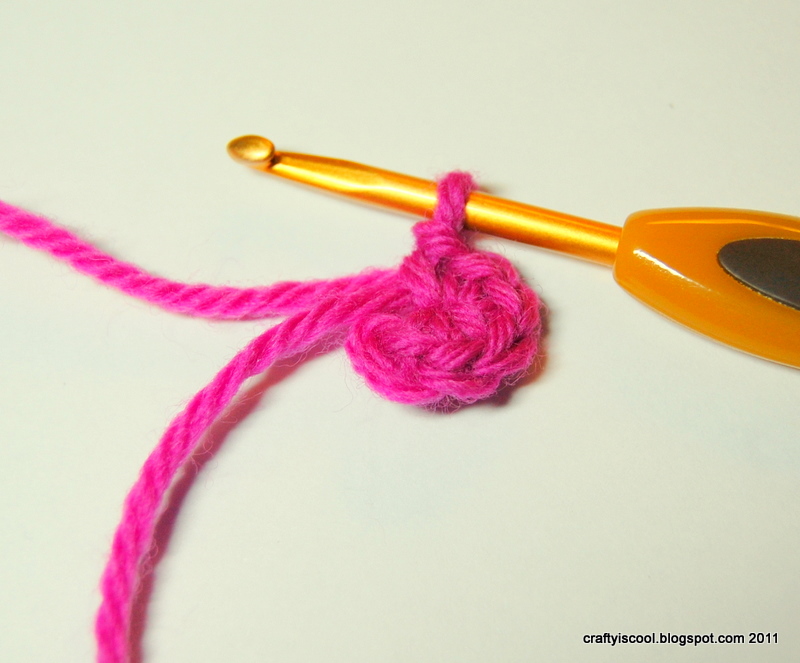
Starting at the top of the monster’s head, with worsted weight yarn and an E hook, make an adjustable ring, chain (ch) 1, and single crochet (sc) 6 stitches into the ring. Pull the ring closed with the loose yarn tail.
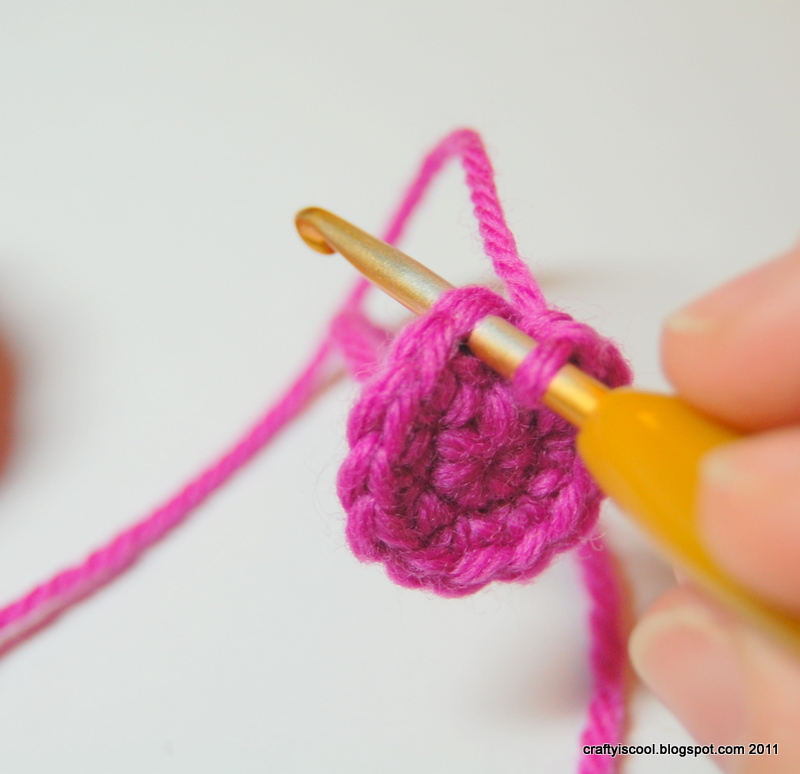
R1 (Row or Round 1): 2sc into each st (12)
R2: (2sc into next st, sc into next st)* rep around (18)
R3: (sc into next st, 2sc into next st, sc into next st)* rep around (24)
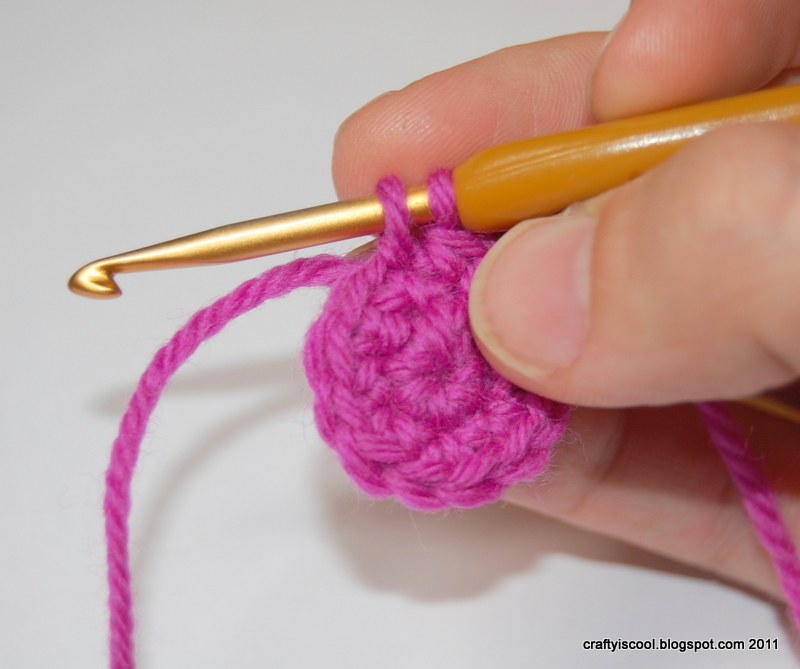
R4-12: sc into each st (24)
Fasten off. Set aside.
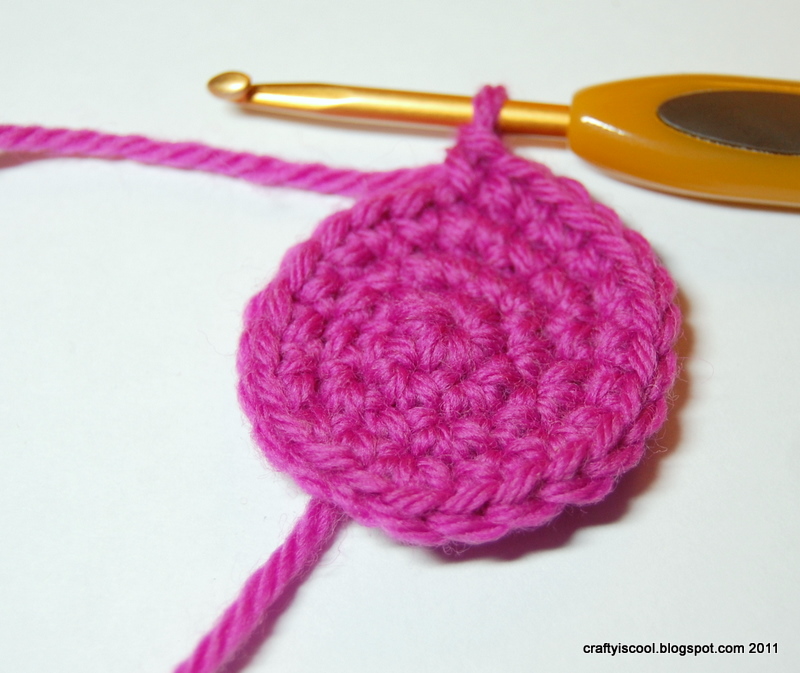

Base:
Make an adjustable ring, chain (ch) 1, and single crochet (sc) 6 stitches into the ring. Pull the ring closed.
R1: 2 sc into each st (12)
R2: (2 sc into next st, sc into next st)* rep to end of rnd (18)
R3: (sc into next st, 2sc into next st, sc into next st)* rep to end of rnd (24)
Fasten off.

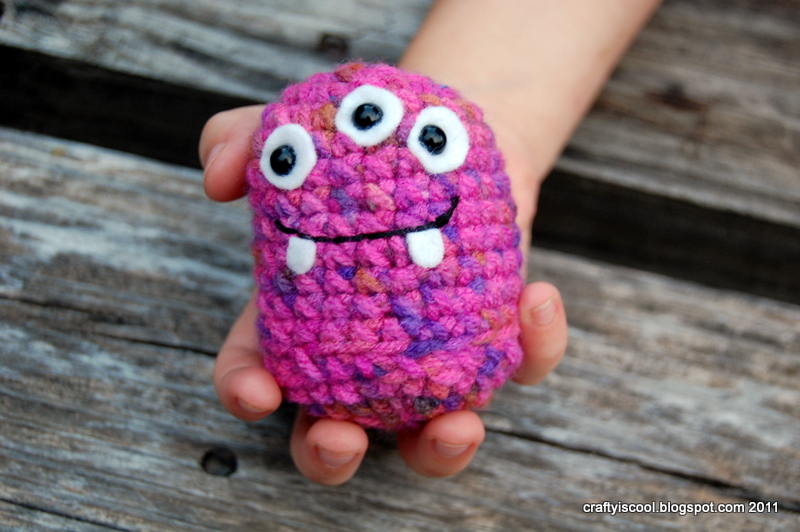
Here are my baby monsters! See how the expressions change with a little stitching, changing the eye size, and even the position of the felt?


Baby monsters are perfect for little hands!
 
 
Рубрики:  Копилка Hand Made
Метки:  

Процитировано 17 раз
Понравилось: 3 пользователям

бекарчик   обратиться по имени Воскресенье, 12 Июня 2011 г. 22:47 (ссылка)
Спасибо!
Ответить С цитатой В цитатник
Marguwa   обратиться по имени Среда, 15 Июня 2011 г. 16:58 (ссылка)
Чумовые))))
Ответить С цитатой В цитатник
 

Добавить комментарий:
Текст комментария: смайлики

Проверка орфографии: (найти ошибки)

Прикрепить картинку:

 Переводить URL в ссылку
 Подписаться на комментарии
 Подписать картинку