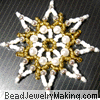
Beaded Snowflake Star
What you need:
1) Size 11/0 glass seed beads (gold and white), Size 12/0 glass seed beads (white)
2) 4mm pearls (you can replace with 4mm crystals) 3mm silver beads (you can replace with 3mm crystal)
3) Beading string (0.25mm). |
 |
|
|
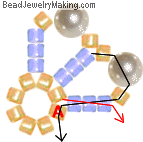
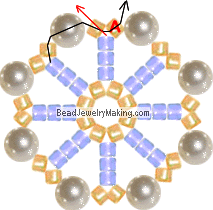
Step 1: |
Cut a piece of beading string around 30 inches long.
-
Add eight gold beads at the centre of the string and crisscross the string through the last added bead to form a 8 bead circle as shown.
|
|
 |
|
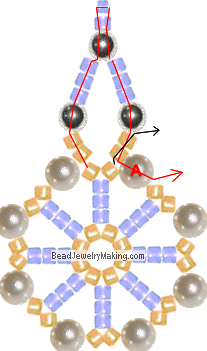
Step 2: |
Continue to:
-
Add three white, one gold (size 11/0) beads, one 4mm pearl, one gold and three white (size 11/0) beads on the left (red) string.
Crisscross the right (black) string through all the last three white beads added.
Continue to pass the red string (the one you used to add new beads on this step) through one old bead from step 1 marked A.
|
|
 |
|
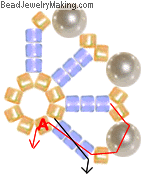
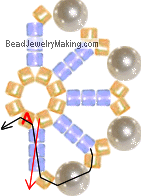
Step 3: |
Continue to:
-
Add one gold size 11/0 bead, one 4mm pearl, one gold and three white (size 11/0) beads on the top (black) string.
Crisscross the bottom (red) string through all the last three white beads added.
Continue to pass the black string (the one you used to add new beads on this step) through one old bead from step 1 marked A.
|
|
 |
|
Step 4: |
Continue to:
-
Add one gold size 11/0 bead, one 4mm pearl, one gold and three white (size 11/0) beads on the right (red) string.
Crisscross the left (black) string through all the last three white beads added.
Continue to pass the red string (the one you used to add new beads on this step) through one old bead from step 1 marked A.
|
|
|
|
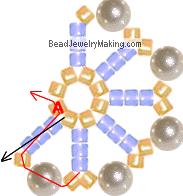
Step 5: |
Continue to:
-
Add one gold size 11/0 bead, one 4mm pearl, one gold and three white (size 11/0) beads on the bottom right (black) string.
Crisscross the top left (red) string through all the last three white beads added.
Continue to pass the black string (the one you used to add new beads on this step) through one old bead from step 1 marked A.
|
|
 |
|
Step 6: |
Continue to:
-
Add one gold size 11/0 bead, one 4mm pearl, one gold and three white (size 11/0) beads on the bottom (red) string.
Crisscross the top (black) string through all the last three white beads added.
Continue to pass the red string (the one you used to add new beads on this step) through one old bead from step 1 marked A.
|
|
 |
|
Step 7: |
Continue to:
-
Add one gold size 11/0 bead, one 4mm pearl, one gold and three white (size 11/0) beads on the bottom left (black) string.
Crisscross the top right (red) string through all the last three white beads added.
Continue to pass the black string (the one you used to add new beads on this step) through one old bead from step 1 marked A.
|
|
 |
|
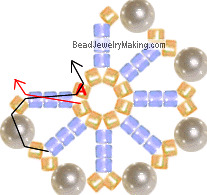
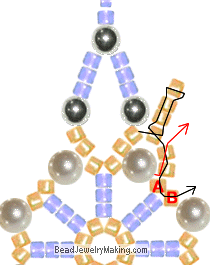
Step 8: |
Continue to:
-
Add one gold size 11/0 bead, one 4mm pearl, one gold and three white (size 11/0) beads on the left (red) string.
Crisscross the right (black) string through all the last three white beads added.
Continue to pass the red string (the one you used to add new beads on this step) through four old beads from step 1 and 2 marked A, B, C and D.
|
|
 |
|
Step 9: |
Continue to:
-
On the left (black) string, add one gold size 11/0 bead, one pearl and one last gold size 11/0 bead.
Crisscross the right (red) string through the last bead added.
Continue to pass the red string (the one you used to add new beads on this step) through one old bead from step 2 marked A.
|
|
 |
|
Step 10: |
Continue to:
-
On the left (red) string, add two gold beads (size 11/0), one 3mm silver bead, three white beads (size 11/0), one 3mm silver bead, one size 11/0 white bead and one size 12/0 white bead.
Continue to pass the same string back down through the white size 11/0 bead and the silver 3mm bead you just added.
Add three white (size 11/0) beads, one 3mm silver bead and two gold beads (size 11/0).
Crisscross the right (black) string through the two last gold bead added.
Continue to pass the red string (the one you used to add new beads on this step) through one old pearl from step 2 marked A.
|
|
 |
|
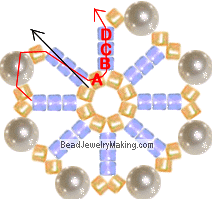
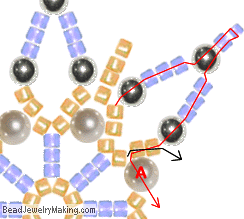
Step 11: |
Continue to:
-
On the top (black) string, add four gold beads, pass the same string back down through the first three gold beads you just added.
Add two more gold beads on this same string (black).
Crisscross the bottom (red) string through the last two gold beads added.
Continue to pass the black string (the one you used to add new beads on this step) through two old beads from step 2 and 3 marked A and B.
|
|
 |
|
Step 12: |
Continue to:
-
On the top (red) string, add one 3mm silver bead, three white beads (size 11/0), one 3mm silver bead, one size 11/0 white bead and one size 12/0 white bead.
Continue to pass the same string back down through the white size 11/0 bead and the silver 3mm bead you just added.
Add three white (size 11/0) beads, one 3mm silver bead and two gold beads (size 11/0).
Crisscross the bottom (black) string through the two last gold bead added.
Continue to pass the red string (the one you used to add new beads on this step) through one old pearl from step 3 marked A.
-
Now repeat:
step 11
step 12
step 11
step 12
step 11
step 12
step 11
step 12
step 11
step 12
step 11
step 12
The next step will continue after the repetitions.
|
|
 |
 |
|
Step 13: |
After the repetitions of step 11 and 12s, Continue to:
-
On the top left (black) string, add four gold beads, pass the same string back down through the first three gold beads you just added.
Continue to pass the same string (the one you used to add new beads on this step) through two old beads from step 11 marked A and B.
The two strings should meet head to head now, tie off and pass the excess back through the piece.
Now you can tie a ribbon on one of the points and hang the beaded Snowflake Star as a Christmas tree ornament or just simply around the house as Christmas Decorations.
|
|