-Рубрики

 -Цитатник

Рамочки-С Днём Рождения! - (0)

Рамочки-С Днём Рождения! .....Ваш текст..... код рамочки .....Ваш текст..... код...

Рамочка "С Днем Рождения!" - (0)

Рамочка "С Днем Рождения!" …Ваш текст ... …Ваш текст ...

Рамочка "С Днём рождения!" - (0)

Рамочка "С Днём рождения!" ***Здесь будет текст*** ***Здесь будет текст*...

Рамочка " С Днем Рождения!" (с прокруткой) - (0)

Рамочка " С Днем Рождения!" (с прокруткой) Название вашего текстаВаш текст Название вашего текс...

поздравления - (0)

Рамочки для текста № 275. Для стихов, поэзии, мемуаров и для поздравления с днём рождения. Рамки ...

 -Всегда под рукой

 -Поиск по дневнику

Поиск сообщений в МАТЮШИНА_ЛЮБОВЬ

 -Подписка по e-mail


 -Статистика

Статистика LiveInternet.ru: показано количество хитов и посетителей
Создан: 13.03.2013
Записей: 211
Комментариев: 26
Написано: 858


image

---

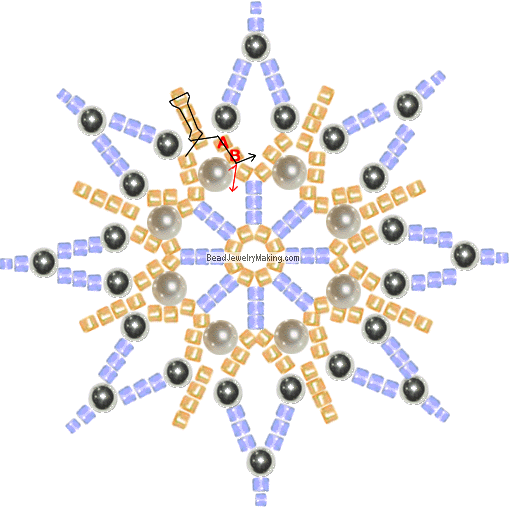
СНЕЖИНКА

Четверг, 13 Декабря 2018 г. 21:46 + в цитатник
Это цитата сообщения Солнцева_Наталья [Прочитать целиком + В свой цитатник или сообщество!]
Снежинки

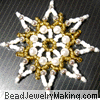
Beaded Snowflake Star

The pictorials are illustrated with spaces between beads for a clearer direction, in the actual beading, there should be no spaces.

Beaded Snowflake Star

What you need:
1)  Size 11/0 glass seed beads (gold and white), Size 12/0 glass seed beads (white)
2)  4mm pearls (you can replace with 4mm crystals) 3mm silver beads (you can replace with 3mm crystal)
3)  Beading string (0.25mm).
Snowflake Star  
Step 1: Cut a piece of beading string around 30 inches long.
  • Add eight gold beads at the centre of the string and crisscross the string through the last added bead to form a 8 bead circle as shown.
Snowflake Star Step 1
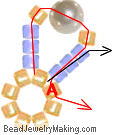
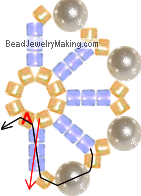
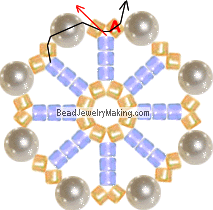
Step 2: Continue to:
  • Add three white, one gold (size 11/0) beads, one 4mm pearl, one gold and three white (size 11/0) beads on the left (red) string.
    Crisscross the right (black) string through all the last three white beads added.
    Continue to pass the red string (the one you used to add new beads on this step) through one old bead from step 1 marked A.
Snowflake Star Step 2
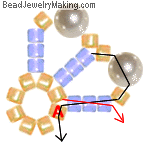
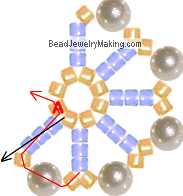
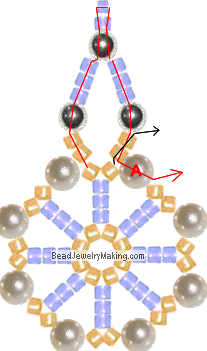
Step 3: Continue to:
  • Add one gold size 11/0 bead, one 4mm pearl, one gold and three white (size 11/0) beads on the top (black) string.
    Crisscross the bottom (red) string through all the last three white beads added.
    Continue to pass the black string (the one you used to add new beads on this step) through one old bead from step 1 marked A.
Snowflake Star Step 3
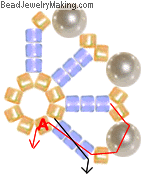
Step 4: Continue to:
  • Add one gold size 11/0 bead, one 4mm pearl, one gold and three white (size 11/0) beads on the right (red) string.
    Crisscross the left (black) string through all the last three white beads added.
    Continue to pass the red string (the one you used to add new beads on this step) through one old bead from step 1 marked A.

Snowflake Star Step 4

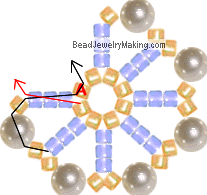
Step 5: Continue to:
  • Add one gold size 11/0 bead, one 4mm pearl, one gold and three white (size 11/0) beads on the bottom right (black) string.
    Crisscross the top left (red) string through all the last three white beads added.
    Continue to pass the black string (the one you used to add new beads on this step) through one old bead from step 1 marked A.
Snowflake Star Step 5
Step 6: Continue to:
  • Add one gold size 11/0 bead, one 4mm pearl, one gold and three white (size 11/0) beads on the bottom (red) string.
    Crisscross the top (black) string through all the last three white beads added.
    Continue to pass the red string (the one you used to add new beads on this step) through one old bead from step 1 marked A.
Snowflake Star Step 6
Step 7: Continue to:
  • Add one gold size 11/0 bead, one 4mm pearl, one gold and three white (size 11/0) beads on the bottom left (black) string.
    Crisscross the top right (red) string through all the last three white beads added.
    Continue to pass the black string (the one you used to add new beads on this step) through one old bead from step 1 marked A.
Snowflake Star Step 7
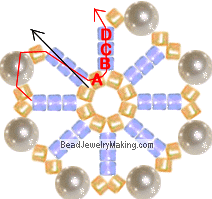
Step 8: Continue to:
  • Add one gold size 11/0 bead, one 4mm pearl, one gold and three white (size 11/0) beads on the left (red) string.
    Crisscross the right (black) string through all the last three white beads added.
    Continue to pass the red string (the one you used to add new beads on this step) through four old beads from step 1 and 2 marked A, B, C and D.
Snowflake Star Step 8
Step 9: Continue to:
  • On the left (black) string, add one gold size 11/0 bead, one pearl and one last gold size 11/0 bead.
    Crisscross the right (red) string through the last bead added.
    Continue to pass the red string (the one you used to add new beads on this step) through one old bead from step 2 marked A.
Snowflake Star Step 9
Step 10: Continue to:
  • On the left (red) string, add two gold beads (size 11/0), one 3mm silver bead, three white beads (size 11/0), one 3mm silver bead, one size 11/0 white bead and one size 12/0 white bead.
    Continue to pass the same string back down through the white size 11/0 bead and the silver 3mm bead you just added.
    Add three white (size 11/0) beads, one 3mm silver bead and two gold beads (size 11/0).
    Crisscross the right (black) string through the two last gold bead added.
    Continue to pass the red string (the one you used to add new beads on this step) through one old pearl from step 2 marked A.
Snowflake Star Step 10
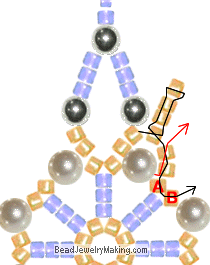
Step 11: Continue to:
  • On the top (black) string, add four gold beads, pass the same string back down through the first three gold beads you just added.
    Add two more gold beads on this same string (black).
    Crisscross the bottom (red) string through the last two gold beads added.
    Continue to pass the black string (the one you used to add new beads on this step) through two old beads from step 2 and 3 marked A and B.
Snowflake Star step 11
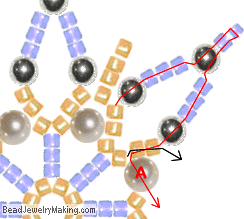
Step 12: Continue to:
  • On the top (red) string, add one 3mm silver bead, three white beads (size 11/0), one 3mm silver bead, one size 11/0 white bead and one size 12/0 white bead.
    Continue to pass the same string back down through the white size 11/0 bead and the silver 3mm bead you just added.
    Add three white (size 11/0) beads, one 3mm silver bead and two gold beads (size 11/0).
    Crisscross the bottom (black) string through the two last gold bead added.
    Continue to pass the red string (the one you used to add new beads on this step) through one old pearl from step 3 marked A.
  • Now repeat:
    step 11
    step 12
    step 11
    step 12
    step 11
    step 12
    step 11
    step 12
    step 11
    step 12
    step 11
    step 12
    The next step will continue after the repetitions.
Snowflake Star step 12
Snowflake Star step 13
Step 13: After the repetitions of step 11 and 12s, Continue to:
  • On the top left (black) string, add four gold beads, pass the same string back down through the first three gold beads you just added.
    Continue to pass the same string (the one you used to add new beads on this step) through two old beads from step 11 marked A and B.
    The two strings should meet head to head now, tie off and pass the excess back through the piece.
    Now you can tie a ribbon on one of the points and hang the beaded Snowflake Star as a Christmas tree ornament or just simply around the house as Christmas Decorations.


Рубрики:  ♠ БИСЕРОПЛЕТЕНИЕ/+ Снежинки

САЛФЕТКИ-ПЛОТНЫЕ

Понедельник, 30 Июля 2018 г. 09:16 + в цитатник
1.DSCN2751 (700x525, 85Kb)
----

САЛФЕТКИ-РОМАШКИ

Суббота, 02 Июня 2018 г. 11:02 + в цитатник
310руб (700x525, 61Kb)
----
Рубрики:  ♠ БИСЕРОПЛЕТЕНИЕ/+ я сплела

САЛФЕТКИ РАЗНЫЕ

Суббота, 02 Июня 2018 г. 10:32 + в цитатник
(34-34) (700x525, 59Kb)

Рубрики:  ♠ БИСЕРОПЛЕТЕНИЕ/+ я сплела

Рамочка "С днем рождения"

Четверг, 31 Мая 2018 г. 20:57 + в цитатник
Это цитата сообщения NATALI_KOMJATI [Прочитать целиком + В свой цитатник или сообщество!]
Рамочки "С днем рождения"


Здесь будет ваш текст...


С благодарностью к АВТОРАМ клипарта!


***


Здесь будет ваш текст...


С благодарностью к АВТОРАМ клипарта!


Серия сообщений "***МОИ РАМКИ день рождения":

Часть 1 - Спасибо мои дорогие!!!
Часть 2 - рамочка "С ДНЕМ РОЖДЕНИЯ!
...
Часть 25 - Рамочка для записи...с днем рождения...
Часть 26 - Рамочка "С днем рождения"
Часть 27 - Рамочки "С днем рождения"
Часть 28 - Рамочка "С днем рождения"


Рубрики:  ♠ РАМКИ/+ с днём рождения

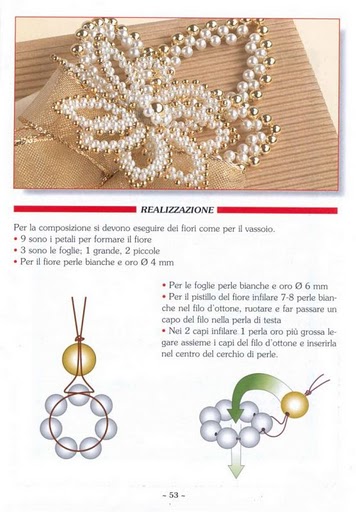
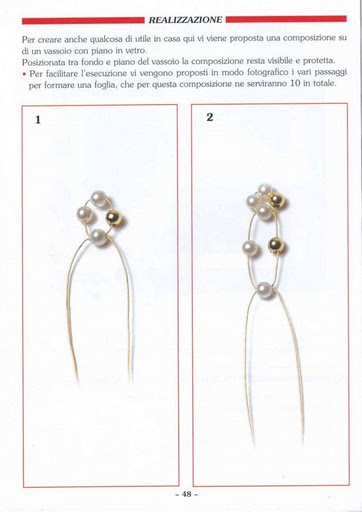
схема очень красивого цветка с бисера

Вторник, 20 Марта 2018 г. 19:33 + в цитатник
Это цитата сообщения Alla1505 [Прочитать целиком + В свой цитатник или сообщество!]
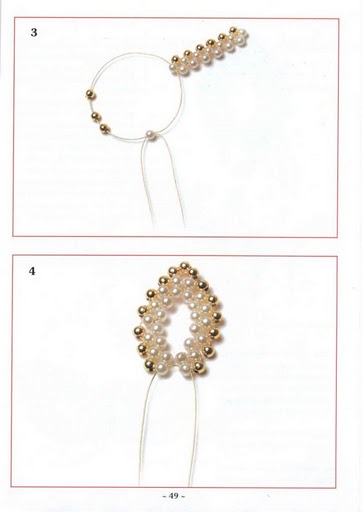
схема очень красивого цветка с бисера

 (356x512, 50Kb)


 (362x512, 26Kb)


 (365x512, 35Kb)

 (365x512, 23Kb)
Рубрики:  ♠ БИСЕРОПЛЕТЕНИЕ/+ цепочка

Рамочка "Поздравляю!"

Воскресенье, 18 Марта 2018 г. 15:47 + в цитатник
Это цитата сообщения GALZIMA [Прочитать целиком + В свой цитатник или сообщество!]
Рамочка "Поздравляю!"

***Здесь ваш текст***

0_15df1b_9259d1e1_orig (22x30, 0Kb)

и ещё простая>>>>>>>
Рубрики:  ♠ РАМКИ/+ разные


Понравилось: 1 пользователю

рамочка "С Днем рождения"

Суббота, 10 Марта 2018 г. 21:55 + в цитатник
Это цитата сообщения NATALI_KOMJATI [Прочитать целиком + В свой цитатник или сообщество!]
рамочка "С Днем рождения"


Здесь будет Ваш текст!


D1opY.gif


Серия сообщений "***ДЕНЬ РОЖДЕНИЯ":

Часть 1 - Спасибо мои дорогие!!!
Часть 2 - Без заголовка
...
Часть 8 - С Днем рождения ЛАРИСА!
Часть 9 - А в какое время родились вы или ваш ребёнок??!!!
Часть 10 - рамочка "С Днем рождения"
Часть 11 - рамочка "С днем рождения"...желтые розы
Часть 12 - серая рамочка "С днем рождения"
...
Часть 39 - С днем рождения,Валечка!
Часть 40 - Томочке!
Часть 41 - Рамочка "С днем рождения"


Серия сообщений "***МОИ РАМКИ день рождения":

Часть 1 - Спасибо мои дорогие!!!
Часть 2 - рамочка "С ДНЕМ РОЖДЕНИЯ!
Часть 3 - рамочка"С Днем РОЖДЕНИЯ"
Часть 4 - рамочка "С Днем рождения"
Часть 5 - рамочка "С днем рождения"...желтые розы
Часть 6 - серая рамочка "С днем рождения"
...
Часть 13 - Рамочка "День рождения"
Часть 14 - Рамочка "С днем рождения"
Часть 15 - Рамочка ...С днем рождения


Рубрики:  ♠ РАМКИ/+ с днём рождения

Рамочка цветочная

Суббота, 10 Марта 2018 г. 21:44 + в цитатник
Это цитата сообщения Veta-z [Прочитать целиком + В свой цитатник или сообщество!]

Рамочка цветочная


Ваш текст


Рубрики:  ♠ РАМКИ/+ с букетом

Серия сообщений о масках в фотошопе от НИК-НИНА.

Пятница, 09 Марта 2018 г. 19:59 + в цитатник
Это цитата сообщения Jorjorych [Прочитать целиком + В свой цитатник или сообщество!]

Серия сообщений о масках в фотошопе от НИК-НИНА.

.Серия сообщений "ФШ. работа с масками":
Часть 1 - Фотошоп, применяем маски
Часть 2 - Фотошоп, работа с масками
Часть 3 - Фотошоп, выделение при помощи быстрой маски
Часть 4 - Фотошоп, как использовать маски
Часть 5 - Фотошоп, урок маски от Илоны
Часть 6 - ФШ, перевод маски в PNG
Часть 7 - Фотошоп, извлекаем узор из маски
Часть 8 - Фотошоп, работаем с масками
Часть 9 - ФШ, быстрое выделение маски
Часть 10 - ФШ, работа с масками
Часть 11 - ФШ, работа с масками
Часть 12 - ФШ, маски и их применение
Часть 13 - ФШ, делаем золотую рамку из маски
Часть 14 - ФШ, работа с масками, 2 видео урока
Часть 15 - ФШ, выделение Быстрой маской
Часть 16 - ФШ, работа с масками, видео урок от Зоси
Часть 17 - ФШ, магический эффект с применением масок, видео урок
Часть 18 - ФШ, режим быстрой маски, видео урок
Часть 19 - ФШ, маска для фона, видео урок
Часть 20 - ФШ, перевод маски с ipeg в png
Часть 21 - ФШ, делаем маску рамку
Часть 22 - ФШ, заливаем портрет градиентом
Часть 23 - ФШ CS5, применяем маски, из блога Valdivia
Часть 24 - ФШ, работа с маской
Часть 25 - ФШ, и снова о работе с масками
Часть 26 - ФШ. Бордюрные маски
Часть 27 - Маски в фотошопе
Часть 28 - ФШ, Применение маски с помощью слоя-маски
Часть 29 - МАСКИ ДЛЯ КОЛЛАЖЕЙ
Часть 30 - УРОК ФШ 3 ВАРИАНТА РАБОТА С МАСКАМИ ( I ЧАСТЬ)
Часть 31 - Урок. Коллаж с применением маски и текстуры
Часть 32 - ФШ. 3 способа раскрашивания маски.
Часть 33 - Перевод маски в прозрачный формат

   Эта серия принадлежит НИК-НИНА.

Рубрики:  ♠ УРОКИ


Поиск сообщений в МАТЮШИНА_ЛЮБОВЬ
Страницы: 21 [20] 19 18 ..
.. 1 Календарь