When starting a new color, most techniques leave you with loose stitches either side of the color change. These not only look ugly but also expand as you work them on the next row, which can be unnerving especially if the tail looks like it might escape completely from the stitch below. You could stop knitting after a few stitches and tie a knot with the yarn tails, but that stops the flow of knitting, and the knots sometimes work their way through to the front.
Когда вводится нить нового цвета, большинство техник оставляют вас с рыхлыми петлями со всех сторон петли нового цвета. Это не только выглядит ужасно, но также деформирует петли в следующих рядах, что может нервировать, особенно если кончик виден и этого можно избежать полностью в нижних рядах. Вы можете остановить вязание после нескольких петель и связать концы пряжи в узел, но это остановит процесс вязания и узлы иногда видны с лицевой стороны.
If you join many new colors in one area, as you might with intarsia, it can be difficult to make them neater even when you sew in the ends. I have previously found myself shuffling yarn back towards the join through many stitches to get them to a consistent size.
Если вы используете много новых цветов в одной работе, как это возможно в интарсии, сложно сделать аккуратно, даже если вы сшиваете концы.Я первоначально переплетала пряжу через много петель чтобы получить их одинакового размера
To avoid all these issues, the join I use is a "twist-and-weave", first shown to me in a workshop taught by Jane Crowfoot. The new and old colors are twisted together and the join is made more robust by weaving the tail of the new color into the next stitch.
Что бы избежать все эти проблемы я использую соединение "twist-and-weave", сначала увиденном мною в обучающем мастер-классе Jane Crowfoot.
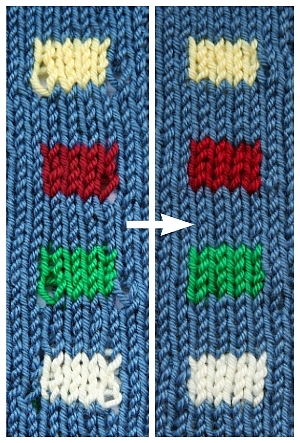
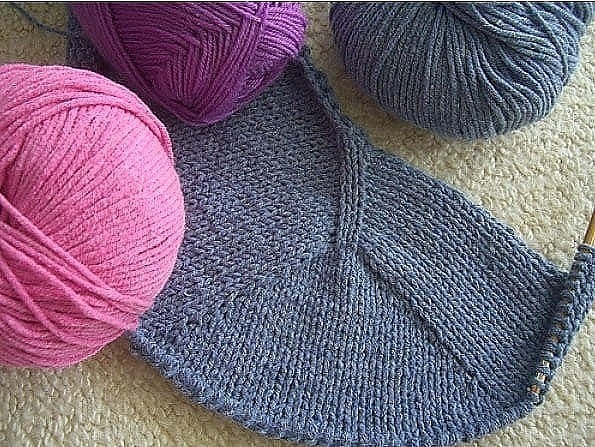
For both pieces of knitting: the join has been tightened up once and no ends have been sewn in at the back.
Для обеих частей вязания: соединения были подтянуты один раз и концы не были сшиты сзади.
It's not just for new colors
Не только для нового цвета
I use this join almost every time I change to a new yarn. For fair-isle/stranded knitting it sets you up to continue weaving ends in neatly across the first few stitches of the row. For stripes and intarsia, it keeps the integrity of the fabric as you're working, meaning you're not dealing with the loose stitches. Depending on whether the back of my work will be visible, I often use this method even if I need to join in a new skein of yarn of the same color. It takes a lot less effort than a wet splice or a Russian or braided join (as great as these methods are!)
Я пользуюсь этим соединением почти каждый раз, когда меняю пряжу. Для жаккардового вязания закрепленные концы позволят вам продолжить аккуратно вязать несколько первых петель ряда, для вязания в полоску и интарсии это сохранит равномерность связанного вами полотна, т.е. вам не придется иметь дело с рыхлыми петлями. В зависимости будет ли видна изнанка моей работы, я часто использую этот метод даже если мне нужно присоединить новый моток пряжи того же цвета. Потребуется намного меньше усилий,чем присоединение методом wet splice или Russian или braided join.
It takes a little practice to get the hang of it, but I think it's worth it. I've not seen it elsewhere since the workshop where I first learnt it (though I'm sure it's out there somewhere) and I think it deserves to be more widely known!
Необходимо немного практики чтобы получить навык, но я думаю это стоит того. Я не видела подобного где-нибудь ещё с того мастер-класса где я впервые научилась методу ( хотя я уверена где-нибудь есть) и я думаю этот метод заслуживает быть более широко известным.
The technique
Техника исполнения
The technique differs depending on whether you're knitting or purling and whether you're working in the Throwing/English/American knitting style or the Picking/Continental style.
Техника отличается в зависимости от того на лицевой или изнаночной стороне выполняется и от стиля вашего вязания Throwing/English/American или Picking/Continental
Not sure which knitting style you use? Generally, if you hold the yarn in your right hand and take the yarn forwards and around the needle to form the stitch, you are "throwing". If you hold the yarn in your left hand and collect yarn for the stitch by moving the right hand needle around the yarn, you are "picking".
Не уверены какой стиль вы используете? Как правило, если вы держите пряжу в правой руке и ей же накидываете нить на спицу , формируя петлю, вы "throwing" ("бросатель"). Если вы держите пряжу в левой руке и набираете петлю двигая спицей вокруг пряжи правой рукой, вы "picking" ("собиратель").
- Knit stitch, throwing style
- Purl stitch, throwing style
- Knit stitch, picking style
- Purl stitch, picking style
Alternatively there are two videos: one for knitters who hold the yarn in their right hand, and another for those who hold it in their left hand.
Есть два видео:
одно для вязальщиц кто держит пряжу в правой руке
второе для тех кто держит пряжу в левой руке
KNIT STITCH, THROWING STYLE
Лицевая петля THROWING STYLE
1. Work the final stitch in the old color and insert the needle into the next stitch. Drop the old color to the far side (purl side) of your work.
1. Сделать петлю старым цветом и ввести спицу в следующую петлю. Перекинуть старый цвет на изнаночную сторону вашей работы.
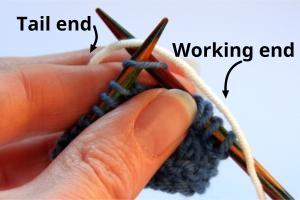
2. Lay the tail end of the new color between the needle tips, with the tail end furthest from you. Hold onto the tail with the left hand (I clamp it between my first and second fingers).
2. Положить конец новой пряжи между кончиками спиц, разместив хвостик дальше от себя. Держать хвостик левой рукой ( Я зажимаю его между первым и вторым пальцами.)
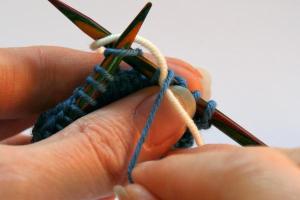
3. Bring the old yarn color from the far side of the work and over the top of the new yarn.
3. Взять пряжу старого цвета с изнаночной стороны и накинуть сверху новой пряжи.
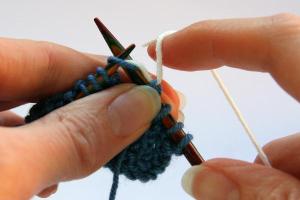
4. Hold the old yarn color firmly with your left thumb, so that you have some tension against the new color as you pick up the working end ready to knit.
4. Зажать пряжу старого цвета большим пальцем,подхватить пряжу нового цвета и натянуть слегка, рабочий конец готов к вязанию.
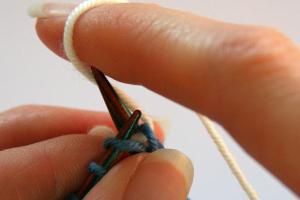
5. Move the working yarn around the tip of the needle to knit the stitch. Keep hold of the tail...
5. Перекинуть рабочую пряжу вокруг кончика спицы чтобы связать петлю. Продолжать держать хвостик...
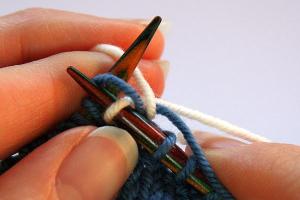
6. ...so that it isn't picked up by the needle and incorporated into the stitch.
6. ...так что он не подобрался спицей и не прошел в петлю.
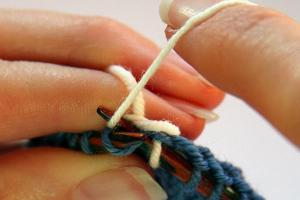
7. Keep hold of the tail as you work the second stitch, and allow the working yarn to catch it against the fabric between the two stitches. Pull gently on the two ends of yarn at the join to make it neater.
7. Продолжать держать хвостик пока вы вяжете вторую петлю и позволить рабочей пряже зацепиться между двумя стежками. Мягко потянуть за оба конца пряжи чтобы сделать соединение аккуратнее.
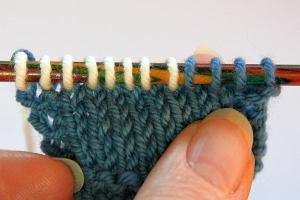
8. The neat color change from the front.
8. Аккуратная смена цвета с лицевой стороны.
PURL STITCH, THROWING STYLE
Изнаночная петля THROWING STYLE
1. Work the final stitch in the old color and insert the needle into the next stitch. Drop the old color to the far side (knit side) of your work.
1. Сделать последнюю петлю старым цветом и ввести спицу в следующую петлю. Перебросить старый цвет от себя на другую сторону вязания вашей работы.
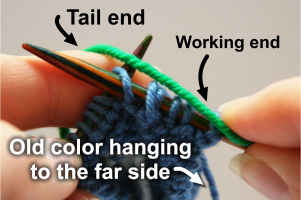
2. Lay the tail end of the new color between the needle tips, with the tail end away from you.
2. Положить кончик нового цвета между кончиками спиц, концом от себя.
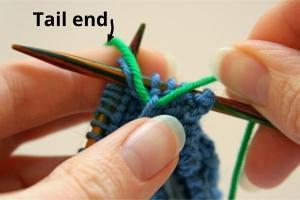
3. Hold onto the tail of the new color with the left hand (I clamp it between my first and second fingers). Bring the old color from the far side of the work, over the top of the new color, and hold it firm with your left thumb.
3. Держать хвостик новой пряжи левой рукой (я зажимаю между первым и вторым пальцами). Взять пряжу нового цвета с дальней стороны работы, накинуть сверху на новый цвет и держать крепко большим пальцем левой руки.
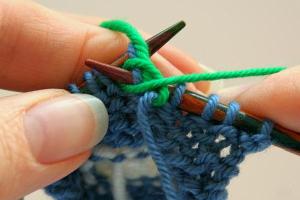
4. Purl the stitch with the working end of yarn, making sure that the tail end is held out of the way...
4. Связать изнаночную петлю рабочим концом пряжи, убедиться что кончик пряжи в стороне...
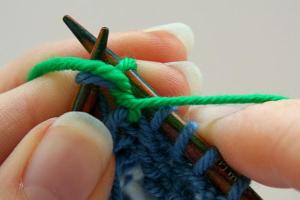
5. ...so that it isn't picked up by the needle and incorporated into the stitch.
5. ...так что он не подобран спицей и не включен в петлю.
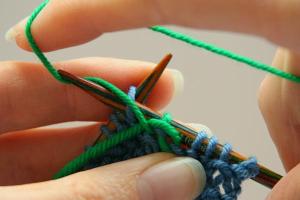
6. Keep the tail end of yarn down as you work the second stitch, and allow the working yarn to catch it against the fabric between the two stitches. Pull gently on the two ends of yarn at the join to make it neater and firmer.
6. Удерживать кончик пряжи внизу пока вы вяжете вторую петлю и позвольте рабочей нити закрепиться между двумя петлями. Мягко потянуть за два конца пряжи чтобы сделать соединение прочным и аккуратным.
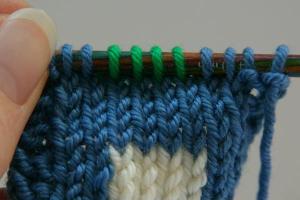
7. Front of the work, with a neat color change.
7. Лицевая сторона с аккуратной сменой цвета.
KNIT STITCH, PICKING STYLe
Лицевая петля PICKING STYLE
1. Work the final stitch in the old color and insert the needle into the next stitch. Drop the old color to the far side (purl side) of your work.
1. Сделать последнюю петлю старым цветом и ввести спицу в следующую петлю. Перекинуть нить старого цвета на дальнюю (изнаночную) сторону работы.
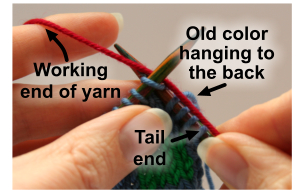
2. Pick up the new color in your right hand, with the tail end in the palm of your hand. Hold the working end of the yarn in your usual way and lay the yarn between the two needle tips.
2. Взять нить нового цвета правой рукой, концом на ладонь. Держать рабочий конец пряжи вашим обычным способом и положить пряжу между кончиками спиц.
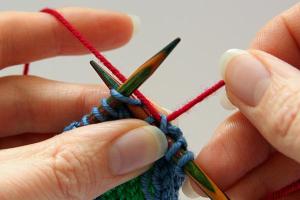
3. Bring the old color from the far side of the work over the new color. Hold in place with the left thumb.
3. Перенести старый цвет с дальней стороны работы поверх нового цвета. Придерживать перенесенную нить большим пальцем левой руки.
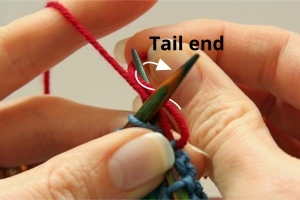
4. Holding the working end of the new yarn above and to the left of the right hand needle, move the tail end over the needle in an anti-clockwise direction. Keep hold of the tail with your right hand.
4. Удерживая рабочий конец новой пряжи выше и левее спицы в правой руке, завести кончик пряжи вокруг спицы по часовой стрелке. Продолжать удерживать хвостик правой рукой.
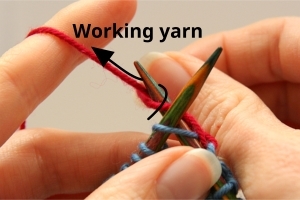
5. Move the working end of yarn around the right hand needle as if to knit, but instead of forming the stitch...
5. Переместить рабочий конец пряжи вокруг правой спицы как будто вы вяжете, но вместо формирования петли...
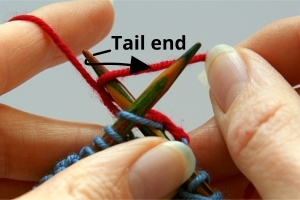
6 ...pull the tail end of yarn down between the yarn and the left hand side of the needle.
6. ...потянуть хвостик пряжи вниз между пряжей и левой стороной спицы.
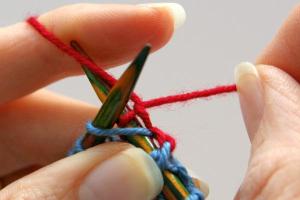
7. Keep pulling the tail down until it reaches the base of the stitch.
7. Продолжать тянуть хвостик пока он не достигнет основания петли.
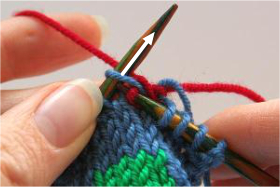
8. Knit the stitch as usual.
8. Вязать петлю как обычно.
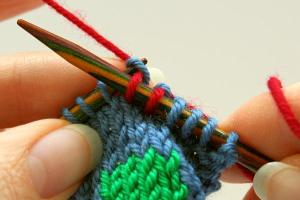
9. Knit the second stitch and then neaten the join by gently pulling the tails of yarn.
9. Вяжите вторую петлю и потом выровняйте соединение мягким потягиванием хвостика пряжи.
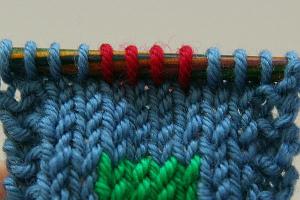
10. Neat stitches from the front.
10. Аккуратные петли с лицевой стороны.
PURL STITCH, PICKING STYLE
Изнаночная петля, PICKING STYLE
1. Work the final stitch in the old color and insert the needle into the next stitch. Drop the old color to the far side (knit side) of your work.
1. Сделать последнюю петлю старым цветом и ввести спицу в следующую петлю. Перебросить нить старого цвета на дальнюю (лицевую) сторону работы.
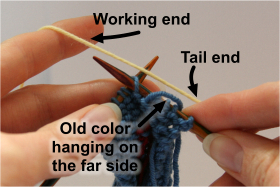
2. Pick up the new color in your right hand, holding the tail end into the palm. Pick up the working end of the yarn in your usual way and lay the yarn between the two needle tips.
2. Взять нить нового цвета в правую руку, зажимать хвостик в ладони. Взять рабочий конец пряжи вашим обычным способом и положить пряжу между кончиками спиц.
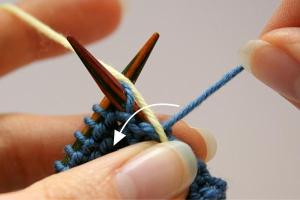
3. Bring the old color from the far side of the work over the new color. Hold in place with the left thumb.
3. Перенести нить старого цвета с дальней стороны работы поверх нового цвета, прижать её большим пальцем левой руки.
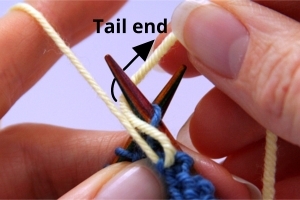
4. With the working end of yarn held to the left of the right hand needle, move the tail end under and behind the needle. Keep hold of it.
4. C рабочим концом пряжи удерживаемым слева праворучной спицы (спицы в правой руке), переместить кончик пряжи под и за спицу. Продолжать удерживать её.
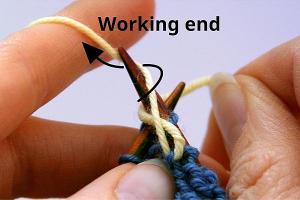
5. Move the working end of yarn around the right hand needle as if to purl, but instead of forming the stitch...
5. Переместить рабочий конец пряжи вокруг спицы в правой руке как если вы вяжете изнаночную петлю, но вместо формирования петли...
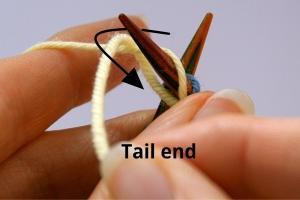
6. ...pull the tail end of yarn down between the yarn and the left hand side of the needle.
6. ...потянуть хвостик пряжи вниз между пряжей и левой стороной спицы.
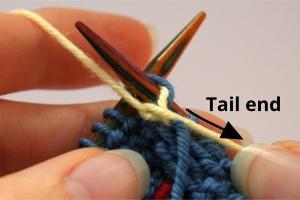
Keep pulling the tail down until it reaches the base of the stitch.
Продолжать тянуть хвостик вниз пока он не достигнет основания петли.
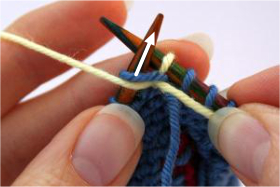
Purl the stitch, holding the tail out of the way.
Вязать изнаночную петлю, удерживая кончик в стороне.
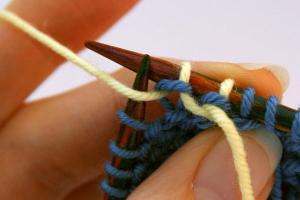
Purl the second stitch and then gently pull the tails of yarn at the join to tidy the stitches.
Вязать изнаночной вторую петлю и потом мягко потянуть хвостики пряжи чтобы сделать петли аккуратными.
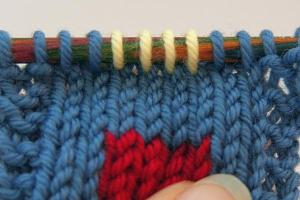
Neat stitches from the front.
Аккуратные петли с лицевой стороны.
I'd love to hear any thoughts or problems you have about this join - send an email to hello@yarnsub.com or leave a comment on the YarnSub Facebook page.


