Altered-book � ����� �����-��� .�� �� Nadya Tana Lifa ������ ������ �� � ������...
��������� ����. ����� ��������� � ������ �� ������ - (0)��������� ����. ����� ������� � ������ �� ������ �������������� ���������
��������� ������ ������ - (0)��� ���, ��� ���������� ������, ���������, ���������� ����� ���� ��� ��������:1. 2. 3. 4. 5.
��������� �������. �������� ���������� �� ������� - (0)����������� ������������� �������, �� ������ ��? ���� �������� ������, �� ����� ��� �����������, ...
������� � ���������� ������. ����� ��� ����� - (0)������� � ���������� ������. ����� ��� ����� �������������� ���������
(� ��� 215231 ������� �� ����� ������������ ����� �����)
������ ����� ������������ ↓
23 ������� 8 ����� ������ ��� ���������� �������� ������ ���������� ��������� ���� ����� ������� ���� �������� ������� ��� �������� ������� ���� �������� �������� �������� ������� �������� ��������� ���� ������� ����� ������ �� �� ������� ������� ����� ��� �������� ����� ������ ������ ������ �����-����� ������� ������ ������ ����� ��������� ���� ���� ������ ���� ��������� �������� ����� ������� ������
������� - �������� � ������� �� ����� ���. ����� 2 |

�� ���: http://stempeleinmaleins.blogspot.c...angle-card.html

http://frommycraftroom.blogspot.com...holy-night.html
http://pysseltagen.blogspot.com/201...ortvikning.html - �������


http://sandrasscrapsels.blogspot.co...ststerboom.html
http://fotki.yandex.ru/users/dazdra.../406979/?page=1


http://angelwoodcrafts.blogspot.com/2009/12/december-magnolia-licious-highlites.html

http://1littlehedgehog.blogspot.co....og-post_18.html

![]()
![]()
http://stranamasterov.ru/node/114737 http://stranamasterov.ru/node/118906


http://shunya.eto-ya.com/2011/01/28/
http://melange-decor.com/greeting-cards/varegka/

http://sandrasscrapsels.blogspot.com/2010/11/kerstok-kaart.html


http://shunya.eto-ya.com/2011/01/28/

http://min-hobbyblogg.blogspot.com/2008/11/sarah-kay-christmas-preparation.html


![]()
http://mayas-hobbyblogg.blogspot.com/2011/12/3ndypapir-challenge.html http://stranamasterov.ru/node/115412 - ��


http://tanya-flower.blogspot.com/2011/12/magic-box_25.html

http://monika-jot.blogspot.com/2011/12/rozetkowy-mobil.html

�������� ���: http://angelwoodcrafts.blogspot.com/2011/12/my-christmas-living-room.html
![]()
http://stranamasterov.ru/node/124265

http://maxafly.blogspot.com/2010/12/blog-post_28.html

http://anita-izendoorn.blogspot.com/2011/10/boekenlegger-in-kerst-sferen.html
![]() ����� ���:http://stranamasterov.ru/node/288844
����� ���:http://stranamasterov.ru/node/288844
�������. ���������� ���������
")
")
http://www.dv-reclama.ru/inter/blogs/detail.php?blog=urlena&post_id=4636


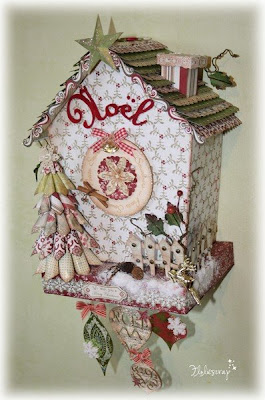

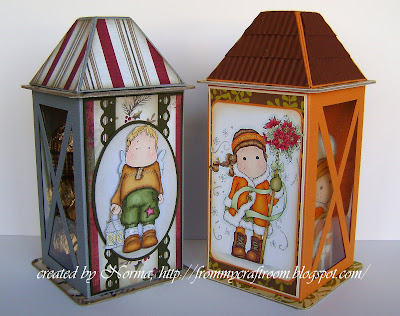
�� ���: http://frommycraftroom.blogspot.com/2009/12/tutorial-lantern-gift-box.html


����� �� ���: http://www.zrobysama.com.ua/?p=7702
������ �� � ��������: http://maria-n-art.blogspot.com/2009/11/blog-post_22.html


�����: http://sandrasscrapsels.blogspot.com/2011/11/arreslee-kaart.html


�� ���: http://blog.scrapbooking.com.ua/?p=10022


�� ���: http://stempeleinmaleins.blogspot.com/2010/11/mini-easel-adventskalender.html
http://frommycraftroom.blogspot.com/2009/10/advent-calendar-box.html
http://frommycraftroom.blogspot.com/2010/12/sending-christmas-hugs-advent-calendar.html

http://mayas-hobbyblogg.blogspot.com/2008/11/papirgleder.html
������-��������� ��� �������� � �����������:

�� �� ����, �� � ������ ����������
 http://mayas-hobbyblogg.blogspot.com/2009/10/sukkersott-58.html
�������� �����: http://min-hobbyblogg.blogspot.com/2009/11/adventskalender-advent-calendar.html

http://mayas-hobbyblogg.blogspot.com/2009/12/dt-hanglar-stanglar-julekalender-advent.html


http://tanya-flower.blogspot.com/2010/11/blog-post_18.html

http://asyamischenko.blogspot.com/2011/12/blog-post_12.html
� ��� ���� ����:


������ � �� ���: http://extremecards.blogspot.com/2008/07/changing-picture-volvelle.html

������ ���: http://min-hobbyblogg.blogspot.com/2010/01/innpakning-for-vinflaske-packaging-for.html

http://cstoen.blogspot.com/2012/08/hjertebodens-juleblogg-vintagflasketag.html
����������� �������...
����� ��������� "�������� � ������������ ��������":
����� 1 - ���������� ���������� ������������ �����
����� 2 - �� ������ ���������
...
����� 21 - ������� - �������� �� ����� ��� � ���������. ����� 1.
����� 22 - �������� ������� - ������� ������� (����� ������� ���������)
����� 23 - ������� - �������� � ������� �� ����� ���. ����� 2.
����� 24 - �������:���������� ��������. ����� 3. Pop-up
����� 25 - ������� ������� - ���� ����������
...
����� 45 - �������� ������ �� Kellie Reynolds
����� 46 - �������� ������ �� ��������� - ���� � ��������
����� 47 - ����� ��� �����������
����� ��������� "��������":
����� 1 - ��������
����� 2 - �������� �� ������� ��
...
����� 23 - �����������. ����������� �� ������ Pion Design
����� 24 - ���������� ������� �������� �� debby
����� 25 - ������� - �������� � ������� �� ����� ���. ����� 2
|
�����: �� �������� |
������� ����������� ���������� |
������� |

����� ��������� "�����":
����� 1 - ������� �������� ��������
����� 2 - ������ � ���������
...
����� 5 - ��������
����� 6 - �������� ����������
����� 7 - ������� ����������� ����������
|
�����: �������� |
���������� ������� �������� �� debby |
����� ��������� "��������":
����� 1 - ��������
����� 2 - �������� �� ������� ��
...
����� 22 - ��������-������ � �������
����� 23 - �����������. ����������� �� ������ Pion Design
����� 24 - ���������� ������� �������� �� debby
����� 25 - ������� - �������� � ������� �� ����� ���. ����� 2
|
�����: �������� |
�����������. ����������� �� ������ Pion Design |
������ ���� ������� ��� ��������) �� ����� ��������, ��� ���� ������������ � ������ ������ ����� ��������, �������� �����... ��� ��� ������, ��� �� ������ �����, ������� �� ���������� ���, ����� ������� ������ � ��� �����)))) � ��� ���, ������, �� ����� ����������� � �������� ������� �� �����, � ���� ����������) � ��� ��� ��������� ������� �� ������ ������������ ������ �� ������ Pion Design.
��� ������ - ����� �������� �� ����, ��� ��� ����������� ��������� � ����. ����� � ��� ��������� ���������, ������������� ����������� � ������� � ����������! �������� blog.piondesign.se


����� ��������� "��������":
����� 1 - ��������
����� 2 - �������� �� ������� ��
...
����� 21 - �������� ��������� � ����� ��������
����� 22 - ��������-������ � �������
����� 23 - �����������. ����������� �� ������ Pion Design
����� 24 - ���������� ������� �������� �� debby
����� 25 - ������� - �������� � ������� �� ����� ���. ����� 2
����� ��������� "���������":
����� 1 - ����������
����� 2 - ����� � ���������
...
����� 7 - ��������� � ����� �����-���. ��
����� 8 - ��������� �������.�����.
����� 9 - �����������. ����������� �� ������ Pion Design
����� 10 - ����������!!! ������ ����� ��������!!!
����� 11 - ��������� ���������. �����������
����� 12 - ���������� �� ������� � ����� ������ ������. ������-�����
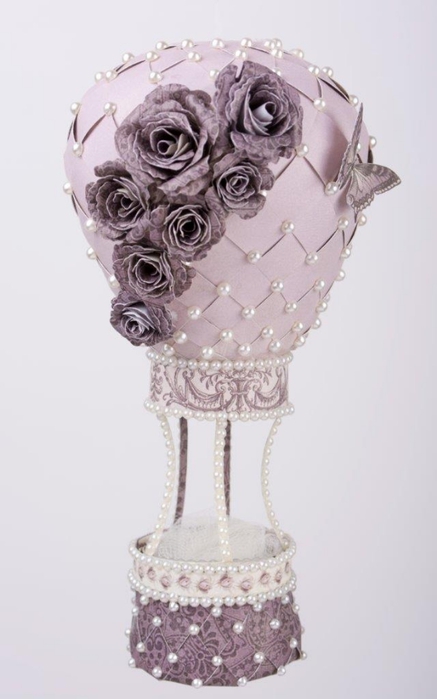
����� 13 - ��������� ����. ����� ��������� � ������ �� ������
����� ��������� "��������, ����, ������":
����� 1 - ������������ ��������
����� 2 - ����������� ��� ��� ����� � ��������
����� 3 - �����������. ����������� �� ������ Pion Design
|
�����: �������� ���� |
����������� ��� ��� ����� � �������� |
������� |

����� ��������� "��������, ����, ������":
����� 1 - ������������ ��������
����� 2 - ����������� ��� ��� ����� � ��������
����� 3 - �����������. ����������� �� ������ Pion Design
|
�����: �� ���� �������� |
��������-������ � ������� |
������� |
����� ��������� "��������":
����� 1 - ��������
����� 2 - �������� �� ������� ��
...
����� 20 - �� �� �������� ������������ ��������.
����� 21 - �������� ��������� � ����� ��������
����� 22 - ��������-������ � �������
����� 23 - �����������. ����������� �� ������ Pion Design
����� 24 - ���������� ������� �������� �� debby
����� 25 - ������� - �������� � ������� �� ����� ���. ����� 2
|
�����: �� �������� ���� �������� |
�� �� �������� ������������ ��������. |
���� ������-����� �� �������� ����������� ��������


����� ��������� "��������":
����� 1 - ��������
����� 2 - �������� �� ������� ��
...
����� 18 - �������� ��� ����������� �4
����� 19 - ����� ���������� ��������
����� 20 - �� �� �������� ������������ ��������.
����� 21 - �������� ��������� � ����� ��������
����� 22 - ��������-������ � �������
����� 23 - �����������. ����������� �� ������ Pion Design
����� 24 - ���������� ������� �������� �� debby
����� 25 - ������� - �������� � ������� �� ����� ���. ����� 2
|
�����: �� �������� |
����� ���������� �������� |
����� ��������� "��������":
����� 1 - ��������
����� 2 - �������� �� ������� ��
...
����� 17 - ���������� 6 ����������� ������ ������
����� 18 - �������� ��� ����������� �4
����� 19 - ����� ���������� ��������
����� 20 - �� �� �������� ������������ ��������.
����� 21 - �������� ��������� � ����� ��������
...
����� 23 - �����������. ����������� �� ������ Pion Design
����� 24 - ���������� ������� �������� �� debby
����� 25 - ������� - �������� � ������� �� ����� ���. ����� 2
|
�����: �� ���� �������� |
��� �� �� ����������� � ����������(����� ���������) |


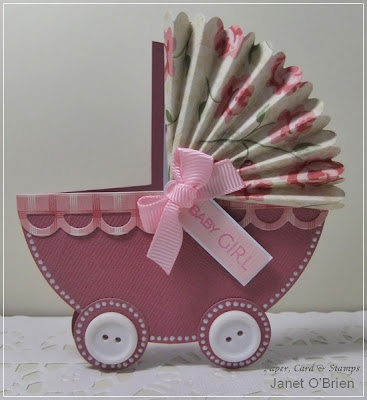
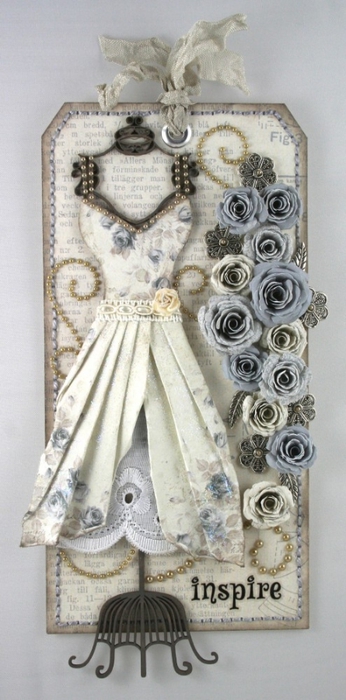
 Today I want to show you three cards that I have made. ������� � ���� �������� ��� ��� �����, ������� � ������ � ���. They are all Confirmand Cards, something that are very popular here in Norway. ��� ��� ���������� �����, ���-������ ����� ��������� � ��������. I have already been asked to make a few:) ���� ��������� ��� ��� ���������� ����:)
 It was a bit hard to figure out how to show the inside the best, but first comes the side where you write your greetings. ��� ���� �������� ������ ������, ��� ���������� � ������, �� ������� �������� ������� wherefores ��� �������� ������������.
 On the other side I have made a criss-cross envelope to put the money in. � ������ �������, � ������ �����-������� ��� ������� ������� ������ �����
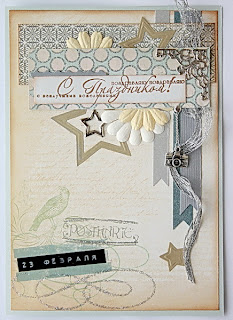
 Here is the second card: ��� ������ �����:
 And under you can see how you can place the money. � ��� ������ �� �� �������, ��� �� ������ ���������� ������. It is quite easy:) I have fasten the paper with brads. ��� ����� ������:) � ���� ����� ������ � ��������.
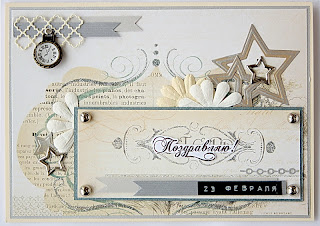
 Here comes the third card: Here Comes ������� �����:
 I have made the outside match the inside. � ������ �� ��������� ����� ������. When I cut the paper for the card it is four cm longer than my normal card (15 cm). ����� � ������� ������ ��� ���� ��� ������ �� �������, ��� ��� ���������� ����� (15 ��). So this measures 15x19cm. ��� ��� ��� 15x19cm ����. Then I fold it in the middle as usual, and also at 15 cm down. ����� � ������� ��� � ��������, ��� ������, � �����, ��� 15 �� ����. The remaining 4 cm is folded up. ���������� 4 �� � ���������.
 The images are from Whiff of Joy . ����������� �� ��������� Joy .
 I hope you got some tip and inspiration!:) Thank you for looking. � �������, �� �������� ����� �� � �����������:) ������� �� �������.
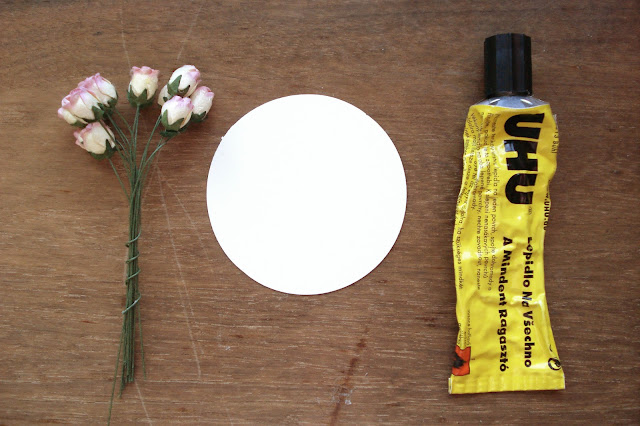
 Hi! ������! Today I will show you how I made an Easter giftbox. ������� � ������ ���, ��� � ������ Giftbox �����. Under you can see the papers I used, pluss the gorgeous stamp illustrated by Norma Fickel for Whiff of Joy . ��� ������ ����� ��������������, � ����� ������������ ����� �������������� ����� Fickel ��� ��������� Joy .
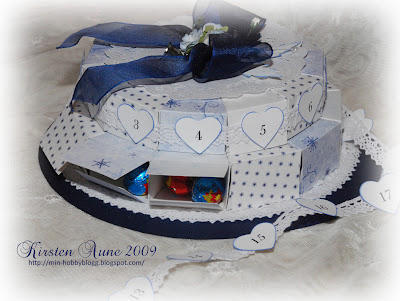
 Here are the measurements for the box. ��� ��������� ��� �������. With this measures I will have a box at the size 11x11x3,5 cm. � ���� ������ ���� ���� � ���� �� ������ ������� 11x11x3, 5 ��.

 Under you see how the papers looks like after I have inked and sewed them. ���� �� ������, ��� ������ �������� ��� ����� ���� ��� � �������� ��� � ���� �����������.
 I use some adhesive tape to fasten them on all four sides. � ��������� ����� ���-�� ����� ��� ������� ����������� �� ���� ������� ������.
 And now for the cover: � ������ ��� �������:
 I have put them together and seved the cover aswell. � �� ������ ������ � seved �����. Then I place it on the side of the box, to see where I am going to fasten them together. ����� � ���������� ��� �� ������� �������, "����� �������, ��� � ��������� ������ ��� ����������� ������.
 I use the strips I made with the word window punch, and eight brads. � ��������� ������ � ������ � ����� ���� �����, ����� � ������. Make sure you have some space between the to parts, so it also can bend. �������� ���-�� ������ �� ��� ������������ ����� ����� ���������, ������� ��� ����� ����� ���������.
 I also use the strips with some smaller brads to fasten the sides together. ����� � ��������� ������ � ���-�� �������� �������� ��� ������� �������� ������. Under you see the inside of the box. ���� �� ������ ������ �������. I could also have fasten them on the outside... � ��� �� ����� ��� ������ ����������� �� ������� ������� ...
 And under you see the outside of the box. � ���� �� ������ �� ��������� �������.
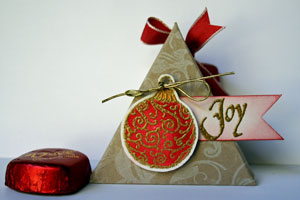
 Now all sides are fastened, and the box is ready to be decorated. ������ ��� �������� ����������, � ������� ������ ������ ��� ���������.
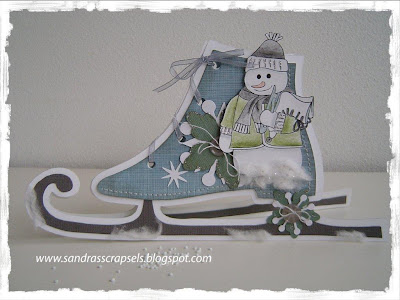
 And here it is! � ��� ���! The girl with the lamb is coloured with Distress Ink, re-inkers on water colour paper 300g. ������� � �������� �������� �������� ������ �������� inkers �� ���� 300 � ������� ������. I have used a 00 size brush. � ���� �������������� ������ 00 �����.
 A closeup: ������� ������:
 The whole cover: ����� ����������:
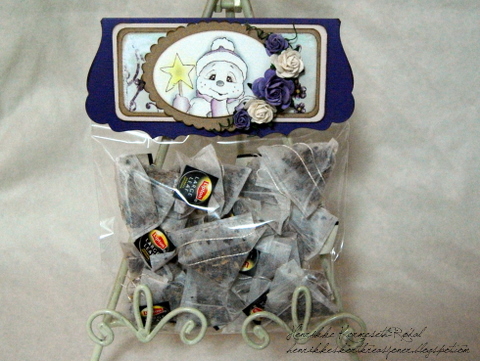
 And inside some yummy chocolate-balls filled with milkcream;)) � ������ ���-�� ������� ���������-���, ����������� ������;))
 Here you see the box from the other side, with the strips. ����� �� ������ ���� � ������ �������, � ���������. I think they made a spesial decoration. � �����, ��� ��� ������� ����������� ���������.
 Thank you so much for looking at my tutorial today! ������� ��� ����� ��� ������, ��� ��� ������� �������! Hope you got inspired! �������, ��� �� �������� �������������!
�����: �� ���� �������� ��������� |
��������� |
�����: �������� |
�������� ��� ����������� �4 |
����� ��������� "��������":
����� 1 - ��������
����� 2 - �������� �� ������� ��
...
����� 16 - �������� ������ �� ��� � ��������� ������ ������
����� 17 - ���������� 6 ����������� ������ ������
����� 18 - �������� ��� ����������� �4
����� 19 - ����� ���������� ��������
����� 20 - �� �� �������� ������������ ��������.
...
����� 23 - �����������. ����������� �� ������ Pion Design
����� 24 - ���������� ������� �������� �� debby
����� 25 - ������� - �������� � ������� �� ����� ���. ����� 2
|
�����: �������� |
���������� 6 ����������� ������ ������ |
����� ��������� "��������":
����� 1 - ��������
����� 2 - �������� �� ������� ��
...
����� 15 - ���� ��� ������� ��������
����� 16 - �������� ������ �� ��� � ��������� ������ ������
����� 17 - ���������� 6 ����������� ������ ������
����� 18 - �������� ��� ����������� �4
����� 19 - ����� ���������� ��������
...
����� 23 - �����������. ����������� �� ������ Pion Design
����� 24 - ���������� ������� �������� �� debby
����� 25 - ������� - �������� � ������� �� ����� ���. ����� 2
|
�����: �������� |
�������� ������ �� ��� � ��������� ������ ������ |
������� |
����� ��������� "��������":
����� 1 - ��������
����� 2 - �������� �� ������� ��
...
����� 14 - �������� "������ ������"
����� 15 - ���� ��� ������� ��������
����� 16 - �������� ������ �� ��� � ��������� ������ ������
����� 17 - ���������� 6 ����������� ������ ������
����� 18 - �������� ��� ����������� �4
...
����� 23 - �����������. ����������� �� ������ Pion Design
����� 24 - ���������� ������� �������� �� debby
����� 25 - ������� - �������� � ������� �� ����� ���. ����� 2
|
�����: �� ���� �������� |
���� ��� ������� �������� |
����� ��������� "��������":
����� 1 - ��������
����� 2 - �������� �� ������� ��
...
����� 13 - ������� - ������� (��������, ���������) ��� ������������� � ������� (����� ��������)
����� 14 - �������� "������ ������"
����� 15 - ���� ��� ������� ��������
����� 16 - �������� ������ �� ��� � ��������� ������ ������
����� 17 - ���������� 6 ����������� ������ ������
...
����� 23 - �����������. ����������� �� ������ Pion Design
����� 24 - ���������� ������� �������� �� debby
����� 25 - ������� - �������� � ������� �� ����� ���. ����� 2
|
�����: �������� |
�������� "������ ������" |
����� ��������� "��������":
����� 1 - ��������
����� 2 - �������� �� ������� ��
...
����� 12 - ������� �������� - ������� ��� �����������
����� 13 - ������� - ������� (��������, ���������) ��� ������������� � ������� (����� ��������)
����� 14 - �������� "������ ������"
����� 15 - ���� ��� ������� ��������
����� 16 - �������� ������ �� ��� � ��������� ������ ������
...
����� 23 - �����������. ����������� �� ������ Pion Design
����� 24 - ���������� ������� �������� �� debby
����� 25 - ������� - �������� � ������� �� ����� ���. ����� 2
|
�����: �������� �� |
������� - ������� (��������, ���������) ��� ������������� � ������� (����� ��������) |
�������� � ������������ ������� �������� �����, �������� � ����� � ������� ��� ���� ��������� ���������� �������� � ��������� � �������� ��������-������������, �����, ��� ���� ����������.
1.
 http://vinograd08.blogspot.com/2009/09/blog-post_04.html
����� ��������� "��������":
����� 1 - ��������
����� 2 - �������� �� ������� ��
...
����� 11 - ��������� �������� Becca Feeken
����� 12 - ������� �������� - ������� ��� �����������
����� 13 - ������� - ������� (��������, ���������) ��� ������������� � ������� (����� ��������)
����� 14 - �������� "������ ������"
����� 15 - ���� ��� ������� ��������
...
����� 23 - �����������. ����������� �� ������ Pion Design
����� 24 - ���������� ������� �������� �� debby
����� 25 - ������� - �������� � ������� �� ����� ���. ����� 2
|
�����: �������� ��������� |
������� �������� - ������� ��� ����������� |
����� ��������� "��������":
����� 1 - ��������
����� 2 - �������� �� ������� ��
...
����� 10 - ��������� �������.�����.
����� 11 - ��������� �������� Becca Feeken
����� 12 - ������� �������� - ������� ��� �����������
����� 13 - ������� - ������� (��������, ���������) ��� ������������� � ������� (����� ��������)
����� 14 - �������� "������ ������"
...
����� 23 - �����������. ����������� �� ������ Pion Design
����� 24 - ���������� ������� �������� �� debby
����� 25 - ������� - �������� � ������� �� ����� ���. ����� 2
|
�����: �������� |
��������� �������� Becca Feeken |
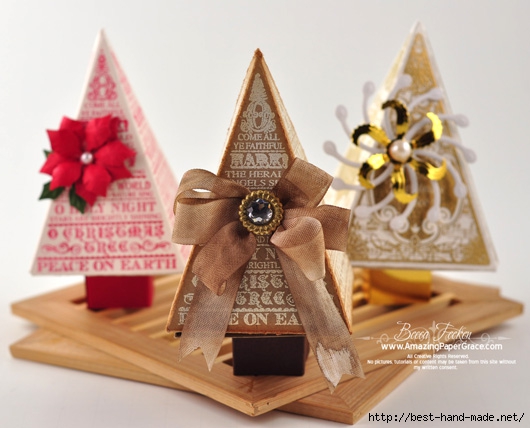
��� ��� �� ����� � ����� ��������� - Becca Feeken, ������� �� ��������� � �� ���� - ��� ������ �����!
http://www.amazingpapergrace.com/

����� ��������� "��������":
����� 1 - ��������
����� 2 - �������� �� ������� ��
...
����� 9 - ����������� ���� � 23 �������
����� 10 - ��������� �������.�����.
����� 11 - ��������� �������� Becca Feeken
����� 12 - ������� �������� - ������� ��� �����������
����� 13 - ������� - ������� (��������, ���������) ��� ������������� � ������� (����� ��������)
...
����� 23 - �����������. ����������� �� ������ Pion Design
����� 24 - ���������� ������� �������� �� debby
����� 25 - ������� - �������� � ������� �� ����� ���. ����� 2
|
�����: �������� |
��������� �������.�����. |
����� ��������� "��������":
����� 1 - ��������
����� 2 - �������� �� ������� ��
...
����� 8 - �������� ��������
����� 9 - ����������� ���� � 23 �������
����� 10 - ��������� �������.�����.
����� 11 - ��������� �������� Becca Feeken
����� 12 - ������� �������� - ������� ��� �����������
...
����� 23 - �����������. ����������� �� ������ Pion Design
����� 24 - ���������� ������� �������� �� debby
����� 25 - ������� - �������� � ������� �� ����� ���. ����� 2
����� ��������� "���������":
����� 1 - ����������
����� 2 - ����� � ���������
...
����� 6 - �� � ����� �����-�����������
����� 7 - ��������� � ����� �����-���. ��
����� 8 - ��������� �������.�����.
����� 9 - �����������. ����������� �� ������ Pion Design
����� 10 - ����������!!! ������ ����� ��������!!!
����� 11 - ��������� ���������. �����������
����� 12 - ���������� �� ������� � ����� ������ ������. ������-�����
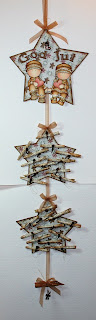
����� 13 - ��������� ����. ����� ��������� � ������ �� ������
|
�����: ���� �������� |
���������� ��� ���������� �������� |
����� ��������� "������� ����, ������� � ������":
����� 1 - ����� �� ����������� ���������. ������-�����
����� 2 - ��� ������� ������� ������� ������
...
����� 8 - ��������-�������
����� 9 - ��������-���������� �� �������� ���������.
����� 10 - ���������� ��� ���������� ��������
����� 11 - ������� ����������
����� 12 - ������� �������
����� 13 - ���� ��� ��!!!
����� 14 - �������� �� ��������
����� 15 - ��� ������ �������. ��������� �������, ������� ������ � �������� ���������
|
�����: ���� �� ������� �������� |
| ��������: | [2] 1 |


 �� ���: