Цитата сообщения Mosaica
Большая сумка в стиле Коко Шанель
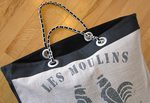
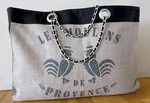
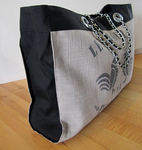
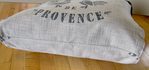
French Market Tote With Coco Chanel Style Chain Handles

High end boutique style that you make yourself! Our French Market Tote will make a bold fashion statement as you stroll the open air markets of Provence, France... or the aisles of your local farmer's market. Load it up with fresh baguettes and bouquets of spring flowers. The pièce de résistance is the great Coco Chanel style chain and leather (faux leather in our case) handles.
Our thanks to the co-sponsors of this week's projects and technique tutorials: Fabric.com and Simplicity. Each project is a carefully designed synergy of unique trims and dramatic fabric. If we do say so ourselves, the end results are stunning! But more than that, each is also a wonderful exercise in how to blend trims and fabrics to achieve a designer look. Our goal is to show you how to look at combinations from a new angle, how to mix textures, how to look for unexpected pairings, how to think out of the box.
To successfully create the trendy look of today's bag, the right fabric and the awesome chain trim is a must.
To mimic a set of Coco Chanel style handles, we used ½" Silver Tone Chain with Black Faux Leather from Simplicity's Project Runway Trim Collection.
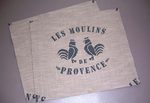
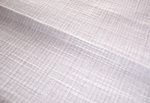
For the fabric, we used Vintage French Feedsack Beaudelaire Jacquard Black from Fabric.com, which is a woven jacquard with a burlap-like finish and an absolutely to-die-for motif. The construction style and fabric cut sizes listed below are all customized to best work with this fabric. If you chose something different, you will likely need to adjust your sizes somewhat.
Finished size: 17" high x 20" wide x 5" deep.
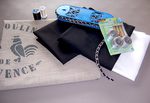
Sewing Tools You Need
Fabric and Other Supplies


Getting Started
-
Download and print the French Market Tote Template-1 and French Market Tote Template-2.
IMPORTANT: Each pattern consists of ONE 8½" x 11" sheet. You must print the PDF files at 100%. DO NOT SCALE to fit the page.
-
Cut out each of the pattern pieces along the solid lines.
-
Butt together the pattern pieces, using the printed arrows as your guide. Do NOT overlap. Tape in place.
-
From the fabric for the bag exterior (Vintage French Feedsack Beaudelaire Jacquard Black in our sample), carefully fussy cut TWO 21" wide x 18" high panels.
NOTE: The motif should be centered side to side with the top of the design 3½" from the upper raw edge and the bottom of the design 4" from the bottom raw edge.

-
From the fabric for the bag lining (Kona 100% Cotton Broadcloth in Kona Dimensions Black in our sample), cut the following:
Two 21" x 18" panels
One 10" x 16" rectangle for the pocket
Use the assembled pattern to cut TWO side panels

-
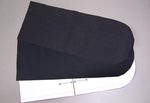
From the fabric for the bag side inserts and top band (Artee 100% Cotton Duck in Black in our sample), cut the following:
TWO 3½" x 26" strips
Use the assembled pattern to cut TWO side panels
-
From the heavyweight fusible interfacing, cut TWO 3½" x 26" strips.
At Your Sewing Machine & Ironing Board
Exterior panels
-
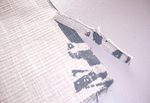
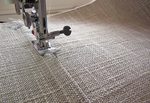
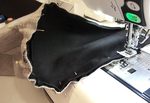
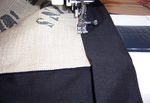
Sew the lower edge of the printed panels together with a flat felled seam, which is the kind of seam you see along the side of your favorite jeans. To make this seam, place the two exterior panels WRONG sides together and pin in place along the bottom edge.
NOTE: BE SURE the two panels are both facing the same way: bottom edge to bottom edge, and top edge to top edge! It may seem silly to make such a big deal about this, but you want to be sure your motif is facing right side UP on both sides of your finished bag. Nothing is sadder than to finish a flat felled seam and then open up your panel to find one design upside down. Well... there are things that are sadder, but this mistake is right up there! Take your time and check your work before you stitch.
-
Using a ¾" seam allowance, stitch along the bottom edge only.

-
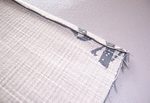
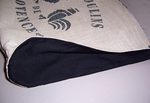
Press the sewn seam flat (ie. not open). Trim ONE side of the seam allowance back to ¼".

-
Fold the un-trimmed side of the seam allowance over the trimmed seam allowance, matching the raw edge to the seam line. Press.

-
Fold this "wrapped" seam once again, fully enclosing and hiding the raw edge. Press.

-
Edgestitch the folded-over seam allowance in place.

-
Here is what your finished flat felled seam should look like. You want it finished with nice straight seams as it will show along the bottom of the bag.

Lining
-
Find the two 21" x 18" lining panels. Place them right sides together and pin in place along the bottom edge.
-
Using a ¾" seam allowance, stitch the panels together.
-
Trim the seam allowance back to ½" and press open and flat.
-
Find the 10" x 16" pocket rectangle.
-
Fold the rectangle in half so it is now 10" x 8". Pin along all three sides, leaving a 3" opening along the 10" raw edge.
-
Using a ½" seam allowance, stitch around all three sides. Remember to pivot at the corners and lock your seam on either side of the 3" opening.
-
Trim the corners at a diagonal. Turn the pocket right side out. Press flat, folding in the raw edges at the opening so they are flush with the sewn seam.
-
Lay the sewn lining flat on your work surface, right side up.
-
Place the pocket on one end of the lining piece so the pocket is centered side-to-side and 4" down from the upper raw edge. The top of the pocket is the folded edge.

-
Edge stitch along the two sides of the pocket and across the bottom, leaving the upper folded edge open. This edgestitching closes the opening used for turning.
Assemble the main body and side panels
-
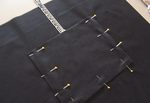
Place the exterior panel and the lining panel right sides together. Pin the pieces together along both long sides.
-
Using a ½" seam allowance, stitch both sides. Turn the unit right side out and press.
-
Find the exterior side panel pieces and lining side panel pieces; the ones you cut using the pattern.
-
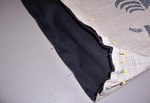
Place one exterior piece right sides together with one lining piece. Pin together along both long sides and around the curved end. Leave the top (the flat end) open.
-
Using a ½" seam allowance, stitch the pieces together.
-
Trim the seam allowance back to approximately ¼" and clip the curve, being careful to not clip through your seam.
-
Turn the panel right side out. Press well.
-
Repeat to create the second side panel.
-
Fold the bag piece lining sides together. Do not make a hard crease along the bottom; it should be slightly bowed.
-
Place one side panel into position, aligning the finished edge of the side panel with the finished edge of the tote bag. It's as if you are placing a lid onto a carton.
-
It's best if you start by matching the center point of the curved bottom of the panel with the flat felled seam of the tote bag, then work up each side toward the top, pinning as you go. Don't be afraid to use plenty of pins.

-
Re-thread your machine with thread in the top to match the side panel (black in our sample) and thread to match the exterior of the bag in the bobbin (tan in our sample). Slide the aligned and pinned seams under your presser foot so you are stitching with the side panel facing up.

-
Edgestitch in place, approximately ⅛" from the edge.
-
Repeat to create the second side.

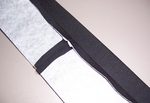
Top band
-
Find the two 3½" x 26" top band strips and the matching 3½" x 26" strips of interfacing.
-
Following manufacturer's recommendations, fuse the interfacing to the wrong side of each strip.
-
Place the interfaced strips right sides together. Pin along both short ends.
-
Using a ½" seam allowance, stitch each short end, creating a loop. Press both seams open.
-
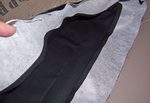
Fold back one edge ½" (folding to the wrong side) all around the loop. Press well.

-
Place the band inside the top of the bag. The right side of the band should be against the lining of the bag. The side seams of the band should be aligned with the top center point of each side panel. Pin the band in place all around.

-
Using a ½" seam allowance, stitch the band in place all the way around the top of the bag.
-
Bring the band up, then fold it over the exterior of the bag. The seam you just sewed now becomes the top finished edge of your bag. Make sure this seam line is even all the way around. Press the folded edge of the bad into place. You should have a 2½" band showing all around. Take the time to measure the band at several points to make sure this reveal is even all around. You can slightly adjust the folded edge if neeed to maintain a straight line.
-
Press again and pin in place.
-
Edgestitch close to the lower folded edge. Then edgestitch around again, this time close to the upper seam.

NOTE: The four side seams of the panels will be thick to stitch across. Go slowly, stopping and hand-cranking over the thick parts if necessary.
Grommets and chain handle
-
Following manufacturer's instructions or our own Sew4Home tutorial on the subject, mark the position of the four snap-on grommets. Ours are centered within the band and the center of each grommet is 6" from the each outside edge of the exterior panel. Looking at it another way, the inside edges of the grommets are 6" apart on center.

-
Again, following manufacturer's instructions and/or our tutorial, place the four grommets.
-
Measure your desired length of Simplicity Chain with Faux Leather. We used 40" of chain. Mark the link closest to the measured length.
-
Using two pairs of needle-nose pliers, twist the link open and separate the chain.
-
Un-weave the faux leather so there is an extra 1" for an overlap to finish. Clip the faux leather at this point.
-
Thread the chain through the grommets to form a continuous handle on either side.
-
Match the link ends and rejoin, using the pliers again to twist the open link back to a closed position.
-
Overlap and glue the leather strand with a dot of craft glue.
-
We have more information as well as lovely step-by-step photos, describing this and other trim techniques in our tutorial: Working With Metal Trims.


Contributors
Project Design: Alicia Thommas
Sample Creation and Instructional Outline: Michele Mishler
Other machines suitable for this project include the Singer 160 and the Pfaff hobby 1142.
Источник: [url]http://sew4home.com/projects/storage-solutio...oco-chanel-style-chain-handles[/url]


