-Поиск по дневнику

Поиск сообщений в Планка

 -Статистика

Статистика LiveInternet.ru: показано количество хитов и посетителей
Создан: 19.07.2012
Записей: 429
Комментариев: 13
Написано: 477

Tiffany Diamonds Quilt

Дневник

Пятница, 05 Июля 2013 г. 00:19 + в цитатник
1 (700x442, 82Kb)
Tiffany Diamonds Quilt
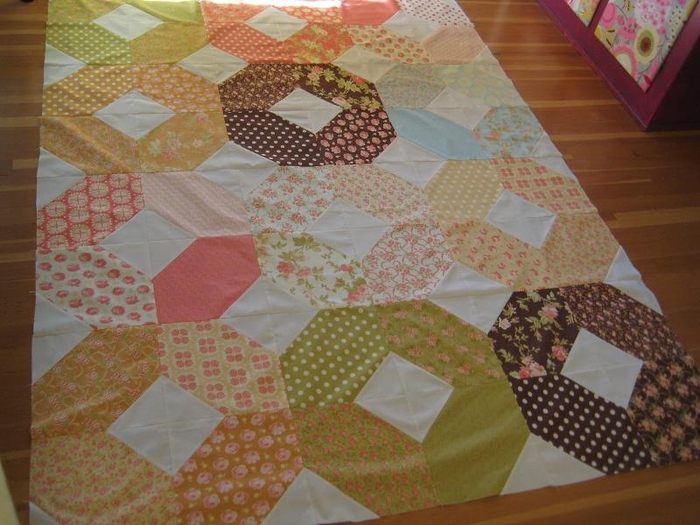
I finally finished the Tiffany Diamonds Quilt! Thanks again, Sarah at Fabric Crush, for the fabulous name :) This is the first quilt that I've tied instead of machine quilting (click the image below for a close-up). Finished Quilt size is 76"x57". Check out the 6-Step Tiffany Diamonds tutorial below!

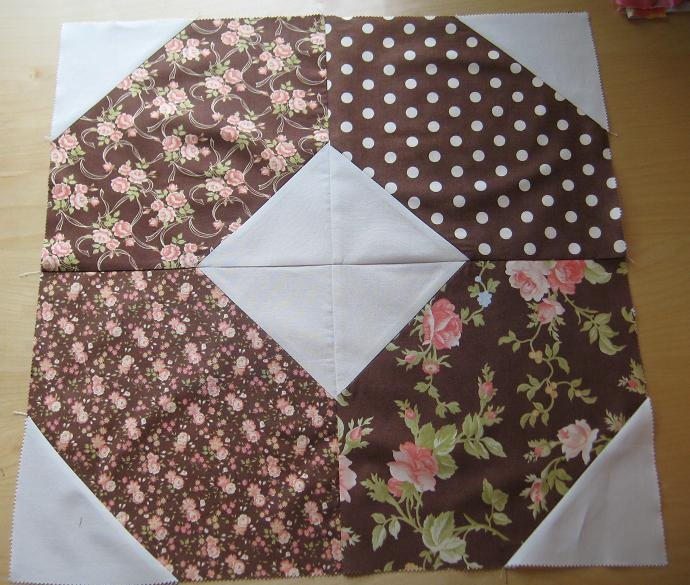
I love the simplicity of this quilt. Working backwards, it is made up of 12 of the following finished blocks:

And the above finished block is made up of 4 of these guys pieced together:
Basically, to make this quilt all you need to learn is how to make the above block. Step 1 (below) will get you started!
Materials:
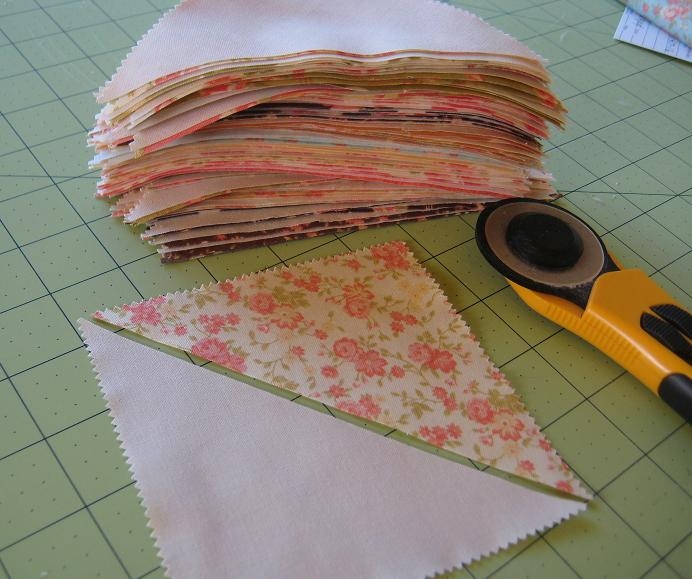
• Total of 48 ten inch squares (1 layer cake pack which has 42 squares + 3/4 yard of fabric cut into 6 squares)
• Total of 96 five inch squares, same print (2 charm packs + 1 fat quarter cut into 6 squares)
• 65”x90” of backing fabric (about 4 yards)
• Batting
Note: 1 yard of fabric = 12 ten inch or 48 five inch squares

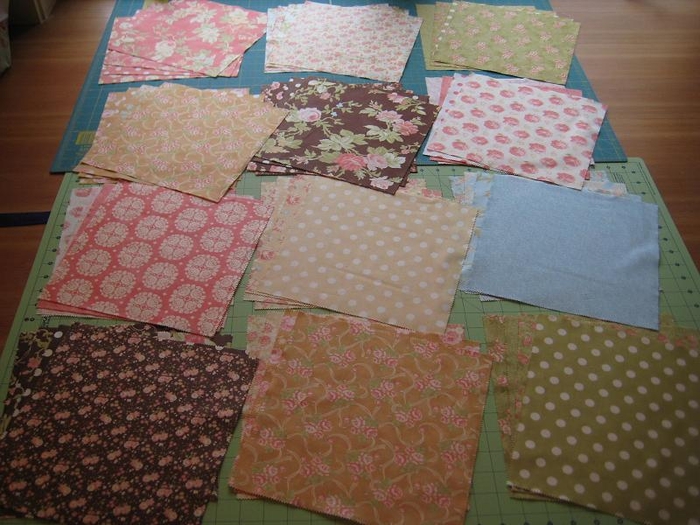
Step 1: Sort all 48 of your ten inch squares into 12 piles of 4 squares each. As shown below, have each pile match with similar colors/prints.

Step 2: For each ten inch square (all 48), do the following Steps A-E:

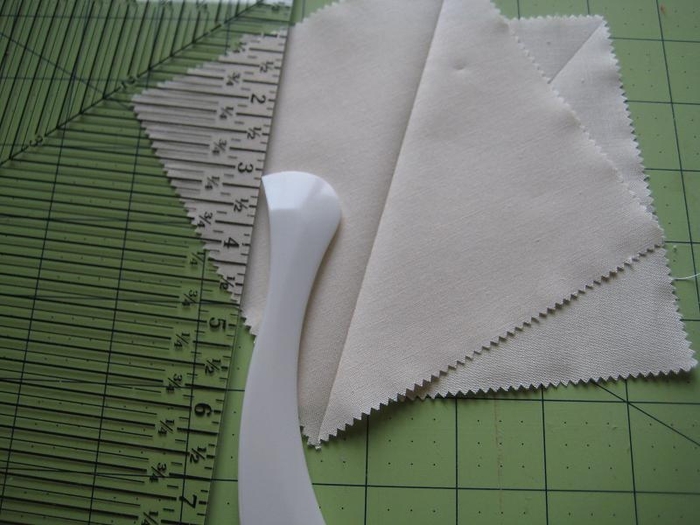
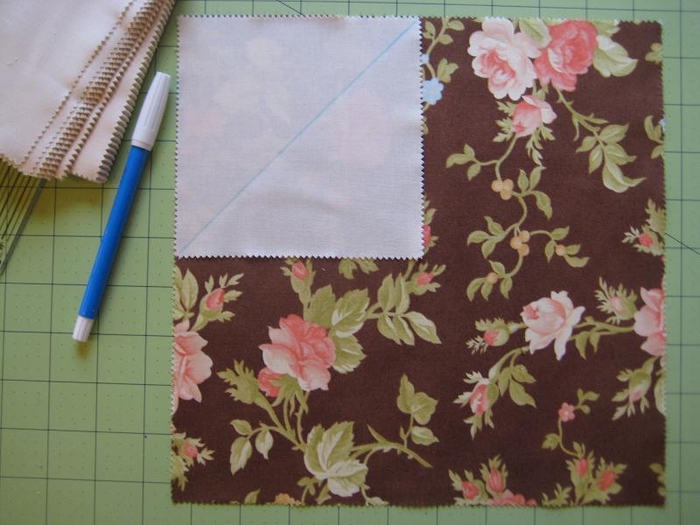
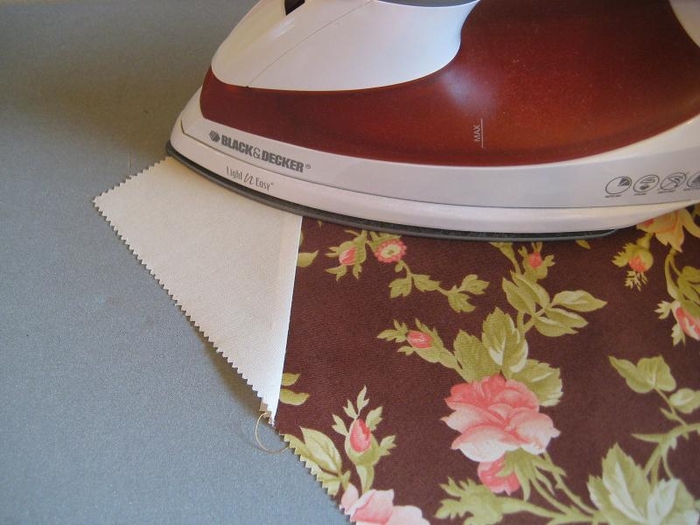
A) Take 2 five inch squares, and on each square mark a diagonal line from corner to corner. As shown below, I used a Hera marker which is a plastic tool that creates a crease on the fabric when pressed with a firm hand. With a Hera marker, you can layer the fabric (~2 layers), and the crease will show through both layers.
If you don’t have a Hera marker, simply draw a line using a ruler and pen, or fold the square diagonal and press with an iron and then unfold.

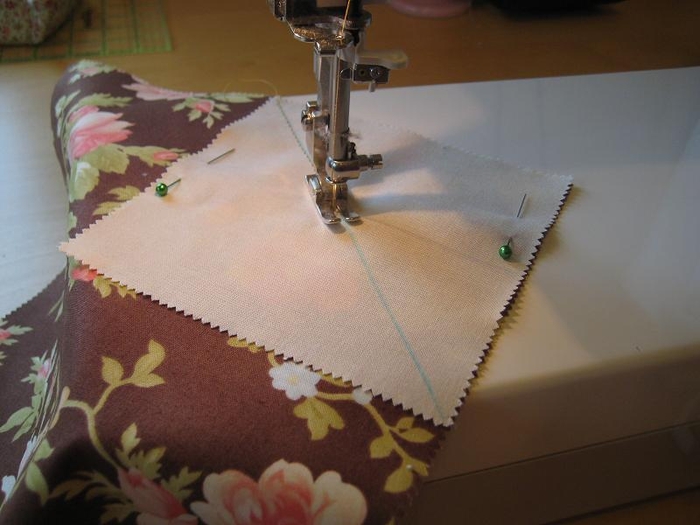
B) Align 1 five inch square along the top left corner of a ten inch square. Make sure the placement of the diagonal line is the same as below.

Pin in place, and then sew directly along the diagonal line:

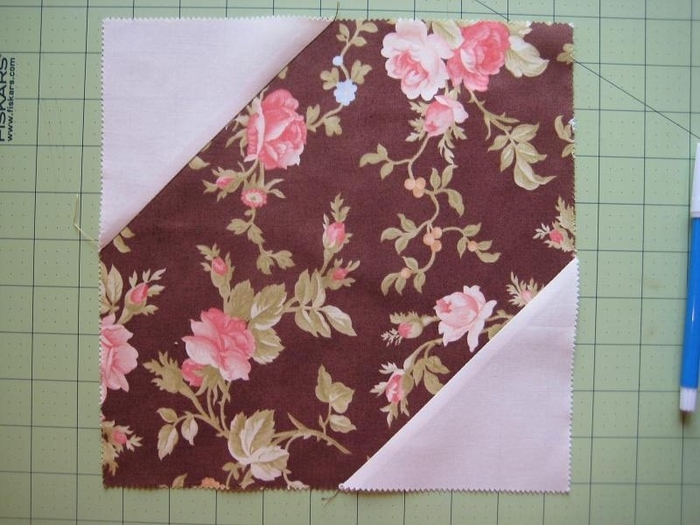
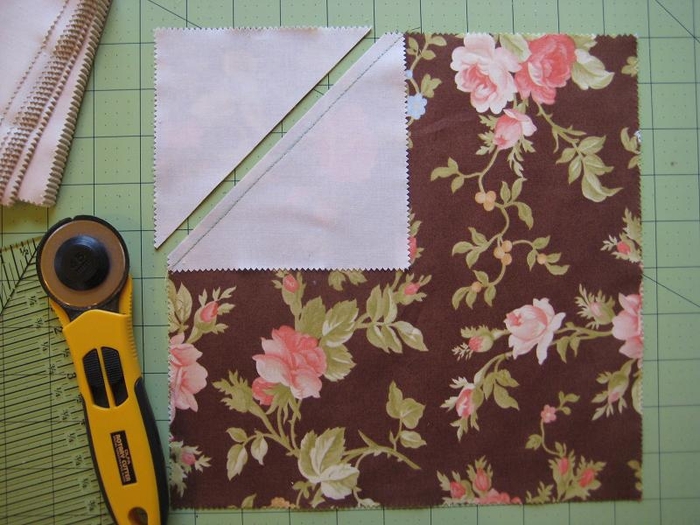
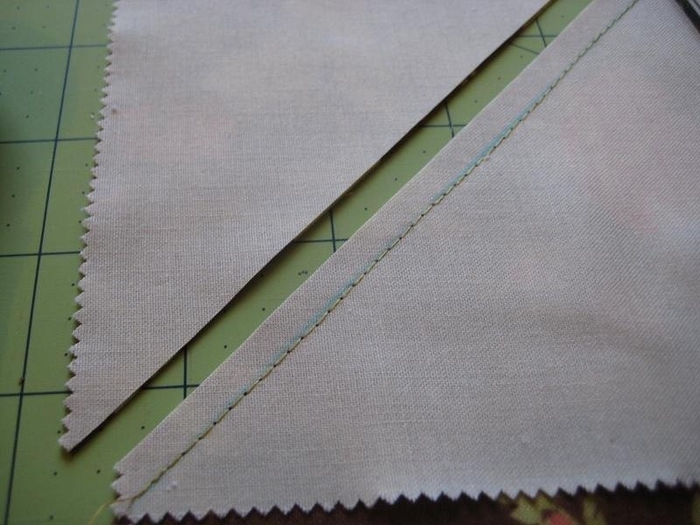
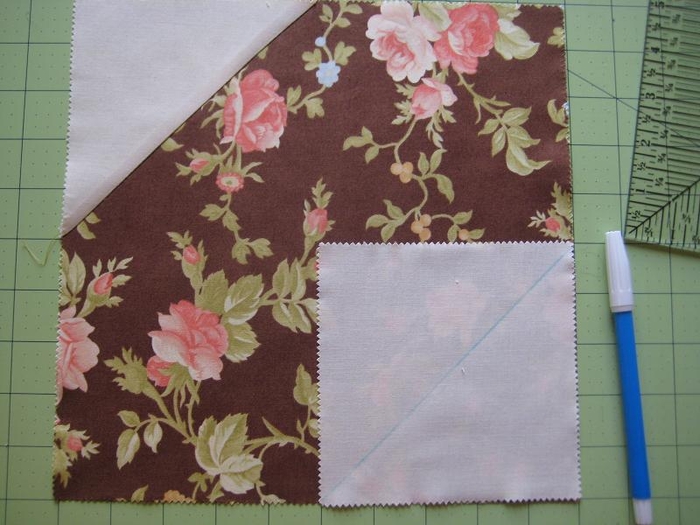
C) As shown below, cut a ¼” seam along the left outer part of the diagonal line that so that the corner comes off.

Up-close photo (be sure to cut a 1/4" allowance from the stitched line):

D) Press open with an iron:

E) Repeat steps B through D, but on the bottom right corner of the ten inch square.

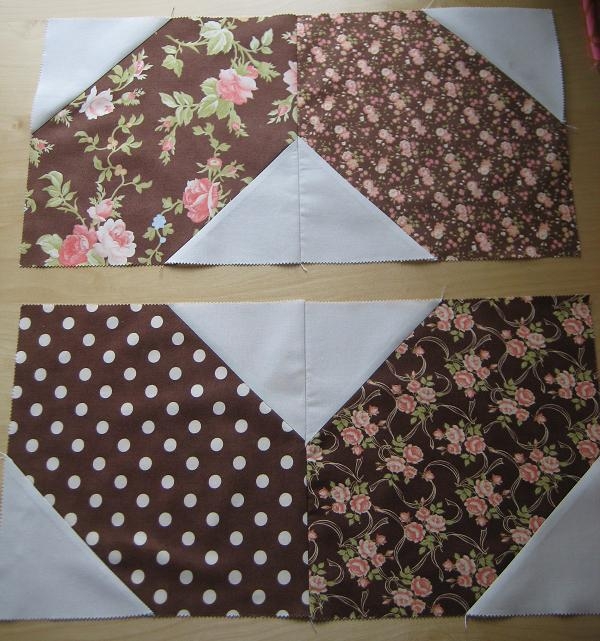
Step 3: After completing Step 2 for all 48 ten inch squares, you can assemble the piles of 4 that you sorted in Step 1. First, arrange the 4 blocks as shown below. Sew the top 2 blocks together and then the bottom 2 blocks together to create 2 units.

Last, sew the top and bottom units together.

(Note for Newbies: when I refer to sewing, sew with the right sides facing together, sew a ¼” seam, and then press open with an iron).
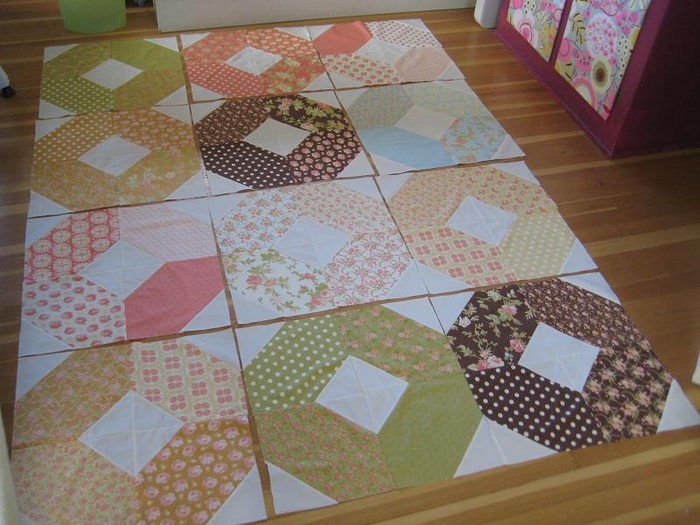
Step 4: Arrange your finished blocks in 4 rows of 3 blocks each.
Start by sewing each of the 3 blocks in each row together. And then sew each row together to create the pieced quilt top.

Step 5: Baste and quilt it! For this one, I decided to tie it (shown below) rather than machine quilt. Click the following for a tutorial on How to Tie a Quilt. If you've never done it before, you'll love it because it's quick and you don't have to worry about the fabric layers puckering like you do when machine quilting. It looks great too, and makes for a much fluffier quilt.


Step 6: Bind it! Click the following for a Quick Quilt Binding Tutorial.

>Tip!: Save the corners you cut from Step 2c. You can use them for an easy half square triangle scrap quilt project down the road!

That's it! Let me know if you have any questions.
Click HERE for a printer friendly version of this tutorial. =)
http://quiltingintherain.blogspot.co.il/

1.
2 (690x585, 256Kb)

2.
3 (700x525, 240Kb)

3.
4 (700x525, 280Kb)

4.
5 (700x525, 219Kb)

5.
6 (700x525, 236Kb)

6.
7 (700x525, 198Kb)

7.
8 (700x525, 266Kb)

8.
9 (700x525, 226Kb)

9.
10 (700x525, 228Kb)

10.
11 (700x525, 243Kb)

11.
12 (600x641, 238Kb)

12.
13 (700x525, 273Kb)

13.
14 (700x525, 268Kb)

14.
15 (700x525, 251Kb)

15.
16 (692x579, 192Kb)
Рубрики:  Пэчворк

Heirloom Quilt Tutorial - and kits!

Дневник

Пятница, 05 Июля 2013 г. 23:56 + в цитатник
0 (700x525, 98Kb)
Heirloom Quilt Tutorial - and kits!

Recall this quilt I was working on? I finally finished it! This one went to my Grandma in the Philippines as a gift for her 50th wedding anniversary. :)

It's a simple quilt that doesn't require that many materials. If you use the right prints, it'll turn out looking more intricate than it really is! I used the Heirloom collection by Joel Dewberry.

If you like it, we have Heirloom quilt kits available at our shop. The kits come with all the fabric you need to make this quilt (even backing and binding fabric). Enjoy the tutorial below! Only five simple steps.

Materials for one 35" x 46.5" quilt:
• 8 fat quarters (or 8 quarter yard cuts)
• 1.5 yards backing fabric
• 1/2 yard binding
OR
• 1 Heirloom quilt kit
Step 1 - From each fat quarter, cut three 7 inch squares (save the remaining scraps for step 4). This will give you a total of twenty-four 7 inch squares. For quicker cuts, stack your fabrics 2-3 at a time, press with an iron to help keep in place, and then cut.

Then, pair your fabric prints:
Step 2 - Choose a fabric pair to start with, and place one square directly on top of the another, with right sides facing together.
With a rotary cutter and ruler, make a diagonal cut as shown below. This will give you two half square triangles. Then, sew a 1/4" seam allowance along each edge where you made the cut.
Press open with an iron, yielding two half triangle squares:
Then, make a diagonal cut on both half triangle squares as shown below. This will yield four triangles:
Switch the triangles around so that opposite prints are adjacent to one another. With right sides facing together, sew the half square triangles together using a 1/4" seam allowance. Press open with an iron:
Step 3 - Repeat step 2 for all remaining pairs that you sorted from step 1. This will yield a total of 24 of these 'x' blocks (six stacks of each pair).
Step 4 - From your remaining eight fat quarter scraps, cut three 6 1/4 inch squares from each. This will yield a total of twenty-four 6 1/4 inch squares.

Step 5 - At this point, you should have a total of twenty-four 'x' blocks from steps 2-3, and twenty-four plain blocks from step 4, for a total of forty-eight blocks. Rearrange all forty-eight blocks in alternating order with 6 blocks per row and a total of 8 rows, as shown below. (click image to enlarge)
Then, piece your quilt top together: with right sides facing together, sew all six blocks in each row together, press open with an iron. And then all eight rows together.

Lastly, baste, quilt and then bind. And there you have it...one simple yet gorgeous, keepsake quilt!

Let me know if you have any questions. Happy Quilting!

1.
00 (700x525, 285Kb)

2.
000 (640x558, 274Kb)

3.
0000 (640x552, 247Kb)

4.
00000 (640x490, 265Kb)

5.
000000 (640x400, 205Kb)

6.
0000000 (640x340, 195Kb)

7.
00000000 (640x348, 172Kb)

8.
000000000 (640x606, 309Kb)

9.
0000000000 (628x640, 362Kb)
Рубрики:  Пэчворк

Rag Quilt

Дневник

Среда, 03 Июля 2013 г. 01:19 + в цитатник
finished (700x649, 157Kb)
Rag Quilt
If basting and binding a quilt isn't really your thing, and if you don't particularly like quilting large quilt tops, then a rag quilt is the perfect quilt project for you. :) With a rag quilt, you create smaller (therefore easier to handle) quilt sandwiches, quilt them while they're still small, and then piece them together to form your quilt. If that sounds confusing, check out my 8-step rag quilt tutorial below.

(Click picture to enlarge)

This quilt measures 23" x 23" which works perfectly for throwing in a stroller, or as a wall hanging quilt. Speaking of strollers, rag quilts are great for little ones as they offer a textured material for them to touch and explore.

I have a similar tutorial called Frayed Seams Quilt which uses fleece material as the entire quilt backing. You can check it out for an alternate rag quilt design.

Materials for a 23"x23" rag quilt:
• 10 quarter yards of varying prints
• 1 yard of fleece (or batting, see note in step 1).
• Coordinating thread
Step 1 - Cut fifty 6.5" squares from your quarter yard cuts (note: 1 quarter yard = six 6.5" squares). From your 1 yard of fleece, cut twenty-five 6.5" squares*.

*If you prefer to not have the fleece show at the seams as it does in this tutorial (see step 4), or if you prefer to use batting instead of fleece, cut twenty-five 5.5" squares instead. Then, when you make your mini quilt sandwich as described in step 2 (below), make sure the fleece/batting is centered in between the fabric pieces.

Step 2 - Make a mini quilt sandwich: take one fleece square and sandwich it in between two fabric squares. The wrong sides of the fabric should be facing the fleece. Repeat until you have 25 mini quilt sandwiches. When putting these together, plan for how the front and back of your quilt will look.


Step 3 - Quilt all 25 of the mini quilt sandwiches you made from the previous step. For this quilt, I quilted a simple X. Start and end your stitch with a back stitch.

Note: For Steps 4 through 6, use a walking foot if possible (to prevent puckering).

Step 4 - Sew the quilt sandwiches together: Sew 5 rows of 5 quilt sandwiches each, using a 1/2" seam allowance. The front of your quilt will have the 1/2" seam, as shown below.

The back will look like this:


Step 5 - Then, sew your five rows together the same way, so that the 1/2" seam allowance will be at the front of your quilt.


Step 6 - After you've sewn all five rows together, sew a 1/2" seam allowance around the perimeter of the quilt. This quilt requires no binding!


Step 7 - Snip little frays (roughly ¼” apart) along all of the ½” seams including the perimeter seam. Do not cut outside of the seam. Use scissors that have really sharp tips (I used applique scissors). I was able to cut through two fabric layers per snip.


Step 8 - Lastly, throw the quilt in the wash (cold water, gently cycle) and dryer (tumble dry low). Washing and drying the quilt will make the fringes you cut from the previous step soft and fluffy.

That's it! As always, let me know if you have any questions and I'd be happy to help you out.

Happy Quilting!

1.
front (700x497, 340Kb)

2.
back (700x608, 401Kb)

3.
IMG_0682 (700x525, 261Kb)

4.
IMG_0693 (700x525, 229Kb)

5.
IMG_0694 (700x525, 287Kb)

6.
IMG_0707 (700x525, 294Kb)

7.
IMG_0708 (700x525, 286Kb)

8.
IMG_0712 (700x525, 330Kb)

9.
IMG_0726 (700x525, 314Kb)

10.
IMG_0727 (700x525, 275Kb)

11.
IMG_0746 (700x525, 340Kb)
Рубрики:  Пэчворк

Baby Boy Rag Quilt - DIY!

Дневник

Среда, 03 Июля 2013 г. 01:03 + в цитатник
photo 1 (534x700, 92Kb)
Baby Boy Rag Quilt - DIY!
First of all, happy Valentine's Day! I hope you all treated yourself to something sweet.

Second of all, it's crazy to think that yesterday was my baby boy's due date yet I've had my little munchkin for 14 days now! It's been a tiring but rewarding and exciting 2 weeks adjusting to Ethan's schedule, but we're getting there!

While up at 3 am the other night nursing Ethan, I managed to compile/edit these rag quilt photos on my iPhone. I made this quilt for my dear friend who is due next month. I was able to finish this quilt the Saturday before my maternity leave started.
I made this quilt using 1 Layer Cake (pre-cut 10 inch squares) from the Puttin' on the Ritzcollection.

Rag quilts are awesome - they're simple and quick projects that make such softly textured quilts. I love the simplicity of rag quilts so much that I decided to post a super quick tutorial on how I made it. If you need a more detailed tutorial, you can refer to my Rag Quilt Tutorial.

Materials:
• 1 Layer Cake (or 40 pre-cut 10 inch squares)
• 20 pre-cut 9 inch squares of batting (I used Warm and Natural batting)
• Coordinating thread
Step 1 - Make a mini quilt sandwich: take one 9 inch batting square and sandwich it in between two 10 inch fabric squares. Make sure the batting is centered; also, the wrong sides of the fabric should be facing the batting. Repeat until you have 20 mini quilt sandwiches.
Step 2 - For all 20 mini quilt sandwiches, sew an X as shown below. You can start and end sewing at least 1/4" from the corners. Start and end each stitch with a back-stitch.
Step 3 - Arrange your 20 mini quilt sandwiches in 5 rows of 4 sandwiches each. Keep in mind of how the back will look.
Step 4 - Sew the quilt sandwiches together using a 1/2 inch seam allowance. Start by sewing the sandwiches within each row together, and then sew the rows together. After you've sewn all five rows together, sew a 1/2" seam allowance around the perimeter of the quilt. This quilt requires no binding!
Step 5 - Use sharp fabric scissors to snip little frays (roughly ¼” apart) along all of the ½” seams. Lastly, throw the quilt in the wash/dryer so the frays become all soft and fluffly. :)
That's it! You know me...I absolutely love cute and satisfying projects like these. Now that i have a little one of my own, I could use more projects like these. Thanks goodness for pre-cuts!

Happy quilting! Back to my munchkin' for now... :)

1.
photo 3 (700x590, 225Kb)

2.
photo 4a (700x561, 257Kb)

3.
photo 5 (700x530, 263Kb)

4.
photo 1a (700x658, 323Kb)

5.
photo 3a (700x685, 343Kb)

6.
photo 4 (700x534, 231Kb)

7.
photo 2 (700x534, 279Kb)
Рубрики:  Пэчворк

Пэчворк М.К.

Дневник

Суббота, 29 Июня 2013 г. 00:57 + в цитатник
1 (599x700, 348Kb)
Sugar Flowers Quilt
As mentioned in my last post, this is a great quilt to showcase your favorite fabrics. It's a simple quilt that's made up of 46 of these blocks:
In this tutorial I've also included an optional technique that shows how to turn the corner scraps into half triangle squares - these can be saved for my next tutorial or for whatever you want, so long as you don't throw away those precious scraps! :) Being a fabric addict, the thought of those babies at the bottom of the bin pains me! Enjoy the tutorial!

p.s. - you can see the finished version of this quilt in all its glory here :)

Materials for the Quilt Top (45.5"x53"):
• 12 fat quarters (or 1/4 yard cuts)
• 2.5 yards of white fabric

Step 1 - From each fat quarter or 1/4 yard, cut four 8" squares for a total of 46 8" squares. Layer your fabrics for quicker cuts (e.g. as shown below, I folded the fabric into quarters so there were four layers to cut through. When you fold, press flat with an iron before cutting).
Step 2 - From the 2.5 yards of white fabric, cut a total of 46 8" squares. Layer the fabric for quicker cuts. The best way to do this is to start with one yard of fabric. Fold it in in half lengthwise so it measures 18"x44", and then sub-cut into five 18"x8" strips. Sub-cut each strip into four 8" squares. You can cut 20 8" squares from one yard. Repeat, but with remaining 1.5 yards.

After you've cut 46 8" squares from the white fabric, layer and then quarter them into 4" squares. This will give you a total of 184 4" squares.
Step 3 - Place a 4" square and align it with the corner of an 8" square. As shown below, mark a diagonal line from corner to corner on the 4" square. I used a Hera marker which is a plastic tool that creates a crease on the fabric when pressed with a firm hand. If you don’t have a Hera marker, simply draw a line using a ruler and pen, or fold the square diagonal and press with an iron and then unfold.
Then, sew along the marked line.
Step 4 - Repeat step 3 for all four corners of the square.
Note: Steps 5 and 6 are optional for this tutorial. I've incorporated these steps to show you an easy way to utilize your scraps. I recommend taking the extra minute to do them. :)

Step 5 - After you've finished step 4, it will look like this. Once again, use a marking tool and mark a line 1/4" along the outer part of the stitch that you previously sewed. Repeat for all four corners.
Step 6 - Sew a 1/4" seam along the line that you previously marked. Repeat for all four corners.
When you're done it will look like this.
Step 7 - Cut the corners off by cutting along the marked lines that you marked from step 5. (If you skipped steps 5 & 6, simply cut a 1/4" seam along the outer part of the lines you sewed in step 4. Or in other words, instead of marking a 1/4" line along the outer part of the stitch as was done in step 5, cut the line instead of marking).
Step 8 - Press open with an iron, giving you five beautiful blocks! Note: the four half squares triangles will not be used for this tutorial, so you don't have to press them open right now. I will be using them in my next tutorial (or you use them to create whatever you please!).
Repeat steps 3 through 8 for all 46 8" squares.

Step 9 - Take eight of the 46 blocks, and cut them so they measure 4.25"x8". This will yield you eight end pieces.

Step 10 - Arrange all 36 blocks and eight end pieces as shown below, with two end pieces in every other row. Sew all blocks together in each row, and then sew all seven rows together.
That's it! And if you happen to make this quilt, I'd love it if you shared it with everyone on theQuiltingInTheRain Facebook page!

Happy Quilting!

1.
2 (700x661, 314Kb)

2.
3 (700x534, 286Kb)

3.
4 (700x534, 224Kb)

4.
5 (700x534, 262Kb)

5.
6 (700x534, 267Kb)

6.
7 (700x534, 237Kb)

7.
8 (700x534, 244Kb)

8.
9 (700x534, 236Kb)

9.
10 (700x534, 224Kb)

10.
11 (700x534, 245Kb)

11.
12 (700x534, 260Kb)

12.
13 (553x700, 273Kb)

13.
14 (700x561, 303Kb)
Рубрики:  Пэчворк

Invisible Zipper Pillow Tutorial

Дневник

Суббота, 29 Июня 2013 г. 13:53 + в цитатник
pillows1 (700x525, 151Kb)
Invisible Zipper Pillow Tutorial


Now that I'm working on my book, I won't be working at the Stitch and Sew Studio as much during open sew hours; however, I will still be teaching classes there on the weekends. :) During my time there (almost 7 months!), I've met some really great people and made some wonderful friends. They've learned sewing tips and tricks from me, but I think I've learned the most from them! Here's a super easy and fun invisible zipper tutorial that I learned from Teresa and Meg. Thanks gals! ;)

Materials:
• Fabric for the front and back of your pillow. the fabric will need to be 1 inch bigger than the pillow size. Example: To make a cover for a 21 x 21 inch pillow, you will need two 22 x 22 inch squares cut from your fabric.
• Zipper - should be at least 2 inches shorter than the finished pillow length. Example: If you're sewing a cover for a 21 x 21 inch pillow, get a 19 inch long zipper.
• Optional: Lightweight interfacing such as Fusi-Bond Lite. Iron this stuff on any quilting cotton weight fabric to achieve a home decorating weight fabric. (It's like an iron-on muslin).

1. Prepare both sides of fabric for the front and back of the pillow. In this tutorial I made a pillow cover for a 14" pillow, so I cut two 15" squares from my fabric. I also ironed on lightweight interfacing to make my cotton fabric more of a home dec weight.


2. Take your prepared fabric, and align them with right sides facing together. Pin to keep the layers from shifting. On one edge, mark 2 inches from the top and bottom as shown below.


3. Along this edge, sew a 1/2 inch seam allowance. When doing so, use a regular stitch within the 2 inch markers, and then use the longest stitch length in the center (this is where the zipper will be). Make sure to back-stitch at the start and end, as well as before you begin a new stitch length.

Click to Enlarge.


4. Press the seam open with an iron. Take your zipper and unzip it half way. You can use a thin strip of tape to help keep the unzipped part closed.


5. With the zipper facing down, align it on the center of the seam where your longer stitches are. You'll have about 1/2-1 inch of the tail ends of your zipper hanging past the 2 inch marks. Tape to keep everything in place. You can place tape at the 2 inch marker to help give you a visual of where you need to sew.

Use a zipper foot and sew a rectangle around the zipper as designated by the dashes below. When you get to the tape, peel it back so you don't sew over it. When the little zipper pully gets in your way, stop sewing with the needle in the down position, and then zip up the zipper so it's out of your way, then continue sewing. Start and end your stitches with back stitches.


6. Here's the satisfying part. :) Flip the pillow cover right side up and use a seam ripper to tear open the long stitches you sewed from step 3. This will unveil your zipper.


7. Next, make sure the zipper is at least half way unzipped and then align your fabric once again with right sides facing together. Pin to keep the fabric from shifting. Sew a 1/2 inch seam allowance around the perimeter (as designated by the dashes below) except where the zipper is. clip the corners to get rid of extra fabric bulk.


7. Turn the pillow cover right side out through the zipper opening. Last but not least, make lots and lots of beautiful, cozy, bright and cheery pillows!

1.
10 (310x400, 159Kb)

2.
12 (302x400, 85Kb)

3.
13 (313x400, 94Kb)

4.
14 (299x400, 83Kb)

5.
15 (345x400, 105Kb)

6.
16 (299x400, 129Kb)

7.
17 (400x369, 104Kb)

8.
18 (359x400, 159Kb)

9.
19 (640x475, 239Kb)
Рубрики:  Пэчворк

Simply Sweet Fabric. Подбор тканей для пэчворка

Дневник

Пятница, 28 Июня 2013 г. 19:41 + в цитатник


1.
photo 2 (478x640, 263Kb)

2.
2 (478x640, 266Kb)

3.
3 (478x640, 304Kb)

4.
4 (478x640, 265Kb)

5.
5 (478x640, 205Kb)
Рубрики:  Пэчворк

Дизайнерский плед из старых свитеров

Понедельник, 24 Июня 2013 г. 03:25 + в цитатник
Это цитата сообщения anngol [Прочитать целиком + В свой цитатник или сообщество!]

Дизайнерский плед из старых свитеров

4248238_1_1_ (426x640, 75Kb)
 

Если у вас есть на примете несколько свитеров, достаточно старых, чтобы их было уже неловко надевать «на людях» и достаточно теплых, чтобы их было жалко просто выбросить – давайте сошьем из них вот такой дизайнерский теплый зимний плед.

 На плед размерами 150 на 180 см потребуется 10 свитеров. Большинство из них можно купить на «Блошином рынке». Кстати, сейчас даже «секонд-хенды» устраивают распродажи и продают, к примеру, любую вещь за 30-50 рублей.

 Первый шаг. Определитесь с гаммой ( в данном случае это кремово-серые теплые земляные тона).

Второй шаг. Распорите все свитера и срежьте все лейблы, молнии ,пуговицы и так далее.

Третий шаг – валяние. Валять будем в стиральной машине. Обратите внимание на то ,что способность к сваливанию имеется только у натуральной шерсти. Если у вас будет «сырье» с искусственными добавками, оно или не сваляется вообще, или не так сильно ,как изделия полностью из натуральной шерсти.

Для валяния сложите ваши заготовки в мешок для бережной стирки или попросту в старую наволочку (если этого не сделать ,шерстинки могут забить весь сток стиральной машины), добавьте постельное белье или пару джинс, и поставьте стиральную машину на длинный режим с переключением от холодной к горячей воде и с обязательным вращением барабана и отжимом.


1 (426x640, 65Kb)


Вот так стал выглядеть свитер 54 размера после стирки с вращением барабана. Сел и свалялся. Для кого то , возможно , неприятность, а для нас в самый раз!


2 (640x427, 80Kb)


Следующий этап – раскрой деталей. Подготавливаем два шаблона: для большого квадрата – 26, 5 см стороной, и для малого квадрата (четыре таких квадрата будем сшивать в один большой) – стороной 14 см.


3 (640x433, 86Kb)


Раскладываем наши детали по цвету и размеру, как на рисунке.

Теперь надо найти свободное ровное местечко, скорее всего – на полу – и разложить на нем детали так, чтобы получился образ будущего пледа.


4 (640x427, 86Kb)


Обратите внимание… нет, не на кошек, а на то, что нужно оставить парочку карманов и расположить их по краям пледа. А что, неплохая идея – туда можно положить, к примеру, пульт от телевизора, или хоть носовой платок.


5 (640x427, 57Kb)


Идем дальше – сшиваем детали пледа на машине. Сшиваем прямой строчкой, самым широким стежком. Сшиваем сперва самые мелкие детали ,потом крупные между собой в ряды. Булавки нужны только тогда, когда сшиваем крупные детали и ряды.


6 (640x427, 90Kb)


Складываем вместе ряды, проверяем еще раз, как они сочетаются между собой…


7 (640x427, 69Kb)


Вот так выглядит изнанка пледа.


Следующий этап – подобрать подходящую подкладку. Лучше использовать чистошерстяную шотландскую ткань. Если у вас такой почему то не окажется, наверно можно на подкладку поставить и флис –он мягкий и тянется. Края пледа закруглим, как на иллюстрации.


8 (640x427, 99Kb)


Последний этап: берем большую толстую иглу, моток пряжи и сшиваем вместе верх и подкладку декоративным швом. Я бы еще закрепила по углам квадратов, просто прошив несколько раз такой же пряжей.


9 (640x427, 50Kb)


Получился плед, уютный и теплый даже на фотографии. На изнаночной стороне можно вышить свои инциалы и год создания пледа — наверняка, он прослужит не один год!


10 (640x427, 96Kb)


Счастливой работы!

Рубрики:  Пэчворк

Сумочка из роз.МК.

Понедельник, 24 Июня 2013 г. 01:55 + в цитатник
Это цитата сообщения pupus [Прочитать целиком + В свой цитатник или сообщество!]

Сумочка из роз.МК.

73413205_large_58e85beax83f6f0149d38690 (600x450, 85Kb)
Читать далее...
Рубрики:  Пэчворк

Объемная роза-печворк

Понедельник, 24 Июня 2013 г. 01:53 + в цитатник
Это цитата сообщения Nika7623 [Прочитать целиком + В свой цитатник или сообщество!]

Объемная роза-печворк

объемная роза-печворк

А это варианты применения:


Рубрики:  Пэчворк

сумочка

Понедельник, 24 Июня 2013 г. 01:50 + в цитатник
Это цитата сообщения labris1985 [Прочитать целиком + В свой цитатник или сообщество!]

сумочка

Небольшой МК по пошиву сумочки из блоков-пэчворк.

Читать далее...
Рубрики:  Пэчворк


 Страницы: [1]