Цитата сообщения Уютка
Чехол для корзинки или коробки
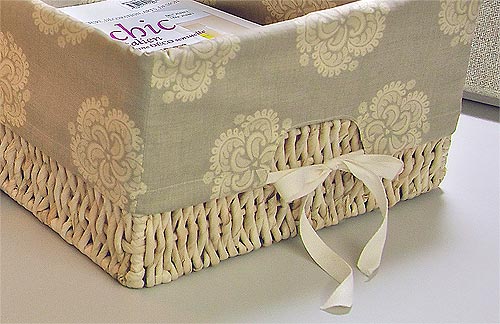

Rounding out our Clean & Tidy week are these easy-to-make basket liners. It's a great project to turn an otherwise ordinary wicker basket into a colorful organizer for just about anything. Sometimes, when my latest catalog arrives from Pottery Barn, Storables or Crate & Barrel, I imagine myself living in those pages with my life neatly tucked away into sleek stainless steel bins and buckets. Then I realize there's never anyone at home in those catalogs, so it would probably be pretty lonely. Instead, I'll make some of these cozy basket liners and invite some friends over for coffee.
We originally used the gorgeous French General Rouenneries fabric from Moda, which came out in early 2010 and can be a bit hard to find now. We found some at Fat Quarter Shop, but you might want to investigate other options. The new Pom Pom de Paris by French General for Moda has some lovely florals and birds with a similar feel to Rouenneries.
Sewing Tools You Need
Fabric and Other Supplies

-
1 yard of 45" wide fabric or ¾ yard of 60" wide fabric PER BASKET: we used Moda's French General in Rouenneries Rouche Tournesal for the large basket and Moda's French General in Rouenneries Roche Texture for the small basket
-
2 yards ½" cotton twill tape: we used off white
-
One or more straight-sided baskets: we found ours at Michael's
-
All-purpose thread in colors to match fabrics
-
All-purpose thread in contrasting color for topstitching
-
See-through ruler
-
Fabric pencil
-
Iron and ironing board
-
Scissors or rotary cutter and mat
-
Straight pins
Getting Started
Measure your basket
-
Measure the width of the front (the back will be the same measurement).

-
Measure the width of the side (each side will be the same measurement).

-
Measure the height.

-
Measure the base. If you've done your measuring correctly, the base should measure the width of the front by the width of the side.
Optional handle opening
-
Measure the opening width and height. Then subtract ¼" from each measurement to account for the hem.

Final measurements
-
Now that you have all your basic measurements, you need to account for your ¼" seam allowances all around.
-
Add ½" to each measurement of the base.
-
Add ½" to the width measurement of the front and the back.
-
Add ½" to the width measurement of each side.
-
To account for casing and its hem, add 1" to the height measurement.
-
Also to your height measurement, you need to add the number of inches you'd like the liner to fold over the sides of the basket. For our basket, we wanted it to fold over approximately ⅔ of the total height, so I added 4½" (in addition to the 1" above for the casing/hem): 6¾" (my starting height) + 1" + 4½" = 12¼"
-
Measure the circumference of the basket, then add about 20" to that measurement for the ties.
Here's an EXAMPLE of the measuring formula described above, using our large basket as the model:
Height: 6¾" = 12¼" (formula described above)
Front / Back (CUT 2): 14" width x 6¾" height = 14½" x 12¼"
Sides/ Left and Right (CUT 2): 12" width x 6¾" height = 12½" x 12¼"
Base (CUT 1): 14" width x 12" height = 14½" x 12½"
Optional Handle (measurement of cut out on each side): 2¾" width x 1¾" height = 1½" x 2½"
Cut out your pieces
-
Cut ONE base piece.
-
With the base piece cut to measurements and laid out flat, measure and cut a ¼" angle at each corner.

-
Cut TWO side pieces.
-
With each side piece laid out flat cut a ¼" angle at each corner, just as you did above for the base piece, but on the bottom edge only.
-
Cut TWO Front/Back pieces.
-
With each side piece laid out flat cut a ¼" angle at the end of each corner on the bottom edge only.
-
Cut the twill tape in half to make two pieces to run through the casing and tie into a bow on either side.
Optional handle opening
-
Fold each side piece in half widthwise and mark the opening of the handle at the top center, using the fold as the outer edge. Since your fabric is folded in half by width you must divide your handle width measurement in half. With a temporary marking pen or chalk draw a rectangle to represent this measurement.

-
Round off corners to curve (we used a pattern weight as a guide).

-
Cut out the curve.

At Your Sewing Machine & Ironing Board
-
Lay the BASE piece flat on your work surface.
-
Line up the bottom edges of the FRONT piece to the BASE piece, right sides together, using the angled corners as a guide.

-
Pin together and sew a ¼” seam.
-
At the opposite side of the BASE, line up the bottom edge of the BACK piece to the BASE piece, right sides together and using the angled corners as a guide.
-
Pin together and sew a ¼” seam.
-
Press all seams open. Set aside.
Finishing optional side handle opening
-
Lay the SIDE pieces flat on your work surface.
-
Take one piece to your sewing machine, and using a longer stitch length (about 3.5), sew a guide line ¼” away from the raw edge of the handle cut out. Clip small snips at the curves of the handle opening up to, but NOT through, the stitched guide line.
-
Repeat for the other SIDE piece.

-
On both SIDE pieces, fold the raw edge over to the wrong side, using your stitched guide line as your fold line. Press and top stitch close to the edge.

Making it into a "box"
-
Lay out the BASE piece, and with right sides together, line up the bottom edges of ONE SIDE piece to the BASE piece, using the angled corners as a guide. Pin together and sew a ¼” seam.

-
Repeat for the remaining side piece. Press both seam allowances open.

-
Pin side seams together at each intersection of the base, and starting at the angled corners, stitch together with a ¼” seam allowance.
-
Repeat until all four side seams are stitched together. Press all seams open.
-
To form your casing and its hem, fold the top edge of each side ¼” and press.

-
Fold an additional 3/4” and press.

-
Re-thread your machine with contrasting thread.
-
Top stitch close to the fold to form the casing.
-
Place a large safety pin at the end of one piece of twill tape and thread it through one side of the casing.

-
Repeat for the other side.

-
Insert lining into the basket and fold out and over the sides. Pull taut with the twill tape on each side, then tie ends into a bow.
-
Contributors
Project Design: Alicia Thommas
Sample Creation and Instructional Editing: Dianne LeBlanc
-
Источник: http://sew4home.com/projects/storage-solutions/854...n-a-tidy-week-desk-set-baskets


