Урок акварели. Приветствие солнцу. |
Greeting the Sun. Приветствие Солнцу. Демонстративный Урок по Акварели.
Художница: Stephanie Pui-Mun Law

Урок из Книги
"Dreamscapes Fantasy Worlds: Create Engaging Scenes and Landscapes in Watercolor"
|
Картинки увеличиваются. Как открыть картинку:
1 способ: навести курсор на картинку -> нажать правую кнопку мышки -> выбрать «Открыть картинку в новой вкладке» -> для увеличения картинки, нажимаем на нее
2 способ: нажать на картинку -> |


![]()
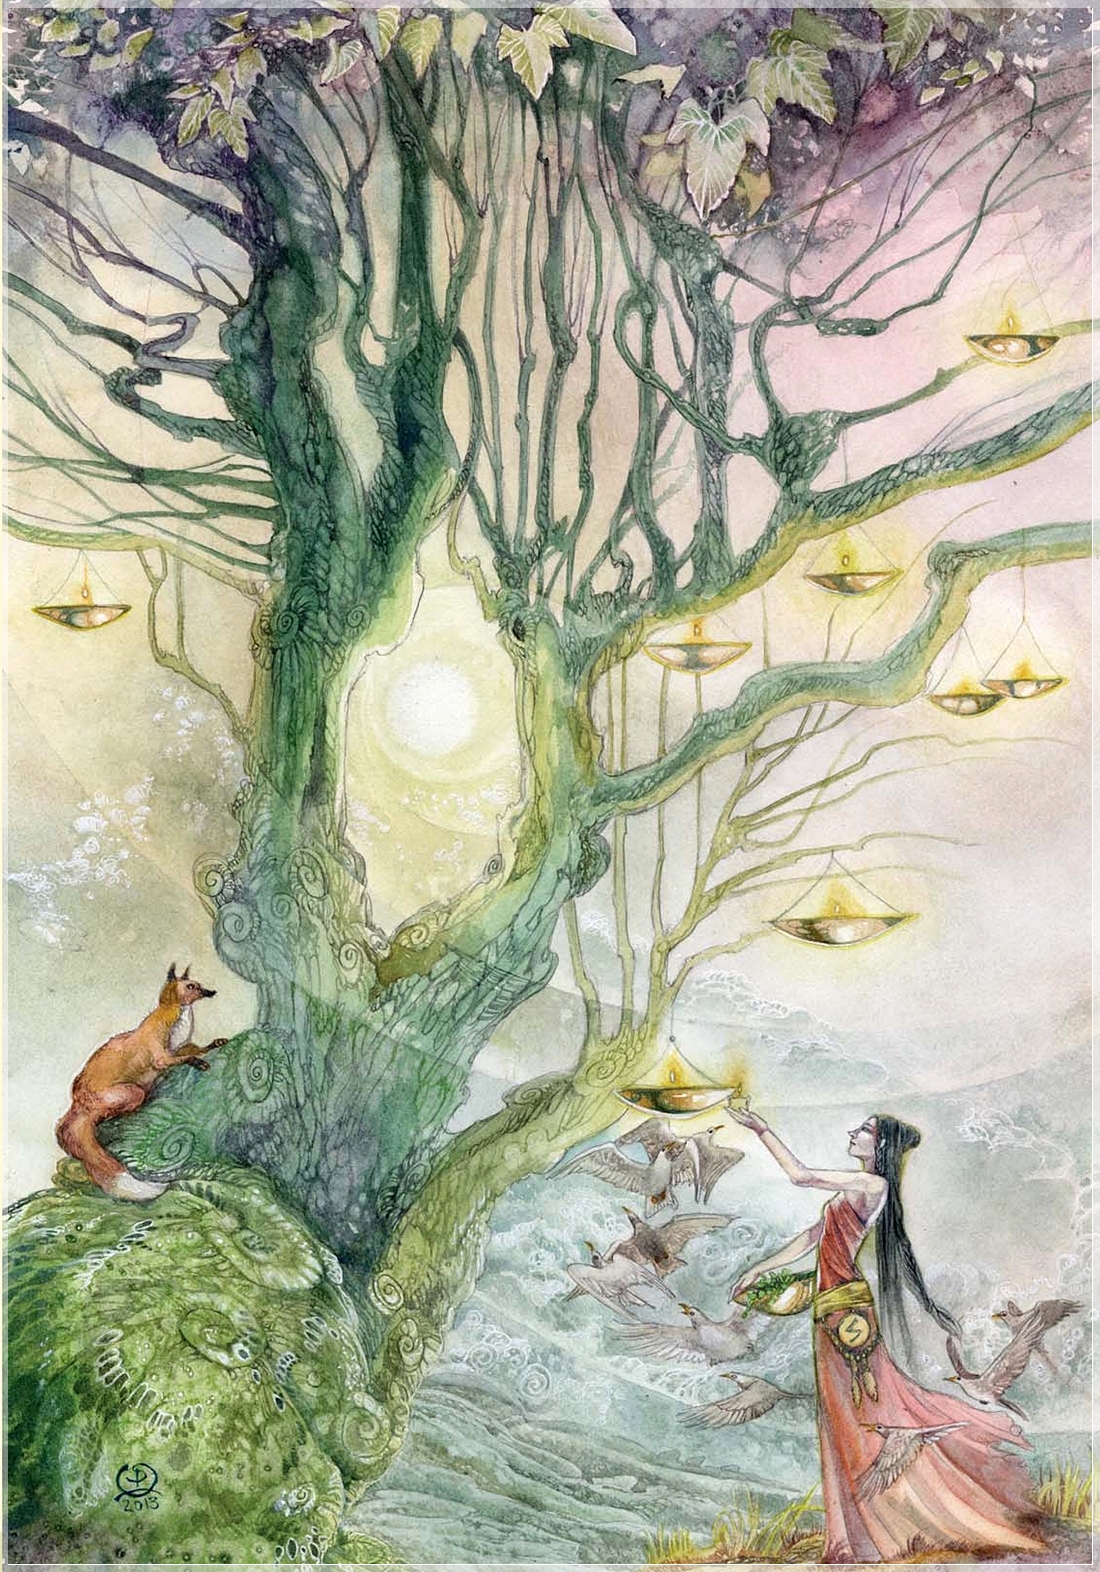
Приветствие Солнцу
Демонстративный Урок.
|
Материалы и Инструменты:
Surface: cold-pressed illustration board
Brushes: nos. 0, 1, 2 and 4 rounds, 1/2-inch (12mm) flat
Watercolors: Alizarin Crimson, Burnt Umber, Cadmium Orange,
Cerulean Blue, Lemon Yellow, Light Red, Naples Yellow,
Payne's Gray, Sap Green, Ultramarine Violet, Viridian Green
Other: salt, white gel pen
|

|
1. Light
Use a no. 1 round with Lemon Yellow around the sun and around the candle dishes. Blend outward into the surrounding white so that it is a soft glow.
|

|
2 Sky Background Layer
Use a mixture of Naples Yellow and Alizarin Crimson toward the upper areas and fade to Viridian Green in the lower sky. Use a no. 4 round to get into tighter corners. Since the glaze is thin, don't be too concerned with avoiding all of the individual branches. Just try to work around them. Make sure the background colors stay clear of the foreground woman figure though. Brush with a 1/2-inch (12mm) flat to smooth and blend the colors.
|

|
3 Hills Base Layer
Add texture to the lower hills in the background. With a no. 1 round, paint a mixture of Viridian Green, Burnt Umber and Payne's Gray for a neutral green tone.
|

|
4 Blend the Hills
Use clear water and a 1/2-inch (12mm) flat. Brush across the hills to smooth and blend the textures.
|

|
5 Add More Depth to the Hills
Use a no. 0 round and more concentrated Viridian Green, Burnt Umber and Payne's Gray mixtures to add finer details on the hills and to pull out the shadows. Keep it relatively hazy. This is a far distant background and shouldn't be competing for attention with the foreground.
|

|
6 Work on the Clouds
Using Cerulean Blue mixed with Payne's Gray and a little bit of Lemon Yellow, take a no. 2 round brush and darken the sky in the lower areas. Around the sun add neutral tones with a bit of Naples Yellow. Sprinkle with salt for added texture. Brush the salt away when the paint has dried.
|

|
7 Highlight the Clouds
Use a white gel pen to edge the cloud highlights, emphasizing irregularities made by the salt.
Don't overdo it. The point is not to draw white clouds but to add to the highlights you have already created and draw them out farther.
|

|
8 Further Define the Clouds
Using a no. 0 round brush, take a Payne's Gray, Cerulean Blue and Viridian Green mixture and darken the cloud shadows. Brush with a 1/2-inch (12mm) flat to smooth and blend. This will soften the edges of the white gel pen as well.
|

|
9 Leaf Shadows
Using a no. 2 round and varying mixtures of Ultramarine Violet, Alizarin Crimson, Viridian Green and Payne's Gray, paint a wash in the upper areas, leaving gaps for the leaves. Dot in contrasting colors wet-in-wet. Sprinkle with salt and brush the salt away when the paint has dried.
|

|
10 Tree Base Layer
Mix Viridian Green, Sap Green and a little bit of Ultramarine Violet and paint a base layer on the tree trunk with a no. 2 round brush. Blend in more Ultrama¬rine Violet toward the top branches so that it melds into the shadowy leaves. Around the light sources (the sun and the lanterns) edge the tree with Lemon Yellow, still with the no. 2 round brush.
|

|
11 Darkening the Upper Branches and Leaves
With nos. 0, 1 and 2 rounds darken the upper branches with a mixture of Ultramarine Violet and Viridian Green. Try to blend these into the shadows you have already started. Add smaller leaves and twigs. Blend these by brushing a damp 1/2-inch (12mm) flat across when they have dried.
|

|
12 Leaf Details
With a no. 0 round brush paint detailed texture on the leaves with Sap Green mixed with Payne's Gray. Paint the edges of the leaves with a darker and more concentrated mixture of Ultramarine Violet and Payne's Gray.
|

|
13 Bark Details
With a no. 0 round brush paint detailed texture bark with a mixture of Viridian Green, Payne's Gray and Ultramarine Violet in the upper branches, blending to slightly warmer tones in the lower areas with a mixture of Burnt Umber and Viridian Green. Add a little bit of Cadmium Orange in the edges of the branches nearest the light sources.
|

|
14 Foreground Rock
Using a no. 4 round brush, use Sap Green mixed with a bit of Naples Yellow as the rock extends up onto the branch. Dot in a bit of wet-in-wet Ultramarine Violet in the lower left corner. Sprinkle the wet paint with salt and brush it off when it's dry.
|

|
15 Defining the Texture
Use a no. 0 round and let your imagination follow the cracks, crenelations and whorls that the paint created as the initial glaze dried. Use a more concentrated mixture of Sap Green with Naples Yellow pulling out the shapes that you see to create texture.
|

|
16 Highlights on the Rock
Take a white gel pen and use it sparingly to emphasize some of the highlights.
|

|
17 Darken Shadows on the Rock
To complement the white highlights, go in with a no. 0 round brush with a mixture of Viridian Green and Ultramarine Violet, deepening the shadows around those highlights.
|

|
18 Grass and Ground
Use a no. 4 round and paint a base wash of Naples Yellow on the ground, dropping Ultramarine Violet wet- in-wet in the lower right area for shadows from the figure with Lemon Yellow in the grass. With a no. 1 round brush add some definition to the grass and stones, still wet-in¬wet so that the paint spreads a bit. Sprinkle a little bit of salt in the lower right area and brush it off when the paint is dry.
Use a no. 1 round brush after the base layer has dried, and with short curved strokes add some more grass shadows with Light Red.
|

|
19 Fox
Start with a wash of Light Red using a no. 2 round brush on the body of the fox. Use a very diluted mixture of Payne's Gray and Ultramarine Violet to lightly wash over the tip of the tail and the chest.
When the initial layer has dried, load a no. 0 round brush with a more concentrated pigment of Light Red. Use short curved strokes to paint in the shadows of fur.
Take a no. 2 round dampened slightly with a diluted wash of Naples Yellow and lightly brush over the textures to smooth and blend. Use a mixture of Payne's Gray and Burnt Umber and a no. 0 round to add a few more shadowy strands to the tail and chest and to darken the paws, eye, nose and ears.
|

|
20 Braziers
Do all of the following for each of the brazier dishes: Use a no. 1 round and start with a light glaze of Burnt Umber. Leave the white of the paper showing on the highlighted curve and along the very bottom edge.
With a mixture of Payne's Gray and a very small amount of Viridian Green, use a no. 0 round to add more shadowed depth to the brazier.
With a no. 0 round add a final small glazed streak of Light Red curving along the surface of the brazier, through the darkest part of the shadow. Still with the no. 0 round, use Cadmium Orange to edge the bottom curve of the dish and blend outward from the flame, leaving the center of the flame white.
|

|
21 Shadows
Using a no. 1 round and Ultramarine Violet mixed with a tiny bit of Payne's Gray to dull the brightness, paint the shadows of the figure's clothing and flesh. Add some deeper shadows around her jewelry and ornamentation with a touch of Burnt Umber.
|

|
22 Adding Colors
Use a mixture of Alizarin Crimson and Naples Yel¬low with a no. 2 round to glaze over the dress. This softens the edges of the shadows you painted in the previous step. Leave an edge of highlighted white along the left side.
Dilute the mixture of color and add a bit of Lemon Yel¬low. With a very light glaze, paint over her skin.
|

|
23 Hair and Ornaments
Use a no. 0 round and glaze Payne's Gray for her hair, darkening the shadows to sculpt the braids with more concentrated pigment.
With a no. 0 round, glaze Naples Yellow on her hip adornments.
With a no. 0 round lightly dot in Sap Green for the leaves in her basket.
|

|
24 Base Layer for the Birds
Use a no. 2 round and glaze the birds with Burnt Umber. Make the ones who are slightly farther in the background a little darker, with more concentrated pigment than the ones in the foreground.
|

|
25 Details on the Birds
Use a no. 0 round and dot in the beaks and legs of the birds with Cadmium Orange. Add definition to the feathers and shadows with a mixture of Burnt Umber and Ultramarine Violet with a no. 0 round.
|
![]()
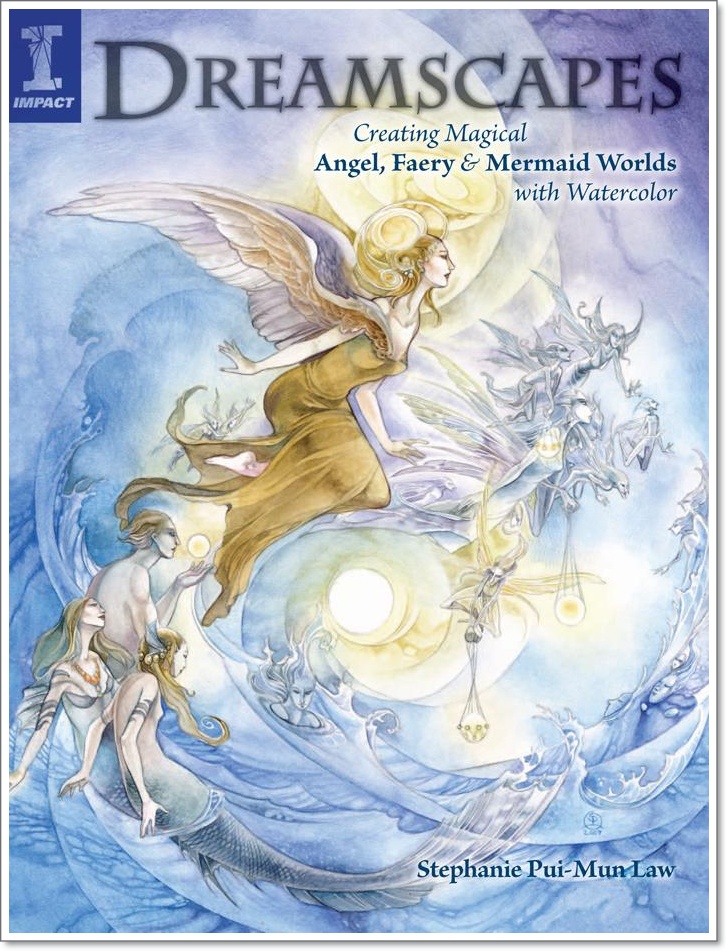
Предлагаю вашему Вниманию, ещё одну замечательную Книгу от Stephanie Pui-Mun Law
"Dreamscapes: Creating Magical Angel, Faery & Mermaid Worlds with watercolor" ... Смотрите Здесь …
| Комментировать | « Пред. запись — К дневнику — След. запись » | Страницы: [1] [Новые] |
 -> "Открыть оригинал"


