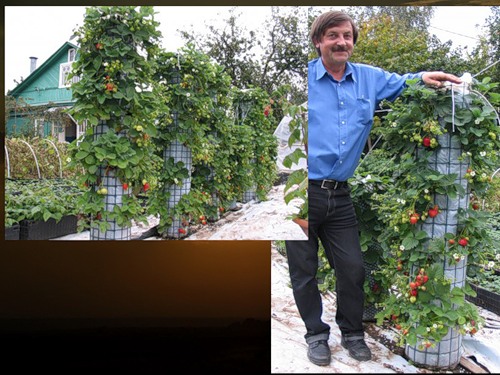
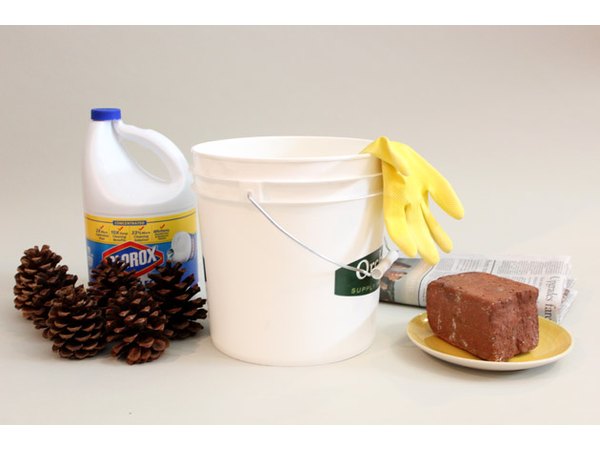
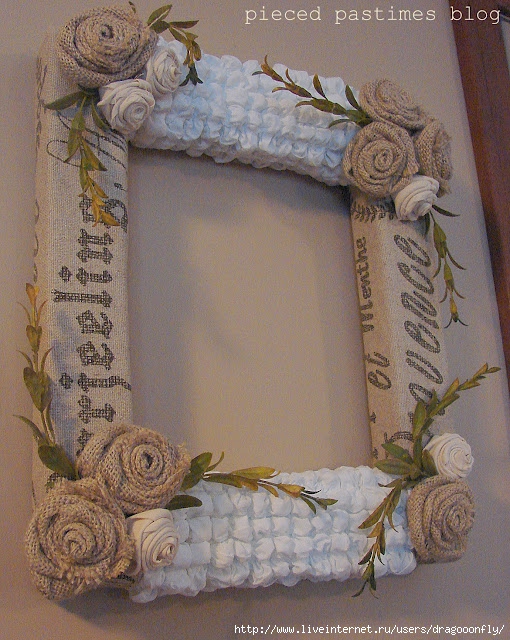
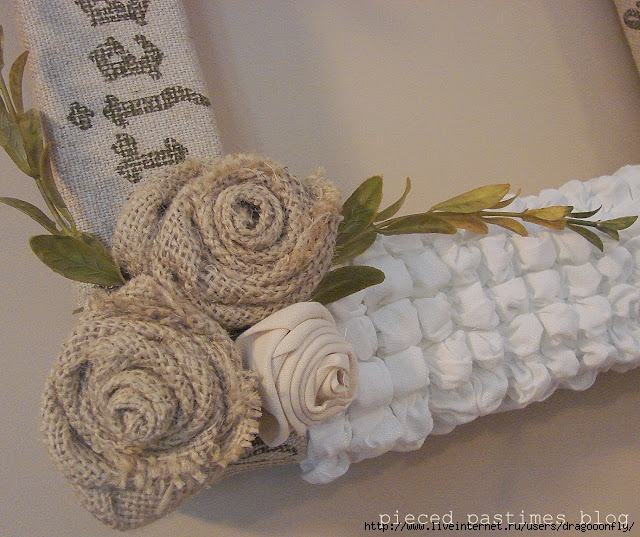
�� ������ �� ��� ������ ���������� ����� �� ������ + ����� ������� , ��� �� ��������� ������ ���������� ���, ��� ��� ������� ��� �������� ����� � �� ����� ���� ���������� � ���� ������� ��� �������! ������ �� �����, ����� � ���������� ��������� ���������, ��� ��� ��� ������� �� ����������� �� �������� �������� (�� �� ��� ����, ��� �������!), ��� ��� ������ ����� – ������ ������ ��, ��� �������� ��� ���, � ���� � ��� ���� �������� �������� ��� ����� �� �����, ����������, ���������� ��! ������� ������� (����� ��� �����) ���������� �� ����!
���������:
• ��������� ������ ������� (�� ��� ������ �� ����� ���� ������ ������ ������� �� ������)
• ������� ����������� ����� ���� (1 �� ����)
• ����� ���
• ������� ���� �������� � ������ �������
• ������ ������
• ����� ���������� �����
• ������ ����� ���������������, ½” � 10’. ���� ����� �������# 203106
• ������ ½ ” �������� ���� �������, ���� ����� ���# 839663
• ���� 3 ½ ” ������� �������, ���������, �������� ���# 202058390
• ���������� ���� ��� �����, ����������� ������, ����� ������ ������ ��������
• ����� � ������� � ��������� �������
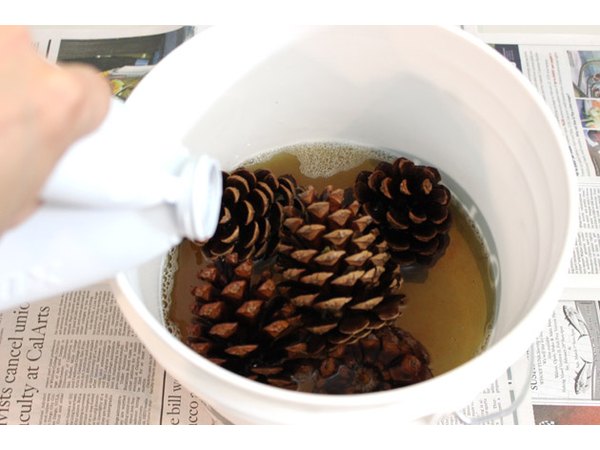
���������� ����� ���:
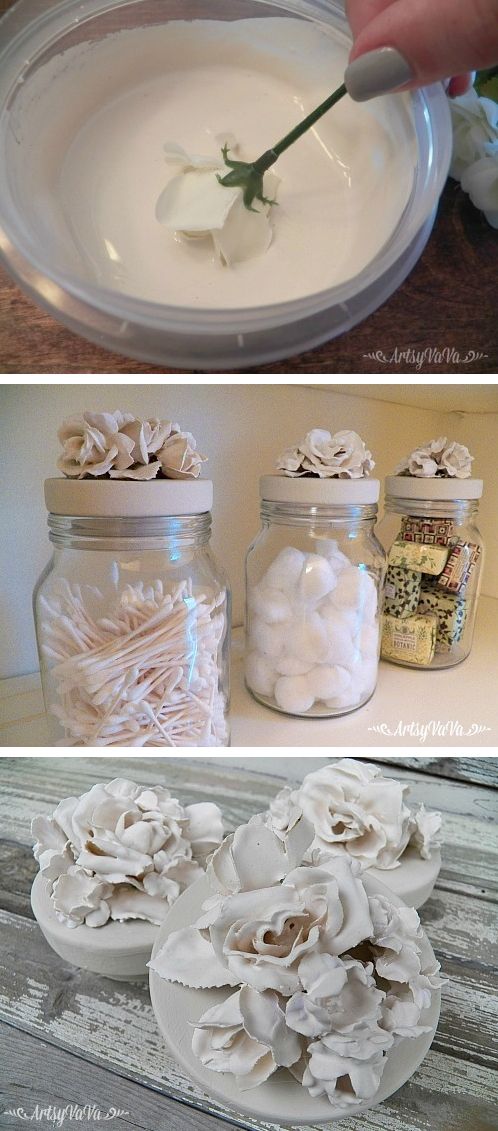
������� �� ���������� ������������ ���� ���...�� ��� ���� ������ ������� �����, ������� �� ��������� ��� �������. ���� ��������� �������, ������� ���� �� �������� ��� �����. �������� ��� �������, ������� ���� ������� ������������ ��������. ������ ������ ������������� � ��������� ���. �������� ������ ���������� ���� �� ����� ���������� ����, ����� ������� ������� �������. �������� ���� ����� ������, ������� �� ��������. ������� �� �� ����� � ������ ���������. ������ �� ������ ������� ��� ������. ���!
 /i0.wp.com/greenweddingshoes.com/wp-content/uploads/2012/03/diy-flower-01.jpg?resize=300,160" target="_blank">http://i0.wp.com/greenweddingshoes.com/wp-content/...y-flower-01.jpg?resize=300,160 300w" style="box-sizing: inherit; border: 0px; max-width: 100%; height: auto;" title="�������-������-01" width="650" />
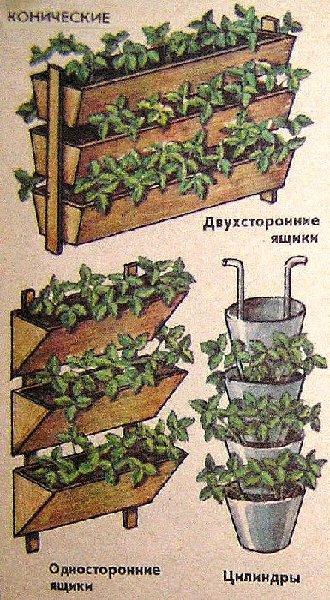
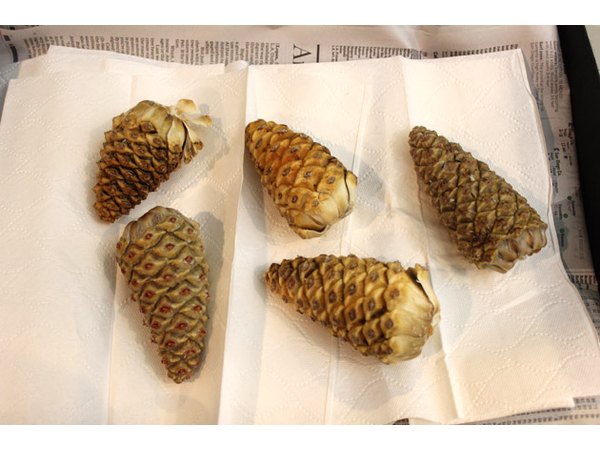
����� ������
��� ����:
�������� ����� ��������� �������� ����. (���� ������ �� ����� ��������� �������, ��� ������ ���������.) ������� ������ � ���� �� �����. ������ ����� �����, ������� �� ���� ����� �������. � �� ��������� �����, ��� ������ ������� ��������, ����� �������� ������� �������.
����� ���� ��� �� �������� 5-7 ����� �������� ���������� ����� 2-4 �� � ������, ��������� ������, ����� ����� �� ������ �������. ��� ������ ��� ��������� ������, ������ ��� ��� ������ ������������ � �������� ������� � �� �� ������, ����� ������ �����....��� ����� �� �������!
�����: ��������� �������� � ����������� �� �������. ��� ����������� ��������� ������� �������, �� ������ �� ������� � �����.
 /i0.wp.com/greenweddingshoes.com/wp-content/uploads/2012/03/diy-flower-02.jpg?resize=300,187" target="_blank">http://i0.wp.com/greenweddingshoes.com/wp-content/...y-flower-02.jpg?resize=300,187 300w" style="box-sizing: inherit; border: 0px; max-width: 100%; height: auto;" title="��� ����� ����������" width="650" />
 /i0.wp.com/greenweddingshoes.com/wp-content/uploads/2012/03/diy-flower-03.jpg?resize=291,300" target="_blank">http://i0.wp.com/greenweddingshoes.com/wp-content/...y-flower-03.jpg?resize=291,300 291w" style="box-sizing: inherit; border: 0px; max-width: 100%; height: auto;" title="�������� � �������" width="650" />
��� ���:
�������� ���� ����� �������. ����� �������� 1-�������� ������� �� ���� ���� ������ ����. ��� ����� ���� ����. ������� ���� ���� ����� ������� �������� ��� �������� ����� �������. ��� ��������� ������ ������� ���� � ����-������� �����.
 /i0.wp.com/greenweddingshoes.com/wp-content/uploads/2012/03/diy-flower-04.jpg?resize=229,300" target="_blank">http://i0.wp.com/greenweddingshoes.com/wp-content/...y-flower-04.jpg?resize=229,300 229w" style="box-sizing: inherit; border: 0px; max-width: 100%; height: auto;" title="��� ���" width="650" />
��� ���:
����������� ��������� �������� � ���������� ������� ����� �������� �� ����������� � �����������. ������ �������, ����� ��������� � �������, ������� �������� �������. ����, ������ ��� �� ���������� �� ���������� ���������.
 /i0.wp.com/greenweddingshoes.com/wp-content/uploads/2012/03/diy-flower-05.jpg?resize=300,208" target="_blank">http://i0.wp.com/greenweddingshoes.com/wp-content/...y-flower-05.jpg?resize=300,208 300w" style="box-sizing: inherit; border: 0px; max-width: 100%; height: auto;" title="��� ��� �������" width="650" />
 /i0.wp.com/greenweddingshoes.com/wp-content/uploads/2012/03/diy-flower-06.jpg?resize=300,194" target="_blank">http://i0.wp.com/greenweddingshoes.com/wp-content/...y-flower-06.jpg?resize=300,194 300w" style="box-sizing: inherit; border: 0px; max-width: 100%; height: auto;" title="��������" width="650" />
��� ������:
���� ��� ��� ����� � �����. ��� ������ ��� ����� �������������, �������� ������ �������� ���, ����� ��� ������ ������ ���.
 /i0.wp.com/greenweddingshoes.com/wp-content/uploads/2012/03/diy-flower-07.jpg?resize=229,300" target="_blank">http://i0.wp.com/greenweddingshoes.com/wp-content/...y-flower-07.jpg?resize=229,300 229w" style="box-sizing: inherit; border: 0px; max-width: 100%; height: auto;" title="�������-������-07" width="650" />
��� ����:
��� ������ �� ������������� �������� ������, ������ ���� � ������ � �������.
�����:�������� ������� �������� � ������� ��� �������������� ������, ����� ��� �� �����������.
 /i0.wp.com/greenweddingshoes.com/wp-content/uploads/2012/03/diy-flower-08.jpg?resize=300,206" target="_blank">http://i0.wp.com/greenweddingshoes.com/wp-content/...y-flower-08.jpg?resize=300,206 300w" style="box-sizing: inherit; border: 0px; max-width: 100%; height: auto;" title="��� ����" width="650" />
���������� ������:
� ��������� ���� �������, ��� ���� ������ ��� ����� – � ��� ������ ��������. ��������� ����������, ���� ��� ����� ����� ��������. �� ����������� ���, �� �� ��� ������� �������. ������ �����, �� ������������ ������ ����� ������������ �� ������������������� ������ � ����� ������. ��� ����� ����� ���� ������ � ������� ������������� ������ �����. ���� �� ����������, �� ������������ ��������, �������� ��� � ������� ������� ��� ���� � ��� ������ ����� �����, ��� ��� �����.
����� ���������� (������). ��� ����� ������� �����: �������� ����� ��� �����, ���� ����� ��������� �� �����. ������ ����������� ������, ������ �� ������ �����, ����������� ���� 8-10” � ����������, ���� � ��� ������ �� ������. ������ ��������� � �� ��������� ������� ��������� ��� �����, ����� �������������� ������ ������ �������� ����� �����. ��� ������ ��������� ���������, ���������� ������ �������� ������ �� ������ ����� ������������, ������ ������ � ������ �� ���� ������� �������� � ��������� �� ������ ���������� (����� �����, ������ ������ �������).
 /i0.wp.com/greenweddingshoes.com/wp-content/uploads/2012/03/diy-flower-09.jpg?resize=300,224" target="_blank">http://i0.wp.com/greenweddingshoes.com/wp-content/...y-flower-09.jpg?resize=300,224 300w" style="box-sizing: inherit; border: 0px; max-width: 100%; height: auto;" title="�������-������-09" width="650" />
������� 1: ������ 7/8” ����� ��������� � ����� ������. �������� ��������� ����� ����� (��� �������� ����).
������� 2: ������������ �����, ����������� ������� ��� ������, ����� ������� ������ � ������������ ���������.
������� 3: ������ �������� ������� � �����, ���� ����������� �� �������� �������.
������� 4: ���������� ���-������. ���� ���������, �������� ����� ��������� � ����!
 /i0.wp.com/greenweddingshoes.com/wp-content/uploads/2012/03/diy-flower-10.jpg?resize=300,224" target="_blank">http://i0.wp.com/greenweddingshoes.com/wp-content/...y-flower-10.jpg?resize=300,224 300w" style="box-sizing: inherit; border: 0px; max-width: 100%; height: auto;" title="�������-������-10" width="650" />
 /i0.wp.com/greenweddingshoes.com/wp-content/uploads/2012/03/diy-flower-11.jpg?resize=300,206" target="_blank">http://i0.wp.com/greenweddingshoes.com/wp-content/...y-flower-11.jpg?resize=300,206 300w" style="box-sizing: inherit; border: 0px; max-width: 100%; height: auto;" title="�������-������-11" width="650" />
�������� ����� � ��������� ����� ���������� �������������� �������. ��� �� ����� ���� �������� �����, ���� ������� ��������.
 /i0.wp.com/greenweddingshoes.com/wp-content/uploads/2012/03/diy-flower-12.jpg?resize=229,300" target="_blank">http://i0.wp.com/greenweddingshoes.com/wp-content/...y-flower-12.jpg?resize=229,300 229w" style="box-sizing: inherit; border: 0px; max-width: 100%; height: auto;" title="�������-������-12" width="650" />
�������, ��������� ����������� ������, ��������� ������� ���� �� 3 ½ ” ������. ��� ����������� ����� �������� ����. � ����� �� �������, ��� ��� ���������, �������� ������ ����...�� ������ ������. �� �� ������, ����� ����� �������� � ������� ����� ������! ������ ������� ����� ����� ������ ���� (�� ������ ������� ��� � ����� ����������� ���� ���������) � –�����! �� ���������!!
 /i0.wp.com/greenweddingshoes.com/wp-content/uploads/2012/03/diy-flower-13.jpg?resize=300,198" target="_blank">http://i0.wp.com/greenweddingshoes.com/wp-content/...y-flower-13.jpg?resize=300,198 300w, http://i0.wp.com/greenweddingshoes.com/wp-content/...diy-flower-13.jpg?resize=90,60 90w, http://i0.wp.com/greenweddingshoes.com/wp-content/...y-flower-13.jpg?resize=180,120 180w" style="box-sizing: inherit; border: 0px; max-width: 100%; height: auto;" title="������� ���������� ������ ���������" width="650" />
� ��������� ���������� � �� �������, ����� �������, ��� ��� ������������ �� ��� ����� �������� �������� ��������� –������ �������, ����� ��������� �� ��� ������� ������������ �����!
 /i0.wp.com/greenweddingshoes.com/wp-content/uploads/2012/03/diy-flower-16.jpg?resize=300,198" target="_blank">http://i0.wp.com/greenweddingshoes.com/wp-content/...y-flower-16.jpg?resize=300,198 300w, http://i0.wp.com/greenweddingshoes.com/wp-content/...diy-flower-16.jpg?resize=90,60 90w, http://i0.wp.com/greenweddingshoes.com/wp-content/...y-flower-16.jpg?resize=180,120 180w" style="box-sizing: inherit; border: 0px; max-width: 100%; height: auto;" title="������� ���������� ������ ���������" width="650" />
 /i0.wp.com/greenweddingshoes.com/wp-content/uploads/2012/03/diy-flower-14.jpg?resize=300,225" target="_blank">http://i0.wp.com/greenweddingshoes.com/wp-content/...y-flower-14.jpg?resize=300,225 300w" style="box-sizing: inherit; border: 0px; max-width: 100%; height: auto;" title="������� ���������� ������ ���������" width="650" />
 /i0.wp.com/greenweddingshoes.com/wp-content/uploads/2012/03/diy-flower-15.jpg?resize=300,198" target="_blank">http://i0.wp.com/greenweddingshoes.com/wp-content/...y-flower-15.jpg?resize=300,198 300w, http://i0.wp.com/greenweddingshoes.com/wp-content/...diy-flower-15.jpg?resize=90,60 90w, http://i0.wp.com/greenweddingshoes.com/wp-content/...y-flower-15.jpg?resize=180,120 180w" style="box-sizing: inherit; border: 0px; max-width: 100%; height: auto;" title="������� ���������� ������ ���������" width="650" />
������� ������� ������ �� ��������� ����� ������ � ���� � (��� �����) ���������� �� ����!
http://greenweddingshoes.com/diy-giant-flowers/
 /i0.wp.com/greenweddingshoes.com/wp-content/uploads/2012/03/diy-flower-intro.jpg?resize=300,197" target="_blank">http://i0.wp.com/greenweddingshoes.com/wp-content/...lower-intro.jpg?resize=300,197 300w, http://i0.wp.com/greenweddingshoes.com/wp-content/...-flower-intro.jpg?resize=90,60 90w" style="box-sizing: inherit; border: 0px; max-width: 100%; height: auto;" title="DIY Giant flower wedding" width="650" />
So many of you loved the giant flowers from Britney + Mark’s wedding that we asked Britney to share how she made those huge flowers and we are super excited to share the DIY with you all today! Britney did want me to share a little disclaimer that when they made these they never planned on creating a tutorial (but we are so happy you did!), so there is no exact science – just do what works for you, and if you have a great solution for one of the steps please share it! Big thanks to (once like a spark) photography for the photos!
Materials:
• Several sheets of poster board (it takes at least two full sheets of poster board per flower)
• Large Plastic Solo Cups (1 per flower)
• Bath poof
• Hot glue gun and extra sticks
• Spray Paint
• Clear Plastic Wrap
• Thin wall electrical conduit, ½” x 10’. Home Depot SKU# 203106
• Halex ½” set screw connectors, Home Depot SKU# 839663
• Raco 3 ½” round cover, Home Depot Internet SKU# 202058390
• Wood Block or bucket filled with sand to help the flower stand up
• Fabric to pool at the base of your stems
Preparing the bath poof:
So we tried to use a whole poof…but it was just too much, so we cut it in half. There is a small rope that goes around the middle of the bath poof. Cut the poof in half leaving one side tied up by the rope. Keep a firm grasp on the rest of the poof. Add a generous amount of glue to the newly cut edge, then cover with a scrap of poster. Re-glue any places that are not secured. Do the same to the other half. Now you can make two flowers. Yay!
 /i0.wp.com/greenweddingshoes.com/wp-content/uploads/2012/03/diy-flower-01.jpg?resize=300,160" target="_blank">http://i0.wp.com/greenweddingshoes.com/wp-content/...y-flower-01.jpg?resize=300,160 300w" style="box-sizing: inherit; border: 0px; max-width: 100%; height: auto;" title="diy-flower-01" width="650" />
MAKING THE FLOWER
Step one:
Lay the poster board glossy side down. (If the poster does not have a glossy side, it’s just fine.) Rip the poster towards yourself length-wise. Start by ripping pieces that are the entire length of the poster. I’m not going to lie, it takes a little practice to get a good technique.
After you get 5-7 very long petals between 2-4 inches wide, move on to tearing the smaller pieces. It’s good for the petals to curl, because they will begin to flatten out over time and you don’t want a droopy flower….or maybe you do!
Tip: Separate the petals based on size. You need several of each size, but more ofthe medium and small.
 /i0.wp.com/greenweddingshoes.com/wp-content/uploads/2012/03/diy-flower-02.jpg?resize=300,187" target="_blank">http://i0.wp.com/greenweddingshoes.com/wp-content/...y-flower-02.jpg?resize=300,187 300w" style="box-sizing: inherit; border: 0px; max-width: 100%; height: auto;" title="step one photo" width="650" />
 /i0.wp.com/greenweddingshoes.com/wp-content/uploads/2012/03/diy-flower-03.jpg?resize=291,300" target="_blank">http://i0.wp.com/greenweddingshoes.com/wp-content/...y-flower-03.jpg?resize=291,300 291w" style="box-sizing: inherit; border: 0px; max-width: 100%; height: auto;" title="petals in groups" width="650" />
Step Two:
Cut your cup in half. Then cut 1 inch tabs all the way around it. This will be your base. Hot glue your biggest petals to the OUTSIDE of the cut tabs. The weight of the petals should open the cup into a semi-flat shape.
 /i0.wp.com/greenweddingshoes.com/wp-content/uploads/2012/03/diy-flower-04.jpg?resize=229,300" target="_blank">http://i0.wp.com/greenweddingshoes.com/wp-content/...y-flower-04.jpg?resize=229,300 229w" style="box-sizing: inherit; border: 0px; max-width: 100%; height: auto;" title="step two" width="650" />
Step Three:
Continue adding petals to the INSIDE of the cup moving from largest to smallest. Be sure to fill in areas that look empty. Stop before you get to the smallest petals.
 /i0.wp.com/greenweddingshoes.com/wp-content/uploads/2012/03/diy-flower-05.jpg?resize=300,208" target="_blank">http://i0.wp.com/greenweddingshoes.com/wp-content/...y-flower-05.jpg?resize=300,208 300w" style="box-sizing: inherit; border: 0px; max-width: 100%; height: auto;" title="step three DIY" width="650" />
 /i0.wp.com/greenweddingshoes.com/wp-content/uploads/2012/03/diy-flower-06.jpg?resize=300,194" target="_blank">http://i0.wp.com/greenweddingshoes.com/wp-content/...y-flower-06.jpg?resize=300,194 300w" style="box-sizing: inherit; border: 0px; max-width: 100%; height: auto;" title="petals" width="650" />
Step Four:
Glue your bath poof to the center. Once the bath poof is glued, add the smaller petals so that they curve up around it.
 /i0.wp.com/greenweddingshoes.com/wp-content/uploads/2012/03/diy-flower-07.jpg?resize=229,300" target="_blank">http://i0.wp.com/greenweddingshoes.com/wp-content/...y-flower-07.jpg?resize=229,300 229w" style="box-sizing: inherit; border: 0px; max-width: 100%; height: auto;" title="diy-flower-07" width="650" />
Step Five:
Once you are satisfied with the fullness of the flower, lightly dust the center with spray paint.
Tip:Guard the outer petals with newspaper or extra poster so they don’t get sprayed.
 /i0.wp.com/greenweddingshoes.com/wp-content/uploads/2012/03/diy-flower-08.jpg?resize=300,206" target="_blank">http://i0.wp.com/greenweddingshoes.com/wp-content/...y-flower-08.jpg?resize=300,206 300w" style="box-sizing: inherit; border: 0px; max-width: 100%; height: auto;" title="step five" width="650" />
Preparing the stem:
I’m going to be honest, my dad did this part – and there is no exact technique. Some have asked if PVC pipe would work. We tried it, but it was too flimsy. Instead, we used thin wall electrical conduit from the electrical department at Home Depot. You also need a screw connector and a round metal outlet cover. If you are confused, print out the picture, take it to the home improvement store and they should know exactly what you need.
Bending the conduit (stem). THIS is the difficult part: Hold the pipe up at an angle, one end resting on the ground. Slightly bend by stepping on the lowest section, move your foot up 8-10” and repeat until you have the curve you want. Be careful and don’t try to bend the conduit all at once, making numerous smaller bends works best. Once the conduit is curved, attach the Halex screw connector onto the flower end of the conduit, knock the center plug out of the Raco round cover plate and secure it to the screw connector (very easy, just sounds confusing).
 /i0.wp.com/greenweddingshoes.com/wp-content/uploads/2012/03/diy-flower-09.jpg?resize=300,224" target="_blank">http://i0.wp.com/greenweddingshoes.com/wp-content/...y-flower-09.jpg?resize=300,224 300w" style="box-sizing: inherit; border: 0px; max-width: 100%; height: auto;" title="diy-flower-09" width="650" />
Option 1: Drill a 7/8” inch hole in a large piece of wood. Insert the bent conduit stem (as seen below).
Option 2: Use buckets filled with gravel or sand to keep the flower upright.
Option 3: Simply push the stem into the ground if your event is outdoors.
Option 4: Make something up. If it works, share your wisdom with the rest of us!
 /i0.wp.com/greenweddingshoes.com/wp-content/uploads/2012/03/diy-flower-10.jpg?resize=300,224" target="_blank">http://i0.wp.com/greenweddingshoes.com/wp-content/...y-flower-10.jpg?resize=300,224 300w" style="box-sizing: inherit; border: 0px; max-width: 100%; height: auto;" title="diy-flower-10" width="650" />
 /i0.wp.com/greenweddingshoes.com/wp-content/uploads/2012/03/diy-flower-11.jpg?resize=300,206" target="_blank">http://i0.wp.com/greenweddingshoes.com/wp-content/...y-flower-11.jpg?resize=300,206 300w" style="box-sizing: inherit; border: 0px; max-width: 100%; height: auto;" title="diy-flower-11" width="650" />
Wrap the conduit in several layers of clear plastic wrap. It actually looks better if it’s a little messy.
 /i0.wp.com/greenweddingshoes.com/wp-content/uploads/2012/03/diy-flower-12.jpg?resize=229,300" target="_blank">http://i0.wp.com/greenweddingshoes.com/wp-content/...y-flower-12.jpg?resize=229,300 229w" style="box-sizing: inherit; border: 0px; max-width: 100%; height: auto;" title="diy-flower-12" width="650" />
Finally, attach the completed flower using a lot of hot glue to the 3 ½” cover plate. You will need A LOT of hot glue. And just when you think it is secure, add more glue…just in case. You don’t want the wind taking off with the top of your flower! Now pool your fabric around the base (you can see this in her ceremony photos below) and –Viola! You are finished!!
 /i0.wp.com/greenweddingshoes.com/wp-content/uploads/2012/03/diy-flower-13.jpg?resize=300,198" target="_blank">http://i0.wp.com/greenweddingshoes.com/wp-content/...y-flower-13.jpg?resize=300,198 300w, http://i0.wp.com/greenweddingshoes.com/wp-content/...diy-flower-13.jpg?resize=90,60 90w, http://i0.wp.com/greenweddingshoes.com/wp-content/...y-flower-13.jpg?resize=180,120 180w" style="box-sizing: inherit; border: 0px; max-width: 100%; height: auto;" title="DIY Giant flower wedding" width="650" />
And a few photos from their wedding to see how they used them for their pretty outdoor ceremony –be sure to check out their entire wedding feature here!
 /i0.wp.com/greenweddingshoes.com/wp-content/uploads/2012/03/diy-flower-16.jpg?resize=300,198" target="_blank">http://i0.wp.com/greenweddingshoes.com/wp-content/...y-flower-16.jpg?resize=300,198 300w, http://i0.wp.com/greenweddingshoes.com/wp-content/...diy-flower-16.jpg?resize=90,60 90w, http://i0.wp.com/greenweddingshoes.com/wp-content/...y-flower-16.jpg?resize=180,120 180w" style="box-sizing: inherit; border: 0px; max-width: 100%; height: auto;" title="DIY Giant flower wedding" width="650" />
 /i0.wp.com/greenweddingshoes.com/wp-content/uploads/2012/03/diy-flower-14.jpg?resize=300,225" target="_blank">http://i0.wp.com/greenweddingshoes.com/wp-content/...y-flower-14.jpg?resize=300,225 300w" style="box-sizing: inherit; border: 0px; max-width: 100%; height: auto;" title="DIY Giant flower wedding" width="650" />
 /i0.wp.com/greenweddingshoes.com/wp-content/uploads/2012/03/diy-flower-15.jpg?resize=300,198" target="_blank">http://i0.wp.com/greenweddingshoes.com/wp-content/...y-flower-15.jpg?resize=300,198 300w, http://i0.wp.com/greenweddingshoes.com/wp-content/...diy-flower-15.jpg?resize=90,60 90w, http://i0.wp.com/greenweddingshoes.com/wp-content/uploads/2012/03/diy-fl" />


 /i0.wp.com/greenweddingshoes.com/wp-content/uploads/2014/04/DIY_Giant_Paper_Flower_Title.jpg?resize=300,200" target="_blank">http://i0.wp.com/greenweddingshoes.com/wp-content/...lower_Title.jpg?resize=300,200 300w,
  /i0.wp.com/greenweddingshoes.com/wp-content/uploads/2014/04/step11.jpg?resize=300,204" target="_blank">http://i0.wp.com/greenweddingshoes.com/wp-content/...4/04/step11.jpg?resize=300,204 300w,
  /i0.wp.com/greenweddingshoes.com/wp-content/uploads/2014/04/step2-3-redo.jpg?resize=227,300" target="_blank">http://i0.wp.com/greenweddingshoes.com/wp-content/...tep2-3-redo.jpg?resize=227,300 227w" style="box-sizing: inherit; border: 0px; max-width: 100%; height: auto;" width="650" />
 /i0.wp.com/greenweddingshoes.com/wp-content/uploads/2014/04/tip1.jpg?resize=300,211" target="_blank">http://i0.wp.com/greenweddingshoes.com/wp-content/...014/04/tip1.jpg?resize=300,211 300w" style="box-sizing: inherit; border: 0px; max-width: 100%; height: auto;" width="650" />
 /i0.wp.com/greenweddingshoes.com/wp-content/uploads/2014/04/step41.jpg?resize=300,225" target="_blank">http://i0.wp.com/greenweddingshoes.com/wp-content/...4/04/step41.jpg?resize=300,225 300w" style="box-sizing: inherit; border: 0px; max-width: 100%; height: auto;" width="650" />
 /i0.wp.com/greenweddingshoes.com/wp-content/uploads/2014/04/step5-6.jpg?resize=300,224" target="_blank">http://i0.wp.com/greenweddingshoes.com/wp-content/.../04/step5-6.jpg?resize=300,224 300w" style="box-sizing: inherit; border: 0px; max-width: 100%; height: auto;" width="650" />
 /i0.wp.com/greenweddingshoes.com/wp-content/uploads/2014/04/step7.jpg?resize=300,200" target="_blank">http://i0.wp.com/greenweddingshoes.com/wp-content/...14/04/step7.jpg?resize=300,200 300w,
  /i0.wp.com/greenweddingshoes.com/wp-content/uploads/2014/04/step8.jpg?resize=300,200" target="_blank">http://i0.wp.com/greenweddingshoes.com/wp-content/...14/04/step8.jpg?resize=300,200 300w,
  /i0.wp.com/greenweddingshoes.com/wp-content/uploads/2014/04/step9.jpg?resize=300,202" target="_blank">http://i0.wp.com/greenweddingshoes.com/wp-content/...14/04/step9.jpg?resize=300,202 300w,
  /i0.wp.com/greenweddingshoes.com/wp-content/uploads/2014/04/step10-redo.jpg?resize=227,300" target="_blank">http://i0.wp.com/greenweddingshoes.com/wp-content/...step10-redo.jpg?resize=227,300 227w" style="box-sizing: inherit; border: 0px; max-width: 100%; height: auto;" width="650" />
 /i0.wp.com/greenweddingshoes.com/wp-content/uploads/2014/04/step111.jpg?resize=300,213" target="_blank">http://i0.wp.com/greenweddingshoes.com/wp-content/.../04/step111.jpg?resize=300,213 300w" style="box-sizing: inherit; border: 0px; max-width: 100%; height: auto;" width="650" />
 /i0.wp.com/greenweddingshoes.com/wp-content/uploads/2014/04/step12-14.jpg?resize=300,147" target="_blank">http://i0.wp.com/greenweddingshoes.com/wp-content/...4/step12-14.jpg?resize=300,147 300w" style="box-sizing: inherit; border: 0px; max-width: 100%; height: auto;" width="650" />
 /i0.wp.com/greenweddingshoes.com/wp-content/uploads/2014/04/final4.jpg?resize=300,220" target="_blank">http://i0.wp.com/greenweddingshoes.com/wp-content/...4/04/final4.jpg?resize=300,220 300w" style="box-sizing: inherit; border: 0px; max-width: 100%; height: auto;" width="650" />
 /i0.wp.com/greenweddingshoes.com/wp-content/uploads/2014/04/finalphoto1.jpg?resize=300,198" target="_blank">http://i0.wp.com/greenweddingshoes.com/wp-content/...finalphoto1.jpg?resize=300,198 300w,
  /i0.wp.com/greenweddingshoes.com/wp-content/uploads/2014/04/DIY_Giant_Paper_Flower_three.jpg?resize=300,205" target="_blank">http://i0.wp.com/greenweddingshoes.com/wp-content/...lower_three.jpg?resize=300,205 300w" style="box-sizing: inherit; border: 0px; max-width: 100%; height: auto;" width="650" />
 /i0.wp.com/greenweddingshoes.com/wp-content/uploads/2014/04/DIY_Giant_Paper_Flower_Full.jpg?resize=200,300" target="_blank">http://i0.wp.com/greenweddingshoes.com/wp-content/...Flower_Full.jpg?resize=200,300 200w,
  /i0.wp.com/greenweddingshoes.com/wp-content/uploads/2014/04/DIY_Giant_Paper_Flower_Title.jpg?resize=300,200" target="_blank">http://i0.wp.com/greenweddingshoes.com/wp-content/...lower_Title.jpg?resize=300,200 300w,
  /i0.wp.com/greenweddingshoes.com/wp-content/uploads/2014/04/step11.jpg?resize=300,204" target="_blank">http://i0.wp.com/greenweddingshoes.com/wp-content/...4/04/step11.jpg?resize=300,204 300w,
 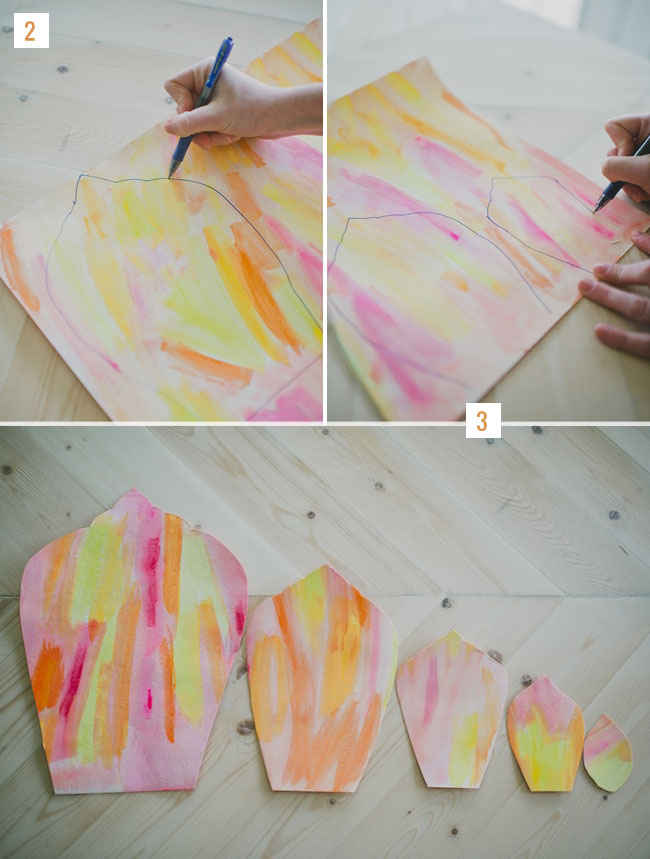 /i0.wp.com/greenweddingshoes.com/wp-content/uploads/2014/04/step2-3-redo.jpg?resize=227,300" target="_blank">http://i0.wp.com/greenweddingshoes.com/wp-content/...tep2-3-redo.jpg?resize=227,300 227w" style="box-sizing: inherit; border: 0px; max-width: 100%; height: auto;" width="650" />
 /i0.wp.com/greenweddingshoes.com/wp-content/uploads/2014/04/tip1.jpg?resize=300,211" target="_blank">http://i0.wp.com/greenweddingshoes.com/wp-content/...014/04/tip1.jpg?resize=300,211 300w" style="box-sizing: inherit; border: 0px; max-width: 100%; height: auto;" width="650" />
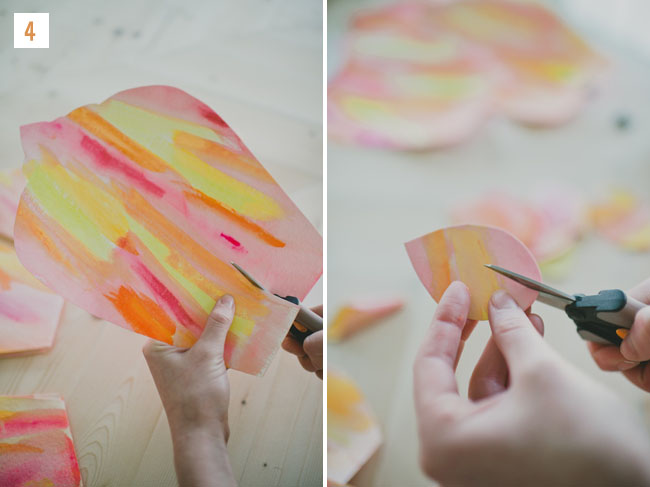 /i0.wp.com/greenweddingshoes.com/wp-content/uploads/2014/04/step41.jpg?resize=300,225" target="_blank">http://i0.wp.com/greenweddingshoes.com/wp-content/...4/04/step41.jpg?resize=300,225 300w" style="box-sizing: inherit; border: 0px; max-width: 100%; height: auto;" width="650" />
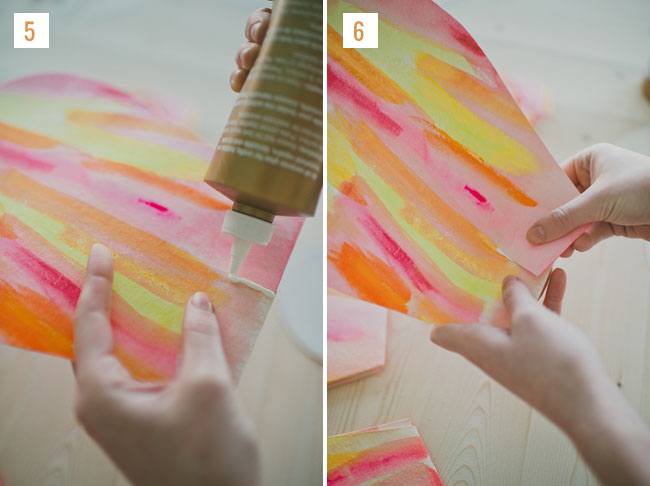 /i0.wp.com/greenweddingshoes.com/wp-content/uploads/2014/04/step5-6.jpg?resize=300,224" target="_blank">http://i0.wp.com/greenweddingshoes.com/wp-content/.../04/step5-6.jpg?resize=300,224 300w" style="box-sizing: inherit; border: 0px; max-width: 100%; height: auto;" width="650" />
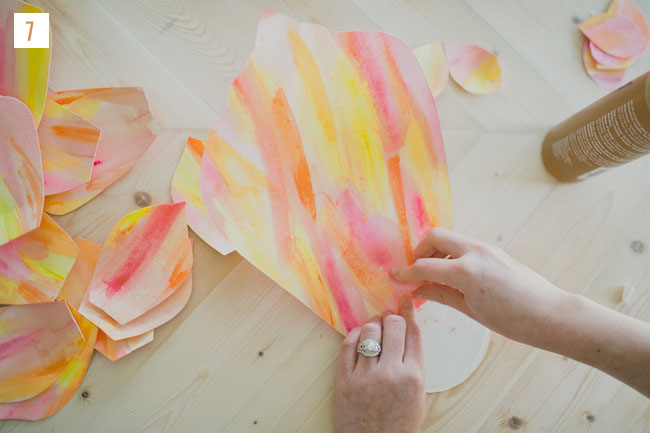 /i0.wp.com/greenweddingshoes.com/wp-content/uploads/2014/04/step7.jpg?resize=300,200" target="_blank">http://i0.wp.com/greenweddingshoes.com/wp-content/...14/04/step7.jpg?resize=300,200 300w,
 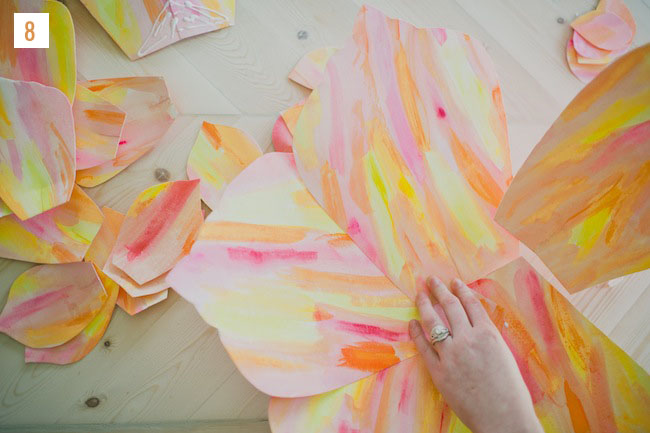 /i0.wp.com/greenweddingshoes.com/wp-content/uploads/2014/04/step8.jpg?resize=300,200" target="_blank">http://i0.wp.com/greenweddingshoes.com/wp-content/...14/04/step8.jpg?resize=300,200 300w,
 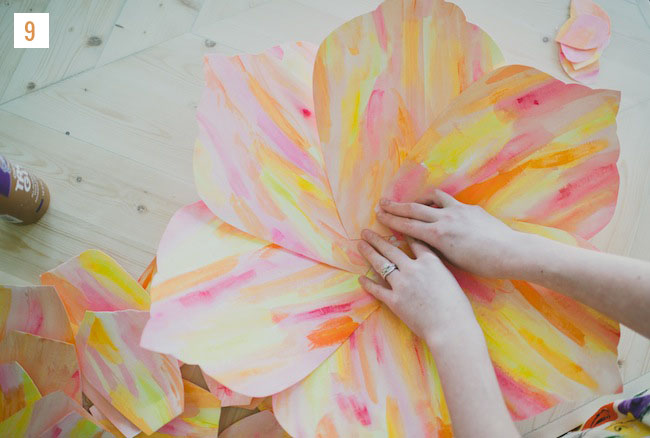 /i0.wp.com/greenweddingshoes.com/wp-content/uploads/2014/04/step9.jpg?resize=300,202" target="_blank">http://i0.wp.com/greenweddingshoes.com/wp-content/...14/04/step9.jpg?resize=300,202 300w,
 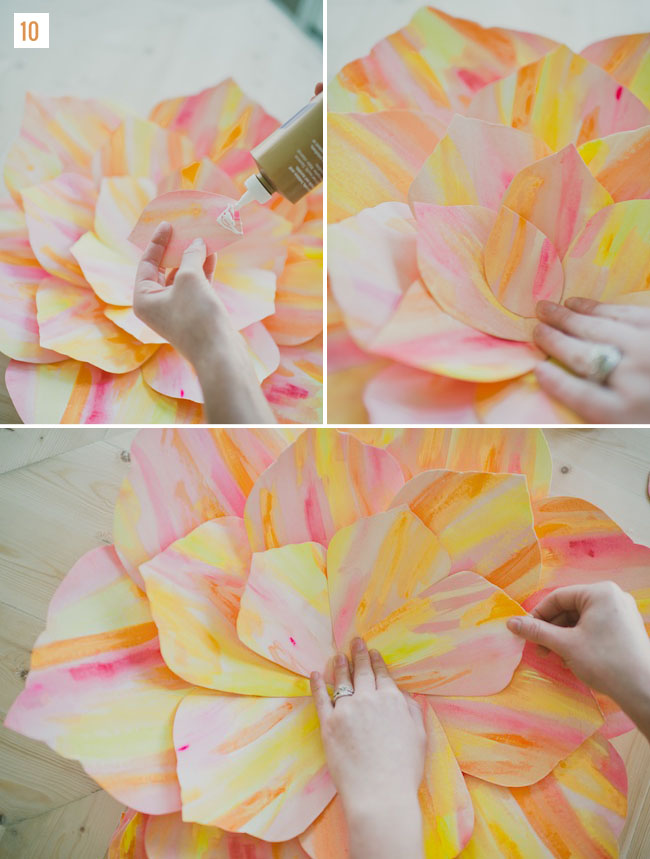 /i0.wp.com/greenweddingshoes.com/wp-content/uploads/2014/04/step10-redo.jpg?resize=227,300" target="_blank">http://i0.wp.com/greenweddingshoes.com/wp-content/...step10-redo.jpg?resize=227,300 227w" style="box-sizing: inherit; border: 0px; max-width: 100%; height: auto;" width="650" />
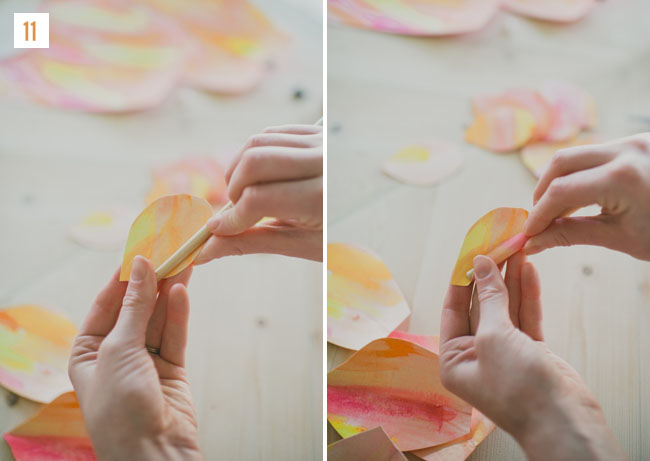 /i0.wp.com/greenweddingshoes.com/wp-content/uploads/2014/04/step111.jpg?resize=300,213" target="_blank">http://i0.wp.com/greenweddingshoes.com/wp-content/.../04/step111.jpg?resize=300,213 300w" style="box-sizing: inherit; border: 0px; max-width: 100%; height: auto;" width="650" />
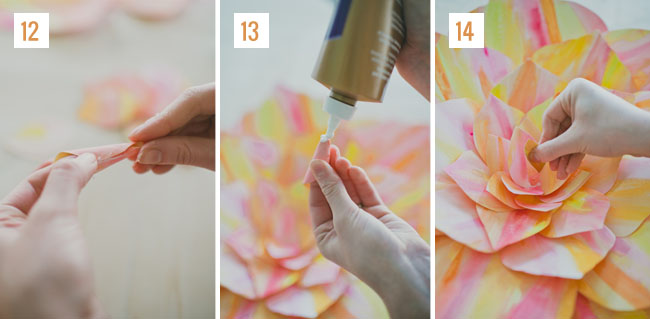 /i0.wp.com/greenweddingshoes.com/wp-content/uploads/2014/04/step12-14.jpg?resize=300,147" target="_blank">http://i0.wp.com/greenweddingshoes.com/wp-content/...4/step12-14.jpg?resize=300,147 300w" style="box-sizing: inherit; border: 0px; max-width: 100%; height: auto;" width="650" />
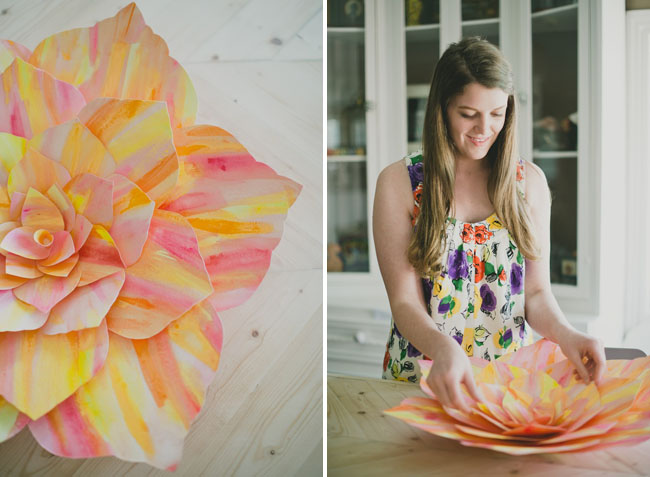 /i0.wp.com/greenweddingshoes.com/wp-content/uploads/2014/04/final4.jpg?resize=300,220" target="_blank">http://i0.wp.com/greenweddingshoes.com/wp-content/...4/04/final4.jpg?resize=300,220 300w" style="box-sizing: inherit; border: 0px; max-width: 100%; height: auto;" width="650" />
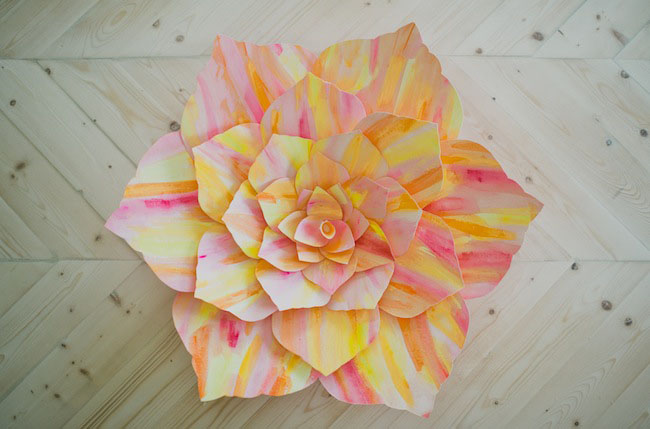 /i0.wp.com/greenweddingshoes.com/wp-content/uploads/2014/04/finalphoto1.jpg?resize=300,198" target="_blank">http://i0.wp.com/greenweddingshoes.com/wp-content/...finalphoto1.jpg?resize=300,198 300w,
 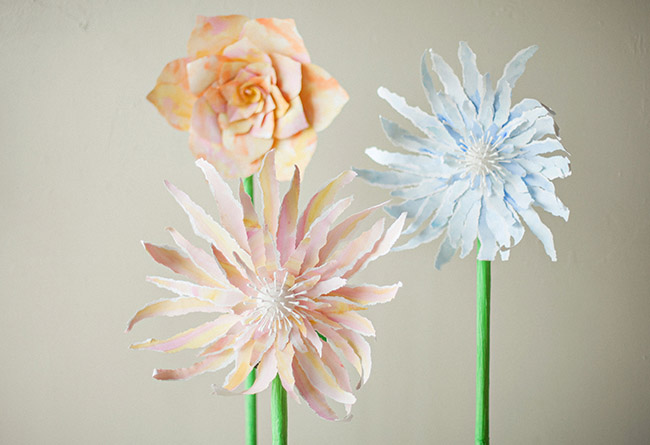 /i0.wp.com/greenweddingshoes.com/wp-content/uploads/2014/04/DIY_Giant_Paper_Flower_three.jpg?resize=300,205" target="_blank">http://i0.wp.com/greenweddingshoes.com/wp-content/...lower_three.jpg?resize=300,205 300w" style="box-sizing: inherit; border: 0px; max-width: 100%; height: auto;" width="650" />
 /i0.wp.com/greenweddingshoes.com/wp-content/uploads/2014/04/DIY_Giant_Paper_Flower_Full.jpg?resize=200,300" target="_blank">http://i0.wp.com/greenweddingshoes.com/wp-content/...Flower_Full.jpg?resize=200,300 200w,
  /i0.wp.com/greenweddingshoes.com/wp-content/uploads/2016/09/step2.jpg?resize=300,226" target="_blank">http://i0.wp.com/greenweddingshoes.com/wp-content/...16/09/step2.jpg?resize=300,226 300w,
  /i0.wp.com/greenweddingshoes.com/wp-content/uploads/2016/09/final1.jpg?resize=300,222" target="_blank">http://i0.wp.com/greenweddingshoes.com/wp-content/...6/09/final1.jpg?resize=300,222 300w,
  /i0.wp.com/greenweddingshoes.com/wp-content/uploads/2016/09/step1.jpg?resize=300,224" target="_blank">http://i0.wp.com/greenweddingshoes.com/wp-content/...16/09/step1.jpg?resize=300,224 300w,
  /i0.wp.com/greenweddingshoes.com/wp-content/uploads/2016/09/step2.jpg?resize=300,226" target="_blank">http://i0.wp.com/greenweddingshoes.com/wp-content/...16/09/step2.jpg?resize=300,226 300w,
  /i0.wp.com/greenweddingshoes.com/wp-content/uploads/2016/09/final1.jpg?resize=300,222" target="_blank">http://i0.wp.com/greenweddingshoes.com/wp-content/...6/09/final1.jpg?resize=300,222 300w,
  /i0.wp.com/greenweddingshoes.com/wp-content/uploads/2016/09/final2.jpg?resize=229,300" target="_blank">http://i0.wp.com/greenweddingshoes.com/wp-content/...6/09/final2.jpg?resize=229,300 229w,
  /i0.wp.com/greenweddingshoes.com/wp-content/uploads/2016/09/final3.jpg?resize=300,225" target="_blank">http://i0.wp.com/greenweddingshoes.com/wp-content/...6/09/final3.jpg?resize=300,225 300w,
  /i0.wp.com/greenweddingshoes.com/wp-content/uploads/2016/09/final4.jpg?resize=300,199" target="_blank">http://i0.wp.com/greenweddingshoes.com/wp-content/...6/09/final4.jpg?resize=300,199 300w,
  /i0.wp.com/greenweddingshoes.com/wp-content/uploads/2016/09/final5.jpg?resize=300,224" target="_blank">http://i0.wp.com/greenweddingshoes.com/wp-content/...6/09/final5.jpg?resize=300,224 300w,
 /i0.wp.com/greenweddingshoes.com/wp-content/uploads/2016/09/final08.jpg?resize=229,300" target="_blank">http://i0.wp.com/greenweddingshoes.com/wp-content/.../09/final08.jpg?resize=229,300 229w,
  /i0.wp.com/greenweddingshoes.com/wp-content/uploads/2016/09/final9.jpg?resize=300,225" target="_blank">http://i0.wp.com/greenweddingshoes.com/wp-content/...6/09/final9.jpg?resize=300,225 300w,
  /i0.wp.com/greenweddingshoes.com/wp-content/uploads/2016/09/final10.jpg?resize=300,199" target="_blank">http://i0.wp.com/greenweddingshoes.com/wp-content/.../09/final10.jpg?resize=300,199 300w,

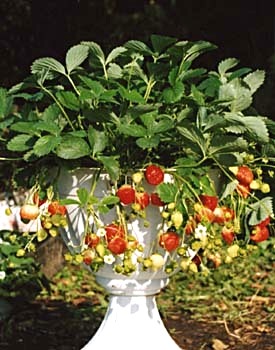
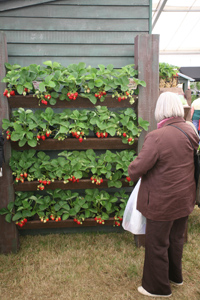
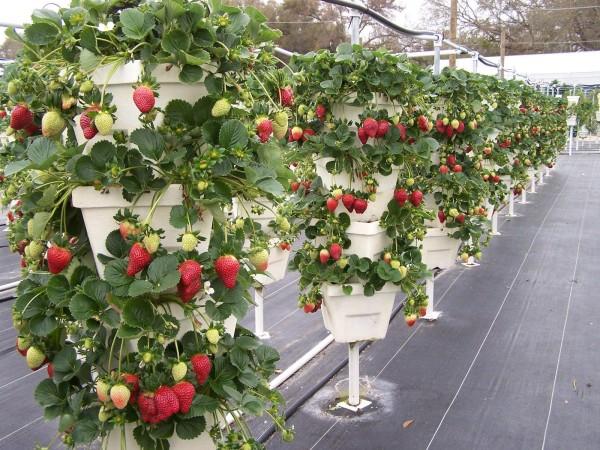


 ������������ �������, ���� � ��������� ��� �����������, � ��� ��� �������� ����� 55 ����� ������ � �� � ������.