Китайская новогодняя куколка амигуруми |
 Китайская новогодняя куколка амигуруми
Очень мне понравилась эта малышка, вот я и нашла мк и описание вязания китаянки с кроликом. Описание так и оставляю на английском, пропустить его через автопереводчик рука не поднялась.
Если кто-нибудь переведет на русский или знает где можно найти готовый перевод, пожалуйста, киньте ссылочку!

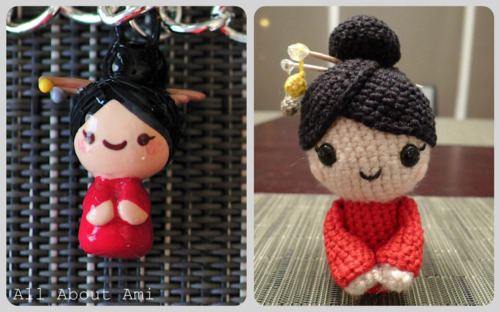
The hair was the challenging part. I wasn’t sure what shape to make and how to position the hair on the head. If I made one big circle and sewed it ontop, it would simply look like she was wearing a hat (or that she had a bowl cut!). I really wanted to make a part in her hair as well. And so, I made two circles of varying sizes and overlapped them to create a side part for her! I flipped the circles inside out (as seen in photo below) since they fit the head better this way.

Then I made a red dress (red symbolizes good fortune and joy in traditional Chinese culture, and it’s found everywhere during Chinese New Year) consisting of two parts: a tube and a circle for the bottom. I joined the circle to the tube with single crochets to create a frilly edge for the bottom. We cut out a cardboard circle, placed it in the bottom, and then filled her dress with rice so that she would stand nicely.

Next, I sewed a cute bun ontop of her head. Then we placed toothpicks in her hair (representing chopsticks of course :D) and Ryan used a glue gun to secure a little yellow and grey ball to the toothpicks. The glue gives it a nice oramental look, almost like a jewel or crystal.

I then made sleeves that flair out and two balls for her hands. Ryan helped me glue gun the hands into her sleeves. I attached the sleeves to her dress (doesn’t it look like she’s ready to give a big hug in the second photo?) and then tied her hands together so she’s ready to hold something!

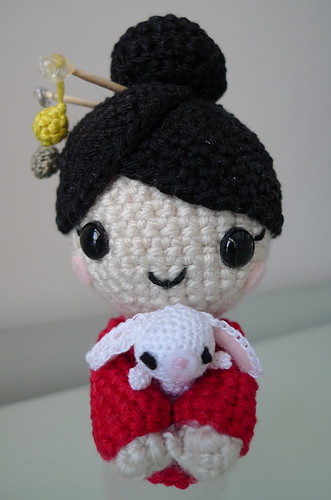
Now onto her little bunny toy! To make such a tiny bunny, I had to get special extra fine crochet thread as seen below:

My eyes were going a little wonky when I was making this bunny since the stitches were so tiny! I had to take breaks and work on it bit by bit. I pretty much made this bunny the same way as my other bunny, adjusting the pattern to make it smaller. Look how tiny the head is:

Assembling the little bunny didn’t take too long. She sure is tiny, hey?

And now to place the little bunny into her arms :)
Here are some side views:

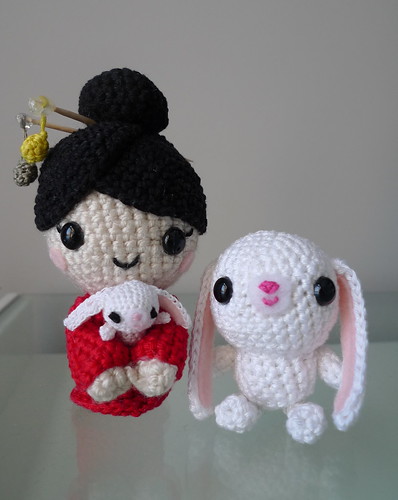
I had to bring out the other bunny too because they look so cute together!


And with some Red Pocket Money :)
 http://allaboutami.tumblr.com/post/3071777557/chinesenewyeardoll
Let’s begin!

Materials:
Note: I worked in continuous rounds (vs. joined rounds) and used the 2.00 mm crochet hook all throughout to get a tighter gauge. Feel free to follow along with my blog post to see step-by-step photos.
HAIR
Using black yarn, we will make: (1) a big black circle, (2) a smaller black circle, and (3) a bun.
(1) Big Circle:
R1: Ch 2, 6 sc in second ch from hook. (6 sts)
R2: 2 sc in each sc around. (12 sts)
R3: *Sc 1, 2 sc in next sc*, rep 6 times. (18 sts)
R4: *Sc 2, 2 sc in next sc*, rep 6 times. (24 sts)
R5: *Sc 3, 2 sc in next sc*, rep 6 times (30 sts)
R6: *Sc 4, 2 sc in next sc*, rep 6 times (36 sts)
R7 – 12: Sc 36
Fasten off. Ends can be tucked in when gluing/sewing hair to head. Flip inside out (it becomes less curved so that it fits the head better).
(2) Small circle:
R1: Ch 2, 6 sc in second ch from hook. (6 sts)
R2: 2 sc in each sc around. (12 sts)
R3: *Sc 1, 2 sc in next sc*, rep 6 times. (18 sts)
R4: *Sc 2, 2 sc in next sc*, rep 6 times. (24 sts)
R5: *Sc 3, 2 sc in next sc*, rep 6 times (30 sts)
R6: *Sc 4, 2 sc in next sc*, rep 6 times (36 sts)
R7 – 8: Sc 36
Fasten off. Ends can be tucked in when gluing/sewing hair to head. Flip inside out (it becomes less curved so that it fits the head better).
(3) Bun:
R1: Ch 2, 6 sc in second ch from hook. (6 sts)
R2: 2 sc in each sc around. (12 sts)
R3: *Sc 1, 2 sc in next sc*, rep 6 times. (18 sts)
R4: *Sc 2, 2 sc in next sc*, rep 6 times. (24 sts)
R5-6: Sc 24
R7: *Sc 2, dec 1*, rep 6 times. (18 sts)
Stuff bun firmly.
R8: *Sc 1, dec 1*, rep 6 times. (12 sts)
R9: *Sk 1 sc, sc 1*, rep 6 times. (6 sts)
Fasten off and leave end for attaching bun to black circles. Alternatively, you could make two smaller side buns for an equally cute look =D
HEAD
Using skin-coloured yarn,
R1: Ch 2, 6 sc in second ch from hook. (6 sts)
R2: 2 sc in each sc around. (12 sts)
R3: *Sc 1, 2 sc in next sc*, rep 6 times. (18 sts)
R4: *Sc 2, 2 sc in next sc*, rep 6 times. (24 sts)
R5: *Sc 3, 2 sc in next sc*, rep 6 times (30 sts)
R6: *Sc 4, 2 sc in next sc*, rep 6 times (36 sts)
R7 – 13: Sc 36
R14: *Sc 4, dec 1*, rep 6 times (30 sts)
R15: *Sc 3, dec 1* rep 6 times (24 sts)
Add details to face. Place overlapping black circles on head to see roughly where to place eyes. Insert 9 mm eyes, sew eyelashes and smile using embroidery floss. Pink cheeks can be glued on now or after stuffing.
R16: *Sc 2, dec 1*, rep 6 times. (18 sts)
Stuff head firmly.
R17: *Sc 1, dec 1*, rep 6 times. (12 sts)
R18: *Sk 1 sc, sc 1*, rep 6 times. (6 sts)
Fasten off and weave in end.
Attaching hair to head:
Chopsticks Hair Ornaments:
Make two small balls using grey and yellow (or your favourite colours) embroidery floss according to this pattern:
R1: Ch 2, 3 sc in second ch from hook. (3 sts)
R2: 2 sc in each sc around. (6 sts)
R3: Sc 6
R4: *Sk 1 sc, sc 1*, rep 3 times (3 sts)
Fasten off and leave ends to hang off toothpicks.
Use a glue gun to attach tail of ball to toothpick. Criss cross the toothpicks and insert them into her bun.
DRESS
Her dress consists of 3 parts using red yarn: (1) The body (2) The sleeves (3) Dress base (bottom)
(1) Body (this is pretty much a simple tube):
Ch 18, join first and last sts with sl st to form a ring.
R1 – 10: Sc 18
Fasten off and weave in end (or it can be tucked into the dress when you fill it with fiberfill/rice).
(2) Dress base:
R1: Ch 2, 6 sc in second ch from hook. (6 sts)
R2: 2 sc in each sc around. (12 sts)
R3: *Sc 1, 2 sc in next sc*, rep 6 times. (18 sts)
R4: *Sc 2, 2 sc in next sc*, rep 6 times. (24 sts)
Fasten off and leave long tail to attach dress base to body.
Stuff body firmly with fiberfill/rice. Attach the dress base to the body with single crochets going all around (using end from dress base) to give a nice decorative edge
(3) Sleeves (they should flare out):
R1: Ch 2, 3 sc in second ch from hook. (3 sts) [leave long tail to later attach sleeves to body]
R2: 2 sc in each sc around. (6 sts)
R3-4: Sc 6
R5: *Sc 1, 2 sc in next sc*, rep 3 times. (9 sts)
R6: *Sc 2, 2 sc in next sc*, rep 3 times. (12 sts)
R7-9: Sc 12
HANDS
Using cream-coloured yarn, make two balls:
R1: Ch 2, 6 sc in second ch from hook. (6 sts)
R2: Sc 6
R3: *Sk 1 sc, sc 1*, rep 3 times (3 sts)
Fasten off and weave in end (or it can be tucked in when hands are glued/sewed into sleeves).
Attaching hands and sleeves:
Now your Chinese New Year Doll is ready to hold anything!!!
If you would like to make the little rabbit that she is holding in the photos, please see Ana Paula Rimoli’s “Amigurumi Too: Crocheted Toys for Me and You and Baby Too” for the pattern. I used “Aunt Lydia’s Extra Fine Crochet Thread” (100% mercerized cotton, 30 size) and a 1.25 mm crochet hook to make the tiny bunny.
Have a great time making your own Chinese New Year Doll, everyone! Happy crocheting!
http://allaboutami.tumblr.com/post/3314419968/chinesenewyeardollpattern
| Рубрики: | КУКЛЫ СВОИМИ РУКАМИ/Вязаные куклы |
| Комментировать | « Пред. запись — К дневнику — След. запись » | Страницы: [1] [Новые] |


