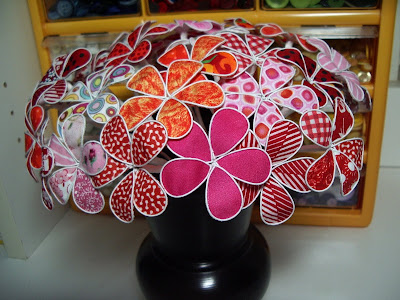
Необыкновенный букет (мастер-класс) |
Мастер-класс по необыкновенным цветам . Он к сожалению на английском. Но по картинкам все ясно.
Supplies: You will need fabric scraps, 26 gauge cloth covered floral stem wire in 18" lengths, a sharpie or a dowel approximately 1/2" in diameter, a plastic seed bead container or a dowel approximately 7/8" in diameter, Tacky Glue, scotch tape, floral tape, sharp scissors, and a pair of wire cutters/pliers.

Please note: The length of wire that you choose to use for each of your petals will ultimately depend on what project you will be using these flowers on. If you are planning to turn your flowers into a bouquet, it is reasonable to say that using the entire 18" length of wire would be prudent. After twisting the center of the 18" piece of wire around the dowel, you should end up with tails approximately 8" in length. This could then be used to form the stem of the flower bouquet.
To begin, twist the center of the wire around the bead container or dowel with the help of a plier if needed. Twist 3-4 times to secure.

Slide the wire off of the bead container or dowel taking care not to distort the shape.

With one hand holding onto the wire tail, place the sharpie or 1/2" dowel into the circle and give it a gentle tug. The harder you pull, the narrower the petal will become.

This is the shape you are trying to achieve.

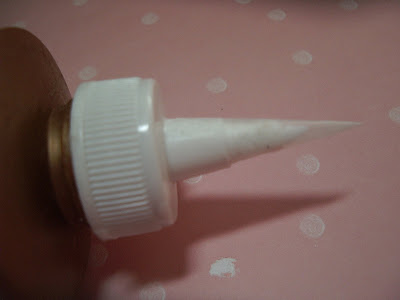
The next step involves gluing the wire onto the fabric. The glue that comes straight from the bottle comes out in too large a stream. To rectify this, place a piece of scotch tape onto the tip of the nozzle at an angle.

Roll the tape around the tip to form a cone shape. The size of the stream should be the approximate width of the wire. You may cut the tip of the cone as needed.
Apply glue evenly and completely around one side of the wire petal.

Place the petal onto the right side of the fabric. Press down on the wire to achieve contact between the glue and the fabric. There will be oozing once the wire is pressed down but this is acceptable as the excess glue will dry clear.

Let the petals dry completely.

Cut around each petal as close to the wire as possible being careful not to cut through the fabric on the wire.

Place 5 petals together evenly. Apply floral tape to the wire stems to hold it together.

Shape the petals by wrapping the edges around a dowel.

Optional Step: To slightly stiffen petals(which I always do), use a 50/50 mix of Elmer's Glue and water. Paint on a light coat with a soft paintbrush. Avoid pressing too hard on the petals because once the fabric becomes saturated, there is a possibility that the fabric could separate from the wire. Allow to dry thoroughly before attaching the flower to your project.

You could turn these flowers into a petite noesgay like I did last June.
If you feel overwhelmed at the prospect of making more than one of anything then I say, just make one.

http://mousechirpy-polkadotpineapple.blogspot.com/...wire-edged-fabric-flowers.html
Серия сообщений "Цветы":
Часть 1 - Вышивка лентами
Часть 2 - Цветы из лент
Часть 3 - Цветы из нейлоновых колготок(носочков)+ Видео-МК
Часть 4 - Необыкновенный букет (мастер-класс)
Часть 5 - Розочки из ткани в горшочке
Часть 6 - Георгин из капроновых лент
...
Часть 18 - Цветок-георгин из капроновой ленты
Часть 19 - Мастер-класс.изготовления цветов
Часть 20 - Цветок из органзы
| Комментировать | « Пред. запись — К дневнику — След. запись » | Страницы: [1] [Новые] |


