Переводчик ПЕРЕВОДЧИК ЦЕЛЫХ СТРАНИЦ ТЕКСТА ПРОСТО ВСТАВЬТЕ АДРЕС СТРАНИЦЫ И ВЫБИРИТЕ ЯЗЫК! ...
Обережная вышивка - (0)Обережная вышивка Обереги вышивала два раза. Старалась делать по правилам, то есть в соответст...
Первоклассное средство против трещин на пятках - (0)Первоклассное средство против трещин на пятках Сделав ЭТО, ты избавишься от трещин на пятках и...
Полезные сайты и генераторы. ИЗ БЛОГА НАДЕЖДЫ МОИСЕЕВОЙ - (0)Полезные сайты и генераторы. ИЗ БЛОГА НАДЕЖДЫ МОИСЕЕВОЙ. http://www.caption.it/index-3....
ПОМОЩЬ В РЕДАКТИРОВАНИИ ФОТО! ВЗЯТО ИЗ БЛОГА ЛЮБАША - (0)ПОМОЩЬ В РЕДАКТИРОВАНИИ ФОТО! ВЗЯТО ИЗ БЛОГА ЛЮБАША Очень удобная кнопка,в которую по...
Зебра из пластиковой бутылки |
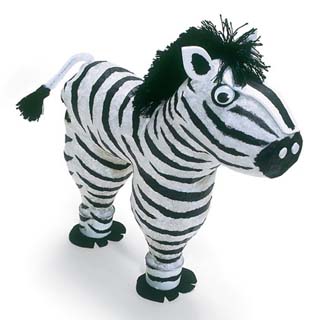
Как сделать зебру из пластиковых бутылок
1. Соберите тело и ноги из частей пластиковых бутылок, так как указано на рисунке. В ноги насыпьте риса, для стойкости фигурки.

2. Голова и шея: отрежьте от низа бутылки 7,5 см, затем обрежьте её как показано и скрепите лентой с шеей. Для головы - используя нож, вырежьте бутылку в верхней части как показано и прикрепите ее к шее скотчем.

3. Покройте поделку белой тонкой бумагой (приклейте ее к поделке). Сверху белой бумаги, наклейте черные бумажные полосы, имитирую окраску этого животного.

4.Добавьте детали: с помощью клея и поролона сделайте нос, ноздри и уши, черные поролоновые копыта, черную гриву и глаза. Используйте канцелярскую кнопку, чтобы проделать отверстие для хвоста, затем вставьте часть белого ершика для трубок(можно использовать проволоку, на которую намотана и приклеена белая нить) с небольшой черной кистью на конце.
Зебра готова!

C помощью этой простой инструкции из пластиковых бутылок можно сделать замечательную фигурку жирафа. Такая игрушка понравится не только вам, но и вашим детям.
Материалы для изготовления жирафа
Как сделать жирафа из пластиковых бутылок
1. Соберите туловище жирафа из пластиковых бутылок - как показано на рисунке. Места соединения частей нужно скрепить с помощью скотча.
2. Не забудьте насыпать в "ноги" жирафа нмного риса - для устойчивости поделки.
3. Нанесите на тонкую цветную бумагу(желтую или оранжевую) немного клея, и покройте ею всю нашу поделку.
4. Добавьте детали: клеем приклейте из коричневого поролона копыта и ноздри, так же желтые уши из поролона с коричневым центром из ткани, коричневую гриву, глаза, ну и сами пятна-окраску по всему телу животного. Используйте канцелярскую кнопку, чтобы сделать отверстия для рожков, затем вставьте 2 трубки-ершика с маленькими коричневыми помпонами приклеенными к концам. Так же сделайте и хвост (трубка-ершик + кисточка-помпон на конце).
5. Дайте поделке высохнуть. Потом с помощью маркера можно нанести детали окраски животного. Фантазируйте

Создание этого величественного слона из обычных пластиковых бутылок, будет отличным занятием для семейного вечера. Результатом вы будете довольны.
Материалы для изготовления слона из пластиковых бутылок
Как сделать слона из пластиковых бутылок
1. Для того чтобы сделать тело и ноги, нужно выполнить следущее: с помощью ножа и ножниц отрежьте нижнюю часть 2 бутылок высотой 10см - это будут ноги. Засыпьте в "ноги" немного риса для устойчивости, а затем прикрепите их с помощью скотча к 1-литровой бутылке, как показано на рисунке.

2. Для изготовления хобота нужно взять 6 пробок от бутылок, и с помощью молотка и гвоздя проделать отверстия в центре каждой из 6 пробок. Дальше эти пробки нужно нанизать на проволоку, которая изогнута в виде хобота, и прикрепить к туловищу (для этого сделайте в крышке литровой бутылки небольшое отверствие для проволоки).

3. Покройте нашу поделку тонкой серой бумагой, предварительно нанеся на нее клей.
4. Добавьте детали: приклейте серы поролоновые уши, розовые поролоновые пальцы, белые бивни и глаза.
5. С помощью канцелярской кнопки сделайте отверстие для хвоста, затем вставьте туда любую веревочку с кисточкой на конце.
Наш слон - готов!
| Рубрики: | пластиковая бутылка |
| Комментировать | « Пред. запись — К дневнику — След. запись » | Страницы: [1] [Новые] |


