-Рубрики
- вязание спицами (1569)
- вязание крючком (890)
- обучение (586)
- вязание детское (511)
- вкуснятина (424)
- выпечка (423)
- платья (201)
- красота и здоровье (191)
- фильмотека (173)
- поделки из бумаги для детей (169)
- шапки (140)
- щитье (130)
- сценарии (104)
- бисер (40)
- сумки (34)
- картинки (30)
- консервирование (28)
- математика для малышей (24)
- журналы (20)
- выкройки штор (19)
- пальто (15)
- носки (14)
- комнатные растения (10)
- музыка (9)
- сказки (8)
- ремонт (5)
- изделия из пластика (3)
- банеры (3)
- вышивка на вязаном полотне (2)
- вязание на вилке (1)
- вечерние платья (1)
- прес (1)
- программы по вязанию (1)
- квилинг (0)
-Музыка
- Татьяна Снежина
- Слушали: 7170 Комментарии: 0
- Татьяна Снежина
- Слушали: 7170 Комментарии: 0
-Поиск по дневнику
-Подписка по e-mail
-Друзья
Друзья онлайн
Zharskaja
Друзья оффлайнКого давно нет? Кого добавить?
Aelen
Alprika
Archana
DALLA2011
Divia
Dushka_li
dyakanna
Elisabet_L
GayaneKostanyan
Gim56
Irina_Snezhko
kru4inka
ladydv
Li-Len
Liene_Berzina
Melodika55
olga_zaedinova
Owesta
PANDA_DA
rubrara
tanya-vamp0810
tusendria
Valya6827
yeska
Аля-М
Баньш
ВС_елена_Я
ВСЁ_для_ДОШКОЛЯТ
Даяна500
Жанна_Лях
Женская-Планета
инна_малюга
ирен777
Ирина_Зелёная
КЕЙТАС
КРАСОТА_ЗДОРОВЬЯ
Леленька
Лесенка
Лида_Роза
Люка24
ЛЮФЕЯ
Марина_Мариуполь
Медведевская
МирАлин
Оделайна
Оксана_Андрусенко
Ракмини
РЕКАА
Сараева_Катющка
Татьяна57
-Постоянные читатели
Agnia_Qween DALLA2011 Dushka_li Ketrinzet77 Lanchik777 Lanika Li-Len MARRY_ANNA SOFA2011 Sisili Vogeltje Wassavi annaroz berta1972 bic38 ekomenas kru4inka masa82 nina-kursk2 radugalena saweds splusha tashunja tleilaxian Аленушка_Ромашкина ВС_елена_Я Василек_69 Джага83 Иванова_Оксана Ирина_Паршутина Кирюшина_Наталья Ланако Лориния Лулука Марина_Мариуполь Мариэллька Милашка2405 РЕКАА Ромашка777 Светлана1201 Светлана_Рукодельница СноваВесна Татьяна-любимая Татьяна57 Фея_Н вика-вика2 ирамаша ирен777 натулька_лазарева юлия_пацай
-Сообщества
-Статистика
вязание спицами |
Цитата сообщения PANDA_DA
Носки с мыска МК
Помогите с переводом (с просторов и-нета)


1. Make a slip knot and place the loop around one of the needles. The anchor loop will count as the first stitch.
2. Hold the two needles together, with the needle that the yarn is attached to toward the top. We'll call this needle #2 and the other needle will be needle #1.
3. In your other hand, hold the yarn so that the tail goes over your index finger and the working yarn (the yarn that leads to the ball) goes over your thumb. This is opposite from how the yarn is usually held for a long-tail cast-on.
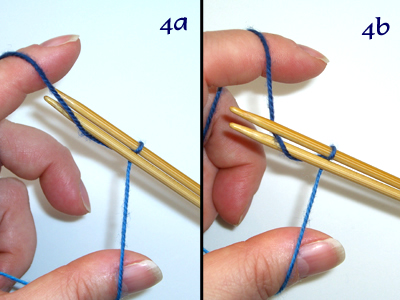
4.
a. Bring the tip of needle #1 over the strand of yarn on your finger,
b. around and under the yarn and back up, making a loop around needle #1
c. Pull the loop snug, but not tight, around the needle.
You have cast one stitch on to needle #1.
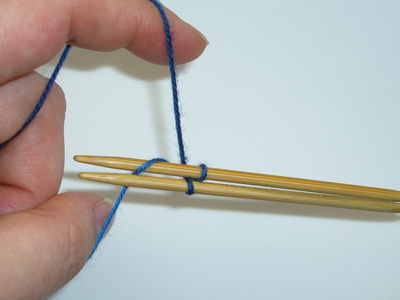
5. Bring needle #2 over the yarn tail on your thumb, around and under the yarn and back up, making a loop around needle #2. Pull the loop snug around the needle.
You have cast one stitch on to needle #2.
There are now two stitches on needle #2 Ñ the stitch you just cast on plus the anchor loop.
The top yarn strand always wraps around needle #1 (the bottom needle), and the bottom yarn strand always wraps around needle #2 (the top needle). Just remember: Top around bottom, bottom around top.
6. Repeat step 4 to cast a second stitch on to needle #1. (bottom around top)
7. Repeat step 5 to cast a third stitch on to needle #2. (top around bottom)
8. Continue repeating steps 4 and 5, alternating between needle #1 and needle #2, until you have cast on the desired number of stitches and ending with step 4. You will have the same number of stitches on each needle.
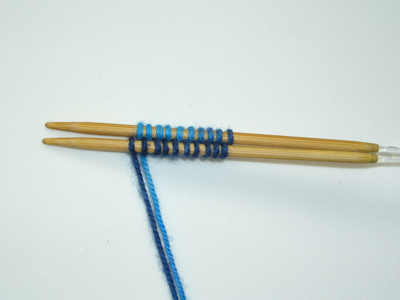
In this picture, a total of 20 stitches, or 10 stitches on each needle, have been cast on. The outside of the sock toe looks like two rows of offset loops. If you turn the needles over, you will see that the wrong side of the work (the inside of your sock) features a row of twists that look like purl bumps between the two needles.
Turn back to the right side to begin knitting.
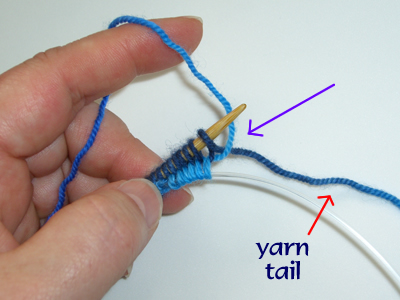
9. Round 1: Drop the yarn tail and let it dangle. Turn the needles so that needle #1 is on the top. Pull needle #2 to the right until the stitches lie on the cable. Pick up the working yarn. Be sure that the yarn tail lies between the working yarn and the needle. In the picture, you can see how the tail passes under the working strand (purple arrow).
Knit the row of stitches from needle #1. The first stitch will probably become loose while you are knitting it. Pull gently on the tail to snug it back up.
You will see a row of stitches appear between the two needles.
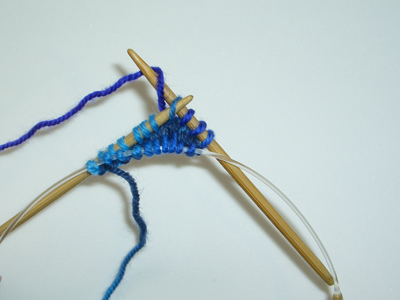
10. Turn the work so that the working yarn is on the right and needle #2 is on the top. Pull needle #1 to the right so that the stitches you just knit lie along the cable. Pull needle #2 to the left so that its point is towards the right and the stitches are ready to knit from it. Knit the stitches from needle #2.
Be careful! The cast-on loops on needle #2 are twisted. On the first round only, be sure to knit them through the back of the loops in order to untwist them. After this round the stitches will be "normal."
You have completed one round and are back where you started.
Note: Do the stitches between the needles appear too loose or "sloppy?" Make sure when you cast on that you have tightened each loop up individually as you placed it around the needle. Try to keep the loops at your regular gauge. If you find that your cast-on stitches are too tight, you can try casting on to a pair of larger needles.
There are two rows of stitches between the needles now. The absolute center of your sock toe lies between the two rows of stitches.
We now return you to your regularly scheduled toe-up sock pattern. Work the toe increases as specified by your pattern. If your pattern specifies a different type of toe, the following instructions are for a typical toe-up sock that starts at the very end:
Round 2: on first needle, * K1, M1, K each stitch to within one stitch of the end of the row, M1, K1, turn to second needle. Repeat from *
Round 3: K all stitches on both needles (no decreases).
Repeat these two rounds, increasing 4 stitches every other round, until the total number of stitches has been reached.
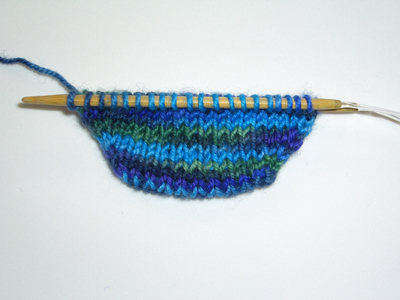
In this picture, 10 rounds have been worked and there are 20 stitches on each needle (40 stitches total.
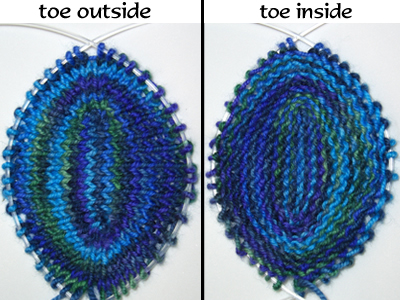


Помогите с переводом (с просторов и-нета)


1. Make a slip knot and place the loop around one of the needles. The anchor loop will count as the first stitch.
2. Hold the two needles together, with the needle that the yarn is attached to toward the top. We'll call this needle #2 and the other needle will be needle #1.
3. In your other hand, hold the yarn so that the tail goes over your index finger and the working yarn (the yarn that leads to the ball) goes over your thumb. This is opposite from how the yarn is usually held for a long-tail cast-on.

4.
a. Bring the tip of needle #1 over the strand of yarn on your finger,
b. around and under the yarn and back up, making a loop around needle #1
c. Pull the loop snug, but not tight, around the needle.
You have cast one stitch on to needle #1.

5. Bring needle #2 over the yarn tail on your thumb, around and under the yarn and back up, making a loop around needle #2. Pull the loop snug around the needle.
You have cast one stitch on to needle #2.
There are now two stitches on needle #2 Ñ the stitch you just cast on plus the anchor loop.
The top yarn strand always wraps around needle #1 (the bottom needle), and the bottom yarn strand always wraps around needle #2 (the top needle). Just remember: Top around bottom, bottom around top.
6. Repeat step 4 to cast a second stitch on to needle #1. (bottom around top)
7. Repeat step 5 to cast a third stitch on to needle #2. (top around bottom)
8. Continue repeating steps 4 and 5, alternating between needle #1 and needle #2, until you have cast on the desired number of stitches and ending with step 4. You will have the same number of stitches on each needle.

In this picture, a total of 20 stitches, or 10 stitches on each needle, have been cast on. The outside of the sock toe looks like two rows of offset loops. If you turn the needles over, you will see that the wrong side of the work (the inside of your sock) features a row of twists that look like purl bumps between the two needles.
Turn back to the right side to begin knitting.

9. Round 1: Drop the yarn tail and let it dangle. Turn the needles so that needle #1 is on the top. Pull needle #2 to the right until the stitches lie on the cable. Pick up the working yarn. Be sure that the yarn tail lies between the working yarn and the needle. In the picture, you can see how the tail passes under the working strand (purple arrow).
Knit the row of stitches from needle #1. The first stitch will probably become loose while you are knitting it. Pull gently on the tail to snug it back up.
You will see a row of stitches appear between the two needles.

10. Turn the work so that the working yarn is on the right and needle #2 is on the top. Pull needle #1 to the right so that the stitches you just knit lie along the cable. Pull needle #2 to the left so that its point is towards the right and the stitches are ready to knit from it. Knit the stitches from needle #2.
Be careful! The cast-on loops on needle #2 are twisted. On the first round only, be sure to knit them through the back of the loops in order to untwist them. After this round the stitches will be "normal."
You have completed one round and are back where you started.
Note: Do the stitches between the needles appear too loose or "sloppy?" Make sure when you cast on that you have tightened each loop up individually as you placed it around the needle. Try to keep the loops at your regular gauge. If you find that your cast-on stitches are too tight, you can try casting on to a pair of larger needles.
There are two rows of stitches between the needles now. The absolute center of your sock toe lies between the two rows of stitches.
We now return you to your regularly scheduled toe-up sock pattern. Work the toe increases as specified by your pattern. If your pattern specifies a different type of toe, the following instructions are for a typical toe-up sock that starts at the very end:
Round 2: on first needle, * K1, M1, K each stitch to within one stitch of the end of the row, M1, K1, turn to second needle. Repeat from *
Round 3: K all stitches on both needles (no decreases).
Repeat these two rounds, increasing 4 stitches every other round, until the total number of stitches has been reached.

In this picture, 10 rounds have been worked and there are 20 stitches on each needle (40 stitches total.


| Рубрики: | вязание спицами |
| Комментировать | « Пред. запись — К дневнику — След. запись » | Страницы: [1] [Новые] |


