-Поиск по дневнику

Поиск сообщений в Альфинур

 -Подписка по e-mail


 -Статистика

Статистика LiveInternet.ru: показано количество хитов и посетителей
Создан: 10.05.2010
Записей:
Комментариев:
Написано: 37797


Блок "Джаред женится" (Jared Takes A Wife!)

Вторник, 26 Апреля 2016 г. 17:22 + в цитатник
Цитата сообщения Los-ku-tik


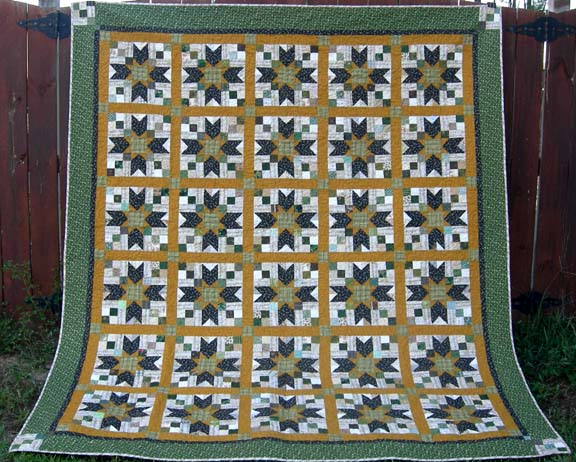
Special yardage and scraps combine to create this quilt using the traditional "Blackford's Beauty" block!
Block size: 12" (Finished  quilt size: approx  82" X 95")

I have the priviledge of singing alto in the Trinity Episcopal Cathedral  Choir in Columbia, SC.  The choir has become family to me in the past year I have sang with them!  Our director/organmaster is getting married on Oct 13th, 2007 and we get to sing for the wedding, which is going to be an experience I am sure I will treasure and never forget!

I was out fondling fabrics one afternoon (oh yes, we all know this scenario!!) When I came across some music fabrics too fun to pass up! They just seemed to jump into my arms and said "Buy me!" I knew this was the perfect focal fabric for this quilt.


The sheet music fabric looks tea stained and has a bit of glitz to it as does the black/gold note fabric.  I've seen a lot of  Black/White/Red quilts....but I want something a bit different.  I pulled out this wonderful antiquey green and loved how the fabrics played against each other.  I started out with two yards of each fabric.


Because I am a scrappy girl and couldn't stand the thought of making a whole quilt out of only 3 or 4 fabrics...out came the neutral and green strips to combine with the "main" fabrics!  My thought was that I would make all the 4 patches in the 4 block corners scrappy, and also use scrappy 2" squares as the cornerstone in the block corners.  I added one more "common" fabric..a gold for the sashings and the inner star points.  The background at the tips of the black diamonds are also from scrappy 2" neutral squares.


The traditional name for this block is Blackford's Beauty!
This quilt has 30 12" blocks set 5 X 6 with 2" finished (2.5" cut) sashing and cornerstones.
 

To make the 30 blocks, I needed 120 four patches pieced from strips!  Of course you can do this leader/ender style from individual squares, but I was in a HURRY!


Assembly: 4 patches!


Seam green 2" scrap strips to 2" neutral strips.  Press towards the darker fabric.  Sub cut into (240) 2" sections.  Match pairs of sections as shown and sew continuously to create a long chain of 4 patch units. Trim between the units and press the 4 patches open.You should have (120) 4-patches. Set Aside.


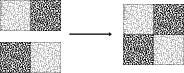
The next step is the sashings and cornerstone pieces to the side and bottom of each 4 patch.  See wich direction the chains face? Be sure all chains are headed in the same direction in this step!  I cut the sheet music fabric for the sashings at 2"X3.5".  I needed 8 of these pieces for each 12" block.  For the total quilt that is 240 2"X3.5" rectangles.  I chain pieced them this way, adding a sashing rectangle to the right side of each 4 patch, and a cornerstone  one short side of each remaining rectangle.  Assemble them as shown into a modified 9 patch unit.


When all the cornerstones are rotated towards the center, the four block corners look like this!

Star Point Fabric:

Out of the black note fabric I cut 240 more rectangles, this time 2"X5".
I also cut (240) 2" squares from the gold fabric for the inner star points.
I then pulled (240) 2" neutral squares from the 2" scrap square bin.

The star points on this quilt are "mirror image" pieces, meaning the diamondpoints slant one direction on half of the points, and the other half of the points slant the other way.  Make two piles of 120 star point rectangles. Keep these in two separate piles so you don't get them confused!


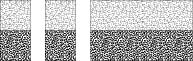
For the first 120, lay the inner star square on top of the main star rectangle  with right sides together.  Stitch on the diagonal across the inner star squares from corner to corner being sure all the first 120  rectangles face this same direction. Afteryou have chain fed these through, change the direction of your sewing on the next 120 rectangles as shown in the picture above.


Trim the excess approximately 1/4" from the seam line and press seam allowance towards the inner star points. See how they slant in opposite directions?


This is where you sew the neutral squares on the diagonal on top of the other end of the star point rectangles.  The seams will go the SAME ANGLE as the inner star seam....when all are sewn, trim excess and press seams towards the background triangles.


You will have two piles of star points that look like this! It takes four pairs of star points to make each block.  Sew all the rectangle pairs  into units.

 
Cut 30 3.5" squares for the block centers.
 
Lay out the block units like this!  It is sewn together in a simple 9 patch layout.  Stitch the units into rows, and sew the rows together to complete each block.  Make 30 blocks.

I set the quilt with 2.5" cut (2" finished) sashings and 2.5" cut cornerstones.  There was just enough black fabric to frame the quilt with a 1.5" cut inner border.  A 5" cut outer border of green tied it all together!


This pic shows a bit of the quilting detail though the prints are busy!  I had some extra block corners that I used in the corners of the outer border.  I used the remainder of the sheet music fabric cut on the bias for a diagonal stripe binding!
I had so much fun making this quilt that I have plans to do another one in plaids, using a red for the inner star.  Just for fun I did a mock up in EQ 5!

 
Doesn't it look fun!! You could also do each star out of the same plaid for the long star points, having each star of a different plaid than the next. But I kind of like them random like this. 


A simple layout with 20 blocks and sashings.  each of the outer borders is a different plaid. Oh so home-spun feeling!

If you make this quilt, I'd love to display a picture of it here!

Метки:  


Добавить комментарий:
Текст комментария: смайлики

Проверка орфографии: (найти ошибки)

Прикрепить картинку:

 Переводить URL в ссылку
 Подписаться на комментарии
 Подписать картинку