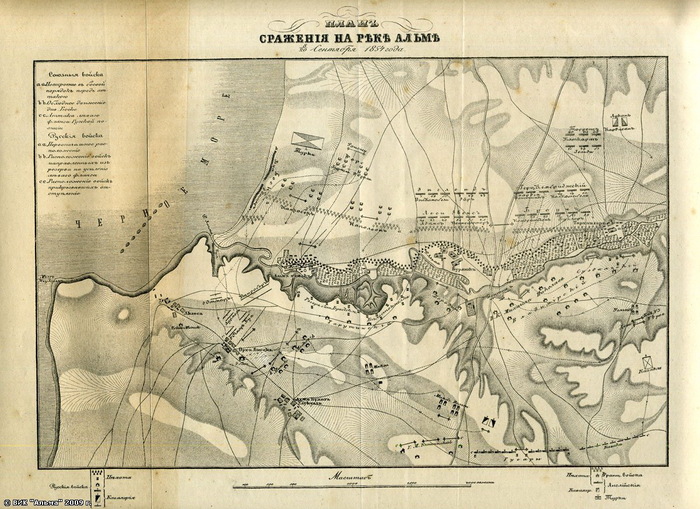
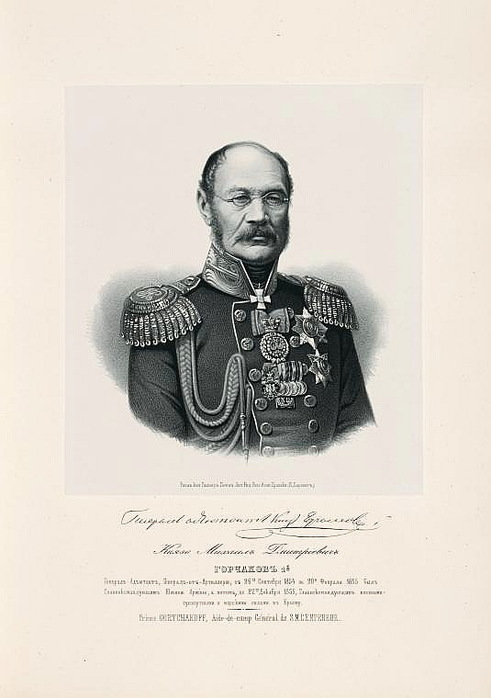
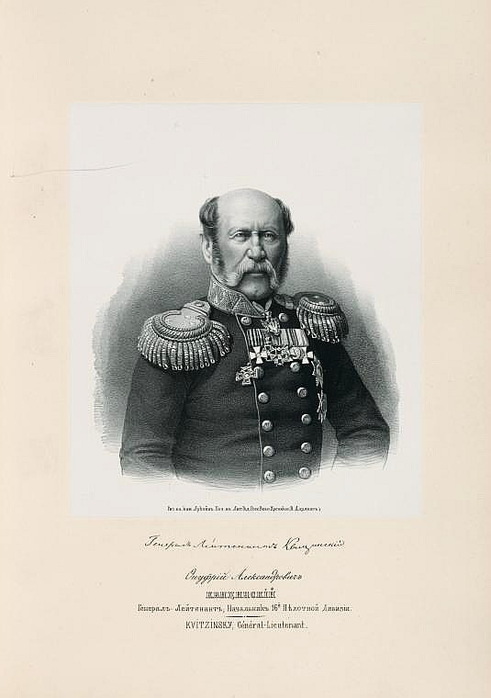
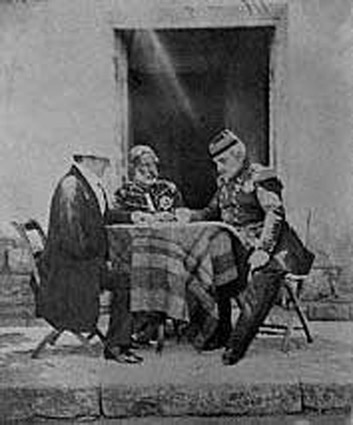
река Альма,мыс Лукулл.
К 155-ти летию Альминского сражения и начала обороны Севастополя.
The Battle of The Alma
War: Crimean War
Date: 20th September 1854
Place: Crimea in the Ukraine
Combatants: British, French and Turkish troops against the Imperial Russian Army.
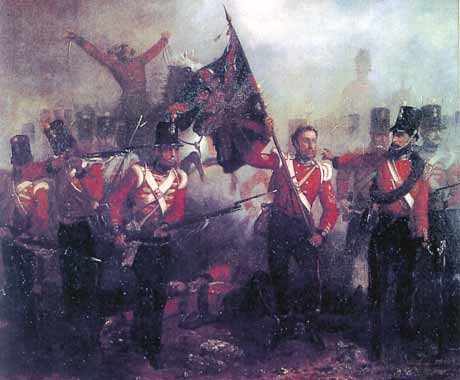
Sergeant Luke O'Connor of the Royal Welch Fusiliers winning the Victoria Cross at the Alma leading the charge of his regiment with the Queen's Colour which he seized from the hands of Lieutenant Harry Anstruther, shot dead as he entered the Great Russian Battery. Sergeant O'Connor subsequently rose to the rank of Field Marshal, the only soldier to serve in every rank in the British Army.
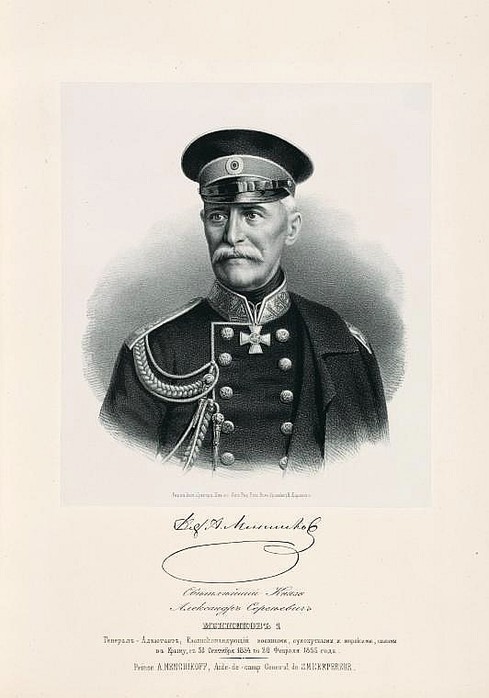
Generals: General the Earl of Raglan commanded the British Army, General Saint-Arnaud commanded the French Army. Prince Menshikov commanded the Russian Army.
Size of the armies: The British Army comprised 26,000 infantry, 1,000 cavalry (the Light Brigade; the Heavy Brigade did not land in the Crimea in time for the battle) and 60 guns. The French Army comprised 28,000 infantry, no cavalry and 72 guns. The Turkish contingent comprised 7,000 infantry, no cavalry and an unknown number of guns. The Russian Army was made up of 33,000 infantry, 3,400 cavalry and120 guns.
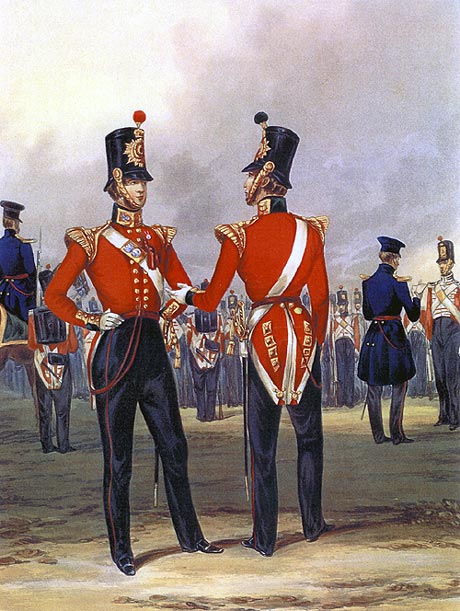
Uniforms, arms and equipment: See the Crimean uniform section.
Winner: The British and French
British Order of Battle:
Commander in Chief: Field Marshal Lord Raglan
The Cavalry Division: General the Earl of Lucan
Troop of Royal Horse Artillery
Light Brigade: Major-General the Earl of Cardigan
4th Light Dragoons
8th Hussars
11th Hussars
13th Light Dragoons
17th Lancers
First Division: the Duke of Cambridge
Two field batteries Royal Artillery
Guards Brigade: General Bentinck
3rd Battalion, Grenadier Guards
1st Battalion, Coldstream Guards
1st Battalion, Scots Fusilier Guards
Officers of the 17th Regiment
Highland Brigade: Major General Sir Colin Campbell
42nd Highlanders
79th Highlanders
93rd Highlanders

The Scots Fusilier Guards Colour Party leads the regiment's attack on the Great Russian Battery. Lieutenant Lindsay carries the Queen's Colour; Lieutenant Thistlethwayte carries the Regimental Colour. Of the party, Lieutenant Lindsay, Sergeants McKechnie and Knox and Private Reynolds were awarded the Victoria Cross. The Queen's Colour received 24 bullet holes and the staff was shot in half.
Click here or image to buy a print
Second Division: Lieutenant-General Sir de Lacy Evans
Two field batteries Royal Artillery
Third Brigade: Brigadier-General Adams
41st Regiment
47th Regiment
49th Regiment
Fourth Brigade: Brigadier-General Pennefather
30th Regiment
55th Regiment
95th Regiment
Third Division: Lieutenant-General Sir Richard England
Two field batteries Royal Artillery
Fifth Brigade: Brigadier-General Sir John Campbell
4th King’s Own Royal Regiment
38th Regiment
50th Regiment
Sixth Brigade: Brigade-General Eyre
1st Royal Regiment
28th Regiment
44th Regiment
Fourth Division: Major-General Sir George Cathcart
One field batteries Royal Artillery
Seventh Brigade: Brigadier-General Torrens
20th Regiment
21st Royal Scots Fusiliers
68th Regiment
Eighth Brigade:
46th Regiment
(57th Regiment, which did not land until after the battle)
Officer of the 79th Cameron Highlanders
Light Division: Lieutenant-General Sir George Brown
One troop of Royal Horse Artillery and one field battery Royal Artillery
2nd Battalion the Rifle Brigade.
First Brigade (known as the Fusilier Brigade): Major-General Codrington
7th Royal Fusiliers
23rd Royal Welch Fusiliers
33rd Regiment
Second Brigade: Major-General Buller
19th Regiment
77th Regiment
88th Regiment
The Battle of the Alma
British Regiments:
4th Light Dragoons: now the Queen’s Royal Hussars.*
8th Hussars: now the Queen’s Royal Hussars.*
11th Hussars: now the King’s Royal Hussars.*
13th Light Dragoons: now the Light Dragoons.*.
17th Lancers: now the Queen’s Royal Lancers.*
Grenadier Guards:*
Coldstream Guards:*
Scots Fusilier Guards:*
1st Royal Regiment, the Royal Scots.*
4th King’s Own Royal Regiment: now the King’s Own Royal Border Regiment.*
19th Regiment: now the Green Howards.*
20th Regiment: now the Royal Regiment of Fusiliers.*
23rd Royal Welch Fusiliers.*
28th Regiment: now the Royal Gloucestershire, Berkshire and Wiltshire Regiment.*
30th Regiment: now the Queen’s Lancashire Regiment.*
33rd Regiment: now the Duke of Wellington’s Regiment.*
38th Regiment: now the Staffordshire Regiment.*
41st Regiment: now the Royal Regiment of Wales.*
42nd Highlanders, the Black Watch (the Royal Highland Regiment).*

The Coldstream Guards storm the Great Russian Battery
44th Regiment: now the Royal Anglian Regiment.
47th Regiment: now the Queen’s Lancashire Regiment.
49th Regiment: now the Royal Gloucestershire, Berkshire and Wiltshire Regiment.*
50th Regiment: now the Princess of Wales’s Royal Regiment.*
55th Regiment: now the King’s Own Royal Border Regiment.*
63rd Regiment: now the King’s Regiment.*
68th Regiment: now the Light Infantry.*
77th Regiment: now the Princess of Wales’s Royal Regiment.*
79th Highlanders: now the Highlanders.*
88th Regiment, the Connaught Rangers, disbanded in 1922.*
93rd Highlanders: now the Argyll and Sutherland Highlanders.*
95th Regiment: now the Worcestershire and Sherwood Foresters Regiments.*
Rifle Brigade: now the Royal Green Jackets.*
* These regiments have the Alma as a battle honour.
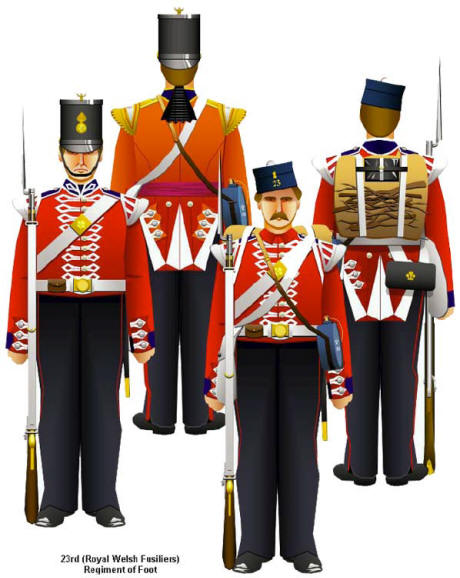
The 23rd Royal Welch Fusiliers - from Tim Reese’s CD Rom of illustrations
of British Regiments from the Crimea War.
Buy the Uniforms of the Crimea CD
The French order of battle:
The four divisions of General Bosquet, General Canrobert, Prince Napoleon and General Forey.
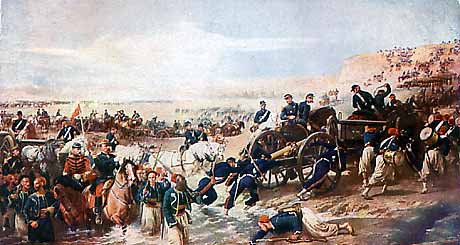
General Bosquet's artillery and Zouaves crossing the Alma River
at Almatamak before climbing onto the Heights
Account:
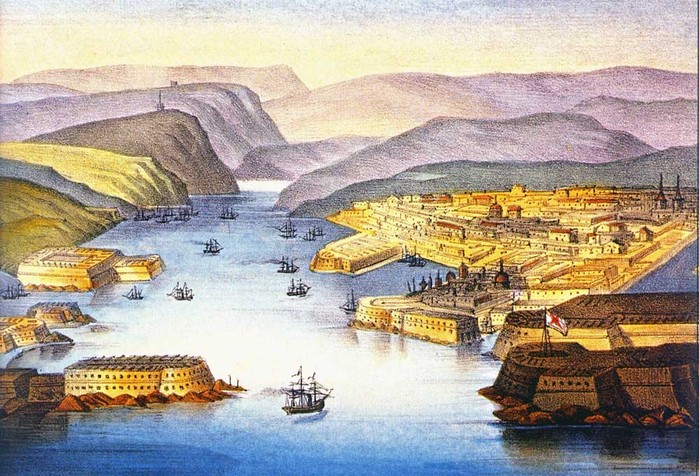
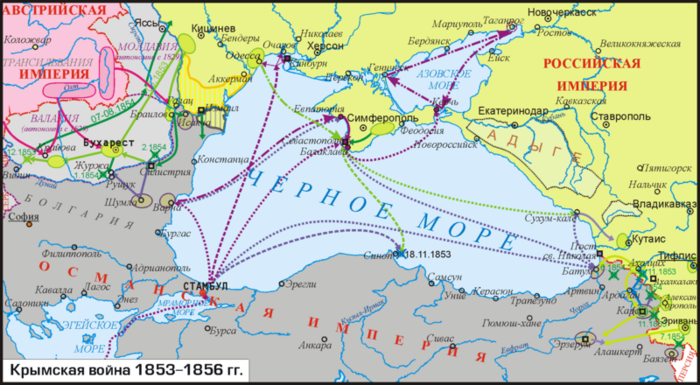
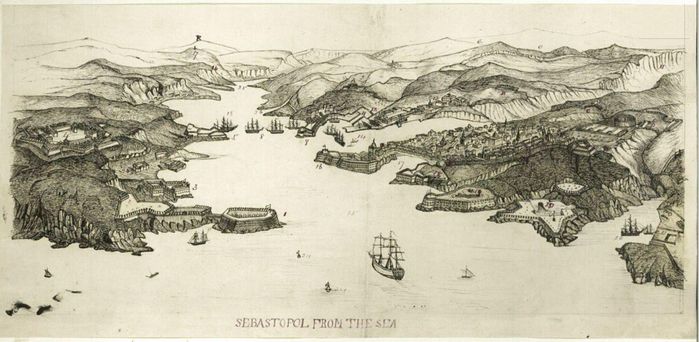
The British and French armies landed on the Crimean Peninsular on 14th September 1854 intending to capture the Russian naval base of Sevastopol on the South West of the Crimea (see main map on Crimea site). The landing took place on the western Crimean coast some fifteen miles to the north of the port.

French Zouaves and Turcos storming the ravine south of Bourliouk in
support of the British 2nd Division during the Battle of the Alma
The road down the coast to Sevastopol crossed four rivers flowing east to west into the Black Sea; the Bulganek, the Alma, the Katelia and the Belbeck.
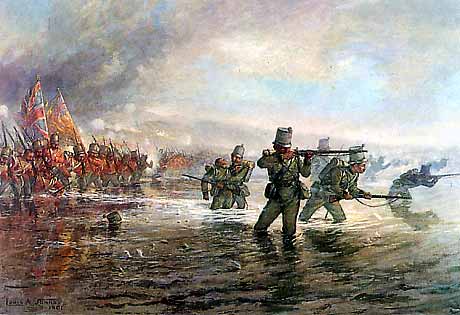
The Light Division crossing the Alma River to storm the
Alma Heights: the Rifle Brigade skirmishing to the fore
The allied army (British, French and Turkish) began the march south from the landing site on 19th September 1854. The French army marched by the coast with the Turkish contingent in its midst. The British in two columns took the inland flank. The Light Brigade of cavalry provided a screen to the front and left flank. Ships of the British and French navies sailed parallel and in advance of the armies.
A skirmish took place as the allied army crossed the Bulganek on the first day of the 25 mile march to Sevastopol. As the Russians withdrew from the hills beyond the river Lord Lucan sought to pursue them with the Light Brigade but was ordered to withdraw by Lord Raglan. The allied armies encamped on the high ground beyond the river.
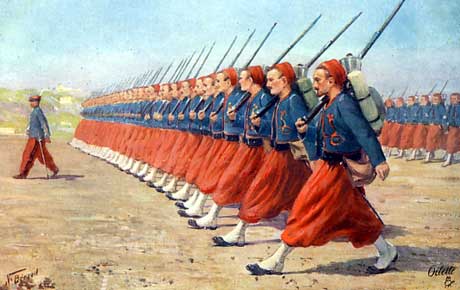
French Zouaves
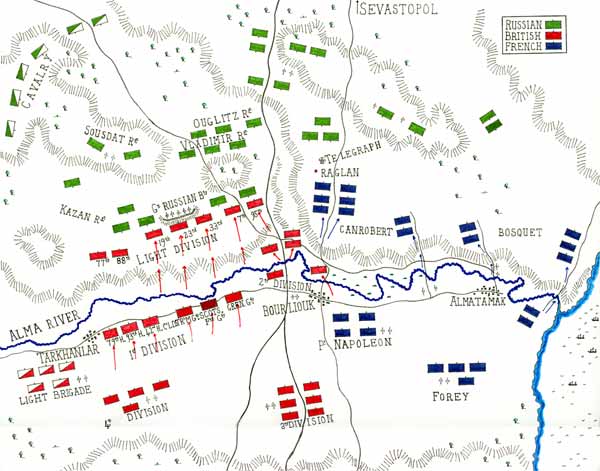
It was on the River Alma that the Russian general, Prince Menshikov, resolved to make his stand, taking advantage of the high ground along the south bank.
The axis of the advance was the post road which followed the coastline from Eupatoria in the North of the Crimea to Sevastopol. The country was open rolling grassland enabling the troops to march on either side of the road.

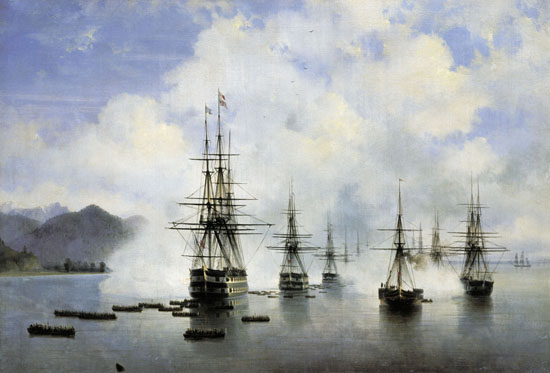
Russian Artillery in action
On 20th September 1854 the allied armies continued their march in the same formations. At about midday a warship steaming in advance of the armies opened a bombardment on the shore. The armies reach the top of one of the low ridges that lay along the line of march and the valley of the Alma opened before them.

The Foot Guards attacking the Great Russian Battery.
Three villages lay along the near bank of the river; Almatamak in front of the French; Bourliouk in the centre of the advance and Tarkhanlar to the left of the British. The post road crossed the Alma to the inland side of Bourliouk and ascended into the hills beyond the river.
Along the high ground on the far side of the Alma lay the Russian Army in strength intending to give battle in defence of Sevastopol. The main body of Menshikov’s force lay on Kourgané Hill in front of the British Army’s centre, covered by a battery of 8 heavy siege guns at the front of its position. These guns were the focal point of the Russian defence and became known as the “Great Russian Battery” or the “Greater Redoubt”. Immediately beyond Bourliouk the Russian reserves occupied a hill with a telegraph station. The post road to Sevastopol lay in the valley between Kourgané Hill and Telegraph Hill.

The 93rd Highlanders advancing to attack the Russians
From Bourliouk to the coast, opposite the French line of advance, the south bank of the Alma became a cliff face. An accessible road crossed the river from Almatamak, ascending the cliff. Near the river mouth a steep path climbed the cliff face. The Russian presence on the high ground above this cliff was slight.
Menshikov’s leadership was uninspired and lacking in vigour. The Russians took little trouble to fortify their positions. The heavy guns on Kourgané Hill were fronted by a low parapet intended to stop the guns from rolling down the hill rather than for protection. No works had been built to keep the French off the coastal high ground or to protect the Russian troops from naval bombardment.

The Heights of Alma: the day after the battle
The Allied plan, agreed between Raglan and St Arnaud that morning was for the French to begin the attack under cover of the fleet’s guns.
Bosquet’s Division stormed up the coastal path and the Almatamak road. Canrobert crossed the Alma to the west of Almatamak and climbed Telegraph Hill, sending his guns up the Almatamak road. The Russian piquets set fire to Bourliouk and withdrew across the river and up the hill.
General St Arnaud sent word to Lord Raglan requesting that the British now launch their assault on the main Russian positions and Raglan issued the orders to his divisional commanders to attack.

French Zouaves
There now occurred an incident of extraordinary eccentricity. Leaving his generals to make the assault Lord Raglan led his staff across the river and rode up onto a promontory below Telegraph Hill. Raglan watched the British attack from a position behind the Russian lines.
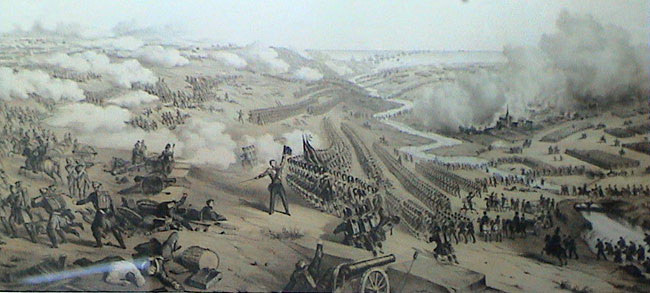
The British infantry advanced towards the river in a line stretching from Bourliouk nearly to Tarkhanlar; the Second Division on the right and the Light Division on the left. The Third Division supported the Second and the First Division the Light. The Fourth Division remained behind the left wing. The Light Brigade of cavalry guarded the inland flank.
The battery of heavy Russian guns on Kourgané Hill opened fire on the advancing British infantry with considerable effect both physical and psychological.

The 42nd Highlanders storming the Alma Heights, led by Sir Colin Campbell
The burning village of Bourliouk caused considerable difficulty, the brigades of the 2nd Division being forced to bypass the village on either side to reach the river. The brigade of General Adams reached the river to the East of Bourliouk and found itself at the base of Telegraph Hill. General Pennefather’s brigade passed to the West of the village. His third regiment, the 95th, joined Codrington’s Fusilier Brigade and took part in the assault with that formation, leaving Pennefather with the 30th and 55th Regiments.
Codrington’s regiments became the apex of the advance up to the Russian Battery. Two regiments of the Division’s second brigade were held back to protect the army’s inner flank. The remaining regiment of that brigade, the 19th, also joined Codrington’s attack so that he led forward five regiments rather than the three of his brigade (7th, 19th, 23rd, 33rd and 95th).
The British infantry advanced to the river and began to cross, finding the water to be fordable at almost every point (it is not clear whether this fact had been discovered before the battle). The far side of the river comprised a steep six foot bank which caused a halt in the advance, partly because of its physical obstacle, partly because it provided cover from the bombardment. The divisional commander of the Light Division, Sir George Brown rode up the bank and urged his soldiers to follow. The division surged out of the river and scaled the hill beyond.

The brief action on the Bulganek on 19th September 1854;
British light cavalry in the foreground
The ground on the hillside was terraced and walled making it difficult for the regiments to reform after the river crossing and the British troops attacked up the hill in some disorder. The regiments reached the Russian Battery to find that the guns had been hastily limbered up and were being removed to the rear. It is the view of General Hamley, who served as an artillery officer in the Crimea, that the precipitous retreat of these guns saved the British regiments from suffering appalling losses in the final stages of the assault.
Even so Codrington’s brigade was in a precarious position. There was little order and casualties were mounting particularly among the officers. Large masses of Russian infantry were bearing down on the battery. Many of the British soldiers retreated back down the hill towards the river.

HRH The Duke of Cambridge, commanding the 1st Division
Raglan’s position on the lower slopes of Telegraph Hill prevented him from exercising proper control over the assault by his army. If matters had gone according to plan the First Division should have been on hand to support Codrington’s troops. It was not. The Duke of Cambridge was slow in ordering his brigades of Guards and Highlanders to cross the Alma. Fortunately the Quartermaster General, Lieutenant General Airey had not accompanied his commander and was on hand to urge Cambridge forward. Even so the First Division was too far back to support the Light Division at the moment of crisis.

HRH The Duke of Cambridge watches as the British Foot Guards
advance to cross the river at the Battle of the Alman
The First Division moved forward to the River Alma with General Bentinck’s Guards Brigade on the right and Sir Colin Campbell’s Highland Brigade on the left. The two brigades were formed in accordance with precedent with the senior regiments on the right within each brigade, the next senior regiment on the left and the junior regiment in the centre: from right to left the Grenadier Guards, the Scots Fusilier Guards, the Coldstream Guards, 42nd Highlanders, 91st Highlanders and the 79th Highlanders. The length of the line, substantially longer than that of the Light Division, extended beyond the Russian inland flank. Differences in the depth of the river and the height and steepness of the bank affected the speed with which these regiments were able to cross the river and begin the ascent of the hill.
The adjutant of the Grenadiers, Captain Higginson, described in his memoirs how his commander, Colonel Hood, noted the confused advance of the Fusilier Brigade as it attacked the Russian Battery and determined to keep his battalion under strict control. The Grenadiers formed in line before leaving the river and advanced up the hill firing two volleys at the Russian infantry on the hillside causing them to retreat.

Grenadier Guards
(Click here or on image to buy a Print)
At the top of the hill the 7th Royal Fusiliers, under the leadership of Lieutenant Colonel Lacey Yea, on the right flank of Codrington’s brigade, had not retreated. Much of the rest of the brigade was falling back and the Scots Fusilier Guards in the centre of Bentinck’s brigade was largely swept back down the hill to the river by the flood of men.

Coldstream Guards storming
(Click here or on image to buy a Print)
The other two Guards battalions, the Grenadiers and the Coldstream, continued on up the hill and retook the Russian Battery. The 42nd Highlanders outstripping the other regiments of the Highland Brigade outflanked the Battery on the left; the other two Highland regiments coming up on the far flank.

The British Foot Guards crossing the Alma River before
storming the Heights in support of the Light Division
During the attack on the Russian Battery on Kourgané Hill the remaining regiments of the 2nd Division, the 55th, 30th and 47th, attacked up Telegraph Hill, supported by the 41st and 49th.
49th Foot
British gun batteries crossed the bridge beyond Bourliouk and bombarded the Russian regiments on Telegraph Hill. A Royal Horse Artillery battery climbed up onto the hill and fired into the Russian infantry from the right of the Guards Brigade. Other British guns came up on the flanks of the regiments of the Second Division and fired into the retreating Russian regiments. In one instance a battery outstripped its gunners, following on foot, and the guns were brought into action by the officers.
The Third Division crossed the Alma in support of the Highland Brigade and the Light Brigade of cavalry moved forward on the inland flank.
Cleared from the Battery and under threat from the attacks on Kourgané and Telegraph Hills, now fully supported by artillery fire, the Russian infantry fell back and left the battlefield, marching away towards Sevastopol.
The only allied cavalry on the field, Cardigan’s Light Brigade, under the direct command of the Cavalry Division commander, Lord Lucan, pressed for permission to pursue the retreating Russians, but were specifically ordered by Lord Raglan to remain with the army.
The allied armies camped beyond the battle field while Menshikov led his army back along the post road to Sevastopol.
The French force took little part in the battle. Bosquet’s division had contact with the Russians. Canrobert’s division in the centre made little use of its position to influence the attack on Kourgané Hill.

/img1.liveinternet.ru/images/attach/c/0//48/127/48127866_russiancavalry.jpg" width="460" height="359" alt=" (460x359, 40Kb)" />
Russian Cavalry of the Guard
Follow-up:
Raglan urged his French colleague St Arnaud that the allies should follow the Russians into Sevastopol. St Arnaud refused to do so. It seems to be the authoritative view, particularly of the Russians, that if the allies had launched a prompt attack they would have had little difficulty in taking the city. The delay enabled the Russians to recover from the defeat and put the city defences in proper order. This in turn condemned the allies to the winters of 1854/5 and 1855/6 in the siege lines around Sevastopol and to two further battles.
On the other hand General Hamley, who served in the Crimea, states in his book that when the army did follow the Russians they found few signs of a disorderly retreat.
The battle revealed a number of stark failings in the British Army.
There was no standard battle drill, each regiment’s conduct depending on the whim of the commanding officer. Some regiments felt it necessary to form line and advance methodically, while others rushed up to the Great Battery as quickly as they could and in no order.
There seems to have been little control at brigade or divisional level. There was no co-ordination between infantry and artillery, the guns being left to come on as and where they could.
Due to his curious expedition behind the Russian lines the commander in chief Lord Raglan largely lost control of his army. Hamley makes the comment: “It was fortunate in the circumstances, that the divisional commanders had so plain a task before them.” It is apparent that however plain their tasks may have been, it was necessary for some control to be exercised. It fell to General Airey to take command of the assault, in particular propelling the First Division into supporting the faltering Light Division attack.
Regimental anecdotes and traditions:
All the Crimean battles are potent symbols for the British Army.
• Victorian accounts of the retreat of the Fusilier Brigade from the Russian Battery describe a bugle call to retire as being the cause. General Hamley, in his account of the battle, makes no mention of this bugle call. It may well be that the causes of the retreat were the disorder of the regiments, the heavy officer casualties, the imminence of an overwhelming Russian attack and the lack of support from the First Division.
• The Royal Welch Fusiliers' Queen's Colour was carried into battle by Ensign Henry Anstruther. Anstruther was shot dead as the regiment stormed the Russian Battery. The Queen's Colour was taken up by Sergeant Luke O'Connor and carried through the rest of the battle. O'Connor was subsequently commissioned and rose to the rank of Major General. O'Connor is said to be the only soldier to have served in every rank of the army to that level.
• Because of the nature of the attack on the Russian Battery and the importance of maintaining momentum, the use of the regimental colours has achieved prominence in the history and traditions of the battle. Important pictures show the Colours of the Scots Fusilier Guards being carried into battle, Sergeant Luke Connor with the Queen’s Colour of the Royal Welch Fusiliers and the Colour Party of the Coldstream Guards. Higginson states that the Colours of the Grenadiers were not uncased until just before the assault on the Russian Battery. He says the Colours of the Scots Fusilier Guards were shot through while the Grenadier Colours were largely unscathed.
• The battle gave rise to controversy over the conduct of the Scots Fusilier Guards. It seems likely that the regiment was pushed back down the hill by the retreat of the Fusilier Brigade. It is reported that the Grenadiers and the Coldstream called out “What’s happened to the Queen’s favourites now?” a reference to the regiment’s standing with Queen Victoria. There are additional criticisms that the regiment failed to re-form after crossing the river or to fix bayonets before advancing up the hill. The Scots Fusilier Guards seem to have begun the attack up the hill before the Grenadiers and the Coldstream on each flank could clear the river and form up to the satisfaction of their commanding officers.
• Some of the poor decisions by British generals in the battle were attributed to their short sight. Higginson describes reaching the Battery and finding Sir George Brown sitting on his horse amid a hail of fire. Brown told him to press on. Higginson pointed out to the general that there was a large Russian column moving towards them. Higginson says “Sir George, being short of sight, had not seen this approaching column.” It is suggested in the authorities that a brigade commander on the left flank of the army was hampered in making decisions by poor eye sight.
References: See the main Crimean War site on britishbattles.com.
© britishbattles.com limited.
 картина К.Н.Филиппова "Военная дорога между Севастополем и Симферополем".


 /img1.liveinternet.ru/images/attach/c/0//48/127/48127866_russiancavalry.jpg" width="460" height="359" alt=" (460x359, 40Kb)" />


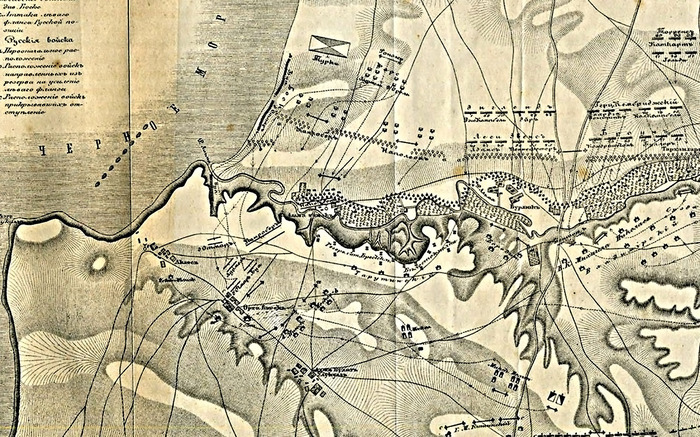


 На всем пространстве от устья р. Альмы до трактира правый берег был покрыт виноградниками и садами. К северу, правый берег реки представляет обширную равнину, на которой сады и виноградники находились только слева от дороги. На всем протяжении р. Альмы был только один деревянный мост, у селения Бурлюк, и имелось множество бродов. Левый фланг русской позиции находился на высоте напротив селения Алматамак, а правый фланг на высокой горе, у дороги, ведущей от Тарханларского трактира к реке Каче. Эта позиция представляла определенные преимущества: господство над правым берегом реки, удобство наблюдения за впереди лежащей местностью, которое не позволяло противнику производить скрытые передвижения войск, укрытие от огня вражеского флота за высоким берегом.