Цитата сообщения M_A_G_D_A
Hula hoops and bed sheets... et voila!!
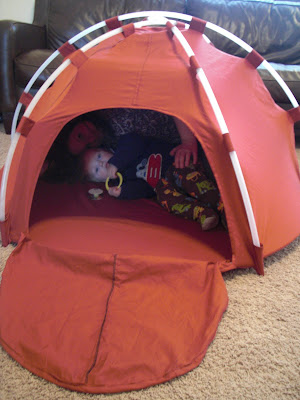
This adorable kid-size dome tent was made from hula hoops and bed sheets. This adorable child-sized tent dome is made of hula hoops and sheets.
The whole project cost less than $10! The whole project cost under $ 10!
Materials: Materials:
* 5 large hula hoops (84" - 90" circumference) * 5 large hula hoops (84 " - 90 "circumference )
* King size flat or fitted sheet or a twin sheet set. * King size flat or fitted sheet or a set of individual sheets . I recommend that you use fabric without a directional pattern. I recommend that you use fabric without a directional pattern .
* Pattern (see end of post) * Pattern ( see end of post)
If using fitted sheets, cut along the seams that make the corners, If you are using fitted sheets , cut along the seams that make the corners
and remove the elastic so the sheet lays flat. and remove the elastic so the blade is flat.
Cut out the following pieces: 6 wedges, 1 circle with a diameter of 50", 1 door flap (three inches larger on the curved edges than the shape on the pattern, which is for the opening), 30 small tabs (4 3/4" x 3"), 6 large tabs (4 3/4" square). Cut the following pieces : 6 wedges, a circle with a diameter of 50 ", a curtain of the door (three inches larger in the curved edges that form the pattern, which is to open ), 30 small tabs (4 3 / 4 "x 3 ") , 6 sheets of large size ( 4 3 / 4 " square).

Trace the pattern pieces onto the sheet and cut out each piece. Trace pattern pieces on the sheet and cut each piece. I used a king size fitted sheet, and this is how I laid out the pieces. I used a king size fitted sheet, and that's how I laid the pieces. (The large section at the right is on the fold, and that is where I cut out my circle.) (Much of the right is at the top, and that is where I cut my circle. )

I had to piece together two of the wedges and the door flap in order to make it all fit on one fitted king size sheet. I had to set up two of the wedges and the curtain of the door to make it all fit on a king size fitted sheet . If you have to piece anything together, make sure to add an additional 1/2" seam allowance where you connect the pieces. If you have a piece something together, be sure to add a seam allowance of 1 / 2 " where you connect the pieces.
I used the leftover scraps to cut out the door flap. I used the remnants of waste to cut the curtain of the door.
Cut a doorway in the front wedge, using the pattern. Cut a door wedge in front, with the pattern. Using purchased or your own bias tape, bind the edges of the doorway. Use of purchase or your own bias tape , bind the edges of the door. Sew a piece of velcro at the top of the doorway. Sew a piece of Velcro on the top of the door. Bind the round edge of the door flap with bias tape. Bind the round edge of the curtain of the door with bias tape . Sew a matching piece of velcro at the top of the door flap. Sew a matching piece of Velcro on the top of the curtain of the door.

Hem the long sides of the small tabs and press. Hem the long sides of the small tabs and the press.
Hem one edge of each large tab. Hem one edge of each large sheet . Fold each in half right sides together and sew across the bottom edge. Fold each in half right sides together and sew around the bottom edge. Turn right side out and press. Turn right side out and press.

Line up the middle of the small tabs with the placement lines on one side of each of the six wedges and pin. Align the center of the small tabs along the lines of placing one side of each of the six wedges and pegs. Line up the bottom of the large tabs with the bottom placement lines and pin. Align the bottom tabs with the main ground lines and the placement of pins. (You will have 12 leftover small tabs for the bottom of your tent.) (You will have 12 remains small tabs at the bottom of your tent. )
Lay the wedges right sides together, sandwiching the tabs between the two wedges. Shim right sides together, placing a chip between the two wedges. Pin in place and sew using a 1/2" seam allowance. Match up another wedge, pin, then stitch it on. Repeat with the other three wedges, creating two halves of the tent top. Serge or zigzag along the raw edges. Pin the two halves of the tent top together, matching all 6 points of the wedges. Sew together and serge or zigzag the raw edges. Pin in place and sew with a 1 / 2 "seam allowance . Match up another wedge , bolt, then close it. Repeat with the other three spots , creating two halves of the upper store. Serge or zig -Zag along the cut edges. Pin the two halves of the tent top , matching all six points of the wedges. sew and serge or zig -zag the raw edges .
Fold your circle into sixths and mark each sixth with a pin. Fold your circle in sixths and each marks the sixth place with a pin. Match the seams of the six wedges with the marks on the circle. Party of the seams of the six cores with the marks on the circle. Overlap the door flap over the doorway and pin. The overlap of the curtain on the door and pin. Ease the bottoms of the wedges around the circle, pinning in place. Facility funds wedges around the circle , setting in place. (This will take some work to get it right, because your tent top may not be the exact size of the bottom circle.) Place the folded tabs into the seam allowance on the corners of the wedges and in the middle of each wedge, so that this time the wedges are on the inside of the tent. (This will take some work to do well, because their top store can not be the exact size of the circle below. ) Place the tabs folded into the seam allowance at the corners of the wedges and the center of each wedge, So this time the spots are inside the store. Stitch around the circle. Sew around the circle.

Take your hula hoops apart. Take your hula hoops apart. On mine, they were wrapped with ribbon, which was taped in place, so it was necessary to remove the ribbon. In mine , which were wrapped with tape, which was recorded in place, so it was necessary to remove the tape. Find the seam in each hoop and pop it apart. Find the seam on each ring and pop apart. (There will be a two-ended cork holding it together.) My hula hoops had a few small pieces of gravel inside to make that shaking sound when you hula, so be sure to watch for them and throw them away. ( There will be a cork holding two ends together . ) hula hoops I had some small parts of the interior of gravel to make the rattling sound when hula, so be sure to see them and throw them away .
Thread three of the hula hoops through the small tabs in the top of the tent and poke the ends into the large tabs. Item three hula hoops through the small tabs at the top of the tent and tuck the ends into large sheets . Hook the final two hoops together, using one of the two ended corks. Attach the last two rings together, using one of them finished corks. Thread the connected hoop through the small tabs on the inside of the bottom of the tent. Pass the ring connected through the small tabs inside the bottom of the store. Cut one of the connected hoops using a saw as necessary to make the circumference of the hoop the same size as the circumference of the bottom of the tent. Cut one of the rings connected with a saw if necessary to make the circumference of the ring of the same size as the circumference of the bottom of the store. Use one more two-ended cork to hook the two ends together. Use a cork over two ends to connect the two ends together.

You're done! There!
http://obsessivelystitching.blogspot.com
Серия сообщений "DECOR":
Часть 1 - Kids Rug
Часть 2 - Salt Dough Fish
...
Часть 64 - Royal Bedrooms
Часть 65 - Tipi playhouse
Часть 66 - Hula hoops and bed sheets... et voila!!
Часть 67 - DIY DON'T BUY!!
Часть 68 - Curtains & ties backs
...
Часть 98 - Chair covers
Часть 99 - Different Decorating Ideas
Часть 100 - Natural Decoration
Серия сообщений "Kids Rooms":
Часть 1 - Kids Rug
Часть 2 - Kids Rooms
...
Часть 12 - Curtain tie back for kids rooms
Часть 13 - Tipi playhouse
Часть 14 - Hula hoops and bed sheets... et voila!!
Часть 15 - DIY DON'T BUY!!
Часть 16 - Kids Rooms
...
Часть 53 - strawberry cushion
Часть 54 - kids room
Часть 55 - wall storage
Серия сообщений "Sewing":
Часть 1 - Infiniti Dress
Часть 2 - Sewing Links
...
Часть 33 - Easy bag
Часть 34 - Toddler Dish Towel Bathrobe !
Часть 35 - Hula hoops and bed sheets... et voila!!
Часть 36 - DIY DON'T BUY!!
Часть 37 - Ideas to re-style waredrobe
...
Часть 92 - sewing program
Часть 93 - sewing program
Часть 94 - jaket pattern


